Let's use the word layer as a synonym for air-layer, even though there are several other methods of layering. Also, I did a search for and gathered comments I've made here on the forums about layering to draw from, and I can see this is going to be a long post, even if I try to leave plenty of room (by not going into every detail) for questions. I guess we'll see how interested you are in layering and whether or not I can provide info in a way that holds your attention. I'll be as brief as I can be and still try to make sure everything is tied together so it's easy to digest. I apologize for any errors I made. I'll try to correct them as I find them - for as long as the edit feature works. I've been at this since about 2p.m., and it's after 11
now - lots of formatting issues trying to get it all in one text box.
propagule = the part of the plant you're propagating – cuttings and layers are both propagules
viable/ viability = alive, loss of viability is death
photosynthate = sugar/ carbs - plant's true food/ source of energy - the product of photosynthesis
vigor = a measure of the plant's genetic potential – different from vitality
vitality = health – how a plant is dealing with the cultural hand it's been dealt - different from vigor
distal = away from the root to shoot transition. A branch is distal to the trunk and a leaf to the branch
proximal = opposite of distal. Twigs are proximal to the leaves that grow on them and the trunk is proximal to twigs and branches
strike = successfully grow new roots
polar = upward or downward – the flow of the hormone, auxin, is 'polar' and downward only
blanching = blocking light from specific parts or the entire plant for the purpose of enhancing propagation
There are many ways of propagating/ cloning plants. Layering is an inexpensive way of producing new plants with exactly the same genetic characteristics as the plant from which the layer was obtained. The same is true of plants grown from cuttings, but layering warrants an added measure of certainty your efforts will be successful because, unlike a cutting, the main plant will still be supporting/ supplying the layered part with water and nutrients while we wait for roots to form on the propagule. For inexperienced propagators, the odds of a layer being successful (for plants that lend themselves to layering) is much greater than the odds of cuttings striking (growing roots).
Interestingly, there are several reasons a grower might wish to utilize layering other than to increase the number of plants with the same genetic sequence. As a bonsai practitioner, many of the layers I perform are designed to rid a plant of an ugly root system, so the plant is 'layered off' immediately above its existing roots; this, because an attractive root system with roots radiating evenly and horizontally from the base of the trunk is highly desirable – ugly/ uneven/ misshapen root systems are not. It's also possible to layer large branches or tops of mature trees that have interesting movement, which can immediately produce bonsai material that would otherwise have taken years to produce.
Tip: Unless you are just having fun, looking for practice, or something to bolster your confidence, don't bother layering plants that come easily from cuttings. Most ivies/ climbing plants, and many other self supporting plants have preformed adventitious roots that make propagation by cuttings so simple it doesn't make sense to layer unless you want to propagate a thick stem/ branch. For the most part, success %s of cuttings and layers decreases as the diameter of the propagule increases, but cutting success diminishes much faster than layering success with the increase in diameter. Plants endowed with a high level of genetic vigor are generally easier to propagate from cuttings or layers, and are good candidates to consider trying to propagate from easier cutting methods. I'll offer some not well-known tips on how to increase the chances of success later in the thread.
It wouldn't be right to offer directions or tips relative to layering w/o explaining what makes layering possible. Dicot stems branches are covered by bark, immediately under the bark is the cambium, which is made up of phloem tissues toward the outside and xylem tissues toward the inside. Water and nutrients move upward in the living xylem tissues growing toward the center of branches/ stems, so intentionally wounding the plant by cutting through the cambium does not interrupt the upward movement of water and nutrients that supply living tissues above the layer; thus, the branch/ stem being layered is not isolated from these life-sustaining necessities as would occur in propagation via cuttings. The types of wounds used to form a layer all disrupt the polar flow of a hormone (auxin) that suppresses lateral branching and stimulates root formation and division. When we cut through the vascular cambium of a plant, all the way through to the xylem, photosynthate cannot move below the cut, so both the hormone that stimulates root formation and photosynthate collect in the tissues immediately above the cut to provide conditions that facilitate new root formation. If we provide a medium surrounding the layer that has moisture and plenty of aeration, odds are extremely high that roots will form and the grower will eventually be able to separate from the main plant, a self-sustaining propagule on its own root system.
You can start a layer any time on tropical plants most often grown as houseplants, but layers strike fastest when performed at the point in time when the plant has high energy levels and is about to enter the portion of the growth cycle when the plant is approaching the peak of its food-making ability; so for those in the Northern Hemisphere, late May to early June will yield the fastest results and highest likelihood of success for the lion's share of plants. I don't like to use the words 'heal' or 'healing' in reference to plants because plants don't 'heal' in the same sense that animals do by replacing damaged or infected cells in their same spatial position, but for the sake of imagery, let's use that descriptor when considering that layers started 'out-of-season' take much longer to strike, and increase the risk of failure due to the wound “healing” before roots can form. This forms a bridge that restores the downward movement of photosynthate and growth and hormones to roots, which considerably decreases the probability of a successful layer. The good news is it seldom results in the propagule's loss of viability.
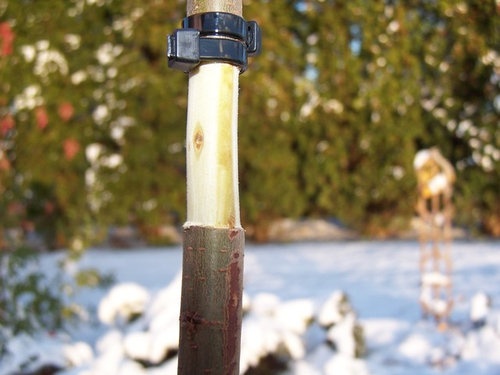
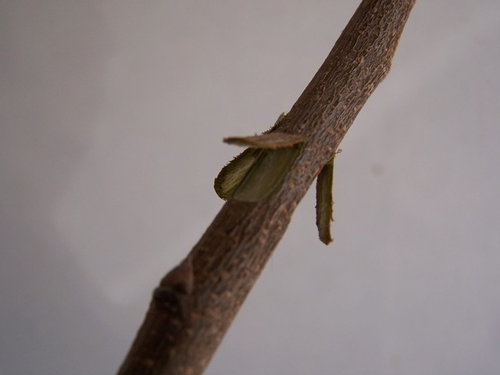
The most common method of layering is probably the ringing method where all bark and cambial tissues are removed, leaving a longitudinal measure of sapwood equal to at least 1.5x the branch thickness exposed and scraped clean of all cambial traces. There is usually a white layer of inner-xylem tissue that sort of has a fuzzy-looking texture. This should be scraped off with a knife blade held 90* to the branch/ stem. See image A below for an image of the ring method. See image B for an illustration of the flap method.
This is a layer prepared with the ring method ^^^
Image B ^^^ The method above is the flap method. It is used most often for plants that root easily. If you use this method, it's important to use something to keep the flaps open so the wounds don't 'heal' over quickly. Pebbles, twine under the flaps, toothpicks, foam beads are all potential items you can use to hold flaps open. Most often, roots form on the flaps because that's where the auxin and photosynthate collect. to hold flaps open. Most often, roots form on the flaps because that's where the auxin and photosynthate collect.
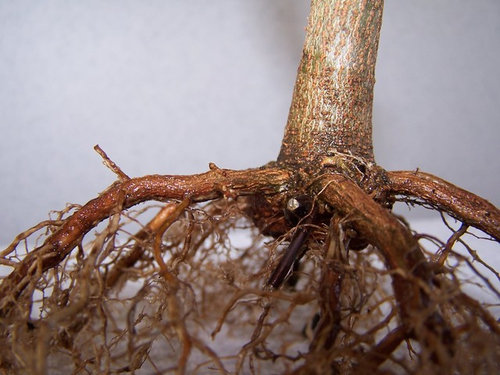
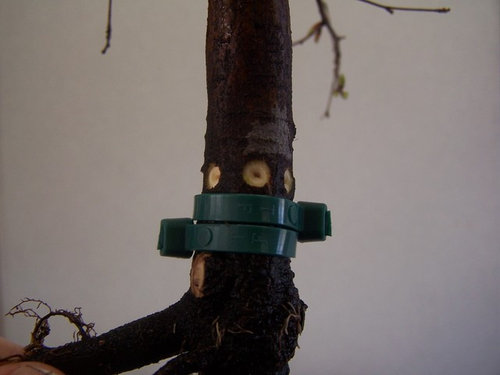
Images C and D below illustrate use of the tourniquet method, which doesn't require wounding. Applying a tourniquet, then waiting for it to restrict the downward movement of auxin and photosynthate to collect above the restriction can be used as a long term layering method or to prepare a plant for a future layer. The plant with the wire tourniquet still visible below the root to shoot transition was layered off of an ugly root system. The tourniquet method can be used on stems/ branches you wish to layer in the future. You can apply a tourniquet and wait up to 2 years to layer.
Image C ^^^ Tourniquet method - requires no wounding
Image D ^^^ Another tourniquet method prepped. Only need to add the root hormone to the holes above zip ties.
The image immediately above shows two steps that I usually take a year apart. I prefer the tourniquet to be applied and a year of growth allowed to take place. As the layer site thickens above the tourniquet and restricts downward flow of nutrients, it swells. The next year I usually uncover the tourniquet and drill holes in the trunk, which I fill with an appropriate rooting aid. The result is an evenly spaced root system as seen in the plant with the wire tourniquet.
Blanching is another enhancement that can be used with much success. Blanching is the blocking of light from the area on the plant where you eventually want roots to grow. I use it very often in conjunction with an appropriate rooting aid. Here's how: Sprinkle an appropriate powdered rooting aid on a sheet of paper, then use it to coat the end of a strip of electrical tape equal to the circumference of the branch/ stem you intend to layer. Then wrap the tape around the branch where you want roots to grow with the dusted part against the bark and secure. Do this 3-4 weeks before starting the layer. The blanching that occurs due to banding with the tape works together with the rooting aid and higher moisture levels under the band to get root initials started before you even prepare the layer. This is very effective for a high % of plants that lend themselves to layering. The bottom of the tape will serve as a template for your top girdling cut a month after you apply the tape with hormone. If you use a tourniquet, apply the tape with hormone on it a month before you start the layer. You can see that a bit of planning and the little bit of patience it takes to wait until the most advantageous time to start your layer can increase your chances for success and the potential for things going south.
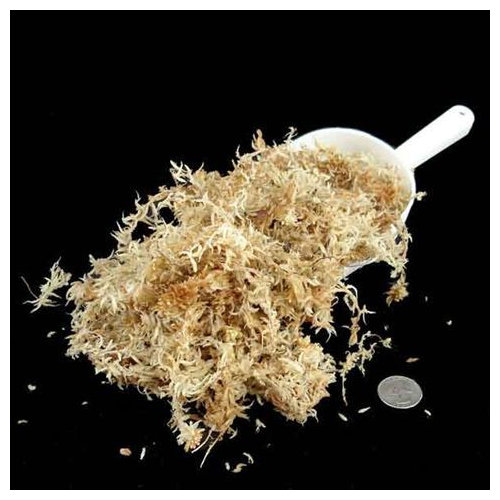
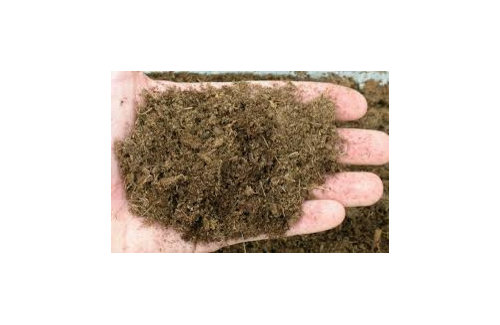
Sphagnum moss, which is different than peat moss approaches being the traditional medium used for most layers hobby growers other than bonsai practitioners are likely to use. Sphagnum moss is collected while living, before it had died and partially decomposed, then dried. It is very different than sphagnum peat moss, which is the same plant but in an advanced state of decomposition. See images E and F below.
Image E ^^^ Sphagnum moss - use? YES
Image F ^^^ Sphagnum PEAT moss - use? NO
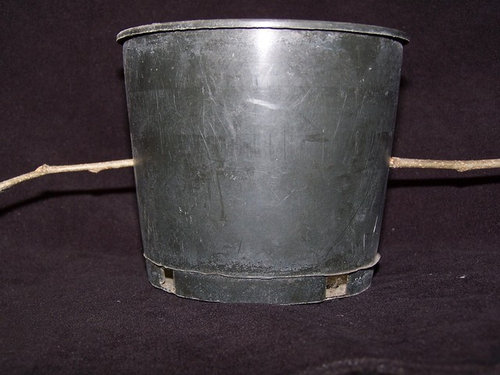
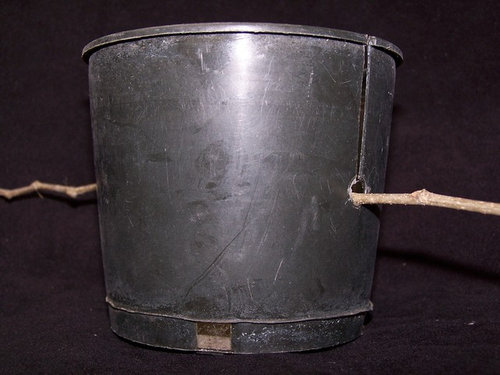
Most growers are most familiar with layers that use the steps of deliberate wounding, covering the wound with a clear pouch containing sphagnum moss, then covering the plastic pouch with aluminum foil or other material that blocks light and helps prevent heat build-up, but containers can be used for layering as well. I frequently use them, filled with gritty mix to layer branches or the entire top of a tree. See images G and H in below.
Image G ^^^ Using a pot for layering a horizontal branch
Image H ^^^ More detail. Hole goes in the bottom for a vertical branch.
I hope the thread is helpful and gets lots of business as time passes, and I hope you'll bookmark it so you can direct others to it. I'm sure I missed a few things I might have covered, but that's why questions were invented.
Al


 8 years agolast modified: 8 years agotapla (mid-Michigan, USDA z5b-6a) thanked tropicofcancer (6b SW-PA)
 4 years ago








PinusParvifloraEnvy