Software
Houzz Logo Print
lknovak

Basement water issue, no source?

8 years ago

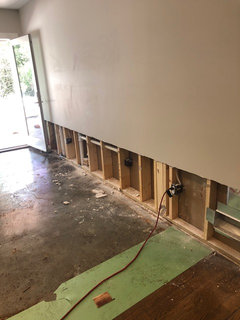
HELP! We built our home fall of 2015. Used a floating engineered oak hardwood floor in the basement. (Slab is 4" concrete with 6 mil vapor barrier. 13 course block foundation.) In mid June we discovered that the flooring had heaved up, and there was water underneath the majority of the wood. You could press down on the edges of the wood and water would seep up in between the planks and around the perimeter. Our home builder came and cut all of the flooring out, cut 2 1/2 feet of sheet rock off to expose the pipes and insulation. No leaking pipes, no wet insulation, no defected shower liner, no leaking appliances/ice maker. The utility room was dry, the sump basket dry- pump has never gone off. Two bedrooms that are carpeted are completely dry, carpet tack strips have not had any moisture on them. Insurance company says it's a flood, won't cover. We had a basement water expert out and he had no clue where the water came from, and said he would he was 99% sure that it didn't come from a flood- block dry, never been wet. Builder says it's "sweating slab syndrome" and he won't cover damages either. We have an air exchanger, but have never though we needed a dehumidifier as well. Builder says we should have been using a dehumidifier and this wouldn't have happened... Any one have experience with sweating slab syndrome to know if it could actually cause this much water? If so, how do we fix it so we can get our remodel underway? Any advice would be greatly appreciated.

Comments (15)

  • PRO
    8 years ago

    Moisture test needed using a calcium chloride test. It should be less than 3 psi, if the vapor barrier under the slab is installed properly. It should be done in front of all doors and windows, along with several areas in the middle of the room.

    Otherwise, you must have a hairline crack in a corner joint, between wall and floor, that is allowing hydrostatic pressure in. Tape clear plastic along the corners to test for condensation. Repair: corners should be sealed with hydraulic cement or something similar.

    Was a vapor barrier installed under the flooring? Was it installed properly? It should run up the walls and trimmed off after the floors are installed. I have seen installers trim off the excess plastic before installing the floor. That allows moisture to run underneath the flooring. Whereas an extra 3/4" up a wall does not. Overlapping seams by 6" , while using tough weather proof tape along the seams. If, duct tape was used, it needs to be super sticky.


  • PRO
    8 years ago

    Thank you for responding. Calcium chloride test- can I order a kit on amazon, or do I need to locate a professional? Are you talking about a vapor barrier under the wood? There was one, and it definitely did not go up to the walls, and I can almost guarantee that they didn't overlap it...

    I don't think I mentioned it in my original comment, but the basement dry now. Since the original event, it has not been a bit damp even. We have tried to flood from the outside, and have had torrential rains that have not caused a drop of moisture. I have even gone out after the big rain storms when the ground is saturated and tried to get water to come in, with no luck.

  • PRO
    8 years ago

    Yes, you can get one on Amazon or some local box stores like Lowe's or HD

  • 8 years ago

    We are waiting for the contractor through our insurance adjuster to commence work following our own basement water damage issue - luckily the plumber who came out to handle the pipe clog which was the root cause indicated to the adjuster that it was indeed a problem that was "sudden and unexpected (not due to deferred maintenance or outside sewer line) incidence and thus covered under our homeowners insurance policy. We have 'replacement cost' not 'actual value' so the depreciation of things like flooring, carpet and the like is minimal - and our deductible is slightly higher than the average, by design.

    When the house is being built, they usually do the 'waterproofing' on the outside portion of whatever your basement is being constructed of (ours is block with some sort of siding stuff over that on the outside, then inside there's insulation between the block and the drywall) - that's when they can more easily dig ditches and do things properly. If water was there for any amount of time, it may appear dry now but the water damage can turn up down the road in a number of unappealing manners - crumbling and discolored ceilings or drywall, stinky molding carpet pad, etc...We had to get a remediation company in and then called the insurance company because our responsibility to mitigate the damage began the minute we noticed there was a problem.

    Our pipe blockage caused the water going from other pipes to find a way out to drain - water always finds a way - which led to water coming UP the laundry standpipe and in a short time there was water on the floors, creeping up into the drywall necessitating cutting out the lower 24", in the carpet and pad, and wicking into the 3rd bathroom's vanity. We're exceedingly lucky that it fell under a covered water damage event and that our policy is replacement cost - in flood zones/plains it's highly recommended that homeowners obtain a flood insurance rider, at the very least extend what is a covered water damage event (they have various riders that may apply) plus look into additional coverage on your belongings because replacing those won't generally be covered unless specified by the policy. As much as it sucks that the insurer doesn't plan to open a claim this time, they will be noting in the file that you have experienced a water damage incident and now is the time for you to call them and go through EVERY bit of your coverage to make sure it's truly sufficient for your needs.

  • PRO
    8 years ago
    last modified: 8 years ago

    Tape a sheet of clear plastic on the slab and let it sit overnight. Any condensation would mean the hydrostatic pressure is high. It can be 7 lbs or up to 18 lbs. This is where you need the calcium chloride test. It will give you an actual reading.

  • PRO
    8 years ago

    Thank you. I ordered the calcium chloride test. I will post again when I get results back from that.

  • PRO
    8 years ago
    G&S,
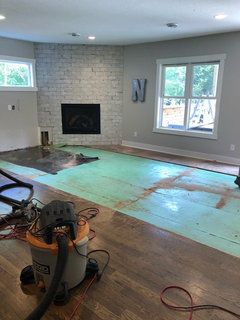
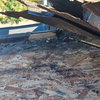
    I literally woke myself up thinking about your moisture barrier comment. Here are two pictures of the flooring while they were taking it out. This was foam, and it tore easily. Did they skip the moisture barrier and just add a underlayment?
  • 8 years ago

    "Did they skip the moisture barrier and just add a underlayment?"

    That's EXACTLY what they did!!!! The green foam has zero vapour protection. This is installation ERROR! Sigh. This is PRECISELY why a good contractor will ASSUME the vapour barrier UNDER the slab has been compromised and will ALWAYS use a vapour barrier underneath flooring....AND the studs in a finished basement.

    BTW - what are the wood studs sitting on? Are they directly on concrete or are they sitting on something?

  • PRO
    8 years ago

    FYI, the CaCl test needs to be weighed with a gram scale after the prescribed period of exposure. Like standard table salt it absorbs moisture from the air and gains weight. This determines how much moisture is coming from the slab into the sealed enclosure on the test kit. Make sure to log the amount of time it's exposed and to seal the enclosure firmly to the subfloor.

  • 8 years ago

    If you determine there is an issue with moisture through the foundation, you may want to get an inspection and quote from a local company authorized to do De Neef injections.

    r!ah thanked Milo Pompeii
  • 8 years ago

    The guy that cut out the Sheetrock should have found the vapor barrier when he removed the base boards. Any experienced floor installer/repair guy should have noticed it missing also.

    The way I do it is lay the vapor barrier out and use thumb tacks to hold the ends approx 6" up on the walls. Small bead of silicone on the seams approx 6" back from the edges then tape the seam. Next the underlayment will go down (in your case foam). Next the flooring. To finish I take a sample of the base board/trim and hold it in place against the wall and use a Sharpie to trace the top edge onto the vapor barrier. Then trim the vapor barrier 1/2 to 3/4" below the line. It leaves 3 1/2 to 5 1/2" of vapor barrier up the wall (depending on trim width). But I have never had to go back to repair damage due to sweating slab syndrome or vapor problems.

  • PRO
    8 years ago

    So- researched the foam. It was Ultra Seal Floor Muffler- a combo of sound and moisture protection. I just got the calcium chloride tests. It says we need to grind the floor prior to testing, so it may take me a couple of days to get this going. Thanks for all of the advice.

  • 8 years ago

    The 2-in-1 underlayment still needs to be TAPED properly and it still needs to run UP THE WALL a little bit (should look a bit like a pool liner). I'm not seeing evidence of either of these requirements.

    I'm hoping your build is new enough to fall under the 5 year warranty (in Canada we require a 2-5-10 year warranty/insurance on new builds). The envelope carries the 5 year warranty (water penetration) and the 10 year is for structural integrity of the slab/foundation.

    Hopefully you have something like this in place. It is worth looking into.

  • 4 years ago

    What did your calcium chloride testing show? What did you do to fix your problem?