Software
Houzz Logo Print
amkerrick

countertop replacement

8 years ago
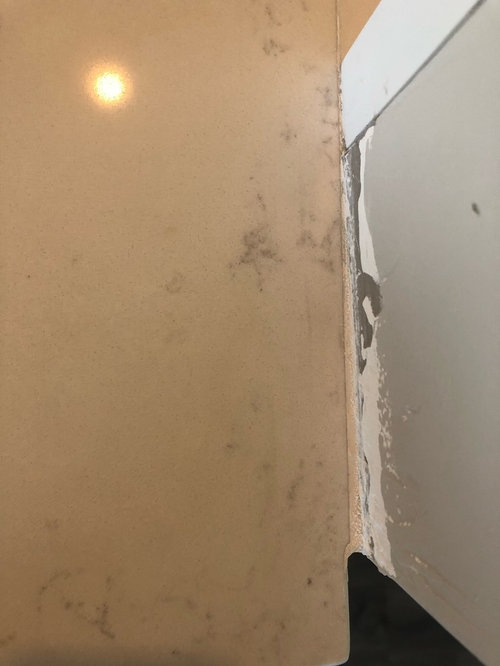
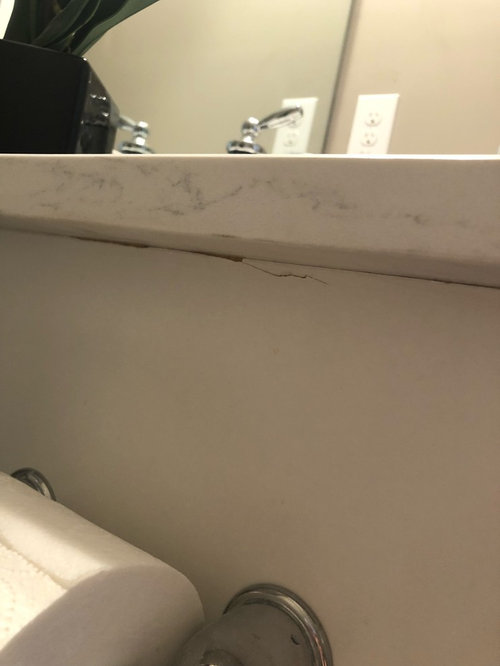
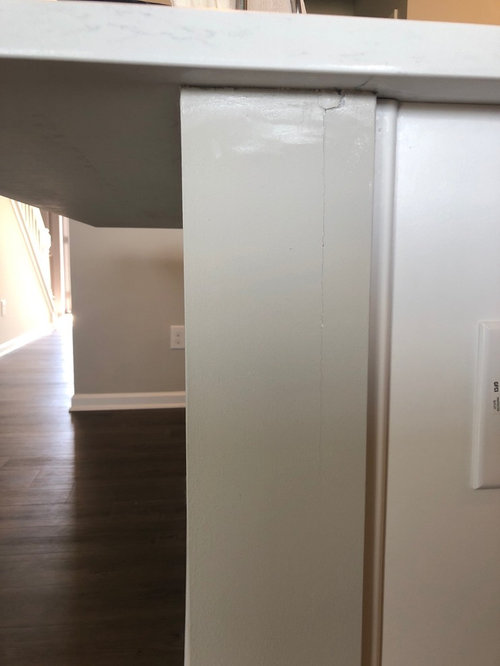
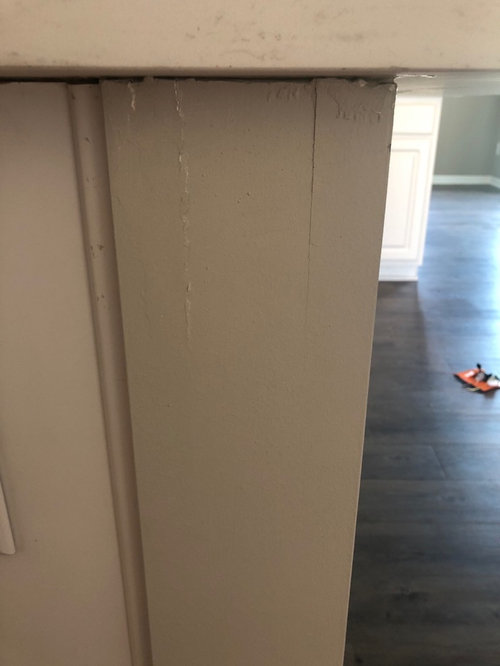
We got new countertops and did not have a contractor (our mistake I’m learning), however, I’m curious as to if this is reasonable damage after replacement... we know now the damage from previous backsplash is our responsibility. However,
1) our island half wall is splitting on the sides (owner states he doesn’t think it needs support and just needs to be patched).
2) they did not put backsplash where our previous granite had backsplash and there is a weird space between the wall and the top
3) our one cabinet on the side is damaged.
Is this expected?

Comments (28)

  • 8 years ago

    I’m curious as to if this is reasonable damage after replacement

    It’s more than reasonable; consider yourself lucky. :)

  • 8 years ago
    And by prepped you mean removed the top? Because that was the countertop company. It did not look like this when they arrived. They removed and installed.
  • 8 years ago

    No, prepped the cabinets for the install. Leveled them up, checked for structural defects, reinforced them. That kind of thing that Counter guys aren’t remotely qualified to do.

  • 8 years ago
    Not sure how we would have that done prior to them removing them when they only offer removal and install the same day? Also, what does the level prep have to do with them damaging my cabinet?
  • 8 years ago

    That’s why you needed the GC.

  • 8 years ago

    I would assume the damage was done when they removed your old counters, which is why these things aren't normally done on the same day.

    Usual steps - Remove old counters, make repairs to cabinets/walls, check all cabinets are level and fix if they aren't, after all that is done, install new counters.

  • PRO
    8 years ago

    With the exception of the second picture, none of that looks like counter top removal damage. I just did the second picture on a job. I put a little white caulk in it and no one was the wiser. These things happen.

  • 8 years ago

    Looks like time to sand it all down, fill some spots, caulk some spots, and get it all cleaned up and primed and painted.

  • 8 years ago
    Thanks everyone. Yeah, we should’ve had someone - it’s our first home and we didn’t realize it would occur.
  • 8 years ago

    Best practices are the countertop company will demo, then come do a digital scan of the space to do a digital template for their fabrication, then come back 7 days later and install.

  • 8 years ago
    last modified: 8 years ago

    Hold on...are you guys saying that a homeowner can't hire a countertop company, which offers removal of countertops and installation, do do removal and installation of countertops? They have to also hire a GC for this one project?

    I know lots of people who have had their counters replaced and only hired one company.

    As homeowners, we don't this for a living. If we hire someone to remove and install countertops, they should be able to do it right or not offer the removal service and they should specify that the cabinets need to be prepped by another professional.

  • 8 years ago
    last modified: 8 years ago

    Counter guys are not licensed GC’s. They may have a business license, but that’s it. They don’t do plumbing, and they don’t alter cabinets, and they don’t do drywall work, and they don’t paint. That’s your job if you want to assume the GC role.

    There’s a LOT more to a new countertop that “just” remove and replace. It’s the people who think they have a “just” job and who don’t do their due diligence that get bit.

  • 8 years ago
    I think the problem lies with us not knowing these details, our fault. However, if they would’ve told us that this would be the end result we would’ve hired someone... they just made it seem like it was all handled.
  • 8 years ago

    Sometimes, you can get by with just one company, but, that company has to know exactly what they are doing. My son and his wife, got new countertops a few months ago. One guy came out and measured, and two weeks later, he came back, and loosened up all the countertops, for easy quick removal, but, left in place so kitchen was usable. A week later, they came in with the countertops, with undermounted sink all attached and put the faucets on it, and then removed the already loosened cabinets and the sink, and hauled them outside. They then installed the new countertops. It is a perfect installation, and not a mark on any walls, or any cabinets.

  • 8 years ago
    Sounds like a lot better of an operation than ours. Our sinks were installed day of with epoxy, and there is also epoxy on my cabinets in some places. I’m frustrated to say the least.
  • 8 years ago

    I guess this is a tough lesson learned. We had new quartz countertops installed on our 20 year old birch cabinets last month. I had the cabinet company come out (a small local company) to look at my cabinets and ensure they were in good enough condition to put stone countertops on, as I had laminate already. Even though the laminate countertops were still installed, he looked over my cabinets and said they were fine for quartz.

    The quartz fabricators came and measured and about 10 days later the new countertops came. The fabricators removed the old ones, looked over the cabinets again, and installed the new countertops. I had to look everything over before I signed off on them, but when I signed the contract to have them made, there was a waiver basically saying that they weren't responsible to any damage done to the old cabinets.

    I think you always take a chance putting new countertops on old cabinets. We were very lucky that we didn't have any issues.

  • 8 years ago
    Our home is less than 1.5 years old- they aren’t old cabinets. I signed nothing of that sort either.
  • 8 years ago

    our island half wall is splitting on the sides


    Not positive but looks like the wall is drywall and the problem is with the drywall tape/ corners? 1.5 year old house so the framing is still drying out. Seasonal movement/ fluctuations in humidity are factors. All things that just happen and nobody's fault but enough to cause these sorts of niggling problems. Plus the fact that a heavy counter top got unloaded from the wall, it breathed a sigh of relief and rebounded a bit and then it got loaded again with another heavy countertop. I suspect that some of the defects were pre-existing and went un-noticed until now.


    A bit of caulk will hide the tiny split in the second photo. (You should expect that some damage is possible when the old counters are removed; this is very minor.)

  • 8 years ago

    How was the sink installed? Are you saying nothing but caulk is holding it up?

  • PRO
    8 years ago

    "Our sinks were installed day of with epoxy, and there is also epoxy on my cabinets in some places."


    You never use epoxy to install a sink; it is not waterproof or flexible enough. Silicone caulk acts as a gasket while mechanical sink fasteners do the work of holding the sink in place.


    Plan on getting that sink cut out of the top if it ever needs replacement.

  • 8 years ago

    For sure check on how the sink was installed. The sink installation method would by my biggest concern (not with the minor cosmetic issues that are alarming OP).


    But I'm thinking that the epoxy was used on seams (I can see a seam in the first photo) and OP is simply mistaken or confused on where it was used.

  • 8 years ago
    I have the company coming back Friday so i will definitely address that. I believe it was epoxy? It was like a tan substance and it had a very strong smell. So much so I had to leave the house because I’m pregnant and was getting an awful headache.
    We also had some issues with how they drilled the holes for my faucets, owner said the plumber was lazy and didn’t want to do extra work? So, we have a different plumber coming Wednesday to look over everything (plumber only did faucet install) but one of my pop up drains isn’t fully functional at this time. Not sure if it’s a loose bolt or if the hole is too close to the sink so it’s hitting it.
    Overall this process did not go as expected, this company has good reviews and was recommended by someone in our HOA group so i had confidence in them.
  • 8 years ago

    If you have a seam then epoxy is used to glue the two pieces of countertop together. It looks like they also used it to attach the countertops to the walls.

    I should have used the term "existing" instead of "old" cabinets. My fabricator told me they have more issues with cabinets being damaged when the old countertops are removed vs installing new ones.

    I have to agree with ci_lantro that the end of the island looks like drywall, not part of the cabinet. Our house was only 4 years old when we bought it and I found areas like looked like that in quite a few places.

  • 8 years ago

    one of my pop up drains isn’t fully functional at this time. Not sure if it’s a loose bolt or if the hole is too close to the sink so it’s hitting it.


    Don't mess with those old school pop-up drains. Get one of the push and seal drains. No connecting rods. (But you can leave the connecting rod in place (unconnected). The push/ pops are super easy to clean.


    Phister 972053A Push and Seal Pop-Up Drain Assembly


    I installed one of the inexpensive Phisters several years in the master bath. Liked it so well and have had zero problems with it so installed one in the downstairs powder room last winter.

  • 8 years ago

    Don't mess around with old school pop-up drains that have a connecting rod. Get a Push and Seal Pop-Up Drain. I have the inexpensive Phister 972035A pop-ups installed in two lavatories. The first one was installed in the master bath several years ago. Liked it so well and had zero issues with it so I installed one in the main floor powder room last winter.


    They are super easy to clean. Don't have to crawl under the sink to disconnect anything and reconnect. Cleaned entirely from the top side.

  • 8 years ago
    It’s whatever came with our moen faucets. The problem isn’t with the pop up drain itself I’m being told it’s where the holes were drilled in relation to the sink.
  • 8 years ago

    The problem isn’t with the pop up drain itself I’m being told it’s where the holes were drilled in relation to the sink.


    That pretty much sums up the problem that I had. The faucet had to in x spot, dictated by the rim of the under-mount sink. The linkage piece was then too short to reach from the drain to the lifter. I looked high and low, for years, trying to find a longer link with no success. So the stopper just sat in the drain.


    The push & seal drain is entirely self contained. It does not require links to raise and lower the stopper. Scored a Perfect 10 for my situation. Besides being easy to clean, it also eliminates one fitting (where the ball valve taps into the drain) and thus eliminate one possible source of leaking.