

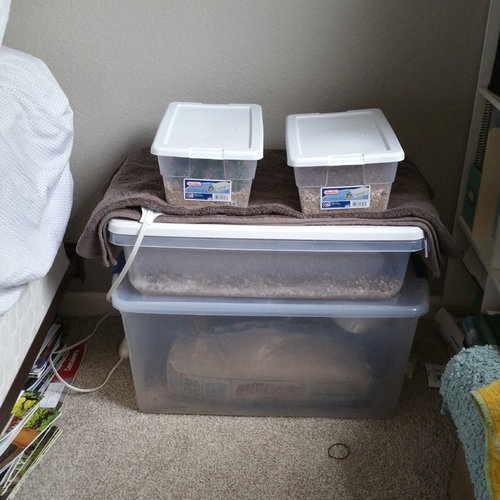
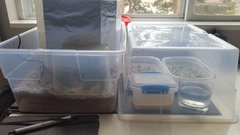
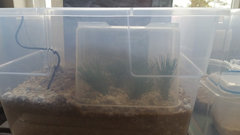
What's your prop stations look like?
I'm using a heating pad for bottom heat (for the moment). Normally the lids are off
Comments (80)
 7 years ago
Oh, and when talking about winter sun. The rays are more 'red' when sun is at a lower angle and have more 'blue' rays during the summer months. So adding more blue light during the winter makes even more sense.
 7 years ago
So it turns out that the agrobrite light comes in 4’ size as well, which is actually $10 cheaper. My heating pad is 4’ x 20”. I was planning to make my chamber to accomodate the pad so the longer light works well. I’m ready to buy the light, but want to be sure that I’m not compromising light intensity. I can’t find any official answers in the listings, but in the customer questions section someone said that the 4’ bulbs are 54 watt and the 2’ are 24 Watts. So am I right that I’ll be getting even more bang for my buck with the 4’ light?
Also, do you guys prefer to hang the light in the chamber or above the chamber and therefore shining through the clear plastic?Related Professionals
Baton Rouge Landscape Architects & Landscape Designers · Washington Landscape Contractors · Springfield Landscape Contractors · Bowling Green Home Builders · Danbury Home Builders · Kennewick Home Builders · Augusta Landscape Architects & Landscape Designers · Nashville Landscape Contractors · Danville Landscape Contractors · Flagstaff Landscape Contractors · Lake Charles Architects & Building Designers · Chattanooga Architects & Building Designers · Odessa Architects & Building Designers · Minot Architects & Building Designers · Anchorage Architects & Building Designers- 7 years agolast modified: 7 years ago
That's crazy that the 4ft is only $84 bucks! That one used to be like $140... so if you have the space, go for it. Watts doesn't matter, it's 20,000 lumens vs. 8,000 for the 2ft.
Put it above the chamber, I would never feel comfortable with a light fixture inside the chamber. If you get the humidity right, it should be like a tropical rain forest in there, basically as much humidity as possible without causing water droplets to build on the ceiling of the chamber - 7 years ago
The 48" (4 tube) will give you better coverage on a 4' x 20" mat. I'd go for that one. :-)
It's funny how prices change on Amazon. The heat mat with thermostat was $10 cheaper the day after I bought mine. But then, I got free shipping bc my order was over $25, the cheaper one I would've had over $12 shipping. Wazwiddat? - 7 years ago
SC77 some how I missed your thoughtful response about the T5 lights from yesterday. Thanks for that. I already bought the T5 light, but it’s nice to know I can upgrade to LED bulbs when these go bad. Hopefully by then the price will be better.
Also, I was thinking I would make the top of my chamber out of acrylic, but thought I would check to see if anyone here has an idea for what will filter out more light? Should I use a thin acrylic, clear plastic, regular glass, or something else? Thanks,
Jacob - 7 years agolast modified: 7 years ago
Are the other walls going to be solid, with light only coming in from the top? Either plastic or acrylic would work. I think plastic is cheaper and easier to work with, but acrylic could give a nice professional look to it as well...
If you are going with solid walls, consider wrapping them with Mylar to reflect the light all around the chamber, and make the acrylic window only wide enough to accommodate the width of the light, so you are not reflecting tons of wasted light back out the top.
My enclosure is made with opaque plastic wrapped around the whole thing, because I wanted to let as much naturally light in as possible... now that it's in the basement, I want to keep as much light IN as possible.... probably need to rebuild it at some point, I waste so much light that just reflects out all the sides
- 7 years ago
I was going to build a pvc frame with plastic sheeting all the way around and plexiglass on top, but now you’ve got me thinking. How about this stuff for the sides? https://m.lowes.com/pd/Common-1-in-x-4-ft-x-8-ft-Actual-0-9375-in-x-3-875-ft-x-7-875-ft-Expanded-Polystyrene-Foam-Board-Insulation/3365576
I could put the reflective side in toward the plants and the plexiglass on top. I would like to make the base out of PVC sheeting.
Do do you think a 2’ tall chamber is a good height? - 7 years ago
Mine is 2 feet tall (with the light a bit above that). It is definitely enough space for cuttings - I'll let someone else answer for grafts.
However, I also use a (relatively, compared to fluorescent lights) powerful LED that needs to be that far above the cuttings for them to get the correct amount of light. You are going to be using a T5, it sounds like - that may need to be closer to the cuttings than 2 feet. And I personally would not recommend putting the light inside the enclosure if it can be helped. You'd be surprised at how quickly heat can build up from even a low powered light like that one.
Also, a caveat - I switched from humidity domes under fluorescent lights (which are fundamentally about the same as the setup it sounds like you are building) to an open-top chamber with fog because I didn't like how the lights + closed space interacted. With the vents in the humidity domes closed, the humidity levels were great, but heat was building up inside. With the vents open, the temperatures inside the dome were better, but the humidity was too low. It was hard to find a balancing point that kept my cuttings from becoming visibly stressed. With my current setup, I can pick the humidity level and the temperatures inside the (open-top) enclosure are at or under room temperature.
However, my propagation area is in a main room of my house, and so it has to deal with base temperatures that are in the 68°-75° range, depending on time of year. If your setup is in a less heated area, the heat buildup from the lights directly over a closed chamber might be no issue whatsoever, or might even be beneficial.
- 7 years ago
This is my play house. Just put on new poly yesterday. I only do cuttings, I'm not interested in doing grafts.
Frank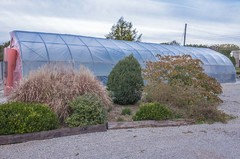
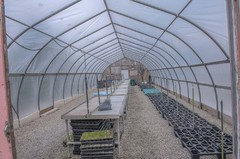
- 7 years agolast modified: 7 years ago
There are apps (google light meter) you can get for your phone that will tell lumens as you move the front of your phone to different locations. Intensity drops off significantly with distance. Sun (even through a window on a cloudy day) produces more lumens than basically all light setups. If using fluoresent 4’, you can (and should imho) put them as close as possible (couple inches) to tops. Fluorescents work fine, especially for seedling/early sapling stages. Depending on how powerful your LEDs (negigible heat, though some) are you can still put them close without burning, though not as close a fluorescents. As mentioned get the “bluer“ fluorescents, they will have a larger “k” value. You could spend more and get a plant specific fluorescent tube, but not necessary. Wally world has 2 bulb 4’er fluorescent tube fixtures/ballasts for under $15. If you plan on keeping indoors for a while, consider starting fluorescent and changing over to LED at some point for a more intense light.
- 7 years ago
Jacob,
I'd stay away from the foamboard sides. Your heat mat should keep your bottoms warm enough and the lights tend to warm things over time even though they don't get all that hot. You can always wrap some insulation around the outside if it gets too cold in your shed.
I used foam board because my basement stays under 60df all winter and with my low powered led shop light, I could keep the ambient air temp at that with bottom heat at 70.Now that I upped my light system, it's holding too much heat. I tested and temp inside were mid 80's so I'm doing something to remedy that as we speak.
- 7 years agolast modified: 7 years ago
Well I think I may have screwed up with the p. abies seeds. For the last 17 days they have been in water, in hopes they would germinate. Then I was gonna put them in a cold frame. None germinated so far (not surprising since they need a cold/moist period of 3-4 weeks to germinate but I tried it anyways). Since it is getting colder now, I think the cold frame is out of the question. Luckily we have an indoor greenhouse (inner city, would get vandalized if outside) in my room at my school (I teach STEM) with an LED (175W) and metal halide 1000W (also have sodium vapor bulb). So now Im gonna do what I should have in the first place and put them in a moist baggy in the fridge for 3-4 weeks, and then either directly plant in soil in the greenhouse or stick in water again to germinate then plant in the greenhouse (what do you recommend?). Seems like half the seeds are floaters and Id guess/hope those still have a chance. The sinkers probably dont have a chance (seed coat not intact), but Ill keep and refrigerate just in case. Hopefully/Im thinking the fact theyve been sitting in water for 17 days doesnt mess things up for the seeds still floating.
- 7 years ago
I don't know pete. Mine are in the garage waiting for next March. I did plant a few in a pot outside in the cold frame but don't expect anything to happen there until next spring when the temps rise regularly into the 70's.
- 7 years agolast modified: 7 years ago
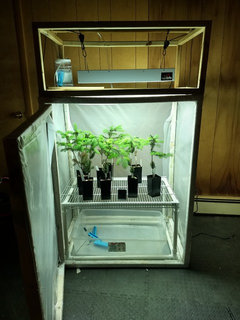
Your really want a good seal though, so maybe wrapping it in poly is the best bet, then if you wanted to block the sides you could use whatever, and not have to worry about moisture. I original had plywood bottom, but it got moldy, so I switched it out with coroplast, which has worked a lot better and easy to clean. Mine is about 3.5ft high, but it could be about 1ft shorter without issue
I build a frame over the top to hold the light and got some adjustable ropes with hooks. I probably keep it 6" off the top of the plastic
- 7 years agolast modified: 7 years ago
@Pete - Picea abies actually don't need cold stratification at all. I think I soaked the seedsfor 24hrs, but not even sure that was necessary. Those things grow like weeds!
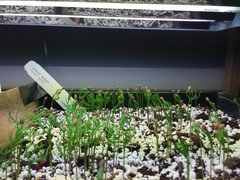
- 7 years ago
Okay, so Flexibility sounds like a good thing to me. I’ll do plastic sheeting or something else thin but reflective for sides And if need be I can always add insulation.
I’m going to go with 2’ tall. That should give me plenty of room for the tallest understocks and shorter things I can always elevate by placing them on stands to get them as close to the light as possible.
I‘m planning to use a pond fogger on a timer for my humidity.
I should have everything done in a couple of days. so I’ll have plenty of time to tweak things and get a good system going. - 7 years agolast modified: 7 years ago
Glad I started early too. After fiddling around with this, I realize that if I use bags, I don't even need a 'chamber'. But I'll leave the sides and door, just for a shield, to protect my eyes from such a strong blue light. Plus I lined the inside with shiny aluminum foil.
It's really something to see how bright these are. And now I'm not even sure if I need all 6 of them. 4 would run cooler but I don't know enough to make that judgement for fear of decreasing the light more than I should. I contacted Westinghouse but they weren't too helpful with information.
I did find out that they have 20 blue led chips each, which I can somewhat estimate how many micromoles they put out but don't know enough to convert that figure to coverage area on a 20" x 10" heat mat. I may have way plenty of umoles or just enough with 6 bulbs. I just don't know.
I tried a 12v electric fan up between the rafters, to move air but that didn't change the temp at all and that's good because I really don't want to run a fan, every day, all winter.
The lights don't run all that hot and I can hold my hand under them very comfortably but like I say, the heats builds up bc the foam retains it.
What finally worked was, I drilled several ~2" dia. holes just above the table and the temp dropped immediately. Created a 'chimney effect' letting the heat inside rise.
I may have to drill more holes to increase air exchange but the temps have dropped to 75 with the basement at 68, so I think it may drop more when the basement gets down to 60. Foam board drills very easy, so I'll wait n see when it gets colder outside before I do more. Glad I didn't wait until February to start this. I also have my CO2 enhancer figured out but more to do, :-)
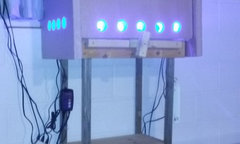
- 7 years ago
" I would like to hear about the co2 setup you’re doing. "
Using a sealed system like bags, will be different than an open system where there is some air exchanged continually inside the chamber.I originally thought that being my bags are sealed, everything would stay the same inside the bags. Co2 would get absorbed by the plants during photosynthesis but being plants also respire, they would give off co2 to replace it. Then I learned that there will be a net increase in oxygen inside a sealed system over time, so I'd have to figure out an 'exchange' of some sort to occasionally remove some air out of the bags and replace with co2.
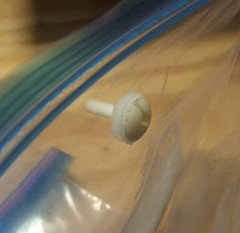
I began my career many years ago as a trained machinist and still have some of the things in my shop I can use to fabricate parts. So I made some 'ports' that will be attached through a hole in the bags. I'll use a length of aquarium air hose on each one and a binder clip on the far end of the hose to seal it. Again, it will be a guess how often I need to draw some of the air out of the bags and replace with co2. I know you don't want to get the levels too high.
I'll post more pictures after I get things put together. Here's a close up of the little ports I made. The first ones I made were brass but seemed a little heavy for the bags to support, so I made more out of plastic. I can suck some air out of each bag using a large syringe and make my own co2, which will be under some pressure, to shoot a little back into the bags and re-inflate them. Hopefully it will be only about twice a week doing that. Yes, I like to play with things. :-)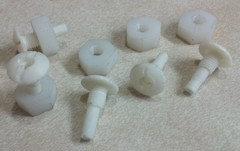
- 7 years ago
According to THIS SITE I'm in the ball park with my 6 led bulbs. It's the first information I found that relates directly to what I'm using. It appears I'm a little strong using all six but only 10 watts, figuring 2 square feet. So better than too weak.
And if I can't get things to run cool enough, I have the option to remove a bulb or two and still be close. :-)
- 7 years ago
Update:
It kept bugging me that the lights were building heat inside my chamber.
So revamped the whole system. Removed the foam board altogether and the cardboard panels that were wrapped in aluminum foil, just to remove anything that had insulation value. Put pure aluminum foil sheet, with no backing, inside as reflector value.
Then it occurred to me, why do I need our weak, winter, outside indirect light when I have 1000 umoles per second, of pure blue LED light pouring in for 12 hours a day? So I closed the curtain and added foil on the window side also. A foiled flipper door in the front for ease of access. Plus some slots for air circulation along the bottom.
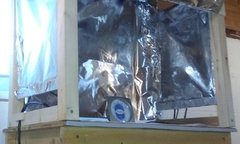
Then to eliminate the dangerous blue light that escapes, I curtained the outside with black plastic sheeting. So there is now nothing that should hold heat around the outside.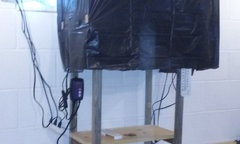
The temperature now runs 68df with all 6 lights full blast. :-)
The lights will be 17" above the top of the pots and 14-15" or so above the tops of the cuttings. Sounds about right according to what I've looked up on the web.
Even with black plastic, you can see some LED light penetrating from the outside but appears to be at diminished enough levels, it should be safe.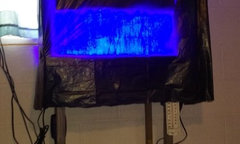
I haven't run the heat mat at the same time but at least the lights won't be raising the temps above what the heat mat is set for. And being the window is in close proximity, cool air will be amending the ambient air temperature to some extent. Brandon Johnson Zone 5b
Original Author7 years agoWow guys! I missed a lot in this thread!
I just got this little guy for my birthday. I'll going to test it out and see what comes. It's a hydroponic cloner, mostly used for starting veggie transplants indoors, but I can get conifers to root on it with the right conditions. I just got it put together this weekend so I don't have any cuttings in there yet.
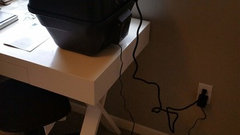
- 7 years ago
oh, sorry Brandon, looks like we hi-jacked your thread.
It's good info though, Shawn's been doing this for a while now.
I got some some issues solved with my set up with all this and it's simply amazing what Jan and DeltaOhio have for set ups.
I've never done hydroponics so you'll have to give updates on yours. Very interesting indeed! :-) Brandon Johnson Zone 5b
Original Author7 years agoHijack away! More for me to learn!
I don't know anything about this either but I'll find out.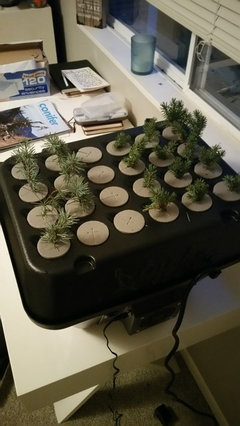
- 7 years ago
Always something to learn. :-)
Is that just water in the root zones? Any rooting compounds used?
Brandon Johnson Zone 5b
Original Author7 years agoI dipped them in IBA gel, knowing it will fall off by the water. I wanted some in there but didn't really know how much..- 7 years ago
I haven't done enough of this sort of thing to be of much help. I looked up online what was recommended for the particular kind of plant I was rooting.
Generally, with the liquid brand, you put the basal end into the mixture for a certain number of seconds or even a minute or two. Then stick them.
You're not supposed to have it stay on for too long because it can burn the tissue. So I think it's more of a treatment than it is a coating. I've never used the gel. That may be different.
What kind of trees are those? Brandon Johnson Zone 5b
Original Author7 years agoI already had the gel and didn't want to buy a liquid mix if I could avoid it,so I gave that a shot. I've burned some cuttings that way before! But my goal is more to have fun and learn than to be successful..
One side is Cedrus atlantica 'Glauca'
The other is a Picea glauca broom I found.
I can't find any literature on what I'm doing specifically, as far as using an hydroponic cloner, so the timing is likely off for the white spruce broom. I'll graft that one in a few months if it won't take root.- 7 years ago
We all start at the beginning. :-)
Have fun and keep us updated.
Lots of folks here to give advice.
Good Luck! :-)
- 7 years agolast modified: 7 years ago
I put the ports into the bags today. Here is a picture of one of them Just to give an idea of how I'm doing it. There will be 5 bags total on the heat mat. Looks like I'll be starting this about the middle of February so I'll wait and disinfect everything by then. I'll post another pic once I get everything stuck and in place. Don't know exactly how I'll source the CO2 yet but that's no big deal.
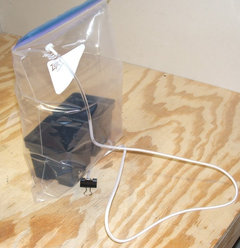
Inside close up:
- 7 years ago
Interesting tidbit in the reply section from the video link above:
I tried to propagate sequoiadendron gigantium using a aeroponic cloning machine, I got tons and tons of roots but once I adapted them to soil, they died. I have also done this with Japanese maple and had the same results. I asked a nationally renowned propagator, Paul Halladin, why they didn't survive, he told me the roots that grow from hydroponic cloning are different types of roots than the roots that grow in soil. I asked how to get around this problem, he said if I were to to propagate them in the cloning machine I would need to transfer them to soil at the first sign of root formation into a sterile seed starting mix or media of sorts. this way the plant can quickly produce root nodes in the cloner and continue growing the proper soil dwelling roots once placed in the media. I tried it, and had near 100% success. I usually just make willow water and add it to the nutrient reservoir. Good call on using a willow cutting in the machine. I'm amazed at your success with the pines.
May have to give this a try.Nice feature in the conifer quarterly Brandon :) Be sure to post your cloning results. Same for you Bill.
- 7 years ago
Thanks! I may just start my own thread, starting from the beginning, to avoid mixing too much and scattering information, that will result from all these beautiful threads. :-)
Brandon Johnson Zone 5b
Original Author7 years agoWell guys... After 26 days, the cambium on most of the Spruce has rotted, and I'm dumping the whole lot. So, experiment one was a failure. There was a opaque slime that started to develop and I need to learn what that was and how to avoid it in the future.- 7 years ago
Hi Brandon!
I was reading another thread in Conifers about hydroponics. Barbaraincalif gave some tips on what she does, about 3/4 way down the thread. Thought you might find it interesting.
[https://www.houzz.com/discussions/and-the-first-to-root-is-dsvw-vd~1900204?n=20[(https://www.houzz.com/discussions/and-the-first-to-root-is-dsvw-vd~1900204?n=20)
Brandon Johnson Zone 5b
Original Author7 years agoMerry Christmas!
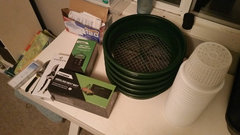
I got some great gifts this year. A heating mat with thermostat, sifting trays for seed, chemicals for the cloner... Hopefully I'll have more success now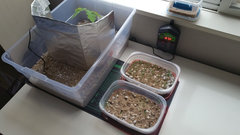
- 7 years agolast modified: 7 years ago
Congrats on the new acquisitions! :-)
Looks like you have some sort of large conifer seed started.
Is that sand and perlite?
Brandon Johnson Zone 5b
Original Author7 years agoThat's actually Quercus robur. It was an acorn off 'Furst Schwarzenberg' but so far it looks completely normal.. :(
I use an arbitrary amount of sand and perlite to start the seedlings.- 7 years ago
I'm still not sure what media I'll be using to start my conifer seeds. I might have to try that one.
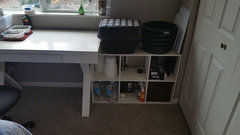
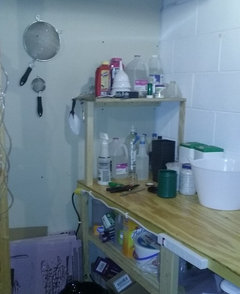
I don't have anything new, just working/organizing my new hort area in the basement. Added a power strip to handle all the cords I'll need this winter and a shelf and hung a few things from the wall so I don't have to search for them.Also put a small batch of seeds in the fridge that require a long period of stratifying.
Brandon Johnson Zone 5b
Original Author7 years agoNice! I'm just building my first set up, so all is new to me!
I've had great success with my Pinus rigida witches' broom I grew from seed.
All my softwood cuttings rotted! :(
Everything I've put in the cloner has rotted too!
But, I got some chemicals for christmas, so I have more tools and more advantage now.
- 7 years ago
Does the sand perlite in the shallow containers have drainage holes in the container? Or do you just add enough water to moisten the media? I just don't know if it matters to start seeds because I haven't done it that many times.
I put that work bench in thinking it would be plenty of room. But it's amazing how much paraphenalia (tools and supplies) you can collect over time and most of it you only use once or twice a year. - 7 years ago
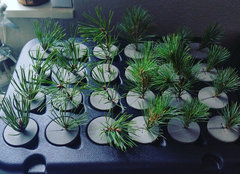
I got 15/16 Araucaria araucana to germinate this year. 50/50 peat/perlite, no supplemental humidity. Just brought in my understock for grafting last night. Small volume, I will be doing about 12 Abies grafts, 5 Picea, and 1 Pinus strobus, which will have multiple grafts attached.
The Ballast went on my T5, which was maybe 4 years old. A little disappointing, but I was able to find a replacement Ballast on Amazon for $25... such a pain to swap, had to splice in all the new wires.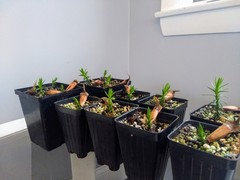
- 7 years ago
Thanks for posting Shawn.
I almost bought a couple more LED bulbs for back up the other day. But they are supposed to last a long time so being I have plenty of light intensity, it won't matter if one or two fail.
I bought some plastic and aluminum covered containers to start conifer seeds. I have Tsuga c., Thuja o. and some Picea abies. Sounds like the Tsuga and Thuja will need stratifying but only a short 60 day period.I have a pail of sand, bag of sifted spagnum peat moss and perlite on hand so may try a couple different kinds of media mixes, not sure yet.
Looks like I'll have Tsuga c., Thuja o., Juniperus v. and some kind of arborvitae cuttings this season to fill my rooting set up. I'll be having a fix done on my aging back early January so decided to wait on starting anything until I'm up and around again, hopefully by early February.
Brandon,Don't worry about the failures. Consider them learning experiences. :-) You'll figure out how you want things and then decide next time to change everything. But that's okay, anytime you can make things easier or more efficient, that's a good thing. :-)
Brandon Johnson Zone 5b
Original Author7 years agoSo...
I've put the seed on a heating mat at 72 degrees. Those seem to be doing well.
I just put a new batch of cuttings into the cloner. Pinus sylvestris and Pinus strobus, both notoriously bad for rooting, but I'm willing to experiment. I added KLN and CloneX, plus H2O2. They're in indirect light, north facing room in dead winter (the lowest light possible). I've also blocked the ducts in the room so it's not getting any heat from the furnace. The motor from the cloner keeps the water at a good temp (65-70) so hopefully this will achieve the cool heads, warm feet concept.
I've read conflicting opinions in the literature as to what temp to hold the heating mat and air temp, so I'm just picking one and going with it. We'll see!
Brandon Johnson Zone 5b
Original Author7 years agoAnother update:
Almost everything is dead...For the cloner, I need to get air stones and another pump to increase the oxygen in the water, and also get some sort of timer to run the machine at intervals instead of constantly.
My Pinus strobus witches' broom cuttings are still alive and have callused! But I don't have any supplemental lighting or CO2, so can I just breathe into the bags??
- 7 years ago
" My Pinus strobus witches' broom cuttings are still alive and have callused! "
Just keep doing what ever it is that you have been doing for these.
Don't worry about CO2, I'm willing to bet that very few amatuer growers use this technique. Keeping the bags closed will help keep out pathogens and mold from entering.
Can you move a light over to the P. strobus from something else that no longer needs it? Or is there room to put the bags containing them inside your lighted chamber?
I'm no expert but temperature and lighting will be most important at this stage. Brandon Johnson Zone 5b
Original Author7 years agoThis is round three or four of cuttings. The first ones I was doing too much. Checking on them three or four times a day. They ended up molding.
This final batch I've left alone mostly. I check once in the AM and once at night for signs of mold or needing water. I only water them when the top of the sand is dry enough that I can blow it around. I've also just started using OHP 6672, a fungicide I use at work. I'm not sure how that will affect the cuttings going forward.
- 7 years ago
I've been mostly ignoring my plants this year, everything is automated, so I only check on them 1x per week. I was shocked when I checked today and the spruce understock already has bud swell and some are starting to push new growth! That's the fastest I have ever observed. I brought them in on Dec 28th, so that's 3.5 weeks. Normally, this doesn't happen for 5 weeks or more... It must be because the weather was mild this year. Also, I think conditions in the basement have been absolutely perfect. 90-95% humidity, 57-63*
No signs of bud swell on Abies or Pinus, but white root tips pushing out the bottom, so I better start preparing a day for grafting sooner than expected! - 6 years ago
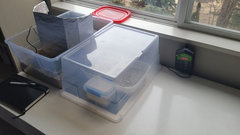
I'll have to give some thought to what and if I'll be propagating this next season. Rooting some difficult conifers was wildly successful but I don't need any more trees so why do more of the same this year?
I stripped my rooting chamber down to bare table for a possible revamp. But I'll have to think of something interesting i can do before that. And I know there's plenty of time before I need to worry about that. :-)
I'm positive I won't be starting anymore tree seeds.




Brandon Johnson Zone 5bOriginal Author