Software
Houzz Logo Print
jbpz8b

First time doing cuttings - is there a problem on this cane?

7 years ago
last modified: 7 years ago
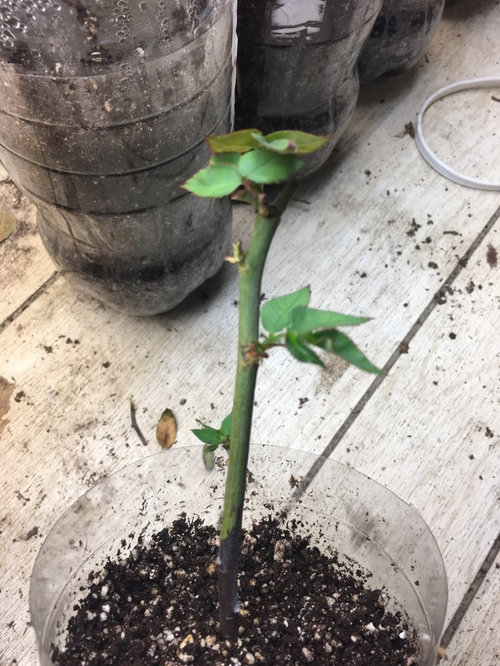
I never did cuttings and this year I got a chance to try some. I read that Mrs. B.R. Cant is not among the difficult roses to propagate and it was doing well until I noticed a brown area on the bottom of its cane this morning. I did the cutting about a month ago. It already grew new leaves, and there is even a bud in this brown area. Is this a serious problem that will kill the cutting or just a passing stage?


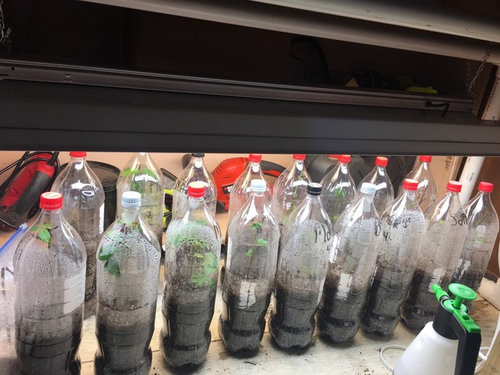
Here is the photo of all the cuttings from this and a couple of other roses. Once a week I remove the top and mist them but now I’m wondering if there is too much moisture inside this removable bottled area. Please advise me on this as well. I would hate to lose other cuttings because of something that I can correct.


Thank you for any help and information.

Comments (36)

  • 7 years ago
    I would guess that one is a goner. They store so much energy in their canes it is hard to tell if the first new leaves are from roots or stores. But when the bottom turns black, for me it means the cane rotted
    JBP (zone 8b/9a) thanked Kippy
  • 7 years ago

    I agree with Kippy. When the cane truns black at the soil line it's a sigh the cane has rotted and died.

    JBP (zone 8b/9a) thanked seil zone 6b MI
  • 7 years ago

    Thank you, Kippy and Seil. Oh, that's what I was afraid of. Hopefully the other cuttings will make it.


    I wonder what made it rot. The soil is only moist, not wet. Do you think that there is too much moisture inside the bottles?

  • 7 years ago

    I agree with everyone else. What's really frustrating is when it happens after you've had them for more than three months and they do this.

    JBP (zone 8b/9a) thanked Alana8aSC
  • 7 years ago

    Have you had success growing them this way?

    JBP (zone 8b/9a) thanked Seeingreen
  • 7 years ago
    last modified: 7 years ago
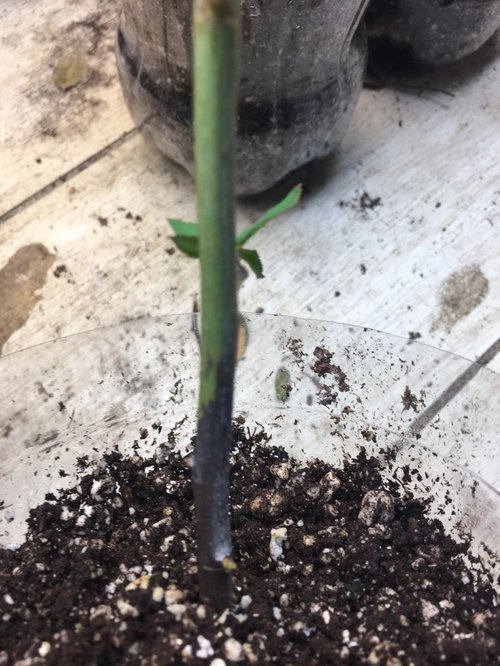
    That’s so frustrating! I had a cutting of Ingrid’s much longed for ‘Potter and Moore’, do just that, after months of looking great. Mine started turning dark like that in the same place, after removing the top. It had already grown so much that it was outgrowing it’s soda bottle. It wasn’t until I needed to start watering it that the black started up the cane. I can only assume I gave it too much moisture when I began watering it.

    Hopefully, the rest of your cuttings will be alright. You can’t win them all! Sorry about it, though. I know how disappointing it is. Lisa

    JBP (zone 8b/9a) thanked Lisa Adams
  • 7 years ago

    It seems to me that, when they push topgrowth, they don't push roots. And then, they die.


    JBP (zone 8b/9a) thanked jerijen
  • 7 years ago

    Good point, Jeri.

    JBP (zone 8b/9a) thanked seil zone 6b MI
  • 7 years ago
    last modified: 7 years ago
    Thank you all for confirming the same and I really appreciate getting it from experienced rosarians as all of you are. Well, the first disappointment in my rose cutting efforts, but it sounds like it is a trial-and-error process that makes me appreciate even more all of the nurseries that sell own-root roses.

    Seeingreen, this is my first attempt to propagate roses from cuttings. Obviously so far it has not been a success :-)

    Thank you all again.

  • 7 years ago
    last modified: 7 years ago

    With the enclosed tops, I doubt they need additional water. I think I spy dessication up that cane. If that's the case it's a goner, but you could always recut the end and try again with a shorter piece. I've had this work. If there is anyway you could create bottom heat, that would help push roots before the leaves. I use a weather resistant pet pad that I had and it's working. I'm experimenting covering mine and just misting them from time to time. Cooler tops and warmer soil pushes roots, but I'll see as my room is pretty cold to start with. I did hundred of cutting before success in the spring and summer. Now I experimenting to see what I can get to work for Fall and winter! : ) I see your zone, but where are you located?

    JBP (zone 8b/9a) thanked Vaporvac Z6-OhioRiverValley
  • 7 years ago

    I'm in Baton Rouge, vaporvac. That's a great idea and I will try cutting it shorter. I'm using a pet pad for one cute stray cat that happily adopted my back yard as her home (although refusing to come inside). I have some heating pads for seed growing and will try those instead. I've now learned not to have high expectations, but will give it a try. Thanks for the advice.

  • 7 years ago

    I might just stick the cuttings in the ground in the future and they could root over "winter" in your zone. They may not even need to be covered.

    JBP (zone 8b/9a) thanked Sheila z8a Rogue Valley OR
  • 7 years ago

    That was my thought Sheila now that we know where she lives depending on their rain.

    JBP (zone 8b/9a) thanked Vaporvac Z6-OhioRiverValley
  • 7 years ago
    last modified: 7 years ago

    JBP,

    You're doing a great at job with your setup. Don't beat yourself up about failed takes. They happen even when everything is optimal. I have killed more cuttings by providing too much moisture than for any other reason. The trick is is not how much moisture is needed to get successful takes, it's how little moisture is needed.

    When first setting up cuttings for rooting, start with barely moist rooting medium, one you think is not moist enough. Observe the condensation on the propagator cover. If droplets or a film of mini droplets form, you have 100% humidity in there. Your cuttings are in an ideal environment in which to take. If no condensation occurs the next day just pour one level teaspoon full of water into the medium. Check the next day. If no condensation occurs still, add another level teaspoon full of water. Repeat daily until you see condensation the next day, then stop, keeping an eye on condensation levels to adjust as needed. You need only a little condensation, not the entire top dripping like a sauna!

    Also, bear in mind, some roses are a dickens to get to root. Even Martha Stewart would fail in getting takes with some varieties. Even with the easiest roses to propagate, some will be no-takes. A success rate of 75% takes, on average, is pretty hard to beat.

    Moses

    JBP (zone 8b/9a) thanked Moses, Pitt PA, cold W & hot-humid S, z6
  • 7 years ago

    My latest effort looked exactly like the photo. I wonder if this cutting had any roots. Mine started forming sets of leaves, then turned dark at the base, and never formed any roots. Someone on the propagation forum told me that leaves with no roots is certain death.

    JBP (zone 8b/9a) thanked flowersaremusic z5 Eastern WA
  • 7 years ago

    Just curious do you have holes punched in the bottom? Are all the bottles cut so they act as lids?

  • 7 years ago
    last modified: 7 years ago

    Thank you for this additional advice. I really appreciate it. Unfortunately, this B.R. Cant rapidly continued to brown and, since I posted this picture, it already browned almost to the top. I then removed it last night and there were no roots. It turned out to be exactly as all of you suspected.

    Sheila and vaporvac, if nothing works this time, I may as well try that in the end.

    Moses, I can't thank you enough for taking your time to give me these step-by-step instructions. I DO need exactly what you wrote. It's difficult to balance the need for moisture and the problem that it may cause for the cuttings. BTW, thank you for your moral support. I'm not sure if I'm doing a great job, but I'm trying.

    flowersaremusic and lisa, this is very sobering to learn. I was even happy when I saw that some leafed out when it turns out to not necessarily be good news.

    seeingreen, there are holes at the bottom and the soil is not wet, but moist. I cut each soda bottle in half to put the soil and cuttings in, so the top is easily removable, as shown on the first two photos, and I remove it when I mist them once a week.

    Just to be clear I'm a "he" not "she", but you couldn't have known it :-)

    Many thanks again to all.

  • 7 years ago

    Next time look for the little puckering on the stem. Once you see that it's time to cut it to try to save it. Otherwise, It's a goner.

    JBP (zone 8b/9a) thanked Vaporvac Z6-OhioRiverValley
  • 7 years ago

    For some reason my last comment disappeared. I saw it on my computer when I initially posted it but not any more nor on my smartphone. I'm not sure if the rest of you can see it, but for any case let me repost it:

    Thank you for this additional advice. I really appreciate it. Unfortunately, this B.R. Cant rapidly continued to brown and, since I posted this picture, it already browned almost to the top. I then removed it last night and there were no roots. It turned out to be exactly as all of you suspected.

    Sheila and vaporvac, if nothing works this time, I may as well try that in the end.

    Moses, I can't thank you enough for taking your time to give me these step-by-step instructions. I DO need exactly what you wrote. It's difficult to balance the need for moisture and the problem that it may cause for the cuttings. BTW, thank you for your moral support. I'm not sure if I'm doing a great job, but I'm trying.

    flowersaremusic and lisa, this is very sobering to learn. I was even happy when I saw that some leafed out when it turns out to not necessarily be good news.

    seeingreen, there are holes at the bottom and the soil is not wet, but moist. I cut each soda bottle in half to put the soil and cuttings in, so the top is easily removable, as shown on the first two photos, and I remove it when I mist them once a week.

    Just to be clear I'm a "he" not "she", but you couldn't have known it :-)

    Many thanks again to all.

  • 7 years ago
    last modified: 7 years ago

    JBP,

    Sometimes cuttings make top growth before roots form. Just be patient. Do not disturb them to 'check,' to see if roots have formed. If the cutting stems are green and not turning black or brown, that is a good sign. Since your propagator bottoms are clear you will easily see root growth, which verifies true takes, without having to disturb the cuttings to see if there is root formation.

    I think cuttings that have a lot of stored energy, like rather thick ones, make top growth first before roots are formed, because there are plenty of stored carbs in those cuttings to support their top growth. Then very shortly, the stored energy is used up, and the new growth needs more nutrients and moisture, both of which now must come through the roots, so roots are initiated.

    Also, with excess moisture in a propagator, but not enough to induce rot, the new growth can absorb the necessary water through its foliage without needing roots. As the foliage expands and new leaves form, water in the air of the propagator top is insufficient to hydrate the additional growth, so roots are grown to access soil moisture for it.

    This above idea and the idea in the paragraph above it, are theories of mine, no proof positive, just thoughts I have regarding top growth preceding root growth.

    BTW, Your first time propagation project is high tech compared to my crude first attempts at rose cutting propagation some years back.

    Moses

    JBP (zone 8b/9a) thanked Moses, Pitt PA, cold W & hot-humid S, z6
  • 7 years ago

    I got a notice of your follow-up, but it disappeared when I looked. I figured you had just erased it. It'll probably appear in a day or two! LOL! :0

    Unless you have bottom heat, I doubt you need to mist. After much trial and error I had 90%+ success. I tried many things and was able to get them rooting in the ground and containers in spring, summer and fall. Still working winter! The main thing is the medium. It MUST be free-flowing with good drainage. I looked for pine fines, but not finding them, used wood chip/mulch from a downed oak. It's worked great and is much easier than anything else. Wood compost really helped the rooting in the ground. Some people use gritty sand. My experiment with play sand was a failure as it held too much moisture. The container itself must also allow for good drainage as I finally surmised from the open bottoms on the various bands I received. Don't give up. It IS discouraging, but even with my 1% success last year, I was thrilled with those that took.

    JBP (zone 8b/9a) thanked Vaporvac Z6-OhioRiverValley
  • 7 years ago

    Moses, your reasoning makes perfect sense to me. I made the cuttings from thicker canes, because that is usually the advice, but I guess it can cut both ways. I'll still use thicker canes as commonly recommended, keeping an eye on the process that you describe. Thanks for the tip.

    vaporvac, I used Fertilome seed and cutting potting mix and mixed it with about 1/3 perlite. I'll look around pine fines in the future. It sounds there is a lot of patience needed and experimenting with different mediums. Your 90% success rate is awesome. I'll be happy if I get to 50-50. I thought I did everything right, even installed lights, but, oh well, not everything works out as planned in life. I'll keep trying, thanks for the encouragement.

  • 7 years ago

    I was told that I should not expose the root part of a cutting to light. I tried doing a quick search and found this:

    http://gardenprofessors.com/does-colored-glass-help-root-cuttings/


    Does anyone else have any comments on this point?

    JBP (zone 8b/9a) thanked henry_kuska
  • 7 years ago
    last modified: 7 years ago

    That is correct. However if you keep your plants in a shaded area but doesn't get direct light it shouldn't matter too much. This is actually true for all plants which is why I generally will put a liner inside of a regular pot. Also using a quart size milk type bottle seems to have enough opacity

    JBP (zone 8b/9a) thanked Vaporvac Z6-OhioRiverValley
  • 7 years ago
    last modified: 7 years ago

    JBP,

    Keep at it. Every success will be greatly appreciated. In time, through trial and error, you will become a pro at propagating roses. I think the rooting medium you are currently using is excellent....just make sure it is on the dry side at first. You will develope a feel for the correct moisture level very soon. You can always add water as needed. The cuttings will not dessicate, believe me. It is near to impossible to correct a too moist rooting medium once in a propagator with a cutting in it.

    BTW When you post on Houzz Garden Web expect the unexpected. Posts sometimes take days to appear, among other unexplainable events. It can be frustrating, but just go with the flow. It's nothing you are doing wrong.

    Moses

    JBP (zone 8b/9a) thanked Moses, Pitt PA, cold W & hot-humid S, z6
  • 7 years ago

    I play with rooting roses occasionally during the last several years, more as experiments out of curiosity. One time all my 7 cuttings rooted successfully, so that was a 100% success rate, but some times that number goes down to 0%, LOL. I have yet to figure out exactly what the critical success factors are. One thing I noticed is that for the cutting to survive, they shouldn't show any top growth within the first month. The surviving cuttings tend to have no change or loose their leaves altogether during the first month or 2. Some air flow is beneficial too; if I leave them sealed in plastic bags, they have a higher tendency to rot, although that could also be caused by too much moisture.....Moses and Vapervac are absolutely right is that too much water/moisture is a common mistake. I have had success with various potting medium, from normal commercial potting soil to even heavy clay soil, but clay certainly has lower success rate. I also suspect that if I can use some type of sterilization process on the potting media to prevent rotting, it will help, because the stressed cutting (like the one you were showing that had depleted its energy on top grwoth with no root) has poor ability to resist any rot-cause bugs.


    Claire

    JBP (zone 8b/9a) thanked Claire Z5 IL
  • 7 years ago

    I have had decent success using coir in my cups to root them in.

    JBP (zone 8b/9a) thanked Dingo2001 - Z5 Chicagoland
  • 7 years ago

    I took about 30 cuttings this september. Excited to see the results. They all look alive. Some have leaves, which worries me now after reading all of the above. They are 3 months old, is their fate still to be sure death, with leaves? :-s

    JBP (zone 8b/9a) thanked Darren Harwood
  • 7 years ago

    Oh Darren you are probably okay. The main problem is when one is taking dormant cuttings that do not have leaves and they immediately push leaves. Then they're using the stored energy from The cane to make Leaves instead of pushing roots.

    JBP (zone 8b/9a) thanked Vaporvac Z6-OhioRiverValley
  • 7 years ago

    Darren, don't go by me. "Leaves without roots, etc." is what someone on the propagation forum told me and it happened to be true for me, but I don't know about in every case. There may be roots you can't see yet, so I'd still give them time. As long as the canes aren't turning black, they're good.

    JBP (zone 8b/9a) thanked flowersaremusic z5 Eastern WA
  • JBP (zone 8b/9a) thanked henry_kuska
  • 7 years ago

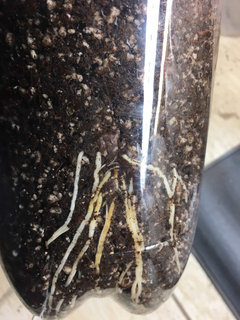
    Well, I am down to 9 out of my original 20 cuttings. I checked last night and this is what I found on one of the cuttings. I am thrilled but (scratch my head)... what do I do with it now? Should I just leave it be for a month or so, unscrew the bottle cap all the time to slowly acclimatize it (besides removing the top half of the bottle once a week) or something else?

  • 7 years ago

    OMG JBP - I'd be over the moon if I saw that! I'm seriously trying to do cuttings this year. One issue I have is patience, or a severe lack there-of. Aside from one of 3 from summer that "looks" still alive with a few leaves, the oldest are from October. I look at them twice a day, at least. From day to day, I mostly see - no real change. A small percentage I can see are dying (I'm sure from too much moisture). Some have lost their leaves but are still green - I am "hopeful" for those. I keep coming back here to get tips!

    JBP (zone 8b/9a) thanked Karen R. (9B SF Bay Area)
  • 7 years ago

    There are few things as thrilling as seeing those roots! Wow! I would do just as you suggest and let those roots fill the bottle. I transplant mine,but that's only because I use mulch and it doesn't have any nutrients so either I use really dilute fertilizer or fish emulsion or transplant. I've had low success with seed starter mix,but I didn't add any perlite and the peat held too much water (or rain as mine were exposed outside). Is this Mrs. BRCant? Those are some really good roots in such a short period of time. What does the top look like?

    JBP (zone 8b/9a) thanked Vaporvac Z6-OhioRiverValley
  • 7 years ago

    I’m excited for you! I think soft wood cuttings are the hardest to root and you have really succeeded! I wanna see more follow up picks!

    JBP (zone 8b/9a) thanked Seeingreen