Software
Houzz Logo Print
ferenc_osvatics

Need help with bathsink repair

7 years ago
Hello everyone!


I'm new here and not really experienced in home repair so would like to have a question.

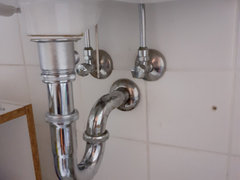
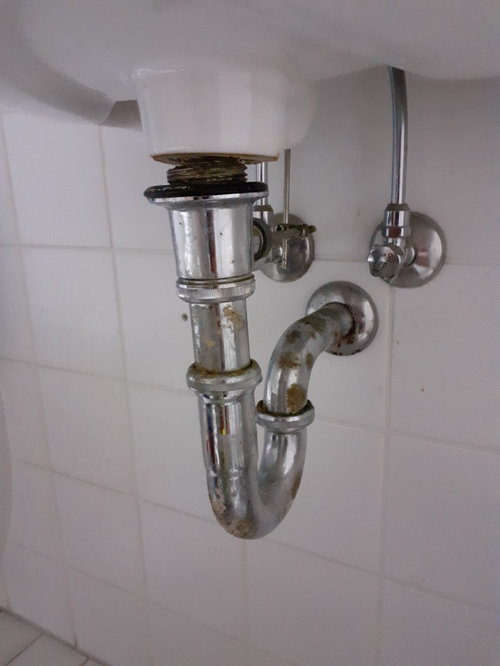
Lately my bathroom sink started (at first) dripping water and lately letting out huge amounts of water underneath. I tought the rubber between the pipe and the sink got old and needed replacement, but after taking it apart and washing it the rubber is just fine, however now I can't put it back since the pipe just keeps dislodging from the sink. Anybody has any idea what I should use to 'marry' them together once again and stop the leaking? I'm guessing both the pipes and the sink are relatively old.

Went to my local shop but what they gave me is sort of like play-doh and I know that won't do as I would need something that would actually make the two stick together.

I'll include a picture.


Thank you in advance


Comments (12)

  • PRO
    7 years ago

    Replace everything pictured with new. Might cost you twenty bucks.

  • 7 years ago

    Yes tought of that too. Unfotunatley over here it won't cost me like that but a whole lot more. Europe you know...

    Either way not sure how to get the part of the pipe out thats literally in the wall?

  • PRO
    7 years ago

    There's a connector in there somewhere. Pull the escutcheon and take a peek please.

  • 7 years ago


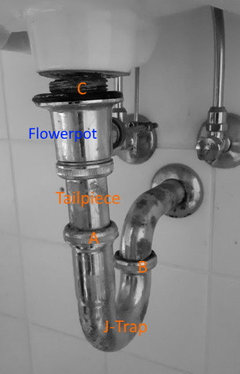
    1. Loosen nut A
    2. Loosen nut B
    3. Slide the j-trap off the tailpiece and the pipe that goes into the wall.
    4. Loosen the vertical nut on the rear of the flowerpot and remove the control rods that open and close the drain from above.
    5. From above, as weedmeister described put some plumbers putty around the drain hole.
    6. Push C into the bottom of the sink, screw the drain into C from above, and rotate the flowerpot to tighten the rubber gasket against the sink bottom. Position the flowerpot so the part that holds the control rods (step #4) faces the wall.
    7. Attach the J-trap to the tailpiece and pipe that goes into the wall. Tighten nuts A and B.
    8. Re-attach the drain control rods to the flowerpot and tighten the vertical nut.

    -- amateur

  • 7 years ago

    Have you removed the connecting rod for the drain stopper? If not, then do because it is probably putting a bind on trying to get everything lined up again. (FYI, I have removed all of that style of stopper and put in pop-up stoppers in my bathroom sinks. I love the pop-ups. Easy to install, easy to clean, one less problem to deal with under the sink.)

  • 7 years ago

    Thanks everyone for the replies and guides, I will try to fix it according to the steps and with the putty. What got me confused is that it does seem like part 'C' as in the picture above can be screwed but theres no way to move it (totally forgot about the drain stopper), and yes the part from above can be screwed as well so hopefully I will be able to fix it.

    The cleaning part will be a bit rought as theres lots of built in smudge there and the sink has holes to which I don't know how I will get to.

    Anyways I know I am really an amature at fixing things, but whenever something breaks I see an opportunity to learn something new and I'm really glad there are people out there who can help.

  • 7 years ago

    To be clear, the putty only goes on the flange, between it and the sink from above. You don't use any on that rubber bit you see in the picture.

  • 7 years ago

    Yes now I realized, was initially going to put some there too but not any more. After removing the flange I'm starting to think all the smudge built up there is actually the putty they used before. Going to be tricky to clean all that as the sink it self has quite a lot of a gap there and not sure what will fit in there. Also I think there might have been some sealant like silicone or such between the rubber part and the bottom since there are still traces of it.

  • 6 years ago

    All right, sorry to reply so late, usually not home because of work.

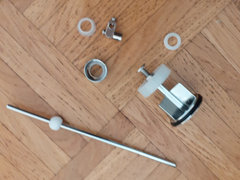
    Now I've gotten to the point as to take someones advice and buy a whole new thing all together. However now I'm facing another issue. I put it together, works really well as the water leakage stopped where it originally was, however I'm confused by the drain plug part. I tried to put it back like the original however now it keeps leaking water there. Could someone advise me what i'm doing wrong?

    This is how it looks now and the new parts I got. However no matter in what combination I'm putting it together the leakage won't stop.

    I tought that ball part and the plastic were supposed to stop the leakage but they don't.


  • 6 years ago

    just guessing:

    The cone part goes in first, fitting snuggly against the ball on the rod (short end first). Then the flat washer goes under the cap, and the cap holds the rod in place in the hole.


    Or: the cone part slips over the short end of the rod, larger size toward the ball. Put the short end with cone/rod in the drain hole. Place round flat washer over long end, then cap, then tighten against the drain.


    That other metal piece slips over the long end, and the vertical rod goes into the hole with the screw which is tightened down once adjusted for open and close.

  • 6 years ago

    Yeah the rods are no problem, an what you said I tried so far,.

    Literally I'm at the point where I have tried every possible combination of rod/ball and what came with it, but it just doesn't seem to work.

    I think I'm just going to get some closing end where tat should be and call it a day.