Software
Houzz Logo Print
mmmm12cozone5

Flexstone/Sentrel panels - calacatta white pictures

6 years ago
last modified: 6 years ago
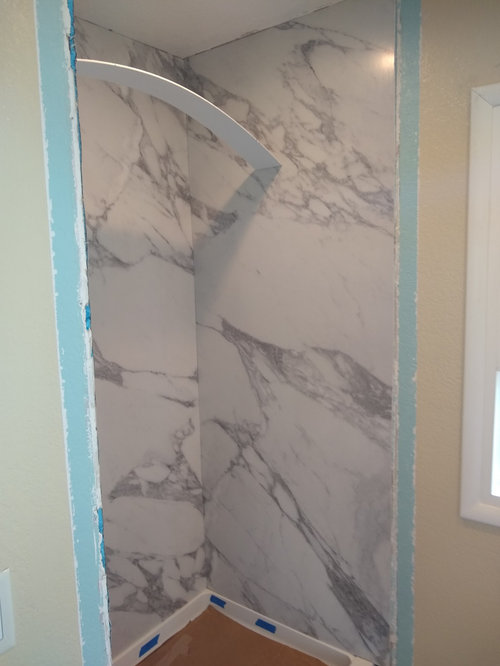
We have two of 3 walls glued and the third wall with niche is being glued tomorrow. So far so good.

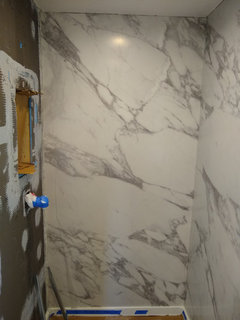
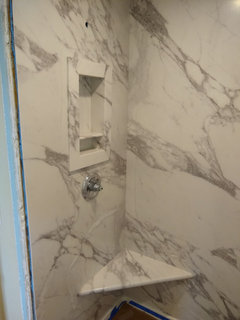
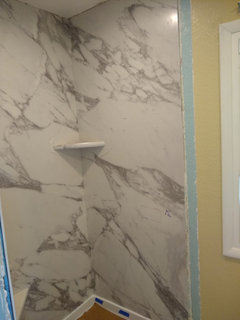
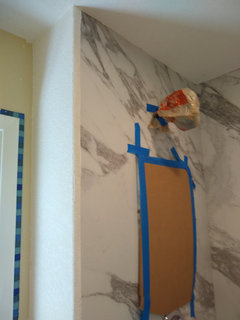
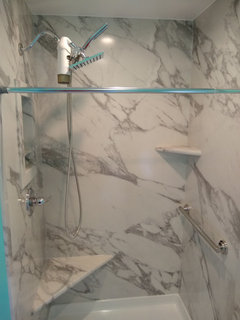
We were a little disappointed that all three panels had the same pattern. But found by flipping over one of the side panels and cutting the bottom and not the top we got some pattern match (an oval toward the top and toward the bottom) that you can see below.


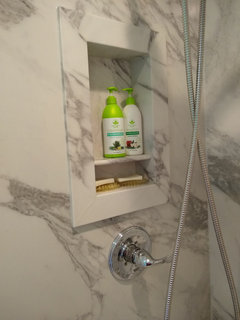
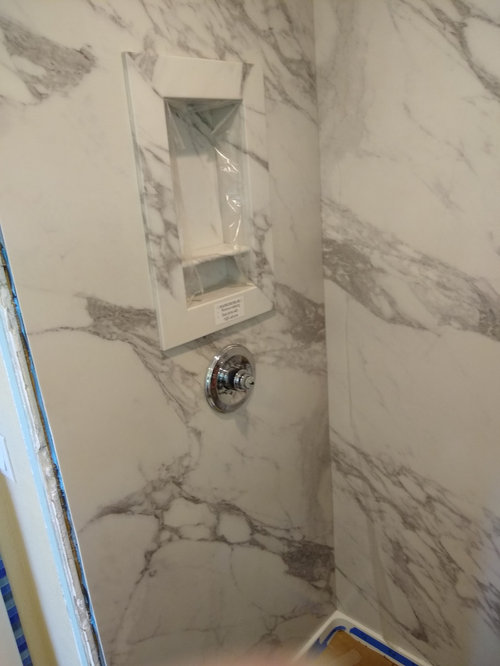
We also carefully placed the niche so that there is a bit of pattern match at the bottom right corner. We used the old handset to make sure our spacing was good before cutting the niche hole.


There are end pieces that will trim out the edges but we need some drywall work first. Also will be installing a suspended corner seat and maybe a corner shelf. Not sure yet if we will use the shelf.

Comments (20)

  • 6 years ago
    last modified: 6 years ago
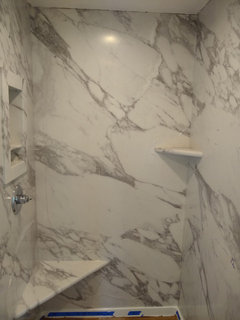
    This is the back wall. Very pleased that we got some pattern match to the right wall

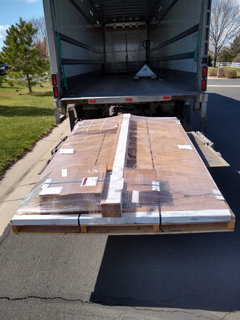
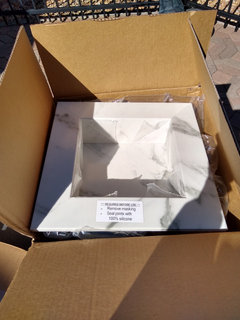
    This is what came with the kit.


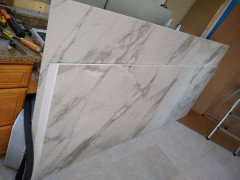
    3 panels cut to our shower size. We had to trim them with a jigsaw for major cuts and a hand planer for minor cuts.

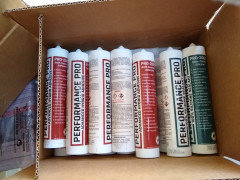
    They sent adhesive and color matched silicon. Even though I paid extra for extra adhesive it doesn't appear to be enough of either. We will likely have to buy adhesive at the hardware store and have them ship us more of the color matched silicon.

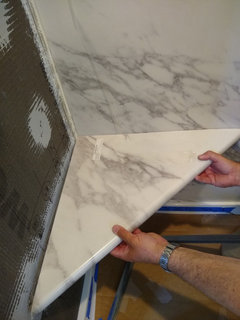
    This is the corner shelf and the corner seat. You can pick which side you want up, more or less patterned.

    This is their standard niche. We ordered the upgraded one with the shelf so they had to ship us that separately.

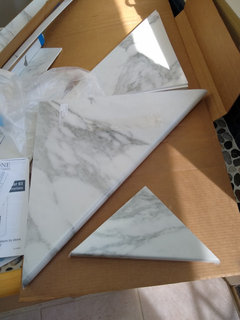
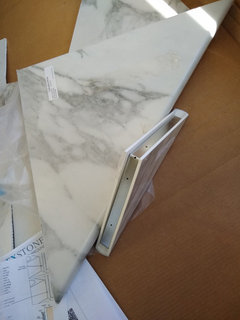
    Corner seat and corner shelf. The shelf comes with the kit. The seat is ordered additional. They both have an internal metal frame that is screwed to the wall. The seat needs backing the shelf does not. Then a clam shell fits over it. The seat has several triangles of the wall material that fit within the metal frame to give it rigidity.


    We ordered the 96" tall panels and the trim to not have a miter cut as we will not be putting trim on the ceiling, just on the outside walls.

  • 6 years ago
    last modified: 6 years ago


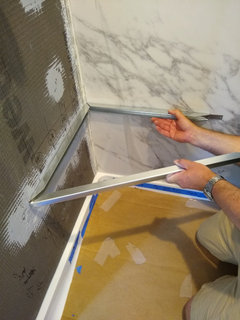
    The corner seat is a metal frame that is screwed into the wall. They have cut pieces of their wall material in triangles to fill the frame. Then the clam shell fits over it.

    You trim off some of the corner seat to get it to fit at the right angle.

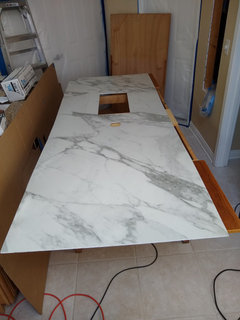
    We set up a table with extension leaves as a work space. It already had a damaged surface so we didn't worry about protecting it. At first we had the table center piece in place so it was a solid table, but then found to cut out the center holes on the plumbing wall it was better to have it out.


  • 6 years ago
    last modified: 6 years ago

    They have "save yourself pieces" like top trim in case your lines are bad and interior corner trim in case you didn't get a good corner cut. So far we think we don't need those. With the hand planer it isn't hard to get any high spots cut down and get a very close fit. Also you can write on the panels with permanent markers and just wipe it off with alcohol so if you are patient with marking and planing any high spots it works out. They also sent corner guards that go behind the panels in the corners for water proofing.

    We were looking at solid surface panels. These are solid plastic with a picture on top. The picture is very high quality and the panels are semi-rigid, lightweight and easy to work with. The hardest part is the height. You can order reduced height ones or full to the ceiling (96") ones. We should have taped off the top of our shower base sooner as getting them in and out may have put some small scratches in it. We had bought the base before the panels so did not get their pattern matched base but instead a swanstone base.

    The company offers 3 free samples which clinched the deal because we felt the material was very high quality.

  • 6 years ago
    last modified: 6 years ago

    The corner seat and corner shelf are in. We peeled back the protective plastic film to caulk everything. So any wrinkles or peeled plastic marks are the protective film that we are leaving on until the drywall work is done.

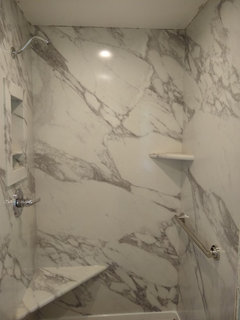
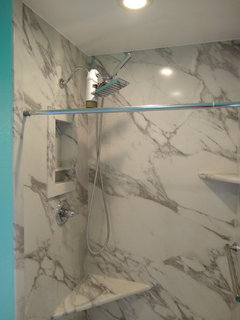
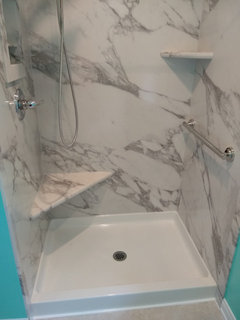
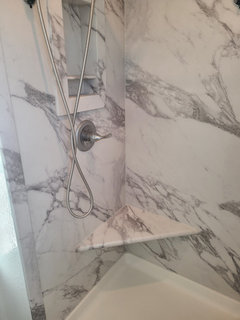
    I think the pattern line up went really well. The plumbing wall niche and corner seat both have pattern matches into the wall.

    The back panel looks very nice.

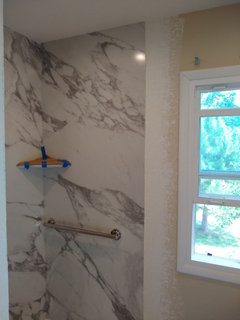
    Also the back right corner has some good pattern matches. You can see our permanent marker writing where we have laid out where the grab bar will go.

    Permanent marker can be wiped off the product easily with alcohol so they encourage you to write your measurments on it as you go.

    Getting a really tight fit at all the seams was fairly easy with a hand planer. My husband marked all the high spots with the permanent marker and widdled them down for a good fit. We are still on the first tube of caulk so the two they sent were plenty.

  • 6 years ago

    Thank you for posting! I just ordered samples to see if I'll like it. I do like the ease of installation but the cost would be more than tile & materials. We'll see!

    mmmm12COzone5 thanked MIa
  • 6 years ago
    last modified: 6 years ago

    Mia,

    What colors did you get?


    Originally, we started out with a guy installing tile in this shower. But the work quality wasn't as we had hoped and then he decided to quit. So we had to pull out some of his work and decided to install something ourselves instead of hiring another person.


    It has worked out really well. I couldn't be more pleased with it. And we know how well everything was done. This should be a lifetime shower for us (we hope).


    With materials and installation tile was alot more. But with just materials I think the cost was about even or maybe slightly more for this. However, I can't stress enough how pleased we are not to have to watch out for quality problems. We know exactly how everything was done because my husband did it all himself. Also the skills needed are cut and paste, with a whole lot of patience to be sure it is all exact. With a cost of $1466 (48"x36"x96" shower kit plus niche with shelf and corner seat) for everything from flexstone/sentrel we are pretty happy. The base, backerboard, plumbing fixtures, grab bar and shower door/curtain we bought locally so aren't included in this figure.


    Our previous tile shower in this room leaked at the corner, behind the tile into the wall. I suspect it was because the weep holes in the base were closed up. Same thing with the shower we originally replaced it with. This is the third shower in this location and I am hoping it is a lifetime shower (for as long as we own the house).


    We did tile in another a bathroom in 2017 and the grout on that is cracked and needs to be resealed. We are using it while this one is redone so only found the problem when we started this remodel. As a result we have shower curtains taped over the tile until we can get it fixed. Having found that in one we so recently had redone we are doubley glad this isn't tile.


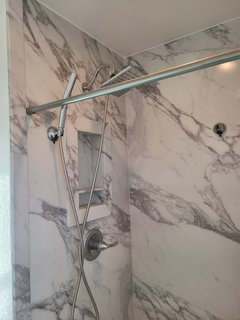
    We are older so my husband does something and then waits a few days to a week before doing the next thing. He just did the plumbing cartridge replacement, the shower arm and the grab bar this morning. This is the first picture I've posted with the plastic protective film pulled off.


    Next step is to get a drywall guy to repair the texture and drywall that was damaged in our previous shower install.

  • 6 years ago
    last modified: 6 years ago

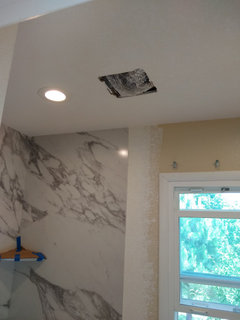
    Yeah! Drywall patch, replace and texture is done! We are getting closer to using this shower.


    When he patched the damage to the ceiling he retextured the whole ceiling.


    The texture match looks really good. The only part I'm not wild about is this corner.


    But the trim should extend to the corner and then if we caulk and then paint the caulk between the trim and the corner it should look OK. Also there is a noticeable line in the corner where the new texture stops and the old is. I'm assuming we can sand that line out once it is dry.

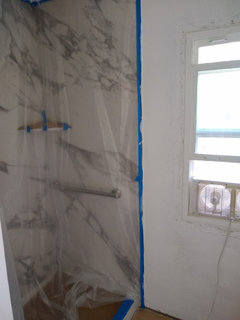
    We covered the walls with plastic and the base, corner seat, corner shelf and niche with cardboard so they wouldn't get damaged if he hit them with his tools.

  • 6 years ago

    Walls and ceiling primed (almost). Still a few places we can see through to the drywall compound so it will have to be touched up.


    Now the fun (horror) of picking paint colors. My old color Benjamin Moore Lady Finger doesn't look right with the new shower.

    I'm sampling colors from ECOS paint so as not to run into the problem we had with our other bathroom where the paint never cured right (smelled chemical for over a year) and we eventually had to take the drywall out.

    Once we got new drywall installed we used the primer and white paint from ECOS. I had intended to do a pretty color but now I'm remembering why we didn't. We had no luck with ECOS matching a Benjamin Moore color and we didn't like any of the samples we were sent. I am noticing that the ECOS samples don't match their color chips from the fan deck very well so that is discouraging. I called ECOS to ask if I should rely on the sample color or the fan deck color and they said the sample color. I'm trying again with 6 new sample colors.

    Will I end up with gray which is the obvious choice? Or will I go out on my own with a non-trendy choice. I have some grey samples coming but also some more daring choices.

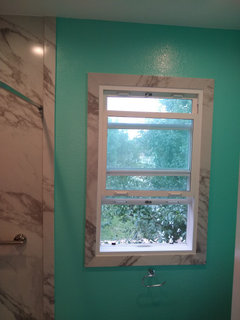
    We took the window trim off because there tends to be a cold draft coming in during the winter and the trim was not in good shape. It appears the window was well insulated as clearly we had done this before (hence the trim a little beat up). We are tempted to use the left over shower trim around the window but then that would give it a marble frame. Hmmm...... Will probably wait until the last minute to decide, after everything is painted. Still have no idea why this window has a cold draft.

  • 6 years ago
    last modified: 6 years ago

    This running document is really help for me tracking timing. It shows the drywall mud went in 16 days ago. About 6 days ago we did the first priming. So there were 10 days for it to dry completely. But there was still a small sweet smell when you put your nose up to it or it was closed over night. We figured it was just the dust on top. However we tested the ECOS primer first on a piece of trim and it dried odor free. Yesterday, accidentally, my husband used a different primer to fill in the spots on the ceiling. This was an untested primer. However it has also dried odor free on the paint stir stick.

    In sniffing the walls with new mud and texture plus ecos primer it still has a sweet smell of drywall mud. I'm not detecting it on the primer over old paint walls.

    The drywall guy had put down the mud in the evening and came back the next morning to texture. The wall mud appeared dry and the texture is such a light layer that it is hard to imagine it couldn't have cured through the texture. Now have to decide whether to paint or continue to wait for the smell to dissipate.

  • 5 years ago
    last modified: 5 years ago

    We moved back into the bathroom today. The Flexstone/Sentrel was the easiest part of the process. Very hard to get a full picture as it is a small room.

    We used a Swanstone base from Home Depot.

    We have a water filter on the shower. Right now we are using a shower curtain. Have to decide if we dislike it enough to get a shower door.

    The niche (stuff on it for scale).

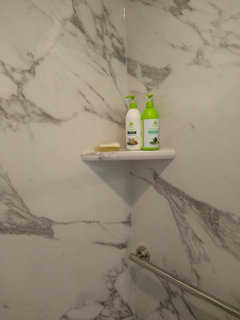
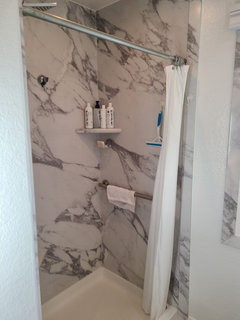
    The corner shelf (stuff on it for scale) and grab bar.

    We took the panels right to the ceiling so had an extra piece of trim. We decided to use it around the window.


  • 5 years ago

    Thank you for posting this! We are considering Flexstone/Sentrel panels and have received our samples. Seeing a DIY installation in such detail has been great! We definitely need the 96" tall panels and unmitered trim pieces -- was it difficult to special order?

    mmmm12COzone5 thanked Amy
  • 5 years ago

    Hi Amy,

    No, it was really easy. Just call them or email them and tell them what you are interested in. They then sent me a detailed quote via email. I called and asked some questions and they provided some suggestions like the corner seat, niche with shelf instead of the standard and the non-mitered corners so I could go to the ceiling without the edging. However I have to say we spent alot of time getting that upper seam perfect so maybe the upper trim isn't such a bad idea.


    Multiple corner shelves instead of a niche would have made things easier also. Installing and caulking a corner shelf just less work.


    Also I highly suggest you get the silicon caulking tool in advance. We didn't get it until the end and it would have made our lives alot easier.

    https://www.amazon.com/Caulking-Silicone-Finishing-Skirting-Replaceable/dp/B085621M34/ref=asc_df_B085621M34/?tag=hyprod-20&linkCode=df0&hvadid=416925996615&hvpos=&hvnetw=g&hvrand=7132673786943552750&hvpone=&hvptwo=&hvqmt=&hvdev=c&hvdvcmdl=&hvlocint=&hvlocphy=9028725&hvtargid=pla-908387383625&psc=1&tag=&ref=&adgrpid=94306392952&hvpone=&hvptwo=&hvadid=416925996615&hvpos=&hvnetw=g&hvrand=7132673786943552750&hvqmt=&hvdev=c&hvdvcmdl=&hvlocint=&hvlocphy=9028725&hvtargid=pla-908387383625

  • 5 years ago
    last modified: 5 years ago

    Who did you call--Flexstone or Sentrel. Sentrel only has a "find a dealer" form to fill out and submit.

    mmmm12COzone5 thanked cindy compton
  • 5 years ago
    last modified: 5 years ago

    I called Flexstone but then they had me order through the Sentrel person. It is all one company in the same location so you can call either. I told them what I wanted, they told me some options that I didn't know about (like the corner seat and enhanced niche), sent me a detailed quote and then I called them back and placed the order over the phone. Don't be afraid to ask about things you are interested in that might not be on the web site. They can customize and they have options that you might not think of.

  • 2 years ago

    Angela,


    It is great! We do squeegee off the seat so the water doesn't dry there. We bought some of those suction cup hooks and hang the squeegee in the shower. It is easy to clean but really doesn't need much in terms of cleaning. Nothing like grout. Make sure to buy a caulking tool kit off amazon so you can get perfect caulk lines easily.


    It pretty much looks like new.

  • 2 years ago

    Angela,


    Here are some pictures of it today, as we use it, not staged for show.


    We use the corner shelf for shampoos. The grab bar to hang the wash cloth to dry and to have something to hold on to for balance. The extra suction cup hook is where we hang our towels while showering. There is a suction cup soap holder below the corner shelf. This works great for not getting soap on the shelf or in the niche. We also have a suction cup extra hand wand hanger on the back wall that I used when showering in a wheelchair.


    The corner seat is my favorite thing. It is under the rain shower head so I can sit there with water falling in my lap and wash my feet. The niche turned out to be unused. If we kept soap in it then it needed cleaning. The corner shelf was handier for shampoo since I'm facing away from the shower head when I need it.


    The caulk under the corner shelf is really hard to clean due to how far back it is. It is probably what we will have to replace first as it may have the start of some mold on it. The rest of it has had no problem. I think under the corner seat holds the humidity longer than the rest of the shower.


    The 96" panels look great!

  • 2 years ago

    This is amazing followup. Thanks so much!!

    mmmm12COzone5 thanked Angela Hufford
  • 2 years ago

    Thank you for the detailed walk through! It’s been super helpful:)

    mmmm12COzone5 thanked Drew M
  • 2 years ago
    last modified: 2 years ago

    Glad it was useful. If you end up doing I would love to see pics. Home Depot and Lowes also have lots of finished pics in the reviews if you want to see how the various patterns look.