Software
Houzz Logo Print
danachit

Installing Hardwood Patch Ourselves, open to helpful suggestions!

5 years ago

We are having our kitchen demo'ed tomorrow and having new cabinets put in five days later. We are moving a cab peninsula down 18 inches, which will expose a 18" by 53" floor spot that will have no hardwood. We have 3 1/4" and 5" hickory hardwood floors, 3/4 thick and prefinished.


Somehow I let this little logistic slip and now I'm stuck. I need flooring down before the cabs go in and this is an area where contractors stay booked for weeks on end. I have 5 days to get this done.


I found the wood and it's a match and a fit. We can rent the flooring stapler gun and air compressor, I can get underlayment.


We did intricate trim work in our two bathroom remodels so we're comfortable with wood work but we've never done floors


The threading in....can you give tips on that part? That was the part I didn't realize I'd have to do.


Any tips at all would be appreciated!!

Comments (16)

  • PRO
    5 years ago

    Need photos of the area.

  • 5 years ago
    last modified: 5 years ago

    @ G&SFloorService here ya go!


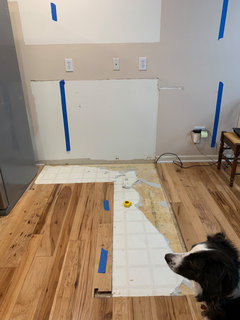
    The patch will be right where the island is.....as it is getting shifted 18" to the right. So part of the current flooring will be underneath the cabinet. Basically a 18 x 53 inch patch. We are stuck. We have to do it ourselves. There is no one to do it. The only tools we have here are a circular saw, a multi tool (oscillating saw) and all sorts of hand tools, and a rented nail stablizer/compressor. As I said, we spent 20+ hours doing intricate trim work and did a great job working side by side. I just hope we're still speaking after this!

  • PRO
    5 years ago

    You will need to remove the island before I can walk you through it. The tools you have will work fine. You will need a sharp chisel and a demolition flathead screwdriver., also.

  • 5 years ago
    last modified: 5 years ago

    We've never heard of a demolition flathead screwdriver....? Just looked it up, okay, check, will get that today! Found a milwaukee in the next mountain town up. THANK YOU so much, we'll get the chisel and demo driver today and be ready. I'll send photos later today after the demo. I can't tell you how much I appreciate this!! If you lived here, I'd be baking you an apple pie!

  • 5 years ago

    Okay, tools bought and will be picked up today.

  • 5 years ago


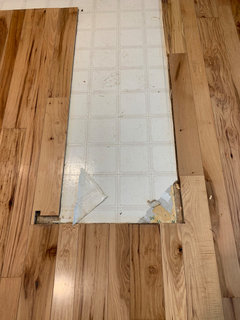
    This is the patch. 18x 53". there is one layer of vinyl and one layer of a 1/4" plywood. There will be an island cabinet butted up against this just to the right.

  • PRO
    5 years ago

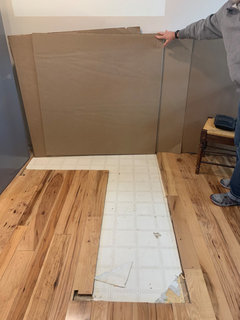
    Can you post a photo zoomed out. what is the distance from the bottom of your patch to the adjacent wall?

  • 5 years ago

    From the raw edge near me and the camera to the wall is 71". We need to pull up that vinyl and thin wood underneath. getting a heat gun in a bit.


  • PRO
    5 years ago
    last modified: 5 years ago

    Distance from this edge to wall going down is 71”? Or is that towards wall cabinets?

    dors the vinyl and Luan run under the hardwood or up against it?


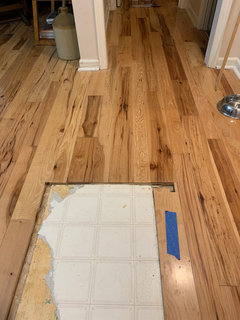
    i need image of the opposite wall. It is not in the picture.

  • 5 years ago

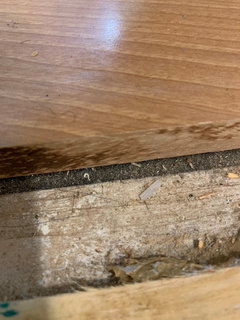
    The edge close to the camera to the wall is 71". The cabinets will be covering up some of that, 24 inches I think? So almost 50 inches will be exposed out from the cabinets. The hickory has some kind of underlayment, you can see in the pic. We had pulled up carpet and had the hickory down in 2010.. Under the old cabs is the vinyl and some kind of thin wood. We now have the chisels, demolition screwdriver, oscillating saw, circular saw with fine tooth blade and heat gun. And the will to do this right!


  • PRO
    5 years ago
    last modified: 5 years ago

    You have a big job ahead of you with the flooring running into the hallway. This is also, random width with a lot of long lengths. You have all the different widths? Looks to be 3 1/4", 4, 5 &6" wide. If, not you will need to track it down.

    The plywood should easily pull out. If not, cut a 4"x4" window near the corners with your multi-tool. You can then start prying it up with a flat bar.


    It also, looks like there is felt underlayment used under the hickory. You will need to remove a piece of flooring to confirm. You will need to get matching underlayment.

  • 5 years ago

    It's 3 1/4" and 5". I still have my receipt. We had to look hard but found the same widths, finished and thickness. And they fit together. We gathered the tools you mentioned and will be making a paint tape plan, then laying out the boards and hoping that we're still speaking to each other at the end of this. :)


  • PRO
    5 years ago

    Because it is hickory and random width. You will need to tackle this one row at a time to avoid any spring back. If, the rows spring close, you will not be able to install a full width board. The opening will be too small.


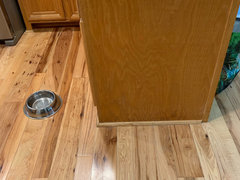
    The photo with the dog, start with that 5” width closest to the dog. That will be your starting point. Remove any partial boards and replace with full boards, blind nail with staples.

  • 5 years ago

    G & S Floor Service, I want to give you an update. So far so good. We got all the tools you suggested and started on the 5" board. We cut out every other one a ways up and threaded in the new boards, rubber malleting them in and gun stapling them in. The first staple gun was broken! All that prep work, tearing out the thread boards....and I had to go another town over to find a gun! But we kept on. We're down to that last board which can't get stapled in cause it's in the middle of the floor. So we're doing a detailed template and cutting the board to fit perfectly. Then it will all be done, and if I say so myself, no will will ever know it was a patch! Thank you for your suggestions!

  • 5 years ago

    I really appreciate your help! We're finally down to the last board and used your advice on the loctite. Thank you for the help!