
Search results for "Accumulating" in Home Design Ideas
 Nancy Hoff Barsotti Interior Design
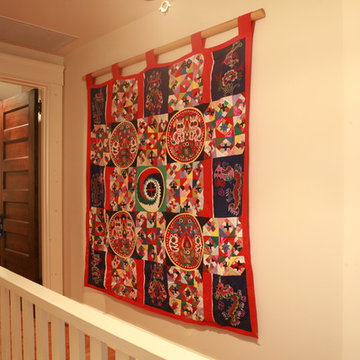
Former servants' quarters, the renovation of this third floor allowed space for treasures accumulated in world travels.
This hand-made quilt was bought in Xian, China. According to lore, it's three-diemensional colorful patches ward off evil spirits from baby's beds.
 Progressive Design Build
Challenge
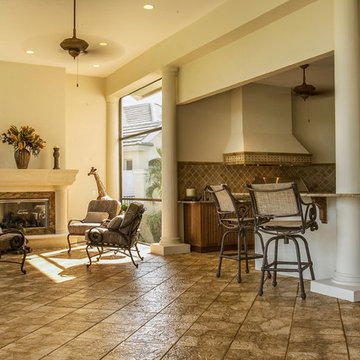
As part-time residents of this Bonita Springs home, our clients were looking to update their outdoor entertainment area. They also planned to be away for the summer during the remodel and needed their renovation project to be finished prior to their return for the winter.
Their needs included:
Changing the color pallet to a monochromatic scheme, removing the yellow brick pavers, adding an outdoor kitchen area, adding an outdoor fireplace, resurfacing the pool and updating the tile, installing a new screen enclosure, and creating privacy from the neighbors, particularly the main sitting areas, pool and outdoor kitchen.
Although there was already a 1,221 sq. ft. lanai under the roof, it lacked functionality needed by the homeowners. Most of its amenities were located at one end of the lanai, and lacked privacy that the homeowners valued.
Solution
The final project design required two additions to the lanai area adding an accumulative 265 sq. ft. to the existing space expanding their sitting area and accommodating a much-needed outdoor kitchen. The new additions also needed to blend with the home’s existing style.
Addition #1—Sitting Area:
The first addition added approximately 145 sq. ft. to the end of the lanai. This allowed Progressive Design Build to tie into the existing gable room for the new space and create privacy from the neighbors.
Addition #2—Outdoor Kitchen:
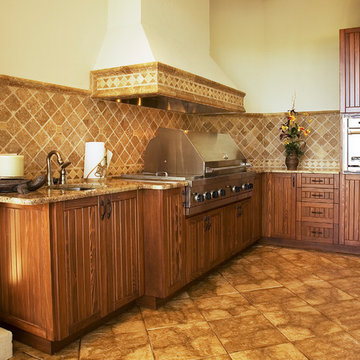
The second addition was a bump out that added approximately 120 sq. ft. to the end of the house close to the interior kitchen. This allowed the client to add an outdoor over and 52” Viking grill (with a side burner) to their outdoor living space. Other amenities included a new sink and under counter fridge, granite countertops, tumbled stone stile and Cypress cabinetry, custom-fabricated with marine grade plywood boxes and marine grade finishes to withstand moisture, common in the Bonita Bay community.
Special attention was given to the preparation area on either side of the stove, the landing area next to the oven and the serving counter behind the bar. Bar seating was added to the outdoor kitchen, allowing guests to visit with the cook comfortably and easily.
Brick Pavers
During the design phase, we discovered that the original brick pavers were set in sand, with no concrete pad below. Consequently, the retaining wall and several pavers were starting to fail, caused by the shifting sands. To remedy the problem, we installed a new concrete deck and laid new nonslip pavers on top of the deck—ideal for wet area applications.
Pool Renovations
To dramatically improve the enjoyment and ambiance of their pool, Progressive Design Build completely re-plumbed it, putting in additional lighting and new water features. New decorative pool tile, coping, and a paver deck were also installed around the pool. The pool finish chosen by our clients was a nice tropical blue color.
Screen Enclosure
A new screen enclosure was installed in compliance with new local building codes, making it more stable and solid than the existing one. The color change from white to bronze coordinated well with the homeowners’ new color scheme; and the location of the service door and stairs provided convenient access to the new pool equipment.
Results
This project was completed on time and within budget before these homeowners returned for their winter holiday. They were thrilled with the weekly communication, which included two-way phone calls and email photo sharing. They always knew where their project was in the construction process and what was happening at all times—providing security and peace of mind.
 Organized Zone Inc.
We are here to tackle the most cluttered spaces in your house! Whether it’s a closet in the basement where things have been accumulating for years or your entire house has been overrun with clutter, we can help! In addition to getting you on track, we are available for ongoing maintenance to make sure that your new organizing strategies persist over time. Price $75 per hour or prepaid 6 hours for $400
Find the right local pro for your project
 HARRIS SERVICES
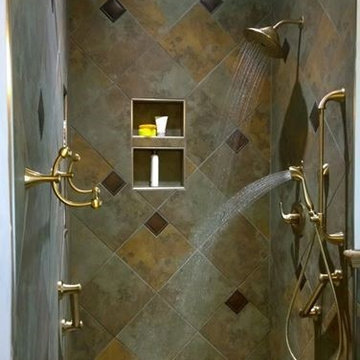
Alcove shower - traditional beige tile, gray tile and ceramic tile mosaic tile floor and multicolored floor alcove shower idea in Indianapolis with multicolored walls
 tish fierro hess
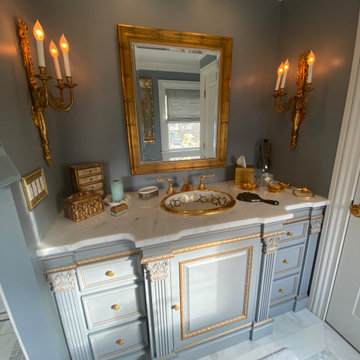
A Luxurious Master Bath years in the making. Although it only took 3 months to create this gorgeous space, it took awhile to accumulate all of special pieces that make up the whole. From the hand painted sink, gold sconces, hand painted cabinet, gold toilet paper holder etc. Every where you turn there is something beautiful to behold. A wall was removed between the original very small shower room and dressing area to create this expansive space.
 Progressive Design Build
Challenge
As part-time residents of this Bonita Springs home, our clients were looking to update their outdoor entertainment area. They also planned to be away for the summer during the remodel and needed their renovation project to be finished prior to their return for the winter.
Their needs included:
Changing the color pallet to a monochromatic scheme, removing the yellow brick pavers, adding an outdoor kitchen area, adding an outdoor fireplace, resurfacing the pool and updating the tile, installing a new screen enclosure, and creating privacy from the neighbors, particularly the main sitting areas, pool and outdoor kitchen.
Although there was already a 1,221 sq. ft. lanai under the roof, it lacked functionality needed by the homeowners. Most of its amenities were located at one end of the lanai, and lacked privacy that the homeowners valued.
Solution
The final project design required two additions to the lanai area adding an accumulative 265 sq. ft. to the existing space expanding their sitting area and accommodating a much-needed outdoor kitchen. The new additions also needed to blend with the home’s existing style.
Addition #1—Sitting Area:
The first addition added approximately 145 sq. ft. to the end of the lanai. This allowed Progressive Design Build to tie into the existing gable room for the new space and create privacy from the neighbors.
Addition #2—Outdoor Kitchen:
The second addition was a bump out that added approximately 120 sq. ft. to the end of the house close to the interior kitchen. This allowed the client to add an outdoor over and 52” Viking grill (with a side burner) to their outdoor living space. Other amenities included a new sink and under counter fridge, granite countertops, tumbled stone stile and Cypress cabinetry, custom-fabricated with marine grade plywood boxes and marine grade finishes to withstand moisture, common in the Bonita Bay community.
Special attention was given to the preparation area on either side of the stove, the landing area next to the oven and the serving counter behind the bar. Bar seating was added to the outdoor kitchen, allowing guests to visit with the cook comfortably and easily.
Brick Pavers
During the design phase, we discovered that the original brick pavers were set in sand, with no concrete pad below. Consequently, the retaining wall and several pavers were starting to fail, caused by the shifting sands. To remedy the problem, we installed a new concrete deck and laid new nonslip pavers on top of the deck—ideal for wet area applications.
Pool Renovations
To dramatically improve the enjoyment and ambiance of their pool, Progressive Design Build completely re-plumbed it, putting in additional lighting and new water features. New decorative pool tile, coping, and a paver deck were also installed around the pool. The pool finish chosen by our clients was a nice tropical blue color.
Screen Enclosure
A new screen enclosure was installed in compliance with new local building codes, making it more stable and solid than the existing one. The color change from white to bronze coordinated well with the homeowners’ new color scheme; and the location of the service door and stairs provided convenient access to the new pool equipment.
Results
This project was completed on time and within budget before these homeowners returned for their winter holiday. They were thrilled with the weekly communication, which included two-way phone calls and email photo sharing. They always knew where their project was in the construction process and what was happening at all times—providing security and peace of mind.
 Xpand Inc. | Homes of Xcellence
At the outset, this project began with the transformation of a 2-car attached garage. The goal was to create a mudroom, an exercise room, and a breezeway to seamlessly connect the spacious detached garage with the main part of the house. Additionally, the project involved partial roof removal and the addition of a new front entry.
But then came an unexpected twist – scope creep.
We found ourselves veering away from the initial client-supplied architectural plans. After numerous consultations with the clients and several iterations of the design, we arrived at a significantly improved plan for the remodel and addition.
Our journey commenced with the demolition of almost the entire former 2-car garage, making space for a new, oversized 3-car garage measuring 40′ x 28′. This garage was strategically placed between the existing house and the large detached garage. We introduced a custom low-sloped flat roof, designed to address historical drainage issues.
To mitigate water pooling, we created a custom concrete step at the back corner of the garage, equipped with a sturdy metal grate that sits flush with the step. We also installed a PVC drainage system, commencing at the step and running beneath a newly designed patio, ultimately draining into the yard. These measures have significantly reduced water accumulation around the house.
The new garage boasts several features, including Longboard aluminum siding, custom full glass garage doors, interior drywall finished to a level 4, an abundance of can lights, an epoxy floor coating, vinyl base trim, a new forced air garage heater, and more.
The clients also requested a designated space for their three kids and their friends to enjoy, thus giving birth to the “Kid Zone.” We partitioned a section of the existing oversized garage, resulting in a space measuring approximately 22′ x 32′, brimming with entertainment possibilities. To enhance control over the temperature in the Kid Zone, we collaborated with our licensed HVAC partner to install a cold weather mini-split system.
One of the most significant challenges was the modernization and consolidation of the home’s main electrical systems. We reconfigured and combined 6-7 different electrical panels into just two. One panel serves the main house, while the second is dedicated to backup power from a generator. These panels, along with the boiler for the in-floor heating system, are housed in a newly constructed mechanical room within the Kid Zone.
Inside the main house, we completed various tasks, such as removing the ceiling in the hallway from the new garage to address prior water damage, improve insulation, and rework electrical and HVAC systems. We also replaced the ceiling from the front door to the base of the stairs, adding new can lighting and enhancing insulation. Skilled drywall specialists then installed and finished new drywall to a level 5 standard.
The exterior of the house underwent a complete overhaul. Before installing new roofing on the entire house and garage, we modified an existing flat roof by adding custom lumber and plywood to enhance the pitch, preventing future ice dams. A new rubber roof was expertly installed on the oversized 3-car garage, and the flat roof section we re-framed.
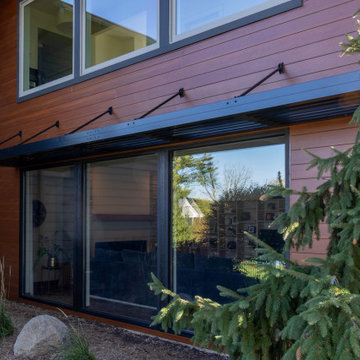
Our meticulous exterior team removed old white aluminum soffit, fascia, and gutters, replacing them with new framing to accommodate Longboard soffit material. This task was particularly challenging due to the age of the house and the non-standard wall and roof framing. Our skilled exterior subcontractors ensured a perfect fit.
Near the pool area, we discovered severe rot and decay from years of water intrusion. After informing the homeowners, we ordered and installed five new commercial-style block framed windows and a custom 8′ high Anderson patio door. This involved careful removal and replacement of window headers from the outside to avoid disturbing the finished part of the house. We reframed the large openings to fit the new windows, and our skilled trim carpenters installed new walnut casing, base, and window sills.
In total, we replaced around 900 lineal feet of soffit and installed approximately 32 squares of aluminum siding. The entire house was meticulously prepped, repaired, and painted according to the client’s chosen color.
Throughout the project, we incorporated numerous custom touches and unique design elements, some of which you can see in the pictures. Our team also addressed various unforeseen challenges, from soil issues to rot and decay repair, roof leaks, drainage problems, electrical and HVAC complexities, and much more.
At Xpand Inc., we take pride in making it all happen, turning your remodeling and renovation dreams into reality.
 MODIVO LIGHT
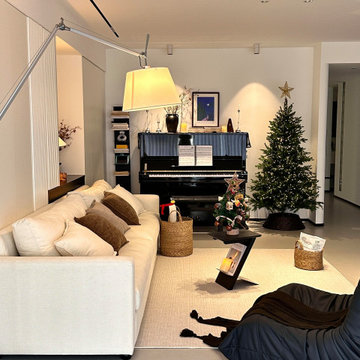
This is our first time decorating a house. Starting from knowing nothing at all to now having the hard decoration completed, we have experienced every emotion along the way—anxiety, doubt, tiredness, hesitation, joy, satisfaction, and touch. We learned and explored on our own, and bit by bit, we finished decorating our home. We’ve accumulated so much experience in this process, and now we want to share it, hoping it can be of a little help to all of you who are doing your own home decoration.
Preparations in Advance
1、Clarify your own ideas: Whether you are looking online, talking to designers, or copying ideas from friends' homes, you should have a clear vision of what your home should look like before designing—such as the style, color scheme, and elements to be used... It is crucial to avoid wanting to install everything that looks good in others' homes in your own. This way, you can clearly put forward your requirements during the design and decoration process, and also avoid frequent revisions to the plan, which may lead to unnecessary rework.
2、Understand your own needs: You need to first figure out the needs of your family, such as how many people live in the house permanently, how many rooms are needed, everyone's living habits, and daily preferences... A home is always for living in, so functionality is always the most important. It is best to list these needs and give priority to meeting them during the design and decoration. This way, you won't find out after decoration that many necessary things are missing, while a bunch of installed things are useless.
3、Determine your budget: There are ways to decorate with more money, and also ways to do it with less. No matter how much money you have, the decorated house can be both beautiful and practical. Therefore, it is essential to decide exactly how much you want to spend on decoration. In every link, such as designing the plan, making a budget table, selecting materials, and construction, you should act in accordance with your own budget.
4、Understand the advantages and disadvantages of your house: There is no perfect house in the world, and every house has its pros and cons. Your design plan should avoid its shortcomings and amplify its advantages. I once wrote an article about the drawbacks of my house ("My house is not perfect, but I still want to find ways to save it"), so we figured out solutions to these problems during the decoration.
5、Learn as much decoration knowledge as possible in advance: Although you can pick up this knowledge in the subsequent decoration process, it is better to learn more beforehand. This will make you much more calm when facing problems.
6、Know your strengths: Before decoration, you must be clear about what you are good at and what you are not. If you are good at design, do the design yourself; if you are skilled at bargaining, go buy building materials on your own; if you have strong hands-on ability, you can even do the decoration and repairs yourself... During the decoration process, you should focus on what you are good at, and leave what you are not good at to others.
 Lindy Architect
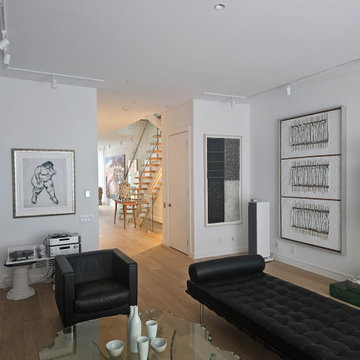
This project was never really about the architecture. It was about a family that collects — art, ceramics, books, ideas — and needed a home that could hold all of that without turning into a museum.
The existing unit had good bones: generous ceiling heights, a floating stair, and enough square footage to work with. What it lacked was a coherent logic — a way of moving through the space that felt intentional, where each transition earned its moment.
We rebuilt that logic from the ground up.
The ground floor is organized around a single corridor that runs from the kitchen island through to the living room, with the staircase serving as the spine of the whole sequence. Rather than treating the stair as purely functional, we kept the glass balustrade open and lit the treads from below, so it reads as a light source as much as a passage. The console beneath it became a natural landing for ceramics and found objects — not styled, just placed.
In the living room, the brief was simple: make room for a very large painting without the room feeling like a gallery. The answer was to keep everything else quiet — a white built-in that does its job, sheer linen curtains that diffuse the light, black leather chairs that anchor the space without competing. The painting does the rest.
Upstairs, the landing is lit by a skylight that washes the hallway in natural light through most of the day. We lined one side with a burl wood console and let the ceramics and framed works speak for themselves. The mix of abstract prints, a bold red canvas, and handmade vessels gives the corridor a rhythm that feels accumulated over time rather than installed all at once — because it was.
Throughout, the material palette is deliberately restrained: white oak floors, white walls, white millwork. The restraint isn't minimalism for its own sake — it's a backdrop. The owners bring the color, texture, and personality. Our job was to give them the right walls to hang things on.

 Sweet Smiling Landscape Design
When I came to this property not only was the landscape a scrappy mess the property also had some very real grading and drainage issues that were jeopardizing the safety of this house. As recent transplants from New Jerseys to Southern California these clients were in awe of all the plants they were seeing in their neighborhood. Living on the water at the Ventura harbor they wanted to be able to take full advantage or the outdoor lifestyle and cool ocean breeze. Being environmentally conscious citizens, these clients were very concerned that their garden was designed with sustainability as a leading factor. As they said in our initial consultation, “Would want or garden be part of the solution not part of the problem.”
This property is the last house on the bottom of a gently sloping street. All the water from the neighbor’s houses drain onto this property. When I came into this project the back yard sloped into the house. When it would rain the water would pool up against the house causing water damage. To address the drainage we employed several tactics. Firstly, we had to invert the slope in the back yard so that water would not pool against the house. We created a very minor slope going away from the house so that water drains away but so the patio area feels flat.
The back of the back yard had an existing retaining wall made out of shabby looking slump stone. In front of that retaining wall we created a beautiful natural stone retaining wall. This retain wall severs many purposes. One it works as a place to put some of the soil removed from the grading giving this project a smaller carbon foot print (moving soil of a site burns a lot of fossil fuel). The retaining wall also helps obscure the shabby existing retaining wall and allows for planting space above the footing from the existing retaining wall. The soil behind the ne retaining wall is slightly lower than the top of the wall so that when the run on water on from the neighbor’s property flows it is slowed down and absorbed before it has a chance to get near the house. Finally, the wall is at a height designed to serve as overflow seating as these clients intend to have occasional large parties and gatherings.
Other efforts made to help keep the house safe and dry are that we used permeable paving. With the hardscape being comprised of flag stone with gravel in-between water has a chance to soak into the ground so it does not flow into spots where it will pool up.
The final element to help keep the house dry is the addition of infiltration swales. Infiltration swales are depressions in the landscape that capture rain water. The down spouts on the sides of the houses are connected to pipe that goes under the ground and conveys the water to the swales. In this project it helps move rain water away from the house. In general, these Infiltration swales are a powerful element in creating sustainable landscapes. These swales capture pollutants that accumulate on the roof and in the landscape. Biology in the soil in the swales can break down these pollutants. When run of watered is not captured by soil on a property the dirty water flows into water ways and then the ocean were the biology that breaks down the pollutants is not as prolific. This is particularly important in this project as it drains directly into the harbor. The water that is absorbed in to the swales can replenish aquafers as well as increasing the water available to the plants planted in that area recusing the amount of water that is needed from irrigation.
When it came to the planting we went with a California friendly tropical theme. Using lots of succulents and plants with colorful foliage we created vibrant lush landscape that will have year around color. We planted densely (the images in the picture were taken only a month after installation). Taller drought tolerant plants to help regulate the temperature and loss of water from the plants below them. The dense plantings will help keep the garden, the house and even the neighborhood cooler on hot days, will provide spaces for birds to enjoy and will create an illusion of depth in a somewhat narrow space.
Today this garden is a space these homeowners can fully enjoy while having the peace of mind that their house is protected from flooding and they are helping the environment.

 China Chi Hardware Co.,Ltd.
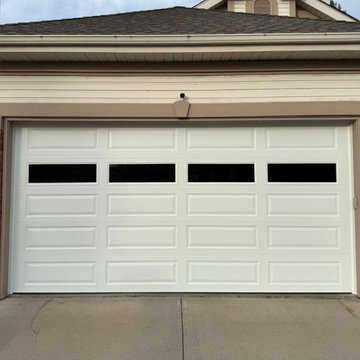
After 18 years of industry accumulation, Chi company ( https://www.chihw.com/) develops into professional wholesale garage door manufacturer & garage door hardware parts supplier, the main products include residential garage doors, industrial doors, door panels & garage door hardware. As the world-class garage door supplier, Chi focuses on improving product quality, continuously optimizing production processes, and gradually establishing a strong production system in key production processes such as stamping, die-casting, and machining.
Our products are exported mainly to USA, Mexico, Europe, Russia, Australia, New Zealand, Middle East etc. We had developed very quickly for its continuous products innovation, wide products range, very competitive price, on-time deliveries, extensive marketing and strong technical support.
Learn more: https://www.chihw.com/
 Talon Construction Inc.
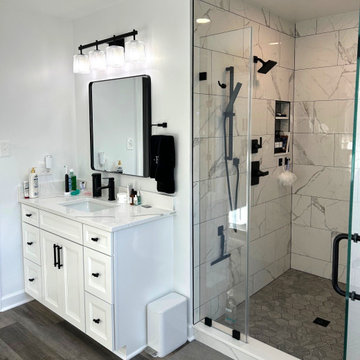
This primary bathroom remodel in Olney, Maryland, showcases a sophisticated transition from traditional architecture to a clean, modern aesthetic. The design centers on a high-contrast palette of crisp whites, deep blacks, and warm wood tones, creating a bright and functional sanctuary.
Design Highlights
Walk-In Shower: The curbless shower features large-format marble-veined wall tiles paired with a dark grey hexagonal mosaic floor. Matte black hardware, including a rain showerhead and a handheld wand, provides a bold, contemporary finish.
Vanity & Storage: Dual white shaker-style vanities are topped with white quartz counters featuring subtle grey veining. Minimalist matte black faucets and pulls tie the look together. A custom window bench with drawer storage sits beneath the large arched window, maximizing utility and seating.
Lighting & Fixtures: Modern four-light vanity fixtures with textured glass shades provide ample illumination. Rounded-corner black framed mirrors add a soft geometric touch to the workspace.
Flooring: Durable luxury vinyl plank (LVP) flooring in a multi-tonal wood finish adds warmth to the space and balances the cooler tones of the cabinetry and tile.
Architectural Features: The original arched window and vaulted ceiling were preserved and enhanced with custom plantation shutters, allowing for privacy without sacrificing the room's natural light.
Frequently Asked Questions
What are the benefits of using large-format tile in a shower?
Large-format tiles create a more seamless appearance by reducing the number of grout lines. This not only makes the space feel larger and more open but also significantly reduces the surface area where mold and mildew can accumulate, making the shower easier to clean.
Why choose matte black hardware over chrome or brushed nickel?
Matte black serves as a strong "anchor" in a white bathroom, providing a high-contrast, modern look that hides water spots and fingerprints more effectively than polished finishes. It pairs exceptionally well with various wood tones and stone patterns.
Is luxury vinyl plank (LVP) a good choice for a bathroom?
Yes, high-quality LVP is 100% waterproof, making it an ideal choice for bathrooms. It offers the aesthetic warmth of hardwood—which is susceptible to moisture damage—with the durability and slip resistance needed for a wet environment.
How does a custom window bench improve a bathroom layout?
Beyond providing a place to sit, a custom bench utilizes the often-underused space beneath a window for extra storage. It creates a cohesive, "built-in" look that ties the vanities together and adds a high-end, furniture-like quality to the room.
What is the advantage of a "design-build" approach for a remodel like this?
The design-build model integrates both the design and construction phases into a single contract. This ensures that the aesthetic vision stays within the established budget and allows for better communication between the designers and the craftsmen during the actual renovation.
 Katherine Stern Design
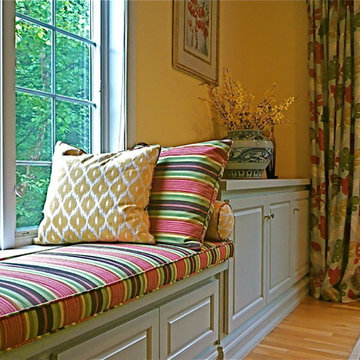
This large, light filled room for a family with young children did not have a single shelf or cabinet for the mounds of books, toys, videos and paraphernalia most families accumulate. Katherine wrapped two sides of the room in custom-built book cases and cabinets and a built-in window seat.
Window Treatments: Leatherwood Design Co.
 Just Add Paint
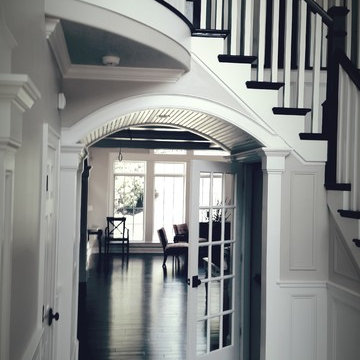
Just Add Paint was called into action to finish this gorgeous houzz after the original painting company sent in some unqualified painters and ended up leaving the job before completion. And it was a good thing - we were mortified to find patches that had been painted over before sanding, joints on the tray ceiling and throughout with excess caulk that had been sealed in with paint, fuzzy walls from low grade paint rollers, splatter all over brand new hardwood floors, and the list goes on, We used every trick in the book that we had accumulated from years of experience to get this one cleaned up. It ended up feeling more like a restoration than a repaint, and we easily the most challenging and satisfying project this year. Very proud of work the crew did on this one and happy to put our name on it. Photos by Grant "Shutterbug" Tankersley
 Builder Boy
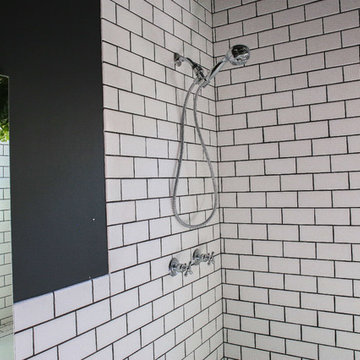
If you are a bold personality and want to incorporate the same essence into your bathrooms also, go for bold décor. And nothing can do this better than all-black tiles with not-so-jazzy prints on them. With such dark-toned bathroom tiles, incorporate stainless steel fixtures to make this space sleek and chic. You may also use some bold accents and furniture pieces such as black wooden window frames, bold dark mirror frame and a huge brass chandelier. If you like, you can also let a cute cactus stay in a corner, or hang a plant from a corner!
 Talon Construction Inc.
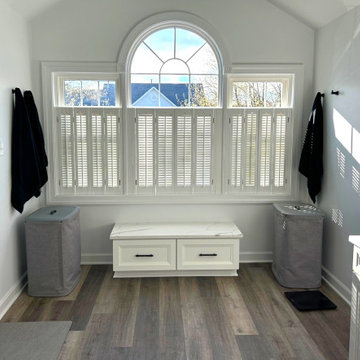
This primary bathroom remodel in Olney, Maryland, showcases a sophisticated transition from traditional architecture to a clean, modern aesthetic. The design centers on a high-contrast palette of crisp whites, deep blacks, and warm wood tones, creating a bright and functional sanctuary.
Design Highlights
Walk-In Shower: The curbless shower features large-format marble-veined wall tiles paired with a dark grey hexagonal mosaic floor. Matte black hardware, including a rain showerhead and a handheld wand, provides a bold, contemporary finish.
Vanity & Storage: Dual white shaker-style vanities are topped with white quartz counters featuring subtle grey veining. Minimalist matte black faucets and pulls tie the look together. A custom window bench with drawer storage sits beneath the large arched window, maximizing utility and seating.
Lighting & Fixtures: Modern four-light vanity fixtures with textured glass shades provide ample illumination. Rounded-corner black framed mirrors add a soft geometric touch to the workspace.
Flooring: Durable luxury vinyl plank (LVP) flooring in a multi-tonal wood finish adds warmth to the space and balances the cooler tones of the cabinetry and tile.
Architectural Features: The original arched window and vaulted ceiling were preserved and enhanced with custom plantation shutters, allowing for privacy without sacrificing the room's natural light.
Frequently Asked Questions
What are the benefits of using large-format tile in a shower?
Large-format tiles create a more seamless appearance by reducing the number of grout lines. This not only makes the space feel larger and more open but also significantly reduces the surface area where mold and mildew can accumulate, making the shower easier to clean.
Why choose matte black hardware over chrome or brushed nickel?
Matte black serves as a strong "anchor" in a white bathroom, providing a high-contrast, modern look that hides water spots and fingerprints more effectively than polished finishes. It pairs exceptionally well with various wood tones and stone patterns.
Is luxury vinyl plank (LVP) a good choice for a bathroom?
Yes, high-quality LVP is 100% waterproof, making it an ideal choice for bathrooms. It offers the aesthetic warmth of hardwood—which is susceptible to moisture damage—with the durability and slip resistance needed for a wet environment.
How does a custom window bench improve a bathroom layout?
Beyond providing a place to sit, a custom bench utilizes the often-underused space beneath a window for extra storage. It creates a cohesive, "built-in" look that ties the vanities together and adds a high-end, furniture-like quality to the room.
What is the advantage of a "design-build" approach for a remodel like this?
The design-build model integrates both the design and construction phases into a single contract. This ensures that the aesthetic vision stays within the established budget and allows for better communication between the designers and the craftsmen during the actual renovation.
 LiLu Interiors
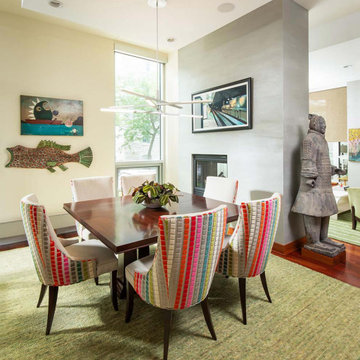
Christy and Matt have traveled the world, picking up a love of Monet’s garden in France and many unique artifacts along the way. They had accumulated an extensive art collection of their own which expanded to include an eclectic array of folk art inherited from Christy’s mom. With an eye on downsizing, the couple realized their living environment had become cluttered. They wanted a more serene feeling in their home…like a modern version of Monet’s Garden. LiLu’s inspiration began with a new color palette, using green as a neutral and adding a mixture of vibrant colors reminiscent of a garden. Sheer drapes in the living room diffuse the natural light, almost as if the sun is being filtered through a canopy of trees. The design team also brought focus to their art collection by designing custom built-ins to display their artwork. The dark wood finish relates to the color of the custom dining table creating a cohesive composition. The clean-lined furniture features soft curves to suggest a more botanical feel. The result has brought dazzling serenity to this condo hidden among the busy streets of downtown Minneapolis.
----
Project designed by Minneapolis interior design studio LiLu Interiors. They serve the Minneapolis-St. Paul area including Wayzata, Edina, and Rochester, and they travel to the far-flung destinations that their upscale clientele own second homes in.
----
For more about LiLu Interiors, click here: https://www.liluinteriors.com/
---
To learn more about this project, click here:
https://www.liluinteriors.com/blog/portfolio-items/secret-garden/
 Lindsey Markel
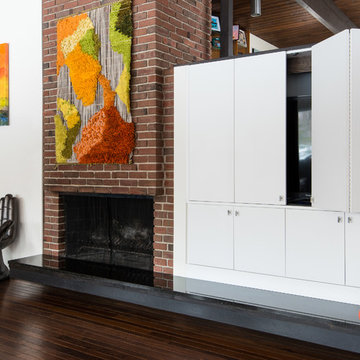
This Mid Century Modern home was designed and lived in by the architect in 1966. Since then there was one other owner but not much was updated to the home. When the current homeowners moved in they found many plumbing and electrical issues that accumulated overtime. They decided it was time for the kitchen, which had a hole in the floor from water damage, to be fixed and updated. They wanted a more open concept in the tight, galley, 60's style kitchen. To do so we needed to move the powder room to another location. New cabinets, flooring, counters, and backsplash were selected for the remodel. And after a lot of construction work was done to update the plumbing, electrical, and mechanical their dreams came true. The homeowners taste and style fits perfectly with the architects intentions for the design of the home.
Cabinet Walls and Talls: Dura Supreme Bria series, Alpine door, High Pressure Laminate, Frosty White
Granite: Black Uba Tuba
Photos By: Kate Benjamin Photography LLC
 iEnjoy Home
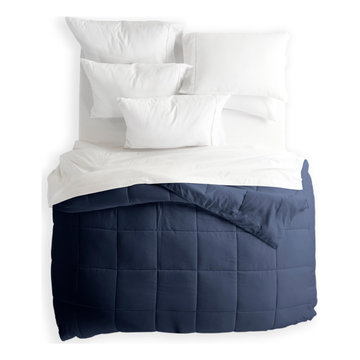
The Home Collection Bed Skirt features 100% ultra-plush microfiber yarns for a luxurious texture and durability. Perfect for concealing bedposts or items stored under the bed and protects against the accumulation of dust. Available in 6 sizes and a variety of 12 beautiful colors to match your comforter or sheet set, this flat, pleated bed skirt is resistant to fading and shrinking and will add the perfect touch to your bedroom decor.
FEATURES:
• 100% Imported Microfiber Yarns
• Home Collection
• Wrinkle Free
• Fade Resistant
• Easy Care – Machine Washable
• Available in 12 Beautiful Colors: White, Cream, Taupe, Gold, Sage, Gray, Chocolate, Navy, Aqua, Black, Purple and Burgundy
• Available in 6 Sizes: Twin, Twin Extra Long, Full, Queen, King, and California King
• Color matches all other Home Collection products
27