
Search results for "Address challenges" in Home Design Ideas

 MATHISON | MATHISON ARCHITECTS
Acton, MA
2008
sq ft varies
Visioning, programming, concept design, schematic design, construction documentation and construction administration
The HingeHouse project was the result of a unique partnership between an independent architect and a pre-fabricated home manufacturer – a partnership among the first of its kind in the country. Today, many pre-fab companies have adopted this collaborative approach recognizing that homeowners are looking for unique, custom homes while taking advantage of reliable and predictable construction methods and costs.
In 2008, the partnership was created to rethink pre-engineered post-and-beam and panelized systems to connect clients to a more modern and integrated set of design values. By integrating systems, factory design approach, manufacturing methodologies and construction sequences with design criteria grounded in sustainable planning and rigorous implementation, HingeHouse was developed.
HingeHouse is a fully-customizable pre-fab home which can be configured to meet the needs of any site, and any family. It is flexible and expandable using Deck House engineered building components. Starting with basic floor plans that are optimized spatially to Deck’s standard components, the living spaces are rotated around a "hinge” point. This design solution addresses the limitations and challenges of a particular site, while highlighting the best aspects of it. HingeHouse considers passive solar orientation depending on where the home is placed on the site and how it is “hinged”. It provides for maximum cross-ventilation from prevailing winds, preserves existing site formations and trees, and works on sloping grades. It addresses specific desired views while mitigating unwanted adjacencies, and provides great flexibility for entry sequences.
HingeHouse uses Deck’s standard sloped roof post-and-beam component system to create a lyrical, light-filled home. The western red cedar exterior is sculptural and dynamic. Interior spaces are lofty, with great view potential using Deck’s own custom-made mahogany windows. The “hinge” of the home, where the two building forms come together, has the added benefit of creating a desirable outdoor living room, complete with an outdoor fireplace. The "hinge” provides both a tool for maximizing customization and spatial orientation and a center of activity at the heart of the home.
Since this partnership in 2008, Maryann Thompson Architects and MATHISON | MATHISON ARCHITECTS have worked with Acorn Deck House Company on numerous full or partial pre-fab projects in the Boston Area, Western Massachusetts, Maryland and Michigan. We have become an advocate for their services and products because it offers advantages on a variety of levels including schedule, cost and quality.
Services provided included visioning, programming, concept design, schematic design, construction documentation and construction administration.
Evan’s Role: Project Designer & Project Manager
 ShadeCraft LLC
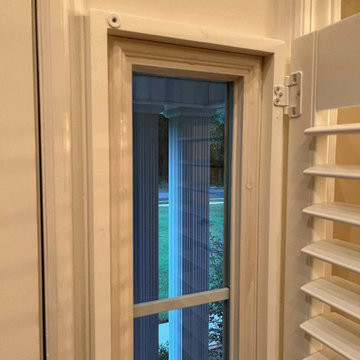
A big challenge our customers face is covering the sidelights on either side of their front door. Whether it be for privacy or to protect furniture and floors, dressing a side light can be a challenge.
Clients want something operable that looks finished. It’s not easy to find a solution that doesn’t look like something just dangling from the wall and blowing around every time the door gets opened.
This is the first impression most guests have of your home, after all.
One of our favorite solutions to addressing sidelight with shutters. Specifically, we offer a unique application to cover sidelights that don’t allow much width as a mounting surface. Batten back shutters reduce the need for the bulky frame and allow a mount with as little as ¾” width!!
This results in a wider louver in relation to the frame; and we want as much width as we can get. This way we have nice, grand shutter louvers, not a bulky frame blocking the widow.
 Drury Design
The Setup
For this primary bathroom project, the homeowners sought to transform their outdated, beige-toned space into a bright, functional sanctuary. The existing bathroom felt cramped and lifeless, with a small shower and limited storage options. The goal was to create a fresh, updated bathroom that maximizes the existing footprint while addressing specific desires for a more open, organized space with timeless materials.
Design objectives:
Brighten the bathroom and eliminate the dated beige color scheme
Install a freestanding tub in a compact space
Create a larger, more open shower without encroaching on the existing foot print too much
Incorporate hidden storage solutions
Maintain the existing bathroom layout while improving functionality
Update lighting and fixtures to create a contemporary feel
The Remodel
Design challenges to be solved:
- Compact Space Utilization – The small bathroom required careful planning to accommodate a freestanding tub while maintaining functionality and avoiding overcrowding.
- Hidden Storage Integration – The clients wanted a discreet hamper solution that wouldn’t clutter the limited floor space.
- Shower Niche Placement – With plumbing limitations and the clients’ desire to preserve their wavy accent tile wall, finding the perfect niche spot became a creative puzzle.
- Tile and Finish Coordination – Selecting complementary white tile and floor materials that worked harmoniously together.
- Larger Shower Space – Make the shower feel more open and brighter
The Renewed Space
Design solutions:
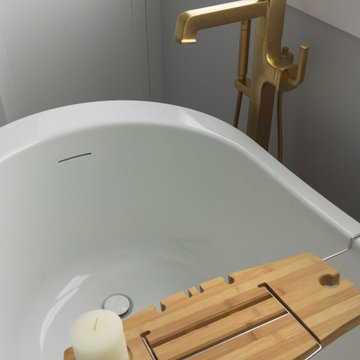
- Strategic Tub Placement – The freestanding tub was carefully positioned to maximize space, with its faucet strategically placed to allow easy access while preserving walking room. We reduced the counter depth just a bit by the tub, allowing more room for hamper cabinet and window access.
- Concealed Hamper Storage – A custom pull-out hamper was integrated into the vanity (right side, by tub), providing discreet storage within an 18-inch depth constraint.
- Shower Plumbing Wall Niche – We shifted the niche left, just enough to work around the plumbing infrastructure and still score a roomy storage spot that looks intentional.
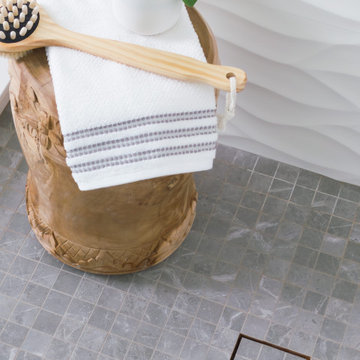
- Sophisticated Selections – Porcelanosa curvy white tile, Kohler brushed gold fixtures, and a neutral grey tile floor created a simple, timeless aesthetic that will be loved years to come.
- Open Shower – Replacing the side wall with a clear glass surround, continuing the tile on the ceiling and extending the footprint opened up this area to the room while allowing more natural lighting into the shower space.
This bathroom transformation shows how thoughtful design turns challenges into opportunities. Brushed gold fixtures add warmth to the fresh white palette, while the perfectly balanced floor tile brings just the right depth. A partially glass-fronted vanity introduces subtle charm, giving the space a unique edge. Once cramped and outdated, this bathroom now feels bright, spacious, and serene—a testament to how every design detail makes a difference.
Find the right local pro for your project
 Drury Design
The Setup
For this primary bathroom project, the homeowners sought to transform their outdated, beige-toned space into a bright, functional sanctuary. The existing bathroom felt cramped and lifeless, with a small shower and limited storage options. The goal was to create a fresh, updated bathroom that maximizes the existing footprint while addressing specific desires for a more open, organized space with timeless materials.
Design objectives:
Brighten the bathroom and eliminate the dated beige color scheme
Install a freestanding tub in a compact space
Create a larger, more open shower without encroaching on the existing foot print too much
Incorporate hidden storage solutions
Maintain the existing bathroom layout while improving functionality
Update lighting and fixtures to create a contemporary feel
The Remodel
Design challenges to be solved:
- Compact Space Utilization – The small bathroom required careful planning to accommodate a freestanding tub while maintaining functionality and avoiding overcrowding.
- Hidden Storage Integration – The clients wanted a discreet hamper solution that wouldn’t clutter the limited floor space.
- Shower Niche Placement – With plumbing limitations and the clients’ desire to preserve their wavy accent tile wall, finding the perfect niche spot became a creative puzzle.
- Tile and Finish Coordination – Selecting complementary white tile and floor materials that worked harmoniously together.
- Larger Shower Space – Make the shower feel more open and brighter
The Renewed Space
Design solutions:
- Strategic Tub Placement – The freestanding tub was carefully positioned to maximize space, with its faucet strategically placed to allow easy access while preserving walking room. We reduced the counter depth just a bit by the tub, allowing more room for hamper cabinet and window access.
- Concealed Hamper Storage – A custom pull-out hamper was integrated into the vanity (right side, by tub), providing discreet storage within an 18-inch depth constraint.
- Shower Plumbing Wall Niche – We shifted the niche left, just enough to work around the plumbing infrastructure and still score a roomy storage spot that looks intentional.
- Sophisticated Selections – Porcelanosa curvy white tile, Kohler brushed gold fixtures, and a neutral grey tile floor created a simple, timeless aesthetic that will be loved years to come.
- Open Shower – Replacing the side wall with a clear glass surround, continuing the tile on the ceiling and extending the footprint opened up this area to the room while allowing more natural lighting into the shower space.
This bathroom transformation shows how thoughtful design turns challenges into opportunities. Brushed gold fixtures add warmth to the fresh white palette, while the perfectly balanced floor tile brings just the right depth. A partially glass-fronted vanity introduces subtle charm, giving the space a unique edge. Once cramped and outdated, this bathroom now feels bright, spacious, and serene—a testament to how every design detail makes a difference.
 U.S. Green Building Council (USGBC)
LEED certification level: Platinum.
Builder: GCCM Construction Services LLC dba UberGreen Spaces & Homes.
Mark Twain said it best, "If the world were to end today I'd move to Kentucky because they are 20 years behind everyone else."
There is some truth to that because Kentuckians believe that 'if it aint broke dont fix it'.
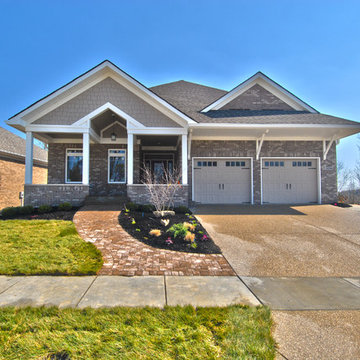
We designed and built Kentucky's first LEED Platinum Net Zero Energy Net Zero Water home in the private sector. We named the home 'My Green Kentucky Home' playing off the state song 'My Old Kentucky Home'. Our take on a home should have people and the planet in mind. We found LEED to be the best most credible third-party green certification program to address these important challenges today.
The envelope of the home was designed to minimize energy losses and maximize inside comfort by using Insulated Concrete Form walls from the footers to the roof, spray foam and blown in cellulose in the attic, rigid foam beneath the Lower Level basement slab and triple-pane fully insulated casement windows. The home was oriented with the back facing south to maximize daylighting, passive heating in the winter and solar production. Our HVAC is geothermal with a storage tank to preheat domestic water. A fresh air system was installed in the return side of the HVAC system to filter and then mix with supply air to the home.
All paints were zero VOC. The reclaimed KY horse farm fencing turned into beautiful hardwood floors was finished with a low VOC sealer. Carpets were low VOC and the 100% recycled padding was zero VOC. The custom cabinets for the kitchen and baths were made locally and built with FSC certified plywood with no added formaldehyde.
The home collects 100% of the rainwater that hits the roof into a 3,300 gallon rainwater collection tank. The primary use of the collected water is to irrigate the lawns, landscaped beds and supply the hose bibs. When the tank is low it automatically shuts the tank valve and opens the city water valve to operate with city water pressure until the tank fills past a certain level, saving electricity and wear and tear on the pump. The cistern is designed to service all the homes domestic water needs when KY State Plumbing code will allow it in the future.
All appliances are Energy Star and locally made by GE. The counter tops on all cabinets are recycled materials and durable without requiring sealers or maintenance. We went a step further for indoor air quality and installed AirRenew drywall by Certainteed which works like trees do in the environment by pulling in VOC's into the drywall and making it inert. The Florida Tile was made in Kentucky with recycled content. We monitor all utility usage per electrical circuit and monitor the amount of energy produced by the solar panels as well helping the owners make more informed decisions.
The home was such a hit that it was the catalyst that sparked development in a dormant neighborhood of vacant lots.
We had the home open for three months to the public where hundreds of folks toured it as it was laid out like an art museum. We had actual walls open all the way to the outside layer of ICF insulation where they saw the concrete and steel inside the walls. We also had the lower level basement slab cut open to show how we insulate beneath the concrete and how we drain and mitigate radon. It was a super inspirational project that made people think about people and the planet much differently than before.
We hope to continue making great projects like these to help inspire, educate and create awareness around some of the most important topics and challenges we face today.
Thank you to everyone at the USGBC for helping us make this happen and the great work you do every day!
 Drury Design
THE SETUP
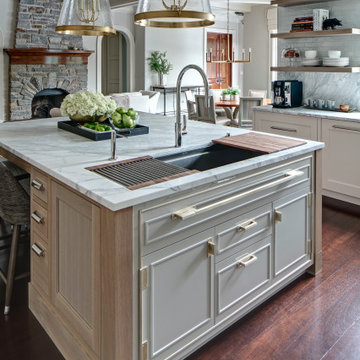
Once these empty nest homeowners decided to stay put, they knew a new kitchen was in order. Passionate about cooking, entertaining, and hosting holiday gatherings, they found their existing kitchen inadequate. The space, with its traditional style and outdated layout, was far from ideal. They longed for an elegant, timeless kitchen that was not only show-stopping but also functional, seamlessly catering to both their daily routines and special occasions with friends and family. Another key factor was its future appeal to potential buyers, as they’re ready to enjoy their new kitchen while also considering downsizing in the future.
Design Objectives:
Create a more streamlined, open space
Eliminate traditional elements
Improve flow for entertaining and everyday use
Omit dated posts and soffits
Include storage for small appliances to keep counters clutter-free
Address mail organization and phone charging concerns
THE REMODEL
Design Challenges:
Compensate for lost storage from omitted wall cabinets
Revise floorplan to feature a single, spacious island
Enhance island seating proximity for a more engaging atmosphere
Address awkward space above existing built-ins
Improve natural light blocked by wall cabinet near the window
Create a highly functional space tailored for entertaining
Design Solutions:
Tall cabinetry and pull-outs maximize storage efficiency
A generous single island promotes seamless flow and ample prep space
Strategic island seating arrangement fosters easy conversation
New built-ins fill arched openings, ensuring a custom, clutter-free look
Replace wall cabinet with lighted open shelves for an airy feel
Galley Dresser and Workstation offer impeccable organization and versatility, creating the perfect setup for entertaining with everything easily accessible.
THE RENEWED SPACE
The new kitchen exceeded every expectation, thrilling the clients with its revitalized, expansive design and thoughtful functionality. The transformation brought to life an open space adorned with marble accents, a state-of-the-art steam oven, and the seamless integration of the Galley Dresser, crafting a kitchen not just to be used, but to be cherished. This is more than a culinary space; it’s a new heart of their home, ready to host countless memories and culinary adventures.
 River Valley Landscapes
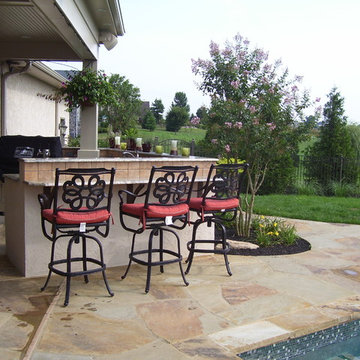
 This project was the result of the owner’s desire to install a swimming pool and outdoor living space inspired by tropical resorts they had visited on family vacations. The one element asked for specifically was a large waterfall spilling into the pool. The challenge for the designers was how to achieve the look the owner’s wished without the use of clichéd items such as thatched huts and tiki torches. The designers decided lush full plantings using plants found in the northeast region that met certain design criteria would be the primary way of giving the tropical feel. Boulder outcroppings, irregular stone paving and fire bowls along the back of the pool would complete the look.
The property is located in a newer subdivision with homes on both sides and a school to the rear. A walkway connects the neighborhood and the school along one side. The desired privacy would be addressed by the placement of plants and trees around the perimeter in mounded beds. Placing the waterfall to the rear of the pool helped block the view of the school beyond. The township had restrictions on the amount of impervious material allowable on site. The patio was designed to the maximum allowable size with square footage going to where it would be most usable. Planting beds were cut into the patio to decrease unnecessary square footage, divide spaces, and allow for more places to add plants and trees.
A rectangular swimming pool was chosen to make it easier to install an automatic pool cover. The pool was designed, with input from the landscape designers, and contracted separately by the owner. The landscape designers chose the location of pool and waterfall so that it was prominently placed to be the focal point of the backyard. The pool includes a curving sunbathing shelf running from end to end, finished in a lighter color to make it more visible, with removable umbrellas for shade and to add to the resort feel. To tie into the boulders used throughout the design, a large boulder was used as a substitute for a diving board. The yard sloped down towards the back of the property which required a large amount of soil to be added and large boulder retaining wall along the back.
For the planting design, the designers choose to focus on plants with larger leaves, various leaf colors and textures, and plants with large flowers in bold colors. These plants were then arranged into a loose lush planting scheme mixed with more traditional northeast plants such as pines, grasses, and roses. Unique plants such as hardy bananas were added for their tropical and exotic look. The full planting beds help to nestle in and enclose the living space.
Broken flagstone was chosen for the patio and intentionally left irregular at the edges. PA flagstone was avoided and a stone with gold and brown tones was chosen. Boulder outcroppings added to the natural and tropical theme. The fire pit was designed with a large built-in bench to increase the amount of seating. The designers chose a rounded smooth shape and incorporated the same stone as the pool coping for the caps and bench. For entertaining guests the outdoor kitchen was outfitted with a large gas grill, beverage taps, refrigerator, sink and a dedicated lobster cooker. The kitchen was finished with granite countertops and stainless steel cabinets. Two strategically placed fire bowls, along with the low voltage lighting, add additional interest to the space at night.
While the designers were faced with many challenges the resulting design incorporated enough elements to achieve the desired look and feel. Using plants appropriate to the northeast that fit the design criteria and carefully choosing hardscaping materials was essential. The owner’s feel they now have their own tropical theme resort right in their Pennsylvania backyard.



 Online Solutions
Technical Support Phone Numbers @ 1-855-999-8045 : AOL mail Technical Support Number, AOL mail Tech Support, AOL mail Tech Support Phone Number, AOL mail Support Center, AOL mail Technical Support Phone Number, AOL mail Tech Customer Support, AOL mail Technical Customer Service, AOL mail Technical Customer Helpline
Professional AOL mail® Technical Customer Service Helpline Number
AOL mail is a popular e-mail client program from Perion used worldwide in order to send and receive messages to friends and families with amazing features, including animated smileys, wallpapers, and icons .This email client for MS operating system allows all users an interactive experience. Moreover, AOL mail support taken from the right resources ensures that you will bring the best out of your mails with the help of stunning elements, such as e-mail backgrounds, emoticons, e-cards, sounds animations, and 3D effects.
Technical-support-phone-number 1855-999-8O45.com understands what issues and problems AOL mail users can experience while trying to get the best out of their email clients. We know how to use all AOL mail products: AOL mail Plus, Protection Center, Gold Gallery, Letter Creator, and Smile Box. We offer instant and user-friendly AOL mail technical support to overcome all sudden and unexpected issues that prevent you from getting the best out of your email clients.
Technical-support-phone-number.com offers you instant solutions for resolving all visible problems and issues with its AOL mail technical support. These include:
• AOL mail diagnostic and secure remote access.
• Fixation of all email clients and servers.
• Configuration of AOL mail email accounts.
• AOL mail crack-up utility issues mail archives.
• AOL mail configuration, set up, and update of the email client.
• AOL mail re-storage of corrupted email folders.
• AOL mail password settings and configuration.
• AOL mail data migration from one email client to another.
If you are facing severe mail related issues and are looking for instant expert help, then simply call us at our AOL mail technical support phone number and get rid of all issues and problems, such as installation and updating of mail software; AOL mail runtime error; AOL mail tray app non-functionality; AOL mail errors 535,10061,550,2738; AOL mail setting customization; and POP3 and SMTP configuration.
AOL mail Runtime Error
AOL mail Tray Application Stopped Working
Customizing the settings of AOL mail software as per your specifications
Installing and updating AOL mail software on your computer
AOL mail Errors 535,10061,550,2738
AOL mail Tray Application Stopped Working
Configuration of AOL mail Email Accounts
AOL mail Password Settings and Configuration.
Configuration of AOL mail Email Accounts
Fixation of all Email Clients and Servers
AOL mail Crack-Up Utility Issues Mail Archives
AOL mail Data Migration from One Email Client to Another
AOL mail re-storage of corrupted email folders
DISCLAIMER: - We are an independent organization working as online third party technical support company for business and personal computer software, printers and email support. We are not in partnership with any brand or any trademark term mentioned in the blog. We solely provide technical support to users of the brands mentioned in the blog.
AOL customer care helpline number,
AOL customer care toll free number,
AOL activation phone number,
AOL activation help number,
AOL activation help phone number,
AOL phone number,
AOL support phone number,
AOL activation number,
AOL helpline number AOL helpline phone number,
AOL Mail phone number,
AOL installation phone number,
AOL installation support number,
AOL installation support phone number,
AOL installation help number,
AOL installation help phone number,
AOL installation help telephone number,
phone number for AOL Mail customer service phone number, AOL Mail customer support phone number for AOL Mail technical support,
phone number for AOL Mail tech support,
AOL Mail phone number,
AOL Mail support number,
AOL Mail support phone number,
AOL Mail support telephone number,
AOL Mail tech support number,
AOL Mail tech support phone number,
AOL Mail tech support contact number,
AOL Mail tech support telephone number,
AOL Mail technical support number,
AOL Mail technical support phone number,
AOL Mail technical support contact number,
AOL Mail technical support telephone number,
AOL Mail customer support number,
AOL Mail customer support phone number,
AOL Mail customer support telephone number,
AOL Mail activation phone number,
www.AOL.com support number,
AOL (American Online) is one of the biggest brands in United States. The Company is offering its services to the industries including Media, web search engine, IT products, and manufacturing of various tech peripherals. The company is offering webmail service namely AOL mail for the users across the world. In the initial times, it was started as a premium email account, but when the other organizations like Microsoft Hotmail, Yahoo mail starts offering free email accounts the AOL decided to change the paid version to a completely free webmail platform. Alongside of making it as free webmail, the company changed its AOL mail customer support toll free number access only for the premium email users but it is offering many AOL mail technical support helpline.An overview regarding many features of AOL mail is given below:
AOL mail Customer Support to Solve AOL Issues
My AOL mail was compromised: There are many times before the same hacking issues reported on AOL mail. But, it’s a fact that 70% of its users didn’t know- What exactly comprises means in Internet? Most of the users think that if they face any log-in errors while attempting to access the account, then it will happened because of hacking attempt. Hacking is an occasional issue, it might usually happen on revenge basis. If you believe that your AOL account hacked, then report the issue to the AOL mail customer support. The customers can contact the AOL mail technical support through their Forum, social media sites and through the help center page.
My AOL mail down right now: Literally ‘Mail Server Down’ is one of the serious issue of AOL. Many times the AOL heard blaming for email outages. You can verify the current status of AOL mail server through the third party web pages like https://downtoday.co.uk/aol-mail/, http://www.isitdownrightnow.com/aol.com.html, etc. This is a server-end issue, which means this is not only the issue of you but it’s an issue of every AOL mail subscribers. AOL customer service technicians will resolve this issue instantly.
Problems sending and composing email: Mailing and messaging are the primary purposes of every web accounts. So if any sorts of issues encountered while sending and composing email then it certainly became a painstaking thing. Some common issues of Sending and Composing Email includes- images won’t showing in the forwarded message, message composing window didn’t opening, I am getting image challenge while trying to send mail, send mail bounces back to the inbox, etc. Find all the answers for your many such mailing issues of AOL mail in its help center page, furnished with the possible causes of issues and its best solution explanation.
How to Contact the AOL Mail Technical Support?
Those who need technical support of AOL mail can contact them through the ways as explained below: Help Center: This is the best way you follow to fix your AOL mailing issue. However, you can only fix the issue through this mode if you have sound technical knowledge. Otherwise leave it and choose any one of the two other methods shown below.
Support Phone Number, Email address: AOL Technical support available through the Phone Number, and Email address. You will get an opportunity to chat/Talk with the tech Support executives if you prefer this method.
Social Media: AOL mail support is available through its official twitter handle. Mention them by using @aolmailhelp/ @ aolsupporthelp/Or by using hash tag #AOLTechnicalSupport to let them know about the issues you've.
 Drury Design
The Setup
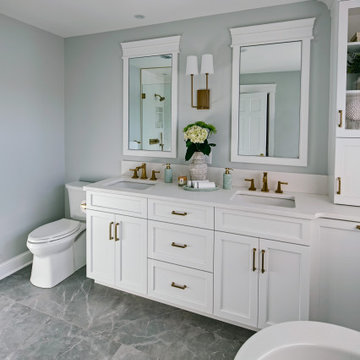
For this primary bathroom project, the homeowners sought to transform their outdated, beige-toned space into a bright, functional sanctuary. The existing bathroom felt cramped and lifeless, with a small shower and limited storage options. The goal was to create a fresh, updated bathroom that maximizes the existing footprint while addressing specific desires for a more open, organized space with timeless materials.
Design objectives:
Brighten the bathroom and eliminate the dated beige color scheme
Install a freestanding tub in a compact space
Create a larger, more open shower without encroaching on the existing foot print too much
Incorporate hidden storage solutions
Maintain the existing bathroom layout while improving functionality
Update lighting and fixtures to create a contemporary feel
The Remodel
Design challenges to be solved:
- Compact Space Utilization – The small bathroom required careful planning to accommodate a freestanding tub while maintaining functionality and avoiding overcrowding.
- Hidden Storage Integration – The clients wanted a discreet hamper solution that wouldn’t clutter the limited floor space.
- Shower Niche Placement – With plumbing limitations and the clients’ desire to preserve their wavy accent tile wall, finding the perfect niche spot became a creative puzzle.
- Tile and Finish Coordination – Selecting complementary white tile and floor materials that worked harmoniously together.
- Larger Shower Space – Make the shower feel more open and brighter
The Renewed Space
Design solutions:
- Strategic Tub Placement – The freestanding tub was carefully positioned to maximize space, with its faucet strategically placed to allow easy access while preserving walking room. We reduced the counter depth just a bit by the tub, allowing more room for hamper cabinet and window access.
- Concealed Hamper Storage – A custom pull-out hamper was integrated into the vanity (right side, by tub), providing discreet storage within an 18-inch depth constraint.
- Shower Plumbing Wall Niche – We shifted the niche left, just enough to work around the plumbing infrastructure and still score a roomy storage spot that looks intentional.
- Sophisticated Selections – Porcelanosa curvy white tile, Kohler brushed gold fixtures, and a neutral grey tile floor created a simple, timeless aesthetic that will be loved years to come.
- Open Shower – Replacing the side wall with a clear glass surround, continuing the tile on the ceiling and extending the footprint opened up this area to the room while allowing more natural lighting into the shower space.
This bathroom transformation shows how thoughtful design turns challenges into opportunities. Brushed gold fixtures add warmth to the fresh white palette, while the perfectly balanced floor tile brings just the right depth. A partially glass-fronted vanity introduces subtle charm, giving the space a unique edge. Once cramped and outdated, this bathroom now feels bright, spacious, and serene—a testament to how every design detail makes a difference.
 Sosna Inc
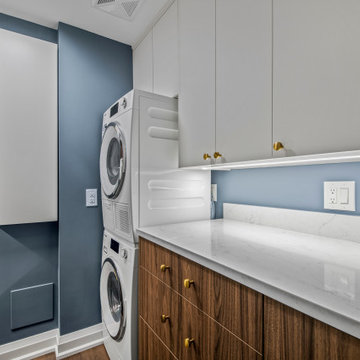
This project centered on helping a wonderful client and her equally fantastic dog transform her condo into a space that truly reflected her style and simplified her life. Eager to create a home that was both beautiful and functional, she envisioned a haven in the heart of the city.
Before: Feeling Disconnected
Before the renovation, our client felt disconnected from her condo. The builder-grade kitchen was a constant source of frustration, with an awkward peninsula that hindered the flow of the space. The condo overall felt outdated and no longer captured her vibrant personality. The foyer and laundry areas were cramped and lacked organization, while the mismatched hardwood flooring only added to the disjointed atmosphere. As for the bathrooms, they felt frozen in time, desperately needing an update.
Worries and Concerns
Like many homeowners, our client had heard her fair share of renovation horror stories—tales of projects gone awry and the frustrations of managing multiple contractors. She was understandably cautious and needed a trustworthy, experienced team she could rely on to handle the project with care and expertise.
The Solution: A Personalized Transformation
We took the time to listen carefully to our client’s needs and concerns and developed a tailored plan to address each of her pain points. For the kitchen, we preserved the existing layout but reimagined the space entirely. The awkward peninsula was redesigned to improve traffic flow and provide much-needed storage and counter space. Clever storage solutions, such as pull-outs, shelving, concealed drawers in the toe kicks, and an appliance garage, were incorporated. The kitchen now boasts a warm and inviting atmosphere, with light wood-tone lower cabinetry, off-white upper cabinets, and brushed nickel hardware that ties it all together.
The laundry room, once cramped and chaotic, was transformed into an organized, efficient space. We added custom cabinetry with pull-outs for hanging clothes, open storage above, a laundry sink, and a spacious counter for folding—no more piles of laundry!
Both the en-suite and shared bathrooms underwent complete renovations. Custom cabinetry was installed, including a floor-to-ceiling linen closet, and light grey and brown-toned tiles were selected, with contrasting hexagonal tiles for the shower floor. A heated flooring system was added for luxury and comfort year-round.
The mismatched flooring throughout the condo was replaced with cohesive vinyl and porcelain tiles, creating a seamless, modern aesthetic throughout the space.
Overcoming Challenges
As with any renovation, there were challenges to navigate. One of the key obstacles was managing the condo board’s renovation rules and policies while coordinating the delivery schedules for finishes and fixtures, especially during the busy holiday season. With careful planning, we ensured the project stayed on track. Additionally, we encountered a height variation between the tile and vinyl flooring. To resolve this, we used self-leveling material under the vinyl, ensuring a smooth and seamless transition between the two flooring types.
The Grand Reveal: A Dream Come True
The final result is simply stunning. The kitchen is now a chef’s dream, with custom-built cabinets, smooth quartz countertops, and a matching stone backsplash. Brushed nickel and stainless steel plumbing fixtures, elegant cabinet hardware, and LED lighting under the upper cabinets add the perfect finishing touches. Custom organizers in the foyer and laundry closets provide ample storage and keep everything neatly in place. The bathrooms have been transformed into spa-like retreats, with beautiful porcelain tiles and custom cabinetry. The new vinyl flooring throughout the main living areas and bedroom unifies the space, creating a cohesive and modern atmosphere.
Life Transformed
Our client’s life has been completely transformed. As a passionate cook, she now relishes spending time in her beautiful and functional kitchen. The single-bowl sink makes cleanup a breeze, and the thoughtfully designed storage solutions have brought a sense of calm and order to her home. The refreshed flooring and neutral paint palette have created a relaxing, comfortable environment she truly loves.
A Memorable Journey
This project was more than just a renovation—it was a collaboration. Our client valued our guidance throughout the design process, particularly when faced with the overwhelming number of decisions. We built a strong relationship with her, and we are immensely grateful for the trust she placed in our team.
 ShadeCraft LLC
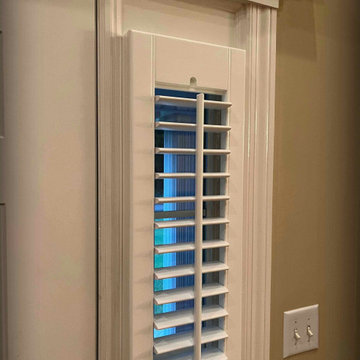
A big challenge our customers face is covering the sidelights on either side of their front door. Whether it be for privacy or to protect furniture and floors, dressing a side light can be a challenge.
Clients want something operable that looks finished. It’s not easy to find a solution that doesn’t look like something just dangling from the wall and blowing around every time the door gets opened.
This is the first impression most guests have of your home, after all.
One of our favorite solutions to addressing sidelight with shutters. Specifically, we offer a unique application to cover sidelights that don’t allow much width as a mounting surface. Batten back shutters reduce the need for the bulky frame and allow a mount with as little as ¾” width!!
This results in a wider louver in relation to the frame; and we want as much width as we can get. This way we have nice, grand shutter louvers, not a bulky frame blocking the widow.
 Sosna Inc
This project centered on helping a wonderful client and her equally fantastic dog transform her condo into a space that truly reflected her style and simplified her life. Eager to create a home that was both beautiful and functional, she envisioned a haven in the heart of the city.
Before: Feeling Disconnected
Before the renovation, our client felt disconnected from her condo. The builder-grade kitchen was a constant source of frustration, with an awkward peninsula that hindered the flow of the space. The condo overall felt outdated and no longer captured her vibrant personality. The foyer and laundry areas were cramped and lacked organization, while the mismatched hardwood flooring only added to the disjointed atmosphere. As for the bathrooms, they felt frozen in time, desperately needing an update.
Worries and Concerns
Like many homeowners, our client had heard her fair share of renovation horror stories—tales of projects gone awry and the frustrations of managing multiple contractors. She was understandably cautious and needed a trustworthy, experienced team she could rely on to handle the project with care and expertise.
The Solution: A Personalized Transformation
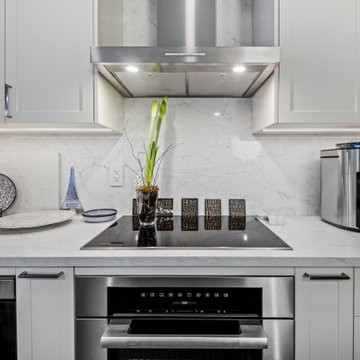
We took the time to listen carefully to our client’s needs and concerns and developed a tailored plan to address each of her pain points. For the kitchen, we preserved the existing layout but reimagined the space entirely. The awkward peninsula was redesigned to improve traffic flow and provide much-needed storage and counter space. Clever storage solutions, such as pull-outs, shelving, concealed drawers in the toe kicks, and an appliance garage, were incorporated. The kitchen now boasts a warm and inviting atmosphere, with light wood-tone lower cabinetry, off-white upper cabinets, and brushed nickel hardware that ties it all together.
The laundry room, once cramped and chaotic, was transformed into an organized, efficient space. We added custom cabinetry with pull-outs for hanging clothes, open storage above, a laundry sink, and a spacious counter for folding—no more piles of laundry!
Both the en-suite and shared bathrooms underwent complete renovations. Custom cabinetry was installed, including a floor-to-ceiling linen closet, and light grey and brown-toned tiles were selected, with contrasting hexagonal tiles for the shower floor. A heated flooring system was added for luxury and comfort year-round.
The mismatched flooring throughout the condo was replaced with cohesive vinyl and porcelain tiles, creating a seamless, modern aesthetic throughout the space.
Overcoming Challenges
As with any renovation, there were challenges to navigate. One of the key obstacles was managing the condo board’s renovation rules and policies while coordinating the delivery schedules for finishes and fixtures, especially during the busy holiday season. With careful planning, we ensured the project stayed on track. Additionally, we encountered a height variation between the tile and vinyl flooring. To resolve this, we used self-leveling material under the vinyl, ensuring a smooth and seamless transition between the two flooring types.
The Grand Reveal: A Dream Come True
The final result is simply stunning. The kitchen is now a chef’s dream, with custom-built cabinets, smooth quartz countertops, and a matching stone backsplash. Brushed nickel and stainless steel plumbing fixtures, elegant cabinet hardware, and LED lighting under the upper cabinets add the perfect finishing touches. Custom organizers in the foyer and laundry closets provide ample storage and keep everything neatly in place. The bathrooms have been transformed into spa-like retreats, with beautiful porcelain tiles and custom cabinetry. The new vinyl flooring throughout the main living areas and bedroom unifies the space, creating a cohesive and modern atmosphere.
Life Transformed
Our client’s life has been completely transformed. As a passionate cook, she now relishes spending time in her beautiful and functional kitchen. The single-bowl sink makes cleanup a breeze, and the thoughtfully designed storage solutions have brought a sense of calm and order to her home. The refreshed flooring and neutral paint palette have created a relaxing, comfortable environment she truly loves.
A Memorable Journey
This project was more than just a renovation—it was a collaboration. Our client valued our guidance throughout the design process, particularly when faced with the overwhelming number of decisions. We built a strong relationship with her, and we are immensely grateful for the trust she placed in our team.
 Distinctive Landscaping
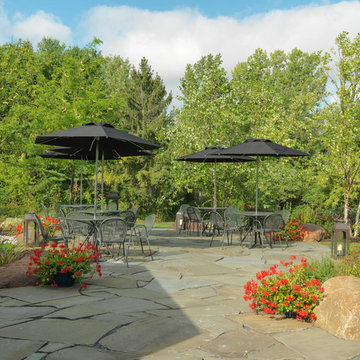
In this project, our clients purchased an existing restaurant fraught with stormwater management issues on the property. Runoff from an adjacent state highway and parking lot regularly flooded the kitchen. Additionally, a man-made pond on the property had become a problematic breeding ground for mosquitos that virtually prohibited outdoor dining during the summer. Both challenges restricted the restaurant from operating at its fullest potential. Our design/build team’s goals were to address the water runoff and mosquito issues using environmentally and financially sustainable practices. Lowering the grades around the building and parking, we were able to direct the runoff into a dry streambed enriched with water-worn cobbles and river stones and planted banks. We addressed the mosquito problem by increasing the pond’s depth, adding an aeration system, and planting the banks with wildflowers. By raising the outdoor dining, guests now overlook the pond and pleasing landscape. Natural breezes at this higher level help alleviate mosquitosl.
 River Valley Landscapes
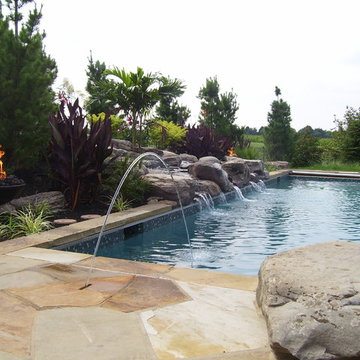
 This project was the result of the owner’s desire to install a swimming pool and outdoor living space inspired by tropical resorts they had visited on family vacations. The one element asked for specifically was a large waterfall spilling into the pool. The challenge for the designers was how to achieve the look the owner’s wished without the use of clichéd items such as thatched huts and tiki torches. The designers decided lush full plantings using plants found in the northeast region that met certain design criteria would be the primary way of giving the tropical feel. Boulder outcroppings, irregular stone paving and fire bowls along the back of the pool would complete the look.
The property is located in a newer subdivision with homes on both sides and a school to the rear. A walkway connects the neighborhood and the school along one side. The desired privacy would be addressed by the placement of plants and trees around the perimeter in mounded beds. Placing the waterfall to the rear of the pool helped block the view of the school beyond. The township had restrictions on the amount of impervious material allowable on site. The patio was designed to the maximum allowable size with square footage going to where it would be most usable. Planting beds were cut into the patio to decrease unnecessary square footage, divide spaces, and allow for more places to add plants and trees.
A rectangular swimming pool was chosen to make it easier to install an automatic pool cover. The pool was designed, with input from the landscape designers, and contracted separately by the owner. The landscape designers chose the location of pool and waterfall so that it was prominently placed to be the focal point of the backyard. The pool includes a curving sunbathing shelf running from end to end, finished in a lighter color to make it more visible, with removable umbrellas for shade and to add to the resort feel. To tie into the boulders used throughout the design, a large boulder was used as a substitute for a diving board. The yard sloped down towards the back of the property which required a large amount of soil to be added and large boulder retaining wall along the back.
For the planting design, the designers choose to focus on plants with larger leaves, various leaf colors and textures, and plants with large flowers in bold colors. These plants were then arranged into a loose lush planting scheme mixed with more traditional northeast plants such as pines, grasses, and roses. Unique plants such as hardy bananas were added for their tropical and exotic look. The full planting beds help to nestle in and enclose the living space.
Broken flagstone was chosen for the patio and intentionally left irregular at the edges. PA flagstone was avoided and a stone with gold and brown tones was chosen. Boulder outcroppings added to the natural and tropical theme. The fire pit was designed with a large built-in bench to increase the amount of seating. The designers chose a rounded smooth shape and incorporated the same stone as the pool coping for the caps and bench. For entertaining guests the outdoor kitchen was outfitted with a large gas grill, beverage taps, refrigerator, sink and a dedicated lobster cooker. The kitchen was finished with granite countertops and stainless steel cabinets. Two strategically placed fire bowls, along with the low voltage lighting, add additional interest to the space at night.
While the designers were faced with many challenges the resulting design incorporated enough elements to achieve the desired look and feel. Using plants appropriate to the northeast that fit the design criteria and carefully choosing hardscaping materials was essential. The owner’s feel they now have their own tropical theme resort right in their Pennsylvania backyard.
 DesignARC
LOS ANGELES, CA / SINGLE FAMILY RESIDENTIAL
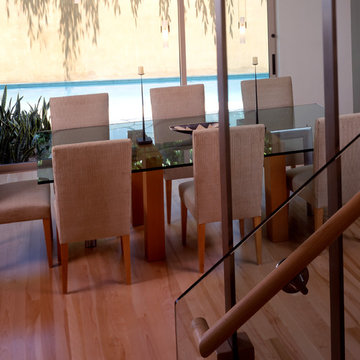
The commission for this 4,300-square-foot residence came with significant challenges for the architects – a house had once existed on the lot but had burned down and the attempt to replace the house had stalled, leading to an abatement order and a lapse of permits.
Our first challenge was to revive the lapsed construction permit by proposing to “modify” the existing structure. The practical effect this had was to fix the footprint of the new home to the existing structure’s plan outline. Having thereby inherited the large, dense block of the original house, the new strategy became one of substituting selective areas of indoor space for outdoor courtyard.
This strategy of trading indoor space for outdoor courtyard allowed an erosion of the formerly monolithic structure into a series of distinct volumetric elements, and further suggested that the architectural pieces could cohere as a “village.” The main level is further eroded by large, glazed planes, merging indoor with outdoor, and virtually stretching the landscape across interior space. Moving the detached garage from the rear yard to beneath the new living space allowed for a 75-meter lap pool and a shaded olive garden.
The gardens include built-in seating, extensive use of ornamental grasses and Zen-like interior courtyards. A material palette of fossilized stone, bonderized-galvanized metal, and natural Douglas fir allows for the warmth desired by the wife, while providing the modernity required by the husband. Programmatically, her music room borrows from the calm and protected olive court in the rear, while his office becomes a pavilion set in the landscape, which both addresses the street and acts as a sheltering monument for the terraced entry garden.
 Michael Nash Design, Build & Homes
This growing family of six was struggling with a dysfunctional kitchen design. The center island had been installed at an odd angle that limited accessibility and traffic flow. Additionally, storage space was limited by poor cabinet design. Finally, doorways in and out of the kitchen were narrow and poorly located, especially for children dashing in and out.
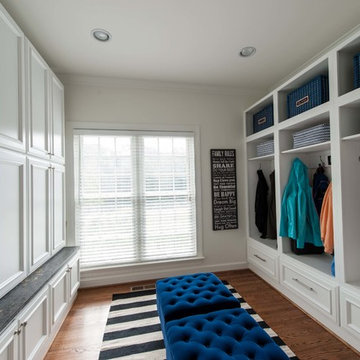
Other design challenges included how to better use a 10’ x 12’ room for children’s jackets and toys and how to add a professional-quality gas range in a neighborhood were natural gas wasn’t available. The new design would address all of these issues.
DESIGN SOLUTIONS
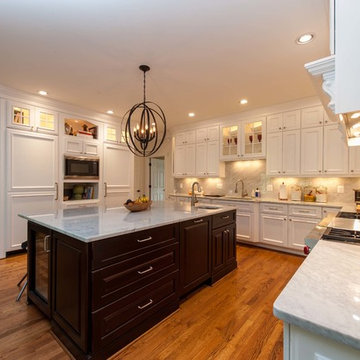
The new kitchen design revolves around a more proportional island. Carefully placed in the center of the new space with seating for four, it includes a prep sink, a second dishwasher and a beverage center.
The distressed ebony-stained island and hutch provides a brilliant contrast between the white color cabinetry. White Carrera marble countertops and backsplash top both island and perimeter cabinets.
Tall, double stacked cabinetry lines two walls to maximize storage space. Across the room there was an unused wall that now contains a 36” tower fridge and freezer, both covered with matching panels, and a tall cabinet that contains a microwave, steam unit and warming drawer.
A propane tank was buried in the back yard to provide gas to a new 60” professional range and cooktop. A custom-made wood mantel hood blends perfectly with the cabinet style.
The old laundry room was reconfigured to have lots of locker space for all kids and added cabinetry for storage. A double entry door separated the new mudroom from the rest of the back hall. In the back hall the back windows were replaced with a set of French door and added decking to create a direct access to deck and backyard.
The end result is an open floor plan, high-end appliances, great traffic flow and pleasing colors. The homeowner calls it the “kitchen of her dreams.”
 Michael Nash Design, Build & Homes
This growing family of six was struggling with a dysfunctional kitchen design. The center island had been installed at an odd angle that limited accessibility and traffic flow. Additionally, storage space was limited by poor cabinet design. Finally, doorways in and out of the kitchen were narrow and poorly located, especially for children dashing in and out.
Other design challenges included how to better use a 10’ x 12’ room for children’s jackets and toys and how to add a professional-quality gas range in a neighborhood were natural gas wasn’t available. The new design would address all of these issues.
DESIGN SOLUTIONS
The new kitchen design revolves around a more proportional island. Carefully placed in the center of the new space with seating for four, it includes a prep sink, a second dishwasher and a beverage center.
The distressed ebony-stained island and hutch provides a brilliant contrast between the white color cabinetry. White Carrera marble countertops and backsplash top both island and perimeter cabinets.
Tall, double stacked cabinetry lines two walls to maximize storage space. Across the room there was an unused wall that now contains a 36” tower fridge and freezer, both covered with matching panels, and a tall cabinet that contains a microwave, steam unit and warming drawer.
A propane tank was buried in the back yard to provide gas to a new 60” professional range and cooktop. A custom-made wood mantel hood blends perfectly with the cabinet style.
The old laundry room was reconfigured to have lots of locker space for all kids and added cabinetry for storage. A double entry door separated the new mudroom from the rest of the back hall. In the back hall the back windows were replaced with a set of French door and added decking to create a direct access to deck and backyard.
The end result is an open floor plan, high-end appliances, great traffic flow and pleasing colors. The homeowner calls it the “kitchen of her dreams.”

 Progressive Design Build
Challenge
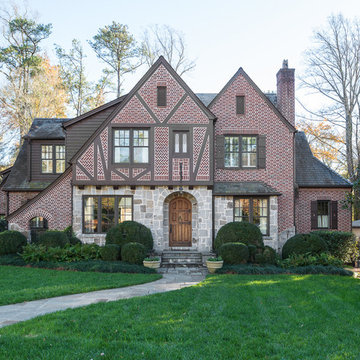
This 2001 riverfront home was purchased by the owners in 2015 and immediately renovated. Progressive Design Build was hired at that time to remodel the interior, with tentative plans to remodel their outdoor living space as a second phase design/build remodel. True to their word, after completing the interior remodel, this young family turned to Progressive Design Build in 2017 to address known zoning regulations and restrictions in their backyard and build an outdoor living space that was fit for entertaining and everyday use.
The homeowners wanted a pool and spa, outdoor living room, kitchen, fireplace and covered patio. They also wanted to stay true to their home’s Old Florida style architecture while also adding a Jamaican influence to the ceiling detail, which held sentimental value to the homeowners who honeymooned in Jamaica.
Solution
To tackle the known zoning regulations and restrictions in the backyard, the homeowners researched and applied for a variance. With the variance in hand, Progressive Design Build sat down with the homeowners to review several design options. These options included:
Option 1) Modifications to the original pool design, changing it to be longer and narrower and comply with an existing drainage easement
Option 2) Two different layouts of the outdoor living area
Option 3) Two different height elevations and options for the fire pit area
Option 4) A proposed breezeway connecting the new area with the existing home
After reviewing the options, the homeowners chose the design that placed the pool on the backside of the house and the outdoor living area on the west side of the home (Option 1).
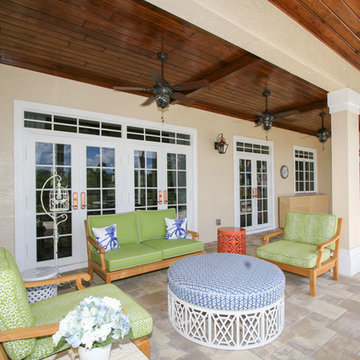
It was important to build a patio structure that could sustain a hurricane (a Southwest Florida necessity), and provide substantial sun protection. The new covered area was supported by structural columns and designed as an open-air porch (with no screens) to allow for an unimpeded view of the Caloosahatchee River. The open porch design also made the area feel larger, and the roof extension was built with substantial strength to survive severe weather conditions.
The pool and spa were connected to the adjoining patio area, designed to flow seamlessly into the next. The pool deck was designed intentionally in a 3-color blend of concrete brick with freeform edge detail to mimic the natural river setting. Bringing the outdoors inside, the pool and fire pit were slightly elevated to create a small separation of space.
Result
All of the desirable amenities of a screened porch were built into an open porch, including electrical outlets, a ceiling fan/light kit, TV, audio speakers, and a fireplace. The outdoor living area was finished off with additional storage for cushions, ample lighting, an outdoor dining area, a smoker, a grill, a double-side burner, an under cabinet refrigerator, a major ventilation system, and water supply plumbing that delivers hot and cold water to the sinks.
Because the porch is under a roof, we had the option to use classy woods that would give the structure a natural look and feel. We chose a dark cypress ceiling with a gloss finish, replicating the same detail that the homeowners experienced in Jamaica. This created a deep visceral and emotional reaction from the homeowners to their new backyard.
The family now spends more time outdoors enjoying the sights, sounds and smells of nature. Their professional lives allow them to take a trip to paradise right in their backyard—stealing moments that reflect on the past, but are also enjoyed in the present.
 E. F. San Juan
Southern Beach Getaway in WaterColor
Private Residence / WaterColor, Florida
Architect: Geoff Chick & Associates
Builder: Chris Clark Construction
The E. F. San Juan team collaborated closely with architect Geoff Chick, builder Chris Clark, interior designer Allyson Runnels, and the homeowners to bring their design vision to reality. This included custom interior and exterior millwork, pecky cypress ceilings in various rooms of the home, different types of wall and ceiling paneling in each upstairs bedroom, custom pecky cypress barn doors and beams in the master suite, Euro-Wall doors in the living area, Weather Shield windows and doors throughout, Georgia pine porch ceilings, and Ipe porch flooring.
Challenges:
Allyson and the homeowners wanted each of the children’s upstairs bedrooms to have unique features, and we addressed this from a millwork perspective by producing different types of wall and ceiling paneling for each of these rooms. The homeowners also loved the look of pecky cypress and wanted to see this unique type of wood featured as a highlight throughout the home.
Solution:
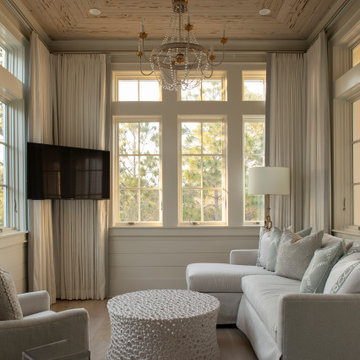
In the main living area and kitchen, the coffered ceiling presents pecky cypress stained gray to accent the tiled wall of the kitchen. In the adjoining hallway, the pecky cypress ceiling is lightly pickled white to make a subtle contrast with the surrounding white paneled walls and trim. The master bedroom has two beautiful large pecky cypress barn doors and several large pecky cypress beams that give it a cozy, rustic yet Southern coastal feel. Off the master bedroom is a sitting/TV room featuring a pecky cypress ceiling in a stunning rectangular, concentric pattern that was expertly installed by Edgar Lara and his skilled team of finish carpenters.
We also provided twelve-foot-high floor-to-ceiling Euro-Wall Systems doors in the living area that lend to the bright and airy feel of this space, as do the Weather Shield windows and doors that were used throughout the home. Finally, the porches’ rich, South Georgia pine ceilings and chatoyant Ipe floors create a warm contrast to the bright walls, columns, and railings of these comfortable outdoor spaces. The result is an overall stunning home that exhibits all the best characteristics of the WaterColor community while standing out with countless unique custom features.
---
Photography by Jack Gardner
29