
Search results for "Assessed" in Home Design Ideas
 Legendary Real Estate
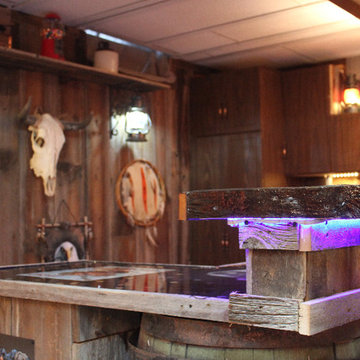
A lower level bar and entertaining area was added, by repurposing the old kitchen cabinets, adding some 100 year old barn wood, installing a custom poured epoxy counterop, undermount LED lighting, plenty of accent lighting and decorative accents, the entertaining area was the favorite room in the new renovation - adding a ton of living/entertaining space to this home!
{Featured Story} Spring, 2015 – This condo was purchased from the estate of the new owner’s parents and refurbished with trendy new touches. There were no close comparables in the Farmington neighborhood with within walking distance to the urban downtown area, so the approach for selling was to create an entirely new set of comparables when the new owner was found. On the market for just days, the renovation, marketing and finishing touches made this a highly sought after, and quick to sell property at top dollar, establishing a new trend in the neighborhood.
{Our Process for this Featured Property}: Assessed the initial investment condo, offered suggestions for rehab and renovation. Assisted with Color Theory through color selection and process (no beige in this condo!). Helped select floor and counter materials, tile selection and features in the kitchen and bath. Final staging of the property was done with antiques and housewares, and created a cozy and lived in feel. As a final touch, a party was thrown when the property was completed to invite in friends and family, as well as an open house with freshly baking chocolate chip cookies to make the prospective buyers feel right at home!
{Outcome} This property sold in days as a cash sale, at a higher price than anything in the neighborhood – and closed quickly. Both the seller and buyer were thrilled with this transaction!
 Bennett Contracting, Inc.
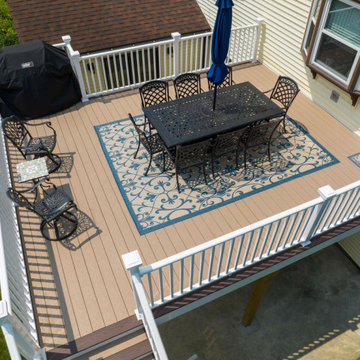
Our next project gave us an amazing opportunity to work with a delightful couple who wanted to breathe new life into their outdated and deteriorated 2-tier wooden deck. Upon assessing the space as well as the wants and needs of our clients, Project Manager, EJ Bonacker, knew it was evident that there was immense potential for improvement. He proposed to shift the deck to a single level and incorporate a Trex RainEscape system. This ingenious addition ensured the area below the deck would remain dry and usable no matter the weather conditions and would also maximize space for entertaining friends and family. Low maintenance TimberTech decking and Titan railings were used which will allow our clients to spend more time enjoying the deck rather than maintaining it. While the older deck did have some lighting, we proposed a comprehensive lighting upgrade which included lights around the perimeter as well as well-lit stairs leading to the ground level which enhanced not only the aesthetics but also the safety during evening gatherings. One of our favorite pieces of this project was designing a special nook for the grill as to not encroach on the primary entertainment area. Our clients were ecstatic we were able to complete their project just in time for the Fourth of July celebrations so they could share laughter, delicious food and create beautiful memories with their neighbors, kids and grandkids. We look forward to helping these clients with more projects for years to come!
 Sunspace Design, Inc.
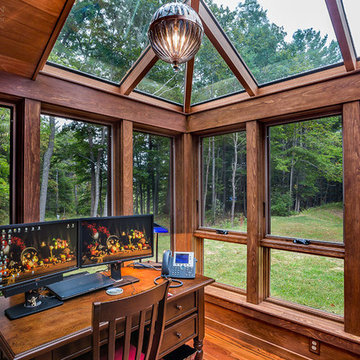
This project’s owner originally contacted Sunspace because they needed to replace an outdated, leaking sunroom on their North Hampton, New Hampshire property. The aging sunroom was set on a fieldstone foundation that was beginning to show signs of wear in the uppermost layer. The client’s vision involved repurposing the ten foot by ten foot area taken up by the original sunroom structure in order to create the perfect space for a new home office. Sunspace Design stepped in to help make that vision a reality.
We began the design process by carefully assessing what the client hoped to achieve. Working together, we soon realized that a glass conservatory would be the perfect replacement. Our custom conservatory design would allow great natural light into the home while providing structure for the desired office space.
Because the client’s beautiful home featured a truly unique style, the principal challenge we faced was ensuring that the new conservatory would seamlessly blend with the surrounding architectural elements on the interior and exterior. We utilized large, Marvin casement windows and a hip design for the glass roof. The interior of the home featured an abundance of wood, so the conservatory design featured a wood interior stained to match.
The end result of this collaborative process was a beautiful conservatory featured at the front of the client’s home. The new space authentically matches the original construction, the leaky sunroom is no longer a problem, and our client was left with a home office space that’s bright and airy. The large casements provide a great view of the exterior landscape and let in incredible levels of natural light. And because the space was outfitted with energy efficient glass, spray foam insulation, and radiant heating, this conservatory is a true four season glass space that our client will be able to enjoy throughout the year.
Find the right local pro for your project
 J.P. Hoffman Design Build
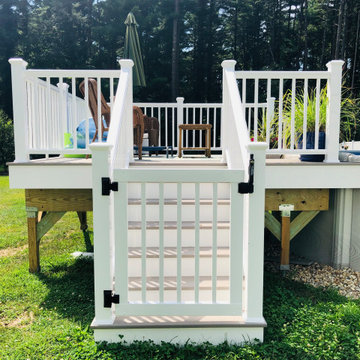
Using low and maintenance-free materials, these two Norton, MA deck renovation projects will have lasting impact. Our clients hired us to create a space to be used for entertaining and relaxation. We built a 12×12 deck onto their brand-new above ground pool. As premier deck contractors, we designed and built this beautiful, modern and maintenance free deck using AZEK PVC decking. AZEK has a natural wood look and is engineered to last longer than alternative materials like pressure-treated wood. Lead Designer, Jason Hoffman, worked with the Norton, MA homeowners through the Design phase and produced a simple, yet effective and classic design.
We partnered with Techno Metal Post, installing Helical Piers for the deck’s foundation. We’re fans of these steel metal posts because of their low footprint on the job. The rapid installation allows us to build on them immediately rather than waiting for concrete to dry. Our team of professionals assess each job to determine the best materials and practices that allow for a seamless, safe and secure building.
In addition to the new pool deck, we also renovated the homeowner’s existing rear deck off the back of the 2nd story of their home. The deck board and railing were in need of repair although the foundation itself was in good shape. We removed the pressure treated decking and rails and facelifted the existing space with the same AZEK PVC decking and railings as the pool deck to create a cohesive backyard look. We also installed composite decking with riser boards on the stairs with a new rail system.
 Evergreen Remodeling & Construction
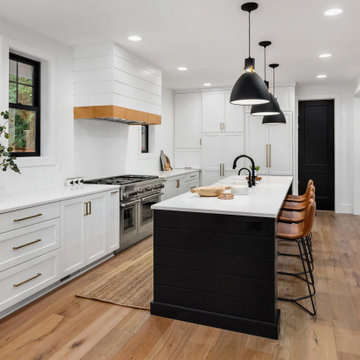
Evergreen successfully completed this comprehensive kitchen renovation on Coronado Island, one of the most stunning destination in Southern California, transforming the space into a modern, functional culinary hub that balances aesthetic appeal with technical precision.
The renovation required careful structural planning, beginning with the removal of existing cabinetry and assessment of electrical and plumbing systems. We relocated water supply lines and drainage to accommodate the new island configuration, ensuring all connections met current building codes. The electrical system was upgraded to support modern appliances, including dedicated 220V circuits for the range and additional outlets strategically placed for small appliances.
The centerpiece island incorporates integrated appliances, requiring precise cutouts and reinforced support structures. We installed a dishwasher with proper venting and water connections, while maintaining seamless cabinetry lines. The ventilation system was redesigned to handle the open-concept layout, with a powerful range hood that ensures proper air circulation.
Flooring installation utilized engineered hardwood with proper moisture barriers and expansion gaps, essential for kitchen environments. The white quartz countertops were templated on-site for perfect fit, with careful attention to seam placement and undermount sink installation.
In the other side, the color palette combines crisp white perimeter cabinets with a contrasting dark island, creating visual depth. Three oversized pendant lights provide both task and ambient lighting, while recessed LED fixtures ensure even illumination. Black fixtures and hardware tie the modern aesthetic together, while natural wood tones add warmth to the contemporary space.
 Senergy360, LLC.
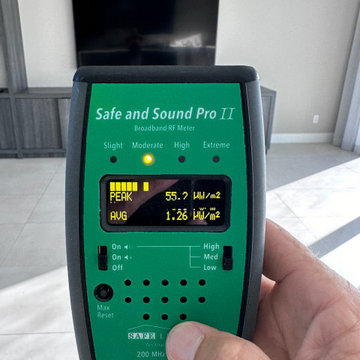
Capturing the critical importance of EMF testing, this professional photo showcases a certified inspector using a state-of-the-art EMF meter to measure dirty electricity levels near a home's electrical panel. The meter's digital display glows with clear numerical readings, while the inspector's careful positioning demonstrates proper testing technique for accurate measurements.
Dirty electricity testing is crucial for modern homes because:
Poor power quality can affect both human health and electronic equipment performance. When your home's electrical system carries microsurges and voltage spikes (dirty electricity), it can contribute to headaches, fatigue, and sleep issues. Additionally, sensitive electronics may malfunction or have shortened lifespans when exposed to poor power quality.
Dirty electricity often stems from modern devices like LED lights, smart appliances, solar inverters, and dimmer switches. These technologies, while energy-efficient, can create electrical noise that travels throughout your home's wiring. Professional testing helps identify problematic areas and guides targeted solutions like whole-house filters or circuit-specific interventions.
For families concerned about creating a truly healthy home environment, dirty electricity testing is an essential but often overlooked assessment. Our comprehensive testing services help identify EMF hotspots and power quality issues, allowing us to recommend effective mitigation strategies for a cleaner electrical environment.
[Note: This description would pair well with a photo on Houzz showcasing EMF inspection services and healthy home practices.]
 Design Line Kitchens
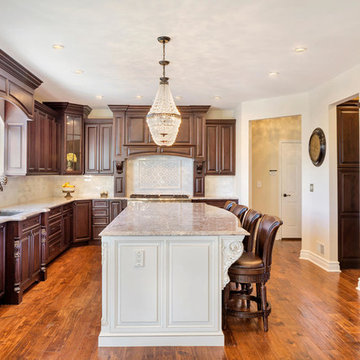
Kitchen by Design Line Kitchens in Sea Girt New Jersey
Fabulous Elegance and Style create a flawless dream kitchen. Traditional arches and raised panel doors are show stoppers .
Photography by: Nettie Einhorn
 Castle Building & Remodeling
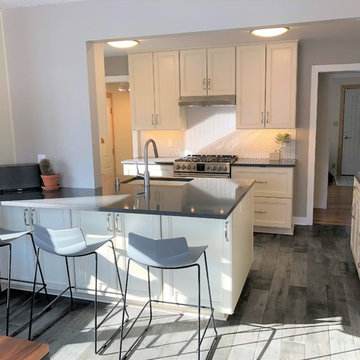
1950’s kitchens need love too... and make great remodels! These homeowners contacted Castle for help on their kitchen remodel. The biggest wish-list item was a larger and more functional kitchen layout (with expanded views into the previously completed rear addition/dining room).
After some conceptual design concepts were assessed, we chose to keep this kitchen's existing footprint and expand the site lines into the rear dining space with a new drywall opening. We expanded the function of the kitchen by wrapping the peninsula around into the dining room with an additional pantry space for kitchen overflow storage. Each cabinet was well thought out for the homeowners use of the space to include functional storage accessories like plate divides, utensil pull-outs, and trash/recycle bins.
Working with the designer, the homeowners found a beautiful balance of some contemporary aesthetics like the overall color scheme combined with some classic elements such as the detailed cabinetry and herringbone tile backsplash. One of our favorite details in the kitchen is the new tile floor that continues into the dining room. The wood texture plank tile adds depth and texture as well as contrasts nicely with the softer and refined finishes above. New Cambria quartz countertops, new cabinetry, herringbone tile backsplash, new tile floors, custom lighting, and new plumbing fixtures complete the space. The new transitional styled kitchen can grow with the family for many years to come. With a swap out of some furniture the whole space can transition between contemporary or traditional. Truly timeless!
Designed by: Emily Blonigen. See the full details (including before photos) on our website: http://www.castlebri.com/kitchens/project-3309-1/
Make sure to check out this project on the Castle Educational Home Tour, September 29 - 30th, 2018!
 Holder Parlette Architecture + Landscapes
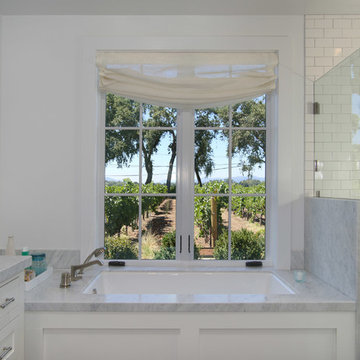
Inspiration for a transitional white tile and porcelain tile drop-in bathtub remodel in San Francisco with marble countertops
 Windy City Painters
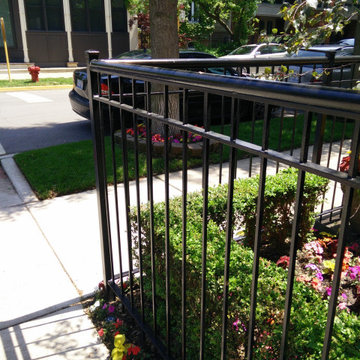
Ever notice how your iron fence looks worse every spring after Chicago winters? That steady seasonal decline is not inevitable - it is a preparation and coating problem that Windy City Painters solves with systematic metal restoration.
PROJECT OVERVIEW
Iron fence painting in Chicago requires more than a fresh coat of paint. Chicago's freeze-thaw cycles, road salt exposure, and high seasonal humidity create conditions that destroy inadequately prepared metal coatings within a year or two. Windy City Painters approaches every iron fence project as a corrosion control job first and a painting job second. The result is a finish that holds up through multiple Chicago winters without peeling, bubbling, or allowing rust to spread beneath the surface.
MAterials AND PRODUCTS
Windy City Painters selects products specifically rated for ferrous metal in high-corrosion environments. For rust conversion, we use Ospho phosphoric acid treatment or Corroseal water-based rust converter, both of which chemically transform active rust into a stable iron phosphate compound. For priming and finish coats, Rust-Oleum DTM and Sherwin-Williams DTM rust-inhibitive direct-to-metal coatings provide excellent adhesion, flexibility, and moisture resistance. These products are formulated to expand and contract with metal through temperature swings without cracking.
THE PROCESS
Step 1 - Mechanical Surface Preparation: Wire wheel grinding and needle gun descaling remove all loose rust, failing paint, and mill scale. This step is non-negotiable. No rust-inhibitive coating performs correctly over contaminated or loosely adhered substrate. Windy City Painters treats this phase as the foundation of the entire project.
Step 2 - Rust Conversion Treatment: Ospho or Corroseal is applied to any remaining rust after mechanical prep. These products do not simply cover rust - they react with iron oxide to create iron phosphate, a chemically stable surface that accepts primer without ongoing corrosion underneath. Contact time and full surface saturation are critical.
Step 3 - Rust-Inhibitive Priming: Rust-Oleum DTM or Sherwin-Williams DTM rust-inhibitive primer is applied by brush to ensure full penetration into ornamental details, crevices, and rail joints where moisture collects. Spray application alone misses critical contact points on older Chicago ironwork.
Step 4 - Finish Coat Application: Two finish coats of Rust-Oleum DTM or Sherwin-Williams DTM topcoat deliver color saturation, UV stability, and a hard film that resists chipping from foot traffic, landscaping equipment, and seasonal debris impact common to Chicago urban properties.
CHICAGO-SPECIFIC CHALLENGES
Chicago iron fences face a combination of stressors that accelerates failure compared to milder climates. Road salt spray migrates well beyond the street surface and deposits chlorides on fence metal throughout winter. Freeze-thaw cycles - sometimes occurring multiple times in a single week - expand and contract metal enough to crack coatings that lack flexibility. Older ornamental iron on greystones, Victorian brownstones, two-flats, and courtyard buildings often has decades of paint buildup that must be addressed before any restoration coating will perform correctly.
WHAT TO EXPECT LONG-TERM
A properly prepared and coated iron fence painted by Windy City Painters typically performs five to seven years before requiring recoating in Chicago conditions. Annual spring inspection for salt residue, minor touch-up of any chips within the first season, and a light rinse to remove winter road chemicals all extend coating life. Structural rust that has compromised rail integrity should be addressed by a welder before painting - Windy City Painters identifies these conditions during initial assessment.
PRO TIPS
Tip 1: Never paint over rust without a conversion treatment first. Paint applied over active rust creates a sealed environment where corrosion accelerates invisibly until the coating fails completely.
Tip 2: Budget for welded repairs on iron fences older than twenty-five years. Ornamental iron on Chicago historic properties often has pitting or section loss that painting alone cannot address structurally.
Tip 3: Time your iron fence painting project for late spring or early fall when temperatures stay consistently above fifty degrees overnight. DTM coatings need adequate cure time before the first freeze to achieve full hardness.
Call Windy City Painters to schedule your iron fence assessment at windypainters.com.
FAQ
Q: What is the cost of iron fence painting in Chicago?
A: Iron fence painting cost in Chicago varies by linear footage, rust severity, and ornamental complexity. Windy City Painters provides free on-site estimates so you receive an accurate number before any commitment is made.
Q: Do you need to remove all old paint before repainting an iron fence?
A: Not always. Windy City Painters assesses existing coating adhesion. Sound paint in good condition can remain. Peeling, bubbling, or paint over active rust must be removed for the new coating to perform correctly.
Q: Can structural rust on an iron fence be repaired without replacing the fence?
A: Depends on severity. Surface and moderate rust responds well to conversion treatment and DTM coatings. If rust has caused section loss or structural weakness, Windy City Painters recommends a welder address those areas before painting.
Q: How long does iron fence painting take?
A: Most residential iron fence projects take one to three days including prep, rust conversion, priming, and two finish coats. Windy City Painters sequences cure time between coats to ensure full adhesion at every stage.
Q: What is the best paint for iron fences in Chicago?
A: Rust-Oleum DTM and Sherwin-Williams DTM rust-inhibitive coatings are among the best options for Chicago iron fences due to their flexibility, moisture resistance, and ability to handle freeze-thaw temperature swings without cracking.
Q: Is it worth painting an old iron fence or should I replace it?
A: Painting is almost always more cost-effective than replacement for structurally sound iron. Windy City Painters assesses every fence honestly and only recommends replacement when restoration would not deliver a durable result.
Q: How do I find a reliable iron fence painting contractor near me in Chicago?
A: Look for contractors who specify rust conversion products by name, explain their mechanical prep process, and provide references from similar Chicago properties. Windy City Painters documents every step and warranties our work.

 Shuler Architecture
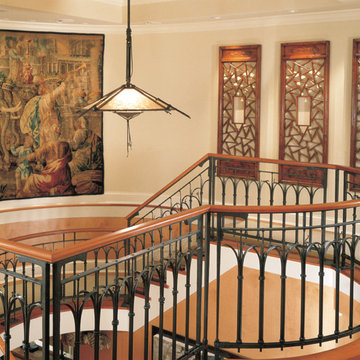
The Owners of this luxurious waterfront estate acquired this property after the previous owners defaulted on their loan and stopped construction. We were initially engaged to inspect and assess the structural integrity of the building shell and work with a geo-technical engineer to evaluate the condition of the site’s soil. Tests determined that the site’s previous use as a sawmill and Native American fishing ground rendered the soil unfit for construction activity. In response to the lack of soil bearing capacity, our solution employs expansive footings supported by hundreds of piles throughout the entire project site.
After completing our inspection of the structure, we were engaged to completely redesigned this home to accommodate our clients’ growing family and extensive art collection. Stylistically, this highly detailed structure borrows from the grand bungalows of the Greene brothers in Pasadena, California while employing sophisticated climate, lighting, AV and security systems. To ensure our clients’ art collection was properly displayed and protected, we worked with specialists from the Seattle Art Museum to develop appropriate lighting and climate control systems. Finally, we engaged the best craftsman we know – general contractor, interior designer, landscape architect, cabinet maker, blacksmith, custom woodworker and stone mason – to execute what ultimately became our clients’ very personal and unique statement for their home.
 KD Landscape
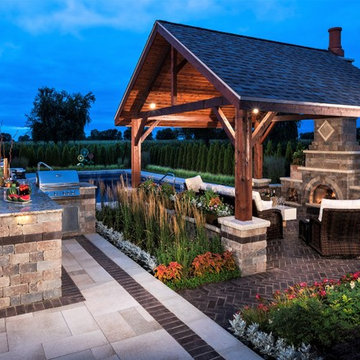
If a night time dip in the pool cools anyone off too much, they can warm up by the fireplace. Photography by Jerry Portelli of Architectural Specialists.
 REKindred - ARCHITECT
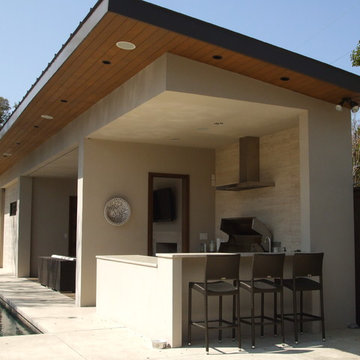
Modern Cabana and pool for Mid-Century whole house remodel, Preston Hollow, Dallas, Texas.
Minimalist pool photo in Dallas
Minimalist pool photo in Dallas
 Castle Building & Remodeling
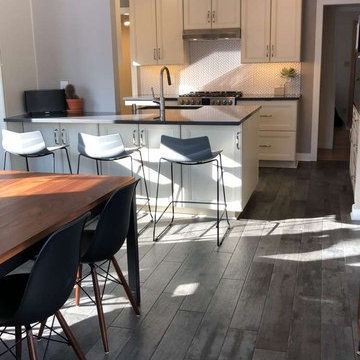
1950’s kitchens need love too... and make great remodels! These homeowners contacted Castle for help on their kitchen remodel. The biggest wish-list item was a larger and more functional kitchen layout (with expanded views into the previously completed rear addition/dining room).
After some conceptual design concepts were assessed, we chose to keep this kitchen's existing footprint and expand the site lines into the rear dining space with a new drywall opening. We expanded the function of the kitchen by wrapping the peninsula around into the dining room with an additional pantry space for kitchen overflow storage. Each cabinet was well thought out for the homeowners use of the space to include functional storage accessories like plate divides, utensil pull-outs, and trash/recycle bins.
Working with the designer, the homeowners found a beautiful balance of some contemporary aesthetics like the overall color scheme combined with some classic elements such as the detailed cabinetry and herringbone tile backsplash. One of our favorite details in the kitchen is the new tile floor that continues into the dining room. The wood texture plank tile adds depth and texture as well as contrasts nicely with the softer and refined finishes above. New Cambria quartz countertops, new cabinetry, herringbone tile backsplash, new tile floors, custom lighting, and new plumbing fixtures complete the space. The new transitional styled kitchen can grow with the family for many years to come. With a swap out of some furniture the whole space can transition between contemporary or traditional. Truly timeless!
Designed by: Emily Blonigen. See the full details (including before photos) on our website: http://www.castlebri.com/kitchens/project-3309-1/
Make sure to check out this project on the Castle Educational Home Tour, September 29 - 30th, 2018!
 Castle Building & Remodeling
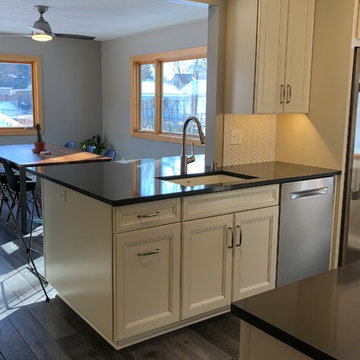
1950’s kitchens need love too... and make great remodels! These homeowners contacted Castle for help on their kitchen remodel. The biggest wish-list item was a larger and more functional kitchen layout (with expanded views into the previously completed rear addition/dining room).
After some conceptual design concepts were assessed, we chose to keep this kitchen's existing footprint and expand the site lines into the rear dining space with a new drywall opening. We expanded the function of the kitchen by wrapping the peninsula around into the dining room with an additional pantry space for kitchen overflow storage. Each cabinet was well thought out for the homeowners use of the space to include functional storage accessories like plate divides, utensil pull-outs, and trash/recycle bins.
Working with the designer, the homeowners found a beautiful balance of some contemporary aesthetics like the overall color scheme combined with some classic elements such as the detailed cabinetry and herringbone tile backsplash. One of our favorite details in the kitchen is the new tile floor that continues into the dining room. The wood texture plank tile adds depth and texture as well as contrasts nicely with the softer and refined finishes above. New Cambria quartz countertops, new cabinetry, herringbone tile backsplash, new tile floors, custom lighting, and new plumbing fixtures complete the space. The new transitional styled kitchen can grow with the family for many years to come. With a swap out of some furniture the whole space can transition between contemporary or traditional. Truly timeless!
Designed by: Emily Blonigen. See the full details (including before photos) on our website: http://www.castlebri.com/kitchens/project-3309-1/
Make sure to check out this project on the Castle Educational Home Tour, September 29 - 30th, 2018!
 Home Improvements
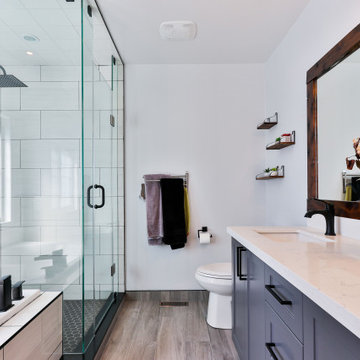
Embarking on a bathroom remodeling project is an exciting endeavor that can greatly enhance the functionality, aesthetics, and value of your home. However, finding a reliable and skilled contractor in a bustling city like Los Angeles can be a daunting task. To simplify the process and ensure a successful bathroom renovation, we have compiled a comprehensive guide on how to find a reputable bathroom remodeling contractor in Los Angeles, California.
Start with Online Research:
The first step in your quest for a reliable contractor is to conduct thorough online research. Utilize search engines like Google to find bathroom remodeling contractors in Los Angeles. Be sure to include specific keywords such as "bathroom remodeling," "contractor," and "Los Angeles" to refine your search results.
Check Online Directories and Review Platforms:
Explore online directories and review platforms like Yelp, Angie's List, and Houzz to find a curated list of bathroom remodeling contractors in Los Angeles. These platforms often provide detailed information about contractors, including customer reviews, ratings, project photos, and contact details. Assess the overall rating and read through multiple reviews to gauge the contractor's reputation and reliability.
Seek Recommendations:
Ask friends, family, neighbors, and colleagues who have recently undergone a bathroom remodeling project in Los Angeles for recommendations. Personal referrals can provide valuable insights and firsthand experiences that online research may not uncover. Inquire about the contractor's professionalism, craftsmanship, adherence to timelines, and overall satisfaction with the project.
Verify Credentials and Licensing:
Once you have shortlisted potential contractors, it is crucial to verify their credentials and licensing. Check if they are licensed by the Contractors State License Board (CSLB) in California. A valid license ensures that the contractor meets the state's requirements and regulations. Additionally, inquire about their insurance coverage to protect against any potential liabilities during the remodeling process.
Evaluate Experience and Expertise:
Assess the experience and expertise of the contractors on your list. Look for contractors who specialize in bathroom remodeling and have a proven track record of successful projects. Review their portfolios or ask for references to see examples of their previous work. A skilled contractor should be able to handle a variety of bathroom designs and styles, and provide creative solutions to meet your specific needs.
Schedule In-Person Consultations:
Arrange in-person consultations with the shortlisted contractors. Use this opportunity to discuss your remodeling goals, budget, timeline, and any specific requirements you may have. A reputable contractor will listen attentively, provide insights, and offer suggestions based on their expertise. Pay attention to their communication style, professionalism, and responsiveness, as these qualities are crucial for a smooth working relationship.
Request Detailed Quotes and Contracts:
Ask the contractors for detailed written quotes that outline the project's scope, materials, labor costs, and any additional expenses. A comprehensive quote will help you compare the estimates provided by different contractors effectively. Once you have selected a contractor, ensure that you have a detailed contract in place that covers all aspects of the project, including timelines, payment schedules, warranties, and dispute resolution processes.
Seek Permits and Building Code Compliance:
Bathroom remodeling projects often require permits and adherence to building codes. A reputable contractor will be familiar with the local building regulations in Los Angeles and should handle the permit application process on your behalf. Verify that the contractor will obtain the necessary permits and ensure that all work is compliant with local codes and regulations.
Conclusion:
Finding a bathroom remodeling contractor in Los Angeles, California, may seem overwhelming, but by following these guidelines, you can streamline the process and select a contractor who meets your expectations. Conduct thorough online research, seek recommendations, verify credentials, evaluate experience, and schedule in-person consultations to make an informed decision.
 Sunspace Design, Inc.
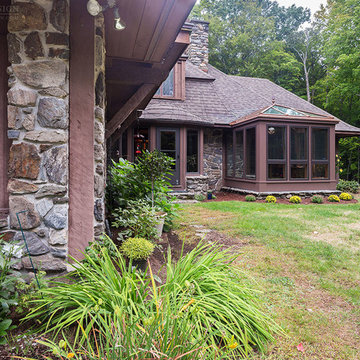
This project’s owner originally contacted Sunspace because they needed to replace an outdated, leaking sunroom on their North Hampton, New Hampshire property. The aging sunroom was set on a fieldstone foundation that was beginning to show signs of wear in the uppermost layer. The client’s vision involved repurposing the ten foot by ten foot area taken up by the original sunroom structure in order to create the perfect space for a new home office. Sunspace Design stepped in to help make that vision a reality.
We began the design process by carefully assessing what the client hoped to achieve. Working together, we soon realized that a glass conservatory would be the perfect replacement. Our custom conservatory design would allow great natural light into the home while providing structure for the desired office space.
Because the client’s beautiful home featured a truly unique style, the principal challenge we faced was ensuring that the new conservatory would seamlessly blend with the surrounding architectural elements on the interior and exterior. We utilized large, Marvin casement windows and a hip design for the glass roof. The interior of the home featured an abundance of wood, so the conservatory design featured a wood interior stained to match.
The end result of this collaborative process was a beautiful conservatory featured at the front of the client’s home. The new space authentically matches the original construction, the leaky sunroom is no longer a problem, and our client was left with a home office space that’s bright and airy. The large casements provide a great view of the exterior landscape and let in incredible levels of natural light. And because the space was outfitted with energy efficient glass, spray foam insulation, and radiant heating, this conservatory is a true four season glass space that our client will be able to enjoy throughout the year.
 Chicago Flooring Innovations
Divine Simplicity Photo
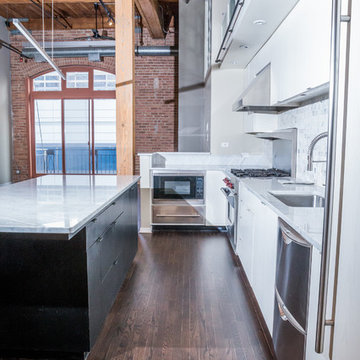
Example of a mid-sized minimalist l-shaped dark wood floor and brown floor open concept kitchen design in Chicago with an undermount sink, flat-panel cabinets, white cabinets, granite countertops, gray backsplash, stainless steel appliances and an island
Example of a mid-sized minimalist l-shaped dark wood floor and brown floor open concept kitchen design in Chicago with an undermount sink, flat-panel cabinets, white cabinets, granite countertops, gray backsplash, stainless steel appliances and an island
 Castle Building & Remodeling
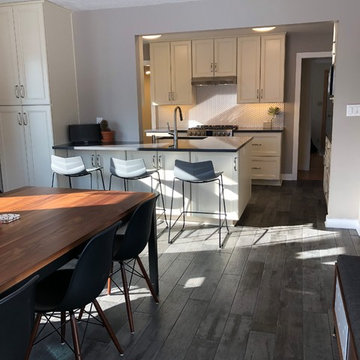
1950’s kitchens need love too... and make great remodels! These homeowners contacted Castle for help on their kitchen remodel. The biggest wish-list item was a larger and more functional kitchen layout (with expanded views into the previously completed rear addition/dining room).
After some conceptual design concepts were assessed, we chose to keep this kitchen's existing footprint and expand the site lines into the rear dining space with a new drywall opening. We expanded the function of the kitchen by wrapping the peninsula around into the dining room with an additional pantry space for kitchen overflow storage. Each cabinet was well thought out for the homeowners use of the space to include functional storage accessories like plate divides, utensil pull-outs, and trash/recycle bins.
Working with the designer, the homeowners found a beautiful balance of some contemporary aesthetics like the overall color scheme combined with some classic elements such as the detailed cabinetry and herringbone tile backsplash. One of our favorite details in the kitchen is the new tile floor that continues into the dining room. The wood texture plank tile adds depth and texture as well as contrasts nicely with the softer and refined finishes above. New Cambria quartz countertops, new cabinetry, herringbone tile backsplash, new tile floors, custom lighting, and new plumbing fixtures complete the space. The new transitional styled kitchen can grow with the family for many years to come. With a swap out of some furniture the whole space can transition between contemporary or traditional. Truly timeless!
Designed by: Emily Blonigen. See the full details (including before photos) on our website: http://www.castlebri.com/kitchens/project-3309-1/
Make sure to check out this project on the Castle Educational Home Tour, September 29 - 30th, 2018!
50