
Search results for "Building professionals" in Home Design Ideas
 John McClain Design
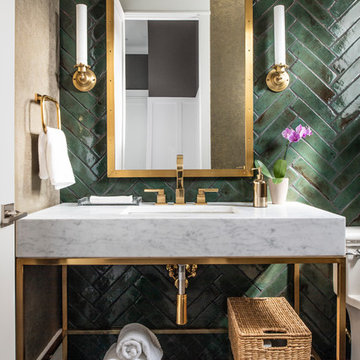
Powder room with a punch! Handmade green subway tile is laid in a herringbone pattern for this feature wall. The other three walls received a gorgeous gold metallic print wallcovering. A brass and marble sink with all brass fittings provide the perfect contrast to the green tile backdrop. Walnut wood flooring
Photo: Stephen Allen
 Battle Associates, Architects
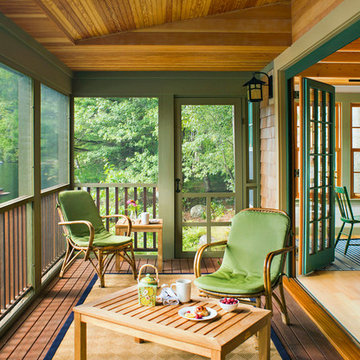
This project was a Guest House for a long time Battle Associates Client. Smaller, smaller, smaller the owners kept saying about the guest cottage right on the water's edge. The result was an intimate, almost diminutive, two bedroom cottage for extended family visitors. White beadboard interiors and natural wood structure keep the house light and airy. The fold-away door to the screen porch allows the space to flow beautifully.
Photographer: Nancy Belluscio
 CARNEMARK design + build
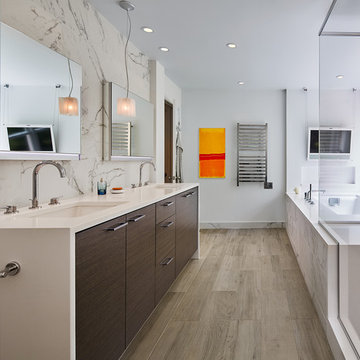
SUITABLE STORAGE. Large lift-up Robern medicine cabinets provide a unique storage option with integrated interior lighting, electrical outlets and cable management area. Special bath features include heated porcelain tile flooring with a contemporary wood charm, as well as a heated towel rack to keep cozy and warm during the winter months.
Photography by Anice Hoachlander
Find the right local pro for your project

 Turnbull Griffin Haesloop
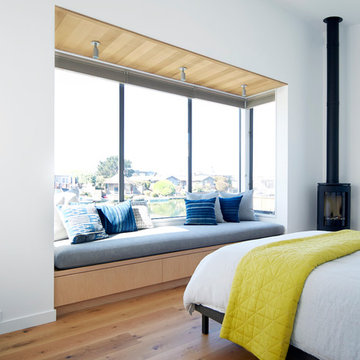
Bedroom - contemporary medium tone wood floor bedroom idea in San Francisco with white walls and a wood stove

 Talon Construction Inc.
Designing and building a kitchen addition is a complex process that involves multiple steps and considerations. Here is a general outline to help you get started on your kitchen addition project:
Define Your Goals and Budget:
• Determine the purpose of the kitchen addition. Is it for more cooking space, a dining area, or a combination of both?
• Establish a realistic budget for your project. Consider all costs, including construction, permits, materials, and furnishings.
Hire a Design Professional:
• Seek the services of a design build company who specializes in kitchen additions.
• Discuss your vision, needs, and budget with the design professional to create a design concept.
Site Evaluation:
• Assess the existing space and structural condition of your home to ensure it can support the addition.
• Consider factors like zoning regulations, setbacks, and building codes.
Design Development:
• Collaborate with your design professional to refine the concept, including the layout, size, and architectural style.
• Choose materials, finishes, and fixtures that fit your design and budget.
Obtain Permits:
• Consult with your local design build contractor to determine the necessary permits and approvals.
• Prepare and submit all required documents, including architectural drawings and engineering plans.
Create Construction Documents:
• Work with your design build professional to develop detailed construction drawings and specifications.
• These documents will serve as a guide for contractors during construction.
Hire a design build contractor:
• Check references, credentials, and licenses before selecting a contractor.
• Sign a detailed contract that outlines the scope of work, timeline, and payment schedule.
Construction Phase:
• Demolition: If needed, remove any existing structures or walls.
• Foundation: Construct the foundation for the addition.
• Framing: Build the structural framework of the addition.
• Plumbing, Electrical, and HVAC: Install or update utilities as required.
• Insulation: Ensure proper insulation for energy efficiency.
• Drywall and Finish Work: Complete the walls and ceilings.
• Flooring and Cabinetry: Install flooring and kitchen cabinets.
• Appliances and Fixtures: Add appliances, plumbing fixtures, and lighting.
• Paint and Finish: Apply paint and finishes to achieve the desired look.
• Final Inspection: Schedule inspections to ensure compliance with building codes.
Final Inspections and Approvals:
• Arrange for final inspections to ensure the addition meets all safety and code requirements.
• Obtain any necessary certificates of occupancy or compliance.
Move In and Enjoy:
• Once all inspections and approvals are received, you can move into your new kitchen addition and start enjoying it.
Remember that every kitchen addition project is unique, so adapt this outline to your specific needs and circumstances. Consulting with professionals and obtaining the required permits and inspections is crucial to a successful and safe project.
 Asher Seaton Homes
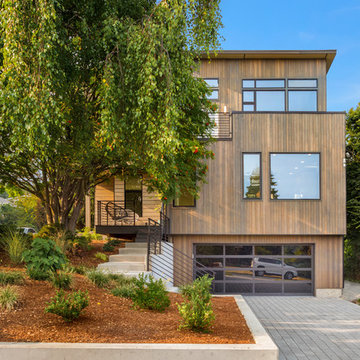
EXTERIOR
---
-Locally sourced, solid cedar siding, selected for both its beauty and durability - substantially upgraded with rain screen wrap
-Impervia Series, Fiberglass Pella windows with the highest built-green rating and energy efficiency, eliminating vinyl gas emissions
-TimberTech 100% composite decking with a 25-year warranty
-Professional landscaping with an authentic Pacific Northwest look
-Custom wood and glass front door made especially for the home

Sponsored
Columbus, OH

Hope Restoration & General Contracting
Columbus Design-Build, Kitchen & Bath Remodeling, Historic Renovations

 RTH Building Company
Kyle Caldwell
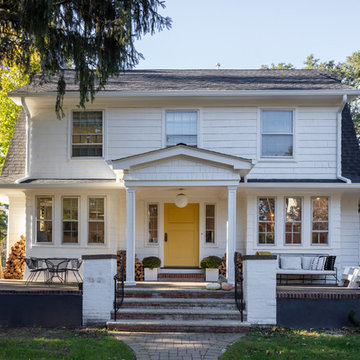
Elegant white two-story gable roof photo in New York with a shingle roof
Elegant white two-story gable roof photo in New York with a shingle roof
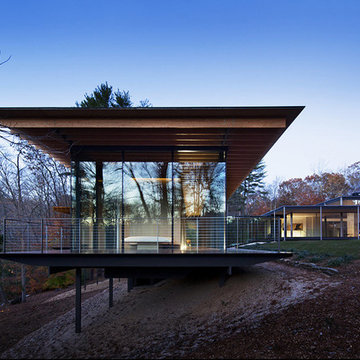
 Keuka Studios, Inc
Sleek lines.Slender cable railings ny Keuka Studios, inc.
Example of a minimalist exterior home design in New York
Example of a minimalist exterior home design in New York
 Homeowner Services of Michigan LLC
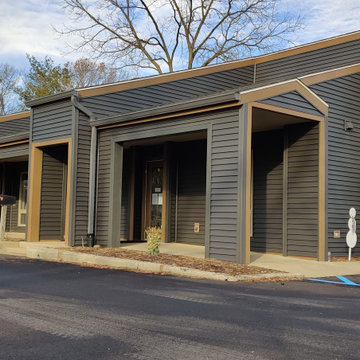
Homeowner Services of Michigan recently completed a comprehensive exterior restoration project for a professional building owned by a commercial property client. The client selected us for our ability to meet their specific needs and adhere to their timeline. A key requirement was to complete the project without disrupting the tenants of the complex.
We began by carefully removing the old, outdated siding. Our team ensured minimal disturbance to the tenants by scheduling work during off-peak hours and utilizing sound-dampening techniques. Once the old siding was removed, we prepared the building’s inner sheath and applied advanced weather-sealing techniques to protect against moisture and improve insulation.
Next, we installed high-quality HardieBoard cement composite siding in a deep slate blue color. This choice provided a modern and professional appearance. Our team ensured precise alignment and secure fastening for maximum durability.
To complete the look, we installed contrasting regal gold trim, gutters, and downspouts. The regal gold trim highlighted the building’s architectural features, while the matching gutters and downspouts ensured efficient water drainage and added to the building's aesthetic appeal.
The project was completed on time and within budget, with no disruption to the building’s tenants. The new exterior not only enhanced the building's curb appeal but also provided improved weather resistance and energy efficiency. The combination of deep slate blue HardieBoard siding and regal gold trim created a striking, professional look that perfectly aligned with the client’s vision.
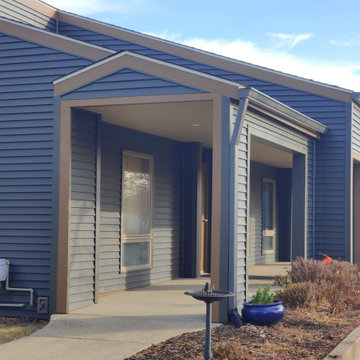 Homeowner Services of Michigan LLC
Homeowner Services of Michigan recently completed a comprehensive exterior restoration project for a professional building owned by a commercial property client. The client selected us for our ability to meet their specific needs and adhere to their timeline. A key requirement was to complete the project without disrupting the tenants of the complex.
We began by carefully removing the old, outdated siding. Our team ensured minimal disturbance to the tenants by scheduling work during off-peak hours and utilizing sound-dampening techniques. Once the old siding was removed, we prepared the building’s inner sheath and applied advanced weather-sealing techniques to protect against moisture and improve insulation.
Next, we installed high-quality HardieBoard cement composite siding in a deep slate blue color. This choice provided a modern and professional appearance. Our team ensured precise alignment and secure fastening for maximum durability.
To complete the look, we installed contrasting regal gold trim, gutters, and downspouts. The regal gold trim highlighted the building’s architectural features, while the matching gutters and downspouts ensured efficient water drainage and added to the building's aesthetic appeal.
The project was completed on time and within budget, with no disruption to the building’s tenants. The new exterior not only enhanced the building's curb appeal but also provided improved weather resistance and energy efficiency. The combination of deep slate blue HardieBoard siding and regal gold trim created a striking, professional look that perfectly aligned with the client’s vision.
 Talon Construction Inc.
Designing and building a kitchen addition is a complex process that involves multiple steps and considerations. Here is a general outline to help you get started on your kitchen addition project:
Define Your Goals and Budget:
• Determine the purpose of the kitchen addition. Is it for more cooking space, a dining area, or a combination of both?
• Establish a realistic budget for your project. Consider all costs, including construction, permits, materials, and furnishings.
Hire a Design Professional:
• Seek the services of a design build company who specializes in kitchen additions.
• Discuss your vision, needs, and budget with the design professional to create a design concept.
Site Evaluation:
• Assess the existing space and structural condition of your home to ensure it can support the addition.
• Consider factors like zoning regulations, setbacks, and building codes.
Design Development:
• Collaborate with your design professional to refine the concept, including the layout, size, and architectural style.
• Choose materials, finishes, and fixtures that fit your design and budget.
Obtain Permits:
• Consult with your local design build contractor to determine the necessary permits and approvals.
• Prepare and submit all required documents, including architectural drawings and engineering plans.
Create Construction Documents:
• Work with your design build professional to develop detailed construction drawings and specifications.
• These documents will serve as a guide for contractors during construction.
Hire a design build contractor:
• Check references, credentials, and licenses before selecting a contractor.
• Sign a detailed contract that outlines the scope of work, timeline, and payment schedule.
Construction Phase:
• Demolition: If needed, remove any existing structures or walls.
• Foundation: Construct the foundation for the addition.
• Framing: Build the structural framework of the addition.
• Plumbing, Electrical, and HVAC: Install or update utilities as required.
• Insulation: Ensure proper insulation for energy efficiency.
• Drywall and Finish Work: Complete the walls and ceilings.
• Flooring and Cabinetry: Install flooring and kitchen cabinets.
• Appliances and Fixtures: Add appliances, plumbing fixtures, and lighting.
• Paint and Finish: Apply paint and finishes to achieve the desired look.
• Final Inspection: Schedule inspections to ensure compliance with building codes.
Final Inspections and Approvals:
• Arrange for final inspections to ensure the addition meets all safety and code requirements.
• Obtain any necessary certificates of occupancy or compliance.
Move In and Enjoy:
• Once all inspections and approvals are received, you can move into your new kitchen addition and start enjoying it.
Remember that every kitchen addition project is unique, so adapt this outline to your specific needs and circumstances. Consulting with professionals and obtaining the required permits and inspections is crucial to a successful and safe project.
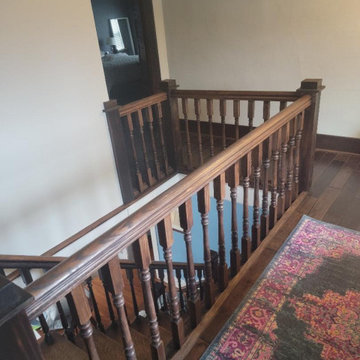

 Homeowner Services of Michigan LLC
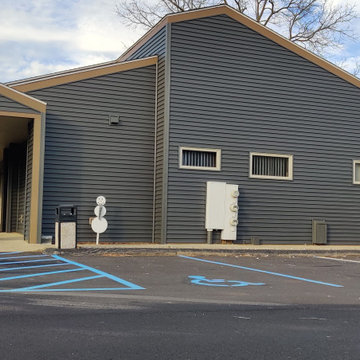
Homeowner Services of Michigan recently completed a comprehensive exterior restoration project for a professional building owned by a commercial property client. The client selected us for our ability to meet their specific needs and adhere to their timeline. A key requirement was to complete the project without disrupting the tenants of the complex.
We began by carefully removing the old, outdated siding. Our team ensured minimal disturbance to the tenants by scheduling work during off-peak hours and utilizing sound-dampening techniques. Once the old siding was removed, we prepared the building’s inner sheath and applied advanced weather-sealing techniques to protect against moisture and improve insulation.
Next, we installed high-quality HardieBoard cement composite siding in a deep slate blue color. This choice provided a modern and professional appearance. Our team ensured precise alignment and secure fastening for maximum durability.
To complete the look, we installed contrasting regal gold trim, gutters, and downspouts. The regal gold trim highlighted the building’s architectural features, while the matching gutters and downspouts ensured efficient water drainage and added to the building's aesthetic appeal.
The project was completed on time and within budget, with no disruption to the building’s tenants. The new exterior not only enhanced the building's curb appeal but also provided improved weather resistance and energy efficiency. The combination of deep slate blue HardieBoard siding and regal gold trim created a striking, professional look that perfectly aligned with the client’s vision.
 Talon Construction Inc.
Designing and building a kitchen addition is a complex process that involves multiple steps and considerations. Here is a general outline to help you get started on your kitchen addition project:
Define Your Goals and Budget:
• Determine the purpose of the kitchen addition. Is it for more cooking space, a dining area, or a combination of both?
• Establish a realistic budget for your project. Consider all costs, including construction, permits, materials, and furnishings.
Hire a Design Professional:
• Seek the services of a design build company who specializes in kitchen additions.
• Discuss your vision, needs, and budget with the design professional to create a design concept.
Site Evaluation:
• Assess the existing space and structural condition of your home to ensure it can support the addition.
• Consider factors like zoning regulations, setbacks, and building codes.
Design Development:
• Collaborate with your design professional to refine the concept, including the layout, size, and architectural style.
• Choose materials, finishes, and fixtures that fit your design and budget.
Obtain Permits:
• Consult with your local design build contractor to determine the necessary permits and approvals.
• Prepare and submit all required documents, including architectural drawings and engineering plans.
Create Construction Documents:
• Work with your design build professional to develop detailed construction drawings and specifications.
• These documents will serve as a guide for contractors during construction.
Hire a design build contractor:
• Check references, credentials, and licenses before selecting a contractor.
• Sign a detailed contract that outlines the scope of work, timeline, and payment schedule.
Construction Phase:
• Demolition: If needed, remove any existing structures or walls.
• Foundation: Construct the foundation for the addition.
• Framing: Build the structural framework of the addition.
• Plumbing, Electrical, and HVAC: Install or update utilities as required.
• Insulation: Ensure proper insulation for energy efficiency.
• Drywall and Finish Work: Complete the walls and ceilings.
• Flooring and Cabinetry: Install flooring and kitchen cabinets.
• Appliances and Fixtures: Add appliances, plumbing fixtures, and lighting.
• Paint and Finish: Apply paint and finishes to achieve the desired look.
• Final Inspection: Schedule inspections to ensure compliance with building codes.
Final Inspections and Approvals:
• Arrange for final inspections to ensure the addition meets all safety and code requirements.
• Obtain any necessary certificates of occupancy or compliance.
Move In and Enjoy:
• Once all inspections and approvals are received, you can move into your new kitchen addition and start enjoying it.
Remember that every kitchen addition project is unique, so adapt this outline to your specific needs and circumstances. Consulting with professionals and obtaining the required permits and inspections is crucial to a successful and safe project.
 Talon Construction Inc.
Designing and building a kitchen addition is a complex process that involves multiple steps and considerations. Here is a general outline to help you get started on your kitchen addition project:
Define Your Goals and Budget:
• Determine the purpose of the kitchen addition. Is it for more cooking space, a dining area, or a combination of both?
• Establish a realistic budget for your project. Consider all costs, including construction, permits, materials, and furnishings.
Hire a Design Professional:
• Seek the services of a design build company who specializes in kitchen additions.
• Discuss your vision, needs, and budget with the design professional to create a design concept.
Site Evaluation:
• Assess the existing space and structural condition of your home to ensure it can support the addition.
• Consider factors like zoning regulations, setbacks, and building codes.
Design Development:
• Collaborate with your design professional to refine the concept, including the layout, size, and architectural style.
• Choose materials, finishes, and fixtures that fit your design and budget.
Obtain Permits:
• Consult with your local design build contractor to determine the necessary permits and approvals.
• Prepare and submit all required documents, including architectural drawings and engineering plans.
Create Construction Documents:
• Work with your design build professional to develop detailed construction drawings and specifications.
• These documents will serve as a guide for contractors during construction.
Hire a design build contractor:
• Check references, credentials, and licenses before selecting a contractor.
• Sign a detailed contract that outlines the scope of work, timeline, and payment schedule.
Construction Phase:
• Demolition: If needed, remove any existing structures or walls.
• Foundation: Construct the foundation for the addition.
• Framing: Build the structural framework of the addition.
• Plumbing, Electrical, and HVAC: Install or update utilities as required.
• Insulation: Ensure proper insulation for energy efficiency.
• Drywall and Finish Work: Complete the walls and ceilings.
• Flooring and Cabinetry: Install flooring and kitchen cabinets.
• Appliances and Fixtures: Add appliances, plumbing fixtures, and lighting.
• Paint and Finish: Apply paint and finishes to achieve the desired look.
• Final Inspection: Schedule inspections to ensure compliance with building codes.
Final Inspections and Approvals:
• Arrange for final inspections to ensure the addition meets all safety and code requirements.
• Obtain any necessary certificates of occupancy or compliance.
Move In and Enjoy:
• Once all inspections and approvals are received, you can move into your new kitchen addition and start enjoying it.
Remember that every kitchen addition project is unique, so adapt this outline to your specific needs and circumstances. Consulting with professionals and obtaining the required permits and inspections is crucial to a successful and safe project.
 Homeowner Services of Michigan LLC
Homeowner Services of Michigan recently completed a comprehensive exterior restoration project for a professional building owned by a commercial property client. The client selected us for our ability to meet their specific needs and adhere to their timeline. A key requirement was to complete the project without disrupting the tenants of the complex.
We began by carefully removing the old, outdated siding. Our team ensured minimal disturbance to the tenants by scheduling work during off-peak hours and utilizing sound-dampening techniques. Once the old siding was removed, we prepared the building’s inner sheath and applied advanced weather-sealing techniques to protect against moisture and improve insulation.
Next, we installed high-quality HardieBoard cement composite siding in a deep slate blue color. This choice provided a modern and professional appearance. Our team ensured precise alignment and secure fastening for maximum durability.
To complete the look, we installed contrasting regal gold trim, gutters, and downspouts. The regal gold trim highlighted the building’s architectural features, while the matching gutters and downspouts ensured efficient water drainage and added to the building's aesthetic appeal.
The project was completed on time and within budget, with no disruption to the building’s tenants. The new exterior not only enhanced the building's curb appeal but also provided improved weather resistance and energy efficiency. The combination of deep slate blue HardieBoard siding and regal gold trim created a striking, professional look that perfectly aligned with the client’s vision.
Sponsored
Columbus, OH

Wannemacher Interiors
Customized Award-Winning Interior Design Solutions in Franklin Cnty OH
 Homeowner Services of Michigan LLC
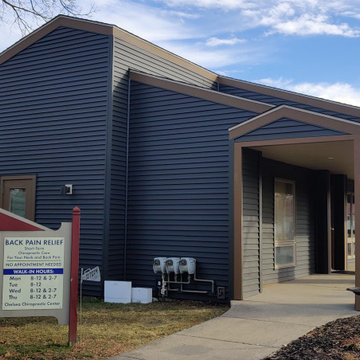
Homeowner Services of Michigan recently completed a comprehensive exterior restoration project for a professional building owned by a commercial property client. The client selected us for our ability to meet their specific needs and adhere to their timeline. A key requirement was to complete the project without disrupting the tenants of the complex.
We began by carefully removing the old, outdated siding. Our team ensured minimal disturbance to the tenants by scheduling work during off-peak hours and utilizing sound-dampening techniques. Once the old siding was removed, we prepared the building’s inner sheath and applied advanced weather-sealing techniques to protect against moisture and improve insulation.
Next, we installed high-quality HardieBoard cement composite siding in a deep slate blue color. This choice provided a modern and professional appearance. Our team ensured precise alignment and secure fastening for maximum durability.
To complete the look, we installed contrasting regal gold trim, gutters, and downspouts. The regal gold trim highlighted the building’s architectural features, while the matching gutters and downspouts ensured efficient water drainage and added to the building's aesthetic appeal.
The project was completed on time and within budget, with no disruption to the building’s tenants. The new exterior not only enhanced the building's curb appeal but also provided improved weather resistance and energy efficiency. The combination of deep slate blue HardieBoard siding and regal gold trim created a striking, professional look that perfectly aligned with the client’s vision.
 Talon Construction Inc.
Designing and building a kitchen addition is a complex process that involves multiple steps and considerations. Here is a general outline to help you get started on your kitchen addition project:
Define Your Goals and Budget:
• Determine the purpose of the kitchen addition. Is it for more cooking space, a dining area, or a combination of both?
• Establish a realistic budget for your project. Consider all costs, including construction, permits, materials, and furnishings.
Hire a Design Professional:
• Seek the services of a design build company who specializes in kitchen additions.
• Discuss your vision, needs, and budget with the design professional to create a design concept.
Site Evaluation:
• Assess the existing space and structural condition of your home to ensure it can support the addition.
• Consider factors like zoning regulations, setbacks, and building codes.
Design Development:
• Collaborate with your design professional to refine the concept, including the layout, size, and architectural style.
• Choose materials, finishes, and fixtures that fit your design and budget.
Obtain Permits:
• Consult with your local design build contractor to determine the necessary permits and approvals.
• Prepare and submit all required documents, including architectural drawings and engineering plans.
Create Construction Documents:
• Work with your design build professional to develop detailed construction drawings and specifications.
• These documents will serve as a guide for contractors during construction.
Hire a design build contractor:
• Check references, credentials, and licenses before selecting a contractor.
• Sign a detailed contract that outlines the scope of work, timeline, and payment schedule.
Construction Phase:
• Demolition: If needed, remove any existing structures or walls.
• Foundation: Construct the foundation for the addition.
• Framing: Build the structural framework of the addition.
• Plumbing, Electrical, and HVAC: Install or update utilities as required.
• Insulation: Ensure proper insulation for energy efficiency.
• Drywall and Finish Work: Complete the walls and ceilings.
• Flooring and Cabinetry: Install flooring and kitchen cabinets.
• Appliances and Fixtures: Add appliances, plumbing fixtures, and lighting.
• Paint and Finish: Apply paint and finishes to achieve the desired look.
• Final Inspection: Schedule inspections to ensure compliance with building codes.
Final Inspections and Approvals:
• Arrange for final inspections to ensure the addition meets all safety and code requirements.
• Obtain any necessary certificates of occupancy or compliance.
Move In and Enjoy:
• Once all inspections and approvals are received, you can move into your new kitchen addition and start enjoying it.
Remember that every kitchen addition project is unique, so adapt this outline to your specific needs and circumstances. Consulting with professionals and obtaining the required permits and inspections is crucial to a successful and safe project.
 E2 Homes Ltd
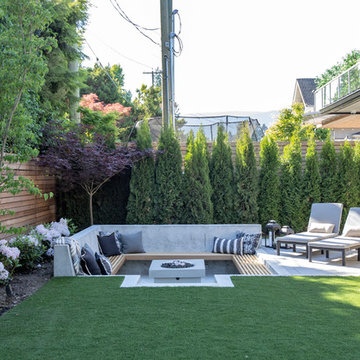
Inspiration for a mid-sized contemporary backyard concrete patio remodel in Vancouver with a fire pit and no cover
8