
Search results for "Cleaning process" in Home Design Ideas
 Guggenheim Architecture + Design Studio
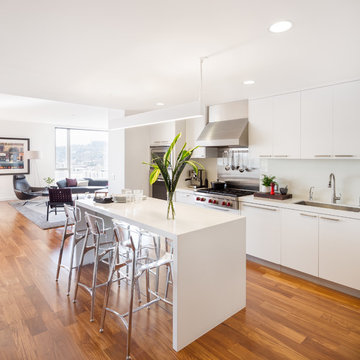
With sweeping views of the Willamette river and Mt. Hood, this Atwater Place condo was designed with a balance of minimalism and livability in mind. A complete kitchen remodel brought a dark interior kitchen to the light and a full furnishings package welcomed Los Angeles transplants home to their new modern and bright residence. Our clients, a retired camera operator for both feature films and television and a producer/production manager on numerous television series including Weeds and The Middle, relocated from their traditionally-styled LA bungalow to Portland in the Summer of 2014. The couple sought a design departure from their long-term California residence and a fresh start for their new life in the South Waterfront.
With only two pieces of sentimental furniture and a handful of artwork included in the plan, we set out to create a comfortable and clean-lined furnishings package complimenting the broad southeast views. Organically shaped upholstery pieces juxtaposed with angular steel and wood tables create a soft balance in the open floor plan. Several custom pieces, including a dining table designed by our studio and a custom hand-blown glass chandelier crafted by Scott Schiesel with Lightlite compliment timeless pieces from Knoll, Herman Miller, and B&B Italia.
The kitchen is designed to reflect light and create brilliance in a space that is otherwise naturally dark. A material balance of stainless steel, back painted glass, quartz composite, lacquer, and mirror all play their part in creating a vibrant cooking environment. We collectively decided to forgo the traditional island pendant for a linear commercial fixture that provides tremendous light to the prep surface and creates an unexpected architectural element. The mirrored prep island creates the illusion of open space while concealing casework and wine storage on the working side of the kitchen.
It is worth noting that this project was designed and installed almost entirely while our clients were still living in LA and wrapping up professional obligations and selling their home. This afforded us the tremendous opportunity to send our clients to showrooms not available in Portland to view key pieces before final specification. Textiles and finish samples were approved via mail and communication took place over e-mail, telephone, and an occasional office visit. This unique process lead to a successful result and a beautifully balanced living environment.
 Balodemas Architects
Hoachlander Davis Photography
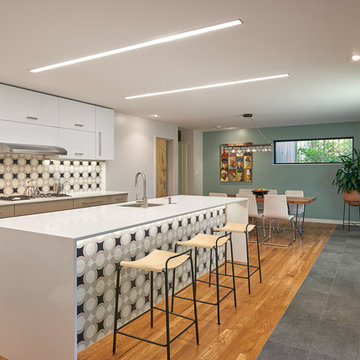
Large minimalist l-shaped medium tone wood floor and brown floor open concept kitchen photo in DC Metro with an undermount sink, flat-panel cabinets, white cabinets, quartzite countertops, black backsplash, ceramic backsplash, stainless steel appliances and an island
Large minimalist l-shaped medium tone wood floor and brown floor open concept kitchen photo in DC Metro with an undermount sink, flat-panel cabinets, white cabinets, quartzite countertops, black backsplash, ceramic backsplash, stainless steel appliances and an island
 JRP Design & Remodel
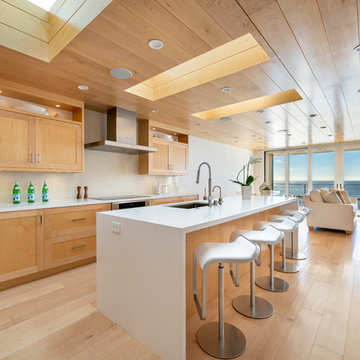
Our clients are seasoned home renovators. Their Malibu oceanside property was the second project JRP had undertaken for them. After years of renting and the age of the home, it was becoming prevalent the waterfront beach house, needed a facelift. Our clients expressed their desire for a clean and contemporary aesthetic with the need for more functionality. After a thorough design process, a new spatial plan was essential to meet the couple’s request. This included developing a larger master suite, a grander kitchen with seating at an island, natural light, and a warm, comfortable feel to blend with the coastal setting.
Demolition revealed an unfortunate surprise on the second level of the home: Settlement and subpar construction had allowed the hillside to slide and cover structural framing members causing dangerous living conditions. Our design team was now faced with the challenge of creating a fix for the sagging hillside. After thorough evaluation of site conditions and careful planning, a new 10’ high retaining wall was contrived to be strategically placed into the hillside to prevent any future movements.
With the wall design and build completed — additional square footage allowed for a new laundry room, a walk-in closet at the master suite. Once small and tucked away, the kitchen now boasts a golden warmth of natural maple cabinetry complimented by a striking center island complete with white quartz countertops and stunning waterfall edge details. The open floor plan encourages entertaining with an organic flow between the kitchen, dining, and living rooms. New skylights flood the space with natural light, creating a tranquil seaside ambiance. New custom maple flooring and ceiling paneling finish out the first floor.
Downstairs, the ocean facing Master Suite is luminous with breathtaking views and an enviable bathroom oasis. The master bath is modern and serene, woodgrain tile flooring and stunning onyx mosaic tile channel the golden sandy Malibu beaches. The minimalist bathroom includes a generous walk-in closet, his & her sinks, a spacious steam shower, and a luxurious soaking tub. Defined by an airy and spacious floor plan, clean lines, natural light, and endless ocean views, this home is the perfect rendition of a contemporary coastal sanctuary.
PROJECT DETAILS:
• Style: Contemporary
• Colors: White, Beige, Yellow Hues
• Countertops: White Ceasarstone Quartz
• Cabinets: Bellmont Natural finish maple; Shaker style
• Hardware/Plumbing Fixture Finish: Polished Chrome
• Lighting Fixtures: Pendent lighting in Master bedroom, all else recessed
• Flooring:
Hardwood - Natural Maple
Tile – Ann Sacks, Porcelain in Yellow Birch
• Tile/Backsplash: Glass mosaic in kitchen
• Other Details: Bellevue Stand Alone Tub
Photographer: Andrew, Open House VC
Find the right local pro for your project
 Advance Design Studio, Ltd.
After six years of living in their Huntley IL home, Chris and Meghan were tired of their dark, dingy, outdated kitchen and it was finally time for a long-anticipated change. “The kitchen is the place where we live, it’s where we do everything,” Meghan said. “It was important that it be a space where we wanted to be.” Meghan loves cooking and enjoys including their girls in healthy meal prepping, this led them to want a brighter, more enjoyable kitchen with increased functionality and improved storage.
For Chris especially, the laundry room was an entirely dysfunctional eyesore. “We had a washer and a dryer, but it was all kind-of cobbled together!” Chris said. “There were always laundry piles everywhere, we weren’t really sure what we wanted to do in there, but it was time for us to make a change.” The mess of the space was stressful every time they walked in the door from the garage each day. Kids’ backpacks and shoes piled up haphazardly in the makeshift boot-bench closet left the family feeling disorganized and stressed. They needed space for folding clothes and locker cubbies to help keep the family organized.
Having known Christine and Todd in the Huntley community for years, Chris and Meghan were familiar with their work. “We already trusted them personally and having seen their projects for years we knew they did top notch work. After we reviewed the initial round of designs, we knew that hiring them was definitely the right choice,” Meghan and Chris said. Although Chris had done a lot of work in their home himself, the kitchen and laundry room renovation was such a large undertaking that he didn’t want to steal time away from his family to spend what would surely be many long weekends doing the job himself. “That would not have been a wise choice for us,” Chris laughed.
“Our designer, Michelle was very, very, easy to work with; anything we wanted to see or weren’t sure about, she went above and beyond to make this easy for us. She was easy to get hold of and always quick to respond,” the couple said. Michelle pulled ideas that mirrored the couple’s taste and style and was adept at directing the couple to limited choices that didn’t overwhelm them and kept the process moving. “I have a hard time making decisions. Michelle made the decision-making process so easy. I loved how she listened to what I liked and then presented three great options for me to choose from,” Meghan said.
The main objectives for the kitchen were better storage solutions, they wanted the space to reflect their lifestyle and taste, and they wanted it to last for years with low maintenance. One of the first steps in creating a more functional kitchen was relocating the refrigerator, creating an improved workflow for the busy family.
“We didn’t know that we could even move the refrigerator to a new location where it is now, that was something that we never would have thought of,” Chris said. “The new refrigerator location makes the kitchen feel so much bigger. We didn’t add any space, but our whole kitchen with the new design just seems like it’s so much larger than before!” Meghan said.
The perimeter mist colored cabinets helped warm and brighten the entire room, while the graphite colored cabinets on the island added contrast. Using this fresh, clean color palette satisfied the couple’s desire for a bright space that was the exact opposite of what they had before. Organization accessories were also added to the cabinets such as a spice drawer tray and roll outs to create hidden convenience.
“I absolutely love the hidden spices – it makes cooking so much more enjoyable!” Chris said. “And all the pull outs, and the double trash bin, who would think you could get so excited about organization!” the couple said in unison.
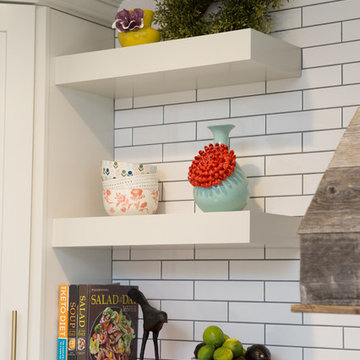
One thing they hated in their original kitchen was how dark the space felt. Added lighting on the ceiling with the new light fixtures combined with the lighter cabinetry colors throughout solved this problem. “Our new kitchen has this warm, almost cozy feeling that our old kitchen never had, it’s just a space that I love spending my time in now,” Meghan said. The light airy feeling was accentuated with the use of floating white shelves on either side of the decorative range hood. “We have so much cabinetry space, the new design is amazing we actually have more storage space than we will ever need,” Meghan said.
The island was extended to create more work surface and added space for stool seating. “The new island changes how we live. Now the kids can be in the kitchen with us, doing homework, eating breakfast, and the three of us have special dinners there when Chris is working late,” Meghan said.
The Carrara Marmi Quartz countertops were chosen because they are, not only beautiful, but are made from hard-working material that doesn’t require maintenance. The white subway tile backsplash that wraps to the ceiling behind the focal point cooktop range/hood compliments the crisp white countertops perfectly, while brushed brass hardware and light fixtures keep the design fresh and new.
The couple had a few fears at the beginning of the project, as most homeowners do. Their biggest fear was being out of their kitchen and laundry room for an extended time. The crew made it very easy for the family to work in a limited space keeping the washer and dryer hooked up the majority of the time, and also getting appliances working with minimal downtime.
“They above and beyond accommodated us to get us through the process,” Meghan said. “They did a great job making sure we were as comfortable as possible throughout the process,” Chris added.
“Our project manager DJ did a great job. He was very good at updating us on schedule changes, getting guys in as quickly as possible. Everyone that stepped in the house was nice and did great work,” said Chris. They thought Advance’s carpenter was phenomenal and were impressed when he took a conceptual idea from a photograph and worked with designer Michelle to create a one of a kind range/hood that has become the topic of conversation with friends and family who visit the new kitchen. “He was in our house literally every day for several weeks. He was easy to work with and good at what he did,” Meghan and Chris said.
The focal point of the kitchen; a hand-crafted, custom-built ventilation hood was clad with handpicked reclaimed barnwood. Advance Design’s carpenter built the framework and the cladding to create a one-of-a-kind design element that the couple loves.
“I think it was especially fun for him to create something unique from scratch, showcasing his talent in this area,” Meghan said. “I love that my kitchen is not like everyone else’s. I got to pick out the wood on my hood and watch it being built and was able to choose what pieces of wood went where on it. It’s totally unique.”
Red Oak flooring was toothed-in throughout the kitchen and the rest of the first floor anywhere changes were made. Then the whole floor was refinished to tone down the orange undertones in the existing floor stain, ultimately changing the color complexion of the entire first floor. The result is a completely new feeling to the entire home.
Renovating the laundry room was extremely important to Meghan and Chris, but they had trouble visualizing what the possibilities were for the seemingly small space. Michelle produced beautiful 3D illustrations that helped them envision the space in a whole new way.
“I must have told Michelle 100 times that I am a visual person, seeing the designs in 3D made it so easy to make decisions and see what we could really do with our space,” Meghan said.
A dividing wall and doorway were removed between the existing laundry room and hallway formerly containing a coat closet, providing space to design specialized graphite colored cabinetry matching the kitchen island to house custom storage cubbies for each family member. Adding the tall utility cabinetry in the new laundry area helped solve the storage issue, tucking away cleaning supplies, household items, and even the cat got its own cubby.
“I love how everything is now hidden in its own space. I can’t tell you how much I hated coming home and seeing everything sitting around on counters,” Chris said.
Electrical outlets were planned for the inside of utility cabinets, so devices could charge in hidden locations. Stacking the washer and dryer allowed for wider countertop space to provide a folding area and a special space for clothes to hang. “The way I do laundry has been completely transformed! I can actually fold clothes and hang them now right out of the washer and dryer,” Meghan said.
“The end result in the kitchen and the laundry/mud room was an updated light and bright space, with a smarter work flow that better meets the needs of this family,” Michelle said.
“I would totally recommend Advance Design,” Meghan said. “Sometimes I sit and just look at my kitchen and laundry room and think ‘Wow, I can’t believe I get to live here!’ It’s an understatement to say we love our new space.”
 Tile Doctor Ltd
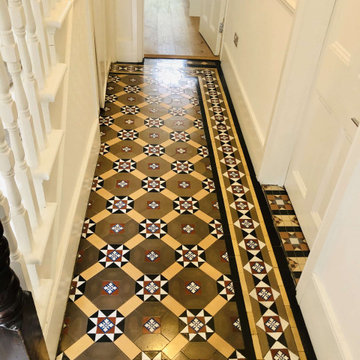
This customer had just moved into a property in Chesham around eighteen months ago. During that time, they had completely renovated the property and in the process had pulled up the hallway carpet to discover a lovely Victorian tiled floor which appeared to be in good condition but very dirty. Period features like these can add a lot of value to a house these days and so they decided to investigate having it professionally cleaned and contacted me for a quote.
Although I can give some indication of price over the phone you never know exactly what to expect so my preference is to visit the property a conduct a test clean. It’s a little trickier to do this now due to COVID-19 but using a combination of PPE, maximum ventilation and social distancing measures I was able to work on the floor. The tiles were in good order with no replacements needed so my focus would be removing carpet adhesive and ingrained dirt. The test went well, and I followed up with a quotation which was accepted, and a date arranged to do the work.
I had worked out previously that the quickest was to deep clean the floor and remove the glue and any old seal was to apply Tile Doctor Remove and Go which as its name suggests is a coatings removed designed for Tiled floors. My method was to spray strong a dilution of Remove and Go onto the Victorian tiles and leave it to soak in for fifteen minutes. Then it was scrubbed in with a black scrubbing pad fitted to a rotary machine. The soil was rinsed off using a minimal of water and extracted with a wet vacuum.
Once the floor had dried, I inspected the tiles and could see more work would be needed to get the white tiles really sparkling. For this I went over the floor using a 200-grit resurfacing pad using water to lubricate the process, I also used handheld burnishing blocks of different grits to do the edges. With this extra effort and another rinse with water to remove the soil the floor looked great, and so I left for the day so it could dry out ready for sealing.
I came back the next day and started by taking moisture readings with a damp meter to ensure the tiles were dry and ready for sealing. This is important as you don’t want to apply sealer to a damp tile and old floors can suffer from damp issues due to the lack of a damp proof membrane.
All was well with the floor, so I was able to move straight onto sealing which started with the application of a single coat of Tile Doctor Colour Grow. This is an impregnating sealer that soaks into the pores of the tile enhancing colour and adding protection. Once this had dried, I followed up with another seven coats of Tile Doctor Seal and Go which adds further protection and leaves a nice subtle sheen to the tiles. This product works really well on old Victorian Tiles like these and being water based it doesn’t leave a smell as it dries.
Andrew Newstead
South Buckinghamshire Tile Doctor
 Gappsi
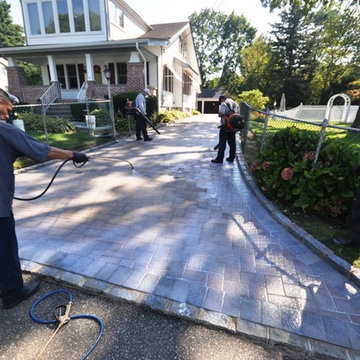
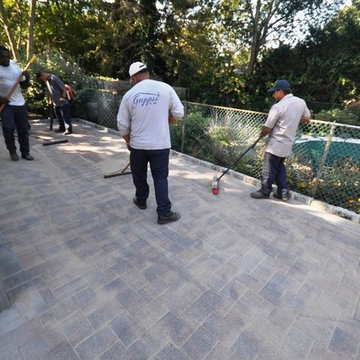
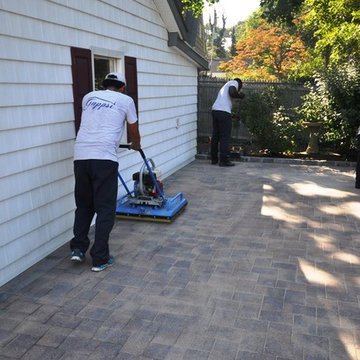
Nicolock oyster blend rustico pavers being sealed in Huntington NY 11743. The sealing process begins with pressure washing the entire patio, removing all dirt/debris from the stone surface and in between the joints. Next, Nexgel Techniseal synthetic sand is applied in between the pavers joints and vibrated with a mechanical plate compactor. The plate compactor has rubber rollers to prevent the stones from cracking or scratching. This vibrating process allows the sand to fall in between the joints and density. Then, we clean the pavers with brooms and landscape blowers, to clean the excess sand from the pavers surface and to evenly spread the sand in between the pavers joints. The next step is to wash the pavers by misting water to penetrate the synthetic sand into the paver joints all the way down below the pavers. The sand and water activate a chemical reaction of the pollen that’s in the sand to cause the sand to harden. Finally, the application of the sealer, two parts components urethane dealer, specially formulated for Gappsi, is applied to the pavers surface and the sand joints to prevent stones from staining, extend their life cycle and further enhance their texture, color, and surface. Call Gappsi at 631-543-1177 for any cleaning, sealing, paver driveways/patio restoration and repairs in Huntington Bay NY.

Sponsored
Columbus, OH

Hope Restoration & General Contracting
Columbus Design-Build, Kitchen & Bath Remodeling, Historic Renovations
 Gappsi
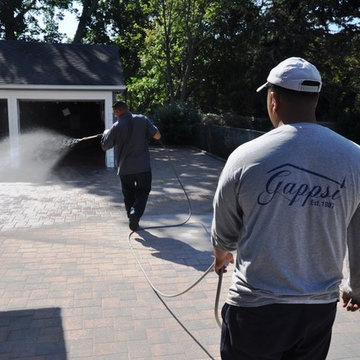
Nicolock oyster blend rustico pavers being sealed in Huntington NY 11743. The sealing process begins with pressure washing the entire patio, removing all dirt/debris from the stone surface and in between the joints. Next, Nexgel Techniseal synthetic sand is applied in between the pavers joints and vibrated with a mechanical plate compactor. The plate compactor has rubber rollers to prevent the stones from cracking or scratching. This vibrating process allows the sand to fall in between the joints and density. Then, we clean the pavers with brooms and landscape blowers, to clean the excess sand from the pavers surface and to evenly spread the sand in between the pavers joints. The next step is to wash the pavers by misting water to penetrate the synthetic sand into the paver joints all the way down below the pavers. The sand and water activate a chemical reaction of the pollen that’s in the sand to cause the sand to harden. Finally, the application of the sealer, two parts components urethane dealer, specially formulated for Gappsi, is applied to the pavers surface and the sand joints to prevent stones from staining, extend their life cycle and further enhance their texture, color, and surface. Call Gappsi at 631-543-1177 for any cleaning, sealing, paver driveways/patio restoration and repairs in Huntington Bay NY.
 Gappsi
Nicolock oyster blend rustico pavers being sealed in Huntington NY 11743. The sealing process begins with pressure washing the entire patio, removing all dirt/debris from the stone surface and in between the joints. Next, Nexgel Techniseal synthetic sand is applied in between the pavers joints and vibrated with a mechanical plate compactor. The plate compactor has rubber rollers to prevent the stones from cracking or scratching. This vibrating process allows the sand to fall in between the joints and density. Then, we clean the pavers with brooms and landscape blowers, to clean the excess sand from the pavers surface and to evenly spread the sand in between the pavers joints. The next step is to wash the pavers by misting water to penetrate the synthetic sand into the paver joints all the way down below the pavers. The sand and water activate a chemical reaction of the pollen that’s in the sand to cause the sand to harden. Finally, the application of the sealer, two parts components urethane dealer, specially formulated for Gappsi, is applied to the pavers surface and the sand joints to prevent stones from staining, extend their life cycle and further enhance their texture, color, and surface. Call Gappsi at 631-543-1177 for any cleaning, sealing, paver driveways/patio restoration and repairs in Huntington Bay NY.
 Gappsi
Nicolock oyster blend rustico pavers being sealed in Huntington NY 11743. The sealing process begins with pressure washing the entire patio, removing all dirt/debris from the stone surface and in between the joints. Next, Nexgel Techniseal synthetic sand is applied in between the pavers joints and vibrated with a mechanical plate compactor. The plate compactor has rubber rollers to prevent the stones from cracking or scratching. This vibrating process allows the sand to fall in between the joints and density. Then, we clean the pavers with brooms and landscape blowers, to clean the excess sand from the pavers surface and to evenly spread the sand in between the pavers joints. The next step is to wash the pavers by misting water to penetrate the synthetic sand into the paver joints all the way down below the pavers. The sand and water activate a chemical reaction of the pollen that’s in the sand to cause the sand to harden. Finally, the application of the sealer, two parts components urethane dealer, specially formulated for Gappsi, is applied to the pavers surface and the sand joints to prevent stones from staining, extend their life cycle and further enhance their texture, color, and surface. Call Gappsi at 631-543-1177 for any cleaning, sealing, paver driveways/patio restoration and repairs in Huntington Bay NY.
 Tile Doctor Ltd
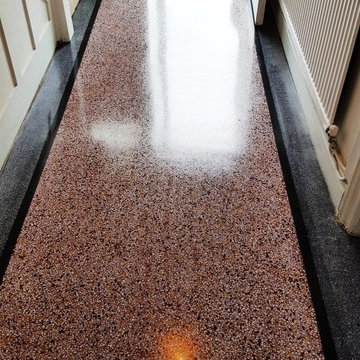
Terrazzo is a quite a bit different from the natural stone floors we most commonly work with. It’s a type of flooring material that was made popular by Venetian builders in Italy in the 1920s, but is ultimately descended from styles of design that date back hundreds of years. A typical Terrazzo floor consists of chips of marble or granite set in concrete and polished to result in a smooth surface.
This Terrazzo floor, installed in the hallway of a property in Bridgend, South Wales, was in relatively good physical condition, but it had clearly lost its shine due to the build-up of dirt and muck over the years. In fact, it was first installed in around 1940! The owner was keen to have it rejuvenated to its best possible condition, so they asked me to come in to see what I could do.
My first course of action was to apply Tile Doctor Pro Clean liberally across the floor and leave it to dwell for a short period. This is a high alkaline cleaner that is designed to deal with light to moderate soil build-up, and to strip away any old sealer remaining on the floor. I scrubbed the product in using a black pad fitted to a rotary machine and vacuumed up the resulting cleaning with a wet-vac machine.
Next, to restore the shine to the floor, I undertook a process known as burnishing, which involves the application of diamond encrusted polishing pads. We will typically start with a Coarse grit pad to level off any uneven areas of the floor and grind down any particularly stubborn marks and stains. Then, we gradually refine the polish on the floor using Medium and Fine grit pads. A small amount of water is used as lubrication with each pad.
After I had finished applying the first three pads in our four-pad system, I gave the floor a thorough rinse and left it to dry overnight.
I returned to the property the next day and immediately ran some damp tests to check for excess moisture issues, which one might expect with an old floor like this one. Thankfully, the floor proved dry – and I could finish the burnishing process with the fourth and final Very Fine diamond encrusted burnishing pad, which achieved a beautiful shine finish.
Finally, I sealed the floor with three coats of Tile Doctor Colour Grow, an impregnating sealer which provides robust protection and enhances the coloured patterns in the Terrazzo.
As you can see from the photos above, the floor is looking so much more colourful and bright after a deep clean, polish and a fresh seal. The customer was over the moon!
Julian Iancono
South East Wales Tile Doctor
 Gappsi
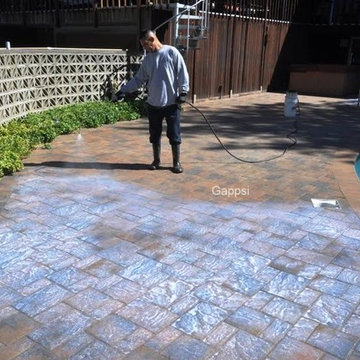
Nicolock oyster ridge stone pavers being sealed in Patchogue NY 11772. The sealing process begins with pressure washing the entire patio, removing all dirt/debris from the stone surface and in between the joints. Next, Nexgel Techniseal synthetic sand is applied in between the pavers joints and vibrated with a mechanical plate compactor. The plate compactor has rubber rollers to prevent the stones from cracking or scratching. This vibrating process allows the sand to fall in between the joints and density. Then, we clean the pavers with brooms and landscape blowers, to clean the excess sand from the pavers surface and to evenly spread the sand in between the pavers joints. The next step is to wash the pavers by misting water to penetrate the synthetic sand into the pavers joints all the way down below the pavers. The sand and water activate a chemical reaction of the pollen that’s in the sand to cause the sand to harden. Finally, the application of the sealer, two parts components urethane dealer, specially formulated for Gappsi, is applied to the pavers surface and the sand joints to prevent stones from staining, extend their life cycle and further enhance their texture, color, and surface. Call Gappsi at 631-543-1177 for any cleaning, sealing, paver driveways/patio restoration and repairs in Patchogue 11772 NY.
 Gappsi
Nicolock oyster ridge stone pavers being sealed in Patchogue NY 11772. The sealing process begins with pressure washing the entire patio, removing all dirt/debris from the stone surface and in between the joints. Next, Nexgel Techniseal synthetic sand is applied in between the pavers joints and vibrated with a mechanical plate compactor. The plate compactor has rubber rollers to prevent the stones from cracking or scratching. This vibrating process allows the sand to fall in between the joints and density. Then, we clean the pavers with brooms and landscape blowers, to clean the excess sand from the pavers surface and to evenly spread the sand in between the pavers joints. The next step is to wash the pavers by misting water to penetrate the synthetic sand into the pavers joints all the way down below the pavers. The sand and water activate a chemical reaction of the pollen that’s in the sand to cause the sand to harden. Finally, the application of the sealer, two parts components urethane dealer, specially formulated for Gappsi, is applied to the pavers surface and the sand joints to prevent stones from staining, extend their life cycle and further enhance their texture, color, and surface. Call Gappsi at 631-543-1177 for any cleaning, sealing, paver driveways/patio restoration and repairs in Patchogue 11772 NY.


 Gappsi
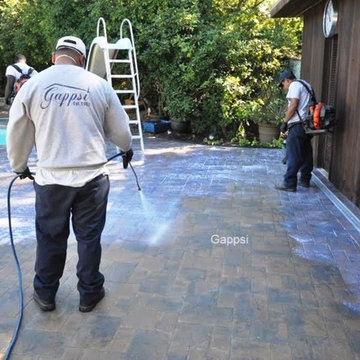
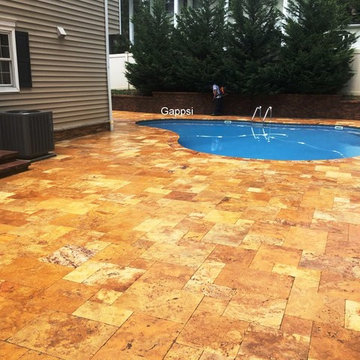
Swimming pool and Retaining wall Built by Gappsi in Woodbury NY, with Travertine patio and coping. Refurbished with the cleaning and sealing process. Using low pressure hot water the paver’s surface gets clean uniformly with no impact of wear on the stone surface. The joints in between the pavers got filled with high quality polymeric sand and vibrated with heavy mechanical plate compactor with rubber rolling system to prevent pavers from getting scratched or damaged. Then sealed with high quality urethane sealer To learn more about Gappsi products, please contact us at 631-543-1177 or visit our web site at www.gappsi.com
 Gappsi
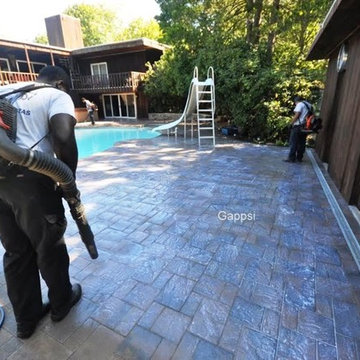
Nicolock oyster ridge stone pavers being sealed in Patchogue NY 11772. The sealing process begins with pressure washing the entire patio, removing all dirt/debris from the stone surface and in between the joints. Next, Nexgel Techniseal synthetic sand is applied in between the pavers joints and vibrated with a mechanical plate compactor. The plate compactor has rubber rollers to prevent the stones from cracking or scratching. This vibrating process allows the sand to fall in between the joints and density. Then, we clean the pavers with brooms and landscape blowers, to clean the excess sand from the pavers surface and to evenly spread the sand in between the pavers joints. The next step is to wash the pavers by misting water to penetrate the synthetic sand into the pavers joints all the way down below the pavers. The sand and water activate a chemical reaction of the pollen that’s in the sand to cause the sand to harden. Finally, the application of the sealer, two parts components urethane dealer, specially formulated for Gappsi, is applied to the pavers surface and the sand joints to prevent stones from staining, extend their life cycle and further enhance their texture, color, and surface. Call Gappsi at 631-543-1177 for any cleaning, sealing, paver driveways/patio restoration and repairs in Patchogue 11772 NY.
 Gappsi
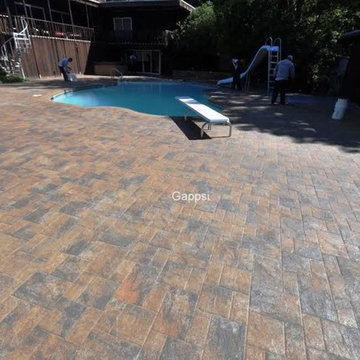
Nicolock oyster ridge stone pavers being sealed in Patchogue NY 11772. The sealing process begins with pressure washing the entire patio, removing all dirt/debris from the stone surface and in between the joints. Next, Nexgel Techniseal synthetic sand is applied in between the pavers joints and vibrated with a mechanical plate compactor. The plate compactor has rubber rollers to prevent the stones from cracking or scratching. This vibrating process allows the sand to fall in between the joints and density. Then, we clean the pavers with brooms and landscape blowers, to clean the excess sand from the pavers surface and to evenly spread the sand in between the pavers joints. The next step is to wash the pavers by misting water to penetrate the synthetic sand into the pavers joints all the way down below the pavers. The sand and water activate a chemical reaction of the pollen that’s in the sand to cause the sand to harden. Finally, the application of the sealer, two parts components urethane dealer, specially formulated for Gappsi, is applied to the pavers surface and the sand joints to prevent stones from staining, extend their life cycle and further enhance their texture, color, and surface. Call Gappsi at 631-543-1177 for any cleaning, sealing, paver driveways/patio restoration and repairs in Patchogue 11772 NY.
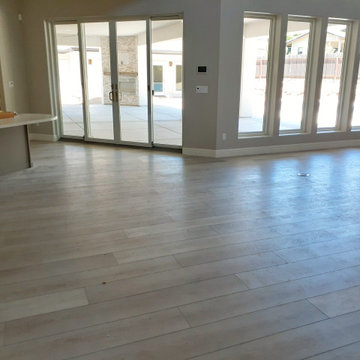
 California Renovation
The client chose a light-colored luxury vinyl plank mimicking the popular Norwegian Oak wood flooring. This perfectly complements their desired "modern but warm" look.
Please note that these photos were taken before the final cleaning process.


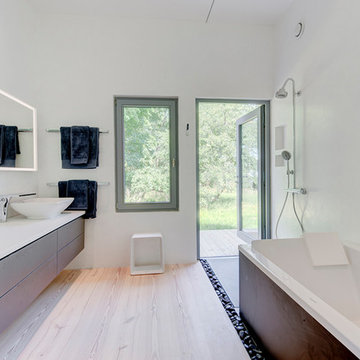
 The Turett Collaborative
Master bath suite by Duravit. Greenport Passive House. Photos by Liz Glasgow.
Bathroom - large modern master bathroom idea in New York with flat-panel cabinets
Bathroom - large modern master bathroom idea in New York with flat-panel cabinets

 Soho Construction Company
Example of a mid-sized minimalist white two-story mixed siding exterior home design in San Diego with a metal roof

 Altura Architects
A bright dining room with lots of natural light in a mountain modern house in Asheville. The room has high windows with great panoramic views.The owners are geologists and have an extensive mineral collection. Creating display cabinets that are integrated into the rooms and highlight the beauty of the minerals was a priority. These minerals and their cabinetry became a driving factor in our design and decision making process and in many cases were a focal point of the architecture and interior design.
23