
Search results for "Cleaning process" in Home Design Ideas
 HOBBS INC
Architect: Amanda Martocchio Architecture & Design
Photography: Michael Moran
Project Year:2016
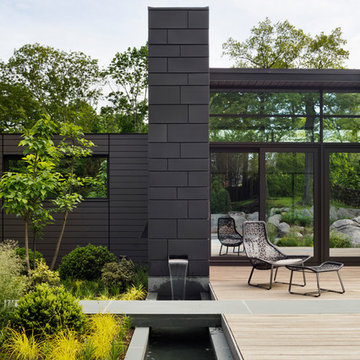
This LEED-certified project was a substantial rebuild of a 1960's home, preserving the original foundation to the extent possible, with a small amount of new area, a reconfigured floor plan, and newly envisioned massing. The design is simple and modern, with floor to ceiling glazing along the rear, connecting the interior living spaces to the landscape. The design process was informed by building science best practices, including solar orientation, triple glazing, rain-screen exterior cladding, and a thermal envelope that far exceeds code requirements.
 HOBBS INC
Architect: Amanda Martocchio Architecture & Design
Photography: Michael Moran
Project Year:2016
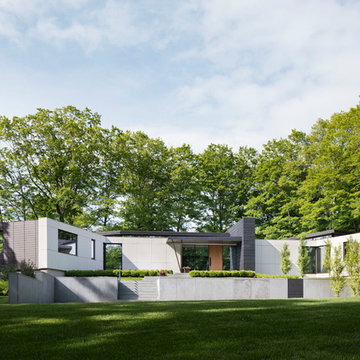
This LEED-certified project was a substantial rebuild of a 1960's home, preserving the original foundation to the extent possible, with a small amount of new area, a reconfigured floor plan, and newly envisioned massing. The design is simple and modern, with floor to ceiling glazing along the rear, connecting the interior living spaces to the landscape. The design process was informed by building science best practices, including solar orientation, triple glazing, rain-screen exterior cladding, and a thermal envelope that far exceeds code requirements.
 Urbanology Designs
A captivating transformation in the coveted neighborhood of University Park, Dallas
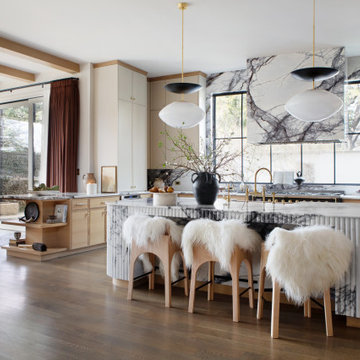
The heart of this home lies in the kitchen, where we embarked on a design endeavor that would leave anyone speechless. By opening up the main kitchen wall, we created a magnificent window system that floods the space with natural light and offers a breathtaking view of the picturesque surroundings. Suspended from the ceiling, a steel-framed marble vent hood floats a few inches from the window, showcasing a mesmerizing Lilac Marble. The same marble is skillfully applied to the backsplash and island, featuring a bold combination of color and pattern that exudes elegance.
Adding to the kitchen's allure is the Italian range, which not only serves as a showstopper but offers robust culinary features for even the savviest of cooks. However, the true masterpiece of the kitchen lies in the honed reeded marble-faced island. Each marble strip was meticulously cut and crafted by artisans to achieve a half-rounded profile, resulting in an island that is nothing short of breathtaking. This intricate process took several months, but the end result speaks for itself.
To complement the grandeur of the kitchen, we designed a combination of stain-grade and paint-grade cabinets in a thin raised panel door style. This choice adds an elegant yet simple look to the overall design. Inside each cabinet and drawer, custom interiors were meticulously designed to provide maximum functionality and organization for the day-to-day cooking activities. A vintage Turkish runner dating back to the 1960s, evokes a sense of history and character.
The breakfast nook boasts a stunning, vivid, and colorful artwork created by one of Dallas' top artist, Kyle Steed, who is revered for his mastery of his craft. Some of our favorite art pieces from the inspiring Haylee Yale grace the coffee station and media console, adding the perfect moment to pause and loose yourself in the story of her art.
The project extends beyond the kitchen into the living room, where the family's changing needs and growing children demanded a new design approach. Accommodating their new lifestyle, we incorporated a large sectional for family bonding moments while watching TV. The living room now boasts bolder colors, striking artwork a coffered accent wall, and cayenne velvet curtains that create an inviting atmosphere. Completing the room is a custom 22' x 15' rug, adding warmth and comfort to the space. A hidden coat closet door integrated into the feature wall adds an element of surprise and functionality.
This project is not just about aesthetics; it's about pushing the boundaries of design and showcasing the possibilities. By curating an out-of-the-box approach, we bring texture and depth to the space, employing different materials and original applications. The layered design achieved through repeated use of the same material in various forms, shapes, and locations demonstrates that unexpected elements can create breathtaking results.
The reason behind this redesign and remodel was the homeowners' desire to have a kitchen that not only provided functionality but also served as a beautiful backdrop to their cherished family moments. The previous kitchen lacked the "wow" factor they desired, prompting them to seek our expertise in creating a space that would be a source of joy and inspiration.
Inspired by well-curated European vignettes, sculptural elements, clean lines, and a natural color scheme with pops of color, this design reflects an elegant organic modern style. Mixing metals, contrasting textures, and utilizing clean lines were key elements in achieving the desired aesthetic. The living room introduces bolder moments and a carefully chosen color scheme that adds character and personality.
The client's must-haves were clear: they wanted a show stopping centerpiece for their home, enhanced natural light in the kitchen, and a design that reflected their family's dynamic. With the transformation of the range wall into a wall of windows, we fulfilled their desire for abundant natural light and breathtaking views of the surrounding landscape.
Our favorite rooms and design elements are numerous, but the kitchen remains a standout feature. The painstaking process of hand-cutting and crafting each reeded panel in the island to match the marble's veining resulted in a labor of love that emanates warmth and hospitality to all who enter.
In conclusion, this tastefully lux project in University Park, Dallas is an extraordinary example of a full gut remodel that has surpassed all expectations. The meticulous attention to detail, the masterful use of materials, and the seamless blend of functionality and aesthetics create an unforgettable space. It serves as a testament to the power of design and the transformative impact it can have on a home and its inhabitants.
Project by Texas' Urbanology Designs. Their North Richland Hills-based interior design studio serves Dallas, Highland Park, University Park, Fort Worth, and upscale clients nationwide.
Find the right local pro for your project
 Advance Design Studio, Ltd.
After six years of living in their Huntley IL home, Chris and Meghan were tired of their dark, dingy, outdated kitchen and it was finally time for a long-anticipated change. “The kitchen is the place where we live, it’s where we do everything,” Meghan said. “It was important that it be a space where we wanted to be.” Meghan loves cooking and enjoys including their girls in healthy meal prepping, this led them to want a brighter, more enjoyable kitchen with increased functionality and improved storage.
For Chris especially, the laundry room was an entirely dysfunctional eyesore. “We had a washer and a dryer, but it was all kind-of cobbled together!” Chris said. “There were always laundry piles everywhere, we weren’t really sure what we wanted to do in there, but it was time for us to make a change.” The mess of the space was stressful every time they walked in the door from the garage each day. Kids’ backpacks and shoes piled up haphazardly in the makeshift boot-bench closet left the family feeling disorganized and stressed. They needed space for folding clothes and locker cubbies to help keep the family organized.
Having known Christine and Todd in the Huntley community for years, Chris and Meghan were familiar with their work. “We already trusted them personally and having seen their projects for years we knew they did top notch work. After we reviewed the initial round of designs, we knew that hiring them was definitely the right choice,” Meghan and Chris said. Although Chris had done a lot of work in their home himself, the kitchen and laundry room renovation was such a large undertaking that he didn’t want to steal time away from his family to spend what would surely be many long weekends doing the job himself. “That would not have been a wise choice for us,” Chris laughed.
“Our designer, Michelle was very, very, easy to work with; anything we wanted to see or weren’t sure about, she went above and beyond to make this easy for us. She was easy to get hold of and always quick to respond,” the couple said. Michelle pulled ideas that mirrored the couple’s taste and style and was adept at directing the couple to limited choices that didn’t overwhelm them and kept the process moving. “I have a hard time making decisions. Michelle made the decision-making process so easy. I loved how she listened to what I liked and then presented three great options for me to choose from,” Meghan said.
The main objectives for the kitchen were better storage solutions, they wanted the space to reflect their lifestyle and taste, and they wanted it to last for years with low maintenance. One of the first steps in creating a more functional kitchen was relocating the refrigerator, creating an improved workflow for the busy family.
“We didn’t know that we could even move the refrigerator to a new location where it is now, that was something that we never would have thought of,” Chris said. “The new refrigerator location makes the kitchen feel so much bigger. We didn’t add any space, but our whole kitchen with the new design just seems like it’s so much larger than before!” Meghan said.
The perimeter mist colored cabinets helped warm and brighten the entire room, while the graphite colored cabinets on the island added contrast. Using this fresh, clean color palette satisfied the couple’s desire for a bright space that was the exact opposite of what they had before. Organization accessories were also added to the cabinets such as a spice drawer tray and roll outs to create hidden convenience.
“I absolutely love the hidden spices – it makes cooking so much more enjoyable!” Chris said. “And all the pull outs, and the double trash bin, who would think you could get so excited about organization!” the couple said in unison.
One thing they hated in their original kitchen was how dark the space felt. Added lighting on the ceiling with the new light fixtures combined with the lighter cabinetry colors throughout solved this problem. “Our new kitchen has this warm, almost cozy feeling that our old kitchen never had, it’s just a space that I love spending my time in now,” Meghan said. The light airy feeling was accentuated with the use of floating white shelves on either side of the decorative range hood. “We have so much cabinetry space, the new design is amazing we actually have more storage space than we will ever need,” Meghan said.
The island was extended to create more work surface and added space for stool seating. “The new island changes how we live. Now the kids can be in the kitchen with us, doing homework, eating breakfast, and the three of us have special dinners there when Chris is working late,” Meghan said.
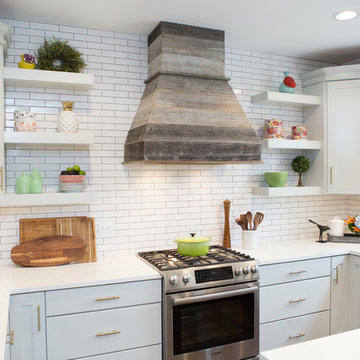
The Carrara Marmi Quartz countertops were chosen because they are, not only beautiful, but are made from hard-working material that doesn’t require maintenance. The white subway tile backsplash that wraps to the ceiling behind the focal point cooktop range/hood compliments the crisp white countertops perfectly, while brushed brass hardware and light fixtures keep the design fresh and new.
The couple had a few fears at the beginning of the project, as most homeowners do. Their biggest fear was being out of their kitchen and laundry room for an extended time. The crew made it very easy for the family to work in a limited space keeping the washer and dryer hooked up the majority of the time, and also getting appliances working with minimal downtime.
“They above and beyond accommodated us to get us through the process,” Meghan said. “They did a great job making sure we were as comfortable as possible throughout the process,” Chris added.
“Our project manager DJ did a great job. He was very good at updating us on schedule changes, getting guys in as quickly as possible. Everyone that stepped in the house was nice and did great work,” said Chris. They thought Advance’s carpenter was phenomenal and were impressed when he took a conceptual idea from a photograph and worked with designer Michelle to create a one of a kind range/hood that has become the topic of conversation with friends and family who visit the new kitchen. “He was in our house literally every day for several weeks. He was easy to work with and good at what he did,” Meghan and Chris said.
The focal point of the kitchen; a hand-crafted, custom-built ventilation hood was clad with handpicked reclaimed barnwood. Advance Design’s carpenter built the framework and the cladding to create a one-of-a-kind design element that the couple loves.
“I think it was especially fun for him to create something unique from scratch, showcasing his talent in this area,” Meghan said. “I love that my kitchen is not like everyone else’s. I got to pick out the wood on my hood and watch it being built and was able to choose what pieces of wood went where on it. It’s totally unique.”
Red Oak flooring was toothed-in throughout the kitchen and the rest of the first floor anywhere changes were made. Then the whole floor was refinished to tone down the orange undertones in the existing floor stain, ultimately changing the color complexion of the entire first floor. The result is a completely new feeling to the entire home.
Renovating the laundry room was extremely important to Meghan and Chris, but they had trouble visualizing what the possibilities were for the seemingly small space. Michelle produced beautiful 3D illustrations that helped them envision the space in a whole new way.
“I must have told Michelle 100 times that I am a visual person, seeing the designs in 3D made it so easy to make decisions and see what we could really do with our space,” Meghan said.
A dividing wall and doorway were removed between the existing laundry room and hallway formerly containing a coat closet, providing space to design specialized graphite colored cabinetry matching the kitchen island to house custom storage cubbies for each family member. Adding the tall utility cabinetry in the new laundry area helped solve the storage issue, tucking away cleaning supplies, household items, and even the cat got its own cubby.
“I love how everything is now hidden in its own space. I can’t tell you how much I hated coming home and seeing everything sitting around on counters,” Chris said.
Electrical outlets were planned for the inside of utility cabinets, so devices could charge in hidden locations. Stacking the washer and dryer allowed for wider countertop space to provide a folding area and a special space for clothes to hang. “The way I do laundry has been completely transformed! I can actually fold clothes and hang them now right out of the washer and dryer,” Meghan said.
“The end result in the kitchen and the laundry/mud room was an updated light and bright space, with a smarter work flow that better meets the needs of this family,” Michelle said.
“I would totally recommend Advance Design,” Meghan said. “Sometimes I sit and just look at my kitchen and laundry room and think ‘Wow, I can’t believe I get to live here!’ It’s an understatement to say we love our new space.”
 Urbanology Designs
A captivating transformation in the coveted neighborhood of University Park, Dallas
The heart of this home lies in the kitchen, where we embarked on a design endeavor that would leave anyone speechless. By opening up the main kitchen wall, we created a magnificent window system that floods the space with natural light and offers a breathtaking view of the picturesque surroundings. Suspended from the ceiling, a steel-framed marble vent hood floats a few inches from the window, showcasing a mesmerizing Lilac Marble. The same marble is skillfully applied to the backsplash and island, featuring a bold combination of color and pattern that exudes elegance.
Adding to the kitchen's allure is the Italian range, which not only serves as a showstopper but offers robust culinary features for even the savviest of cooks. However, the true masterpiece of the kitchen lies in the honed reeded marble-faced island. Each marble strip was meticulously cut and crafted by artisans to achieve a half-rounded profile, resulting in an island that is nothing short of breathtaking. This intricate process took several months, but the end result speaks for itself.
To complement the grandeur of the kitchen, we designed a combination of stain-grade and paint-grade cabinets in a thin raised panel door style. This choice adds an elegant yet simple look to the overall design. Inside each cabinet and drawer, custom interiors were meticulously designed to provide maximum functionality and organization for the day-to-day cooking activities. A vintage Turkish runner dating back to the 1960s, evokes a sense of history and character.
The breakfast nook boasts a stunning, vivid, and colorful artwork created by one of Dallas' top artist, Kyle Steed, who is revered for his mastery of his craft. Some of our favorite art pieces from the inspiring Haylee Yale grace the coffee station and media console, adding the perfect moment to pause and loose yourself in the story of her art.
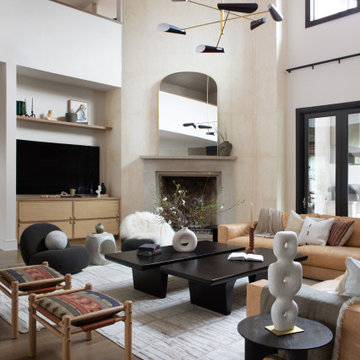
The project extends beyond the kitchen into the living room, where the family's changing needs and growing children demanded a new design approach. Accommodating their new lifestyle, we incorporated a large sectional for family bonding moments while watching TV. The living room now boasts bolder colors, striking artwork a coffered accent wall, and cayenne velvet curtains that create an inviting atmosphere. Completing the room is a custom 22' x 15' rug, adding warmth and comfort to the space. A hidden coat closet door integrated into the feature wall adds an element of surprise and functionality.
This project is not just about aesthetics; it's about pushing the boundaries of design and showcasing the possibilities. By curating an out-of-the-box approach, we bring texture and depth to the space, employing different materials and original applications. The layered design achieved through repeated use of the same material in various forms, shapes, and locations demonstrates that unexpected elements can create breathtaking results.
The reason behind this redesign and remodel was the homeowners' desire to have a kitchen that not only provided functionality but also served as a beautiful backdrop to their cherished family moments. The previous kitchen lacked the "wow" factor they desired, prompting them to seek our expertise in creating a space that would be a source of joy and inspiration.
Inspired by well-curated European vignettes, sculptural elements, clean lines, and a natural color scheme with pops of color, this design reflects an elegant organic modern style. Mixing metals, contrasting textures, and utilizing clean lines were key elements in achieving the desired aesthetic. The living room introduces bolder moments and a carefully chosen color scheme that adds character and personality.
The client's must-haves were clear: they wanted a show stopping centerpiece for their home, enhanced natural light in the kitchen, and a design that reflected their family's dynamic. With the transformation of the range wall into a wall of windows, we fulfilled their desire for abundant natural light and breathtaking views of the surrounding landscape.
Our favorite rooms and design elements are numerous, but the kitchen remains a standout feature. The painstaking process of hand-cutting and crafting each reeded panel in the island to match the marble's veining resulted in a labor of love that emanates warmth and hospitality to all who enter.
In conclusion, this tastefully lux project in University Park, Dallas is an extraordinary example of a full gut remodel that has surpassed all expectations. The meticulous attention to detail, the masterful use of materials, and the seamless blend of functionality and aesthetics create an unforgettable space. It serves as a testament to the power of design and the transformative impact it can have on a home and its inhabitants.
Project by Texas' Urbanology Designs. Their North Richland Hills-based interior design studio serves Dallas, Highland Park, University Park, Fort Worth, and upscale clients nationwide.
 Tile Doctor Ltd
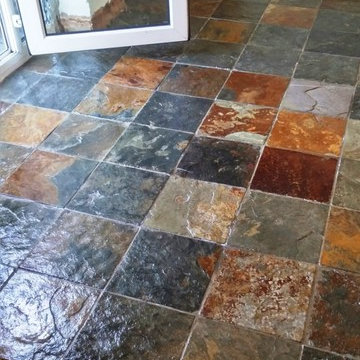
We recently deep cleaned two different tiled floors at a property in the village of Coningsby in the centre of Lincolnshire. The floor was split into two areas one laid with natural Sandstone and the other Riven Slate tiles. Both tiled areas had been sealed previously but the sealer was clearly not doing the job as the floor had a very dull finish due to dirt being absorbed into the tile.
The floors were in need of a deep clean to remove the ingrained dirt and remaining sealer so the first step was to soak the tiles in a strong dilution of Tile Doctor Pro-Clean and then work it in using a rotary machine fitted with a black pad and a stiff brush along the grout lines. This did the job and there’s a great photograph below that shows the difference this made.
To extract the now soiled cleaning solution the floor was rinsed using water which was then extracted using our wet pick up system. Once the floor was clear we were able to see where more work was required and the process was repeated until we were happy the floor was thoroughly clean and free of any remaining sealer.
To get the floor dry a number of turbo air dryers were setup around the floor and we left for the day to allow the floor to thoroughly dry off overnight.
The following morning we tested the tiles to make sure that both were dry which they were. We then applied Tile Doctor quality sealers to both floors; two different finishes were required for the different types of floor so we applied three coats of Colour Grow sealer to the Sandstone flooring as this impregnates the pores in the stone protecting it from staining and enhancing the natural colours to provide a natural look. We than applied four coats of Seal and Go sealer to the Slate floor, Seal and Go adds a nice subtle shine and works well on Riven Slate to highlight the different shades.
The customer was delighted with the results and left an excellent review which you can read below:
The floors look absolutely beautiful. I am very pleased with the service.
J. Gibbons, Coningsby
She wants us to return soon to seal the other stone areas in their property. As you can see from the photos the before and after is very striking. The floors were ready to take light use that same afternoon.
 Tile Doctor Ltd
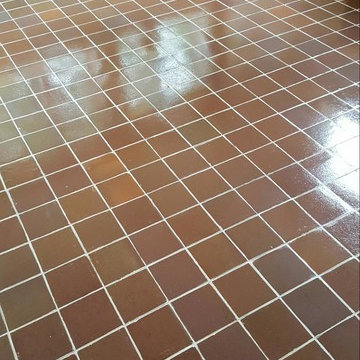
It’s always a good idea to double-check any tile cleaning advice you receive with a professional. Sometimes advice can be inaccurate and cause more problems than good. Such was the case with this customer, who lives in the small town of Appleton near Warrington. He had been advised by his builder to use brick acid to remove carpet glue from a newly discovered Quarry tiled floor. Taking the advice, he had washed the floor several times with a solution of brick acid diluted with water. But while this seemed to successfully remove the carpet glue, it also severely discoloured the grout lines, leaving the entire floor looking grubby and unappealing.
The customer was just about to go on holiday, and asked me to see what could be done to restore the floor’s appearance while he was gone. With the house to myself, I got to work.
My first job was to strip the floor property to remove old sealers present on the tile using a strong dilution of our high alkaline cleaner, Tile Doctor Pro Clean. We use this cleaner on all types of tile and natural stone due to its versatility and consistency.
I spread the solution onto the floor and left to dwell for twenty minutes before scrubbing with a black pad fitted to a floor rotary machine. This process also removed the years of dirt and dust that had penetrated through the recently removed carpet. I also paid attention to the grout lines giving them a good scrub with a stiff grout brush, but the acid staining proved to be impossible to remove completely.
While I’m not sure exactly how long the floor had been covered by carpet, it’s safe to say a deep clean had been long, long overdue. Once I had cleaned the floor to a high standard, I used a wet-vac to remove the now dirty cleaning solution from the floor, before leaving it to dry off completely overnight.
Upon my return to the property the next day, I tested to make sure the floor was dry enough to seal, which is important as excess moisture can cloud the sealer and damage its performance.
Once satisfied, I applied one coat of Tile Doctor Colour Grow, which is our impregnating sealer designed to really bring out the natural colours in the tile, followed by two coats of Tile Doctor Seal and Go to give the tiles a stain resistant, low-sheen finish.
After this was dry I coloured the grout lines with a matching Tile Doctor Grout Colourant to cover and hide the damage the acid had caused to the grout lines. Finally, I gave the floor three more coats of Seal and Go to add the finishing touches.
My customer returned from holiday to find a completely transformed floor. Looking at the before and after photos, it is easy to see why he was more than happy with the result! Another satisfied customer.
Alastair Robb
West Cheshire Tile Doctor


 Tile Doctor Ltd
For this job, I had the pleasure of visiting the historic Salts Mill, a former textile mill turned art gallery, shopping centre, and restaurant complex near Bingley, West Yorkshire. It was built in 1853 by the famous manufacturer and philanthropist, Sir Titus Salt, and was at one point the largest industrial building in the world by total floor area.
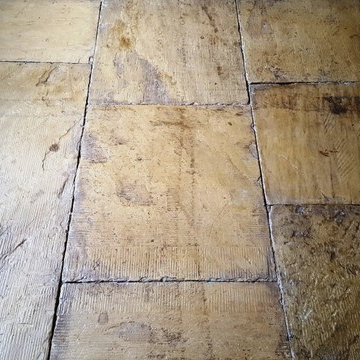
As you can imagine, a lot of the rooms at Salts Mill are over a century and a half old. Most of them also contained stone flooring made from Yorkstone – a type of Sandstone unique to Yorkshire, and easily distinguishable due to its rich, natural yellow colouring. Unfortunately, one such floor in the Salts Mill was in quite a bad state. It has completely lost its vibrance – appearing more grey than yellow – and was evidentially in need of a very deep clean and fresh seal.
I started the Yorkstone tile restoration by soaking the floor in a strong dilution of our reliable alkaline-based tile cleaner, Tile Doctor Pro Clean, and scrubbing it in using a rotary machine fitted with a scrubbing pad. This quickly removed the initial layers of muck and, in the process, revealed oil-based paint and glue stains all over the floor.
To break down the oil and paint I applied Tile Doctor Remove & Go, which is our heavy duty stripper, remover and degreaser. This quickly ate through the paint and glue, and I followed by giving the floor another thorough clean with Pro Clean. Finally, I rinsed the floor with clean water before leaving it to dry for a full two days due to the amount of chemical cleaning product and water applied.
Upon my return to the Salts Mill two days later, I ran some quick damp tests to check for any excess moisture which could’ve prevented me from sealing the floor. Thankfully, the floor was dry and ready to be sealed, but it is always recommended, especially with older floors, to be aware of damp issues as these can be very troublesome.
My choice of sealer was Tile Doctor Seal and Go, a topical sealer which provides a robust, stain resistant seal and a durable low sheen finish all in one product. Multiple coats of Seal and Go were applied, bringing the life and character back to these classic tiles.
Nigel Stoker
North West Yorkshire Tile Doctor
 California Renovation
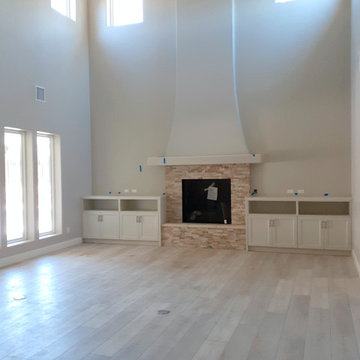
The client chose a light-colored luxury vinyl plank mimicking the popular Norwegian Oak wood flooring. This perfectly complements their desired "modern but warm" look.
Please note that these photos were taken before the final cleaning process.
 Built by Krueger
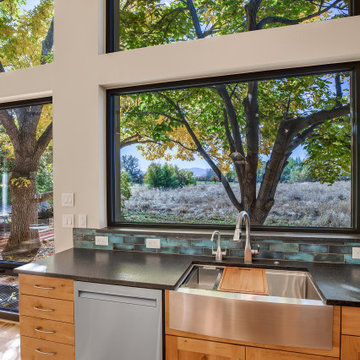
The kitchen features a utility sink complemented with a convenient cutting board making meal preparation a breeze. Adjacent to the sink a dishwasher stands ready to streamline the cleaning process while glancing at captivating view.
 Tile Doctor Ltd
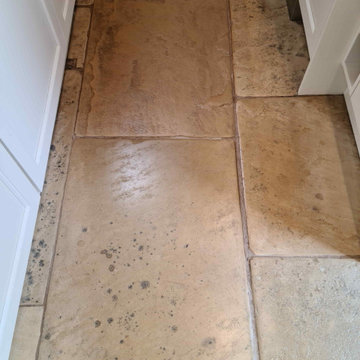
These pictures are of a beautiful Sandstone floor in Ilkley, the tiles were sourced from Lapicida of Harrogate and installed around twelve years prior. If you take a look at their website now you will see they are selling a similar London White Sandstone for nearly £100 per m2. This floor was 35 square metres so clearly this was a significant investment for the owner at the time.
After twelve years of use however the sealer had worn off the floor and dirt had become ingrained in the pores of the stone making it very difficult to keep clean. A good sealer takes a long time to wear off so the change to the appearance of the stone happens so slowly you don’t notice it. The floor was now looking permanently dirty, and the owner of the property had decided it was time to get it renovated.
Before quoting I paid a visit to the property to survey the floor and conduct an initial test clean which came out well. The test cleaning did not go as quickly as I had hoped it might however, due to traces of old satin sealer on some of the stone. It’s important to remove all the old sealer before applying new or you can end up with a patchy appearance. The remnants of old sealer proved challenging to remove as a result I had to try several products and methods before working out the right approach. In the end I resulted to using a product called Tile Doctor Wax Away. I had considered applying diamond burnishing pads which would have been a quicker option, but the flagstones had a riven finish, and the dirt was deeply pitted.
With a successful cleaning plan worked out I provided the client with a which was accepted, and a date agreed for my return.
The cleaning plan I had worked out was to apply a strong dilution of Tile Doctor Wax Away, leave it to soak into the stone for thirty minutes and then scrub it in with a rotary buffer fitted with a black scrubbing pad. The old sealer proved to be tough to remove and in total I used five litres of Tile Doctor Wax Away in the process, as I said it was a big floor!
On day three, I sealed the floor using three coats of Tile Doctor Seal and Go which gave the Sandstone a lovely satin finish that the client liked. This product is also water based so it doesn’t leave a smell as it dries.
Once done the floor was completely transformed, and my client very pleased with the floor which looked so much lighter and cleaner. For aftercare cleaning I recommended the use of Tile Doctor Neutral Tile Cleaner for maintenance, it is pH neutral so will ensure the newly applied seal is protected. It has a nice fresh smell and is gentle enough to use frequently keeping the newly renovated floor looking lovely.
Nigel Stoker
North West Yorkshire Tile Doctor
 Home Of Kitchens INC
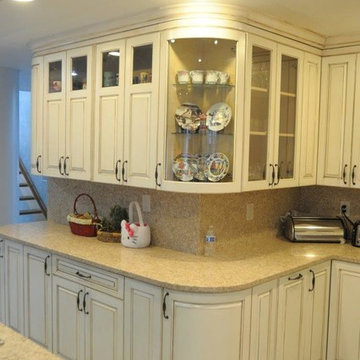
 This beautiful and cozy two-tone kitchen was designed, fabricated and installed by Drabott Custom Woodwork Inc. Design was achieved with use of our Feng-shui specialist who also picked a perfect location for the water flow with maximized flow of Chi Energy. Featuring custom milled curved doors, curved glass panel and open shelving with hand carved decorative fencing. Hand-carved company logo is ading to the rich custom feel, integrated at over-the-sink valance. Island hood is dressed with a custom enclosure with spotlights each controlled separtately. Sectional fridge area features vented cabinet doors with custom mesh panels. Bosch appliances through-out including five burners 36" cooktop and a 30" built-in gas oven.
All exterior is finished using custom mixed high-end finishing products by Magnalac and Magnamax, antique glazing was applied to achieve the anticue ivory look and then sealed to withstand washing/cleaning process without colors fading.
 Windy City Painters
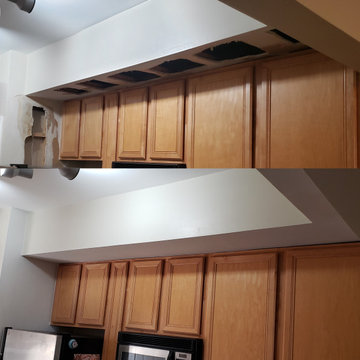
 Windy City Painters response to water damage in a kitchen:
Assessment and Inspection:
Windy City Painters initiates the process by conducting a thorough assessment of the water damage in the kitchen. This involves inspecting the soffit above the kitchen cabinets and the side wall to identify the areas that require repair. The severity of the damage is carefully evaluated to determine the scope of the restoration.
Insulation Replacement:
In cases where water has damaged insulation, Windy City Painters removes and replaces the affected insulation to ensure proper restoration of the affected areas. This step is crucial for preventing future issues related to moisture and maintaining the integrity of the space.
Drywall Replacement:
Damaged drywall is carefully removed and replaced during the repair process. This includes removing sections of drywall that have been compromised by water, ensuring that the new drywall seamlessly integrates with the existing structure.
Sealing Water Spots with Oil-Based Primer:
To prevent any potential water stains from bleeding through the new paint, Windy City Painters applies an oil-based primer to seal water spots. This step not only ensures a smooth and uniform finish but also provides additional protection against future water damage.
Cleaning and Restoration:
After completing the repair work, Chicago painter takes the extra step of cleaning the entire area to ensure a neat and polished final result. This includes removing any debris or dust generated during the repair process, leaving the kitchen in a clean and presentable condition.
Efficient Completion by Skilled Painter:
Windy City Painters prides itself on efficiency, and the entire drywall repair job is completed within one day by a skilled painter. This quick turnaround minimizes disruptions to the homeowner's routine and allows for a prompt return to normalcy.
Scheduling and Estimates:
Customers looking to schedule an appointment or obtain an online estimate can easily do so by visiting the official website at www.windypainters.com. The user-friendly platform facilitates convenient scheduling and access to estimates.
Customer Assurance and Reviews:
Windy City Painters emphasizes customer satisfaction and provides the highest quality service. Potential customers are encouraged to check the company's 5-star reviews on Yelp ( https://www.yelp.com/biz/windy-city-painters-chicago-2) and Google, offering a glimpse into the positive experiences of previous clients.
Windy City Painters offers a comprehensive and efficient drywall repair service, addressing water damage in kitchens with expertise, professionalism, and a commitment to customer satisfaction.

Sponsored
Columbus, OH

Hope Restoration & General Contracting
Columbus Design-Build, Kitchen & Bath Remodeling, Historic Renovations
 California Renovation
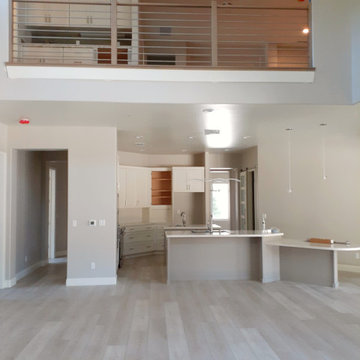
The client chose a light-colored luxury vinyl plank mimicking the popular Norwegian Oak wood flooring. This perfectly complements their desired "modern but warm" look.
Please note that these photos were taken before the final cleaning process.
 Windy City Painters
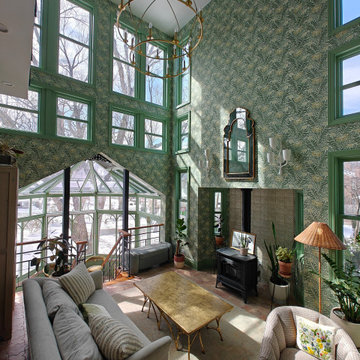
Professional wallpaper installation transformed this Evanston sunroom into a stunning focal point. Evanston's diverse architecture, from historic homes to contemporary residences, requires specialized expertise to ensure wallpaper installation complements existing design elements.
Materials and Products
We utilized premium moisture-resistant wallpaper specifically designed for sunroom environments, paired with professional-grade adhesives from trusted manufacturers like Roman and Zinsser for superior bonding and longevity.
Installation Process
First, thorough surface preparation including cleaning and priming. Second, precise measurements and pattern planning for seamless alignment. Third, careful adhesive application using professional tools. Fourth, meticulous installation with attention to corners and edges.
Chicago Home Challenges
Evanston properties face unique challenges including temperature fluctuations, humidity variations, and aging surfaces. Our wallpaper installation process addresses these concerns through proper surface preparation and climate-appropriate materials.
Results Achieved
The finished sunroom showcases flawless wallpaper installation with perfect pattern matching, smooth application, and professional-quality results that will withstand years of use and seasonal changes.
H2 Professional Tips
Always prime surfaces before wallpaper installation, choose moisture-resistant papers for sunrooms, and hire experienced professionals familiar with Chicago's climate challenges and building characteristics.
See more work and request free estimate at windypainters.com.
Q: What type of wallpaper works best for Evanston sunrooms? / A: Moisture-resistant vinyl or fabric-backed wallpaper handles humidity and temperature changes better than standard paper in sunroom wallpaper installation projects.
Q: How long does professional wallpaper installation take? / A: Most sunroom wallpaper installation projects require 1-2 days depending on room size, pattern complexity, and surface preparation needs.
Q: Can you install wallpaper over existing paint? / A: Yes, wallpaper installation over painted surfaces is possible after proper cleaning, priming, and surface preparation to ensure adhesion.
Q: Do you remove old wallpaper before installation? / A: Professional wallpaper installation often includes complete removal of existing coverings and thorough surface preparation for optimal results.
Q: What preparation is needed for wallpaper installation? / A: Wallpaper installation requires clean, smooth, primed surfaces with all imperfections filled and sanded for professional results.
Q: How do you handle wallpaper seams and patterns? / A: Expert wallpaper installation includes precise measuring, cutting, and alignment to create invisible seams and perfect pattern matching.
Q: Is wallpaper installation suitable for high-humidity areas? / A: Yes, proper wallpaper installation using moisture-resistant materials and techniques works excellently in sunrooms and humid environments.
Q: What warranty do you provide on wallpaper installation? / A: Windy City Painters backs all wallpaper installation work with comprehensive warranties covering materials and workmanship for customer peace of mind.
Q: Can wallpaper installation be done in winter? / A: Professional wallpaper installation can be performed year-round with proper climate control and material handling for optimal adhesion.
Q: How do you ensure wallpaper installation quality? / A: Our wallpaper installation process includes thorough preparation, premium materials, professional techniques, and detailed quality inspection for lasting results.
 D'CASSA
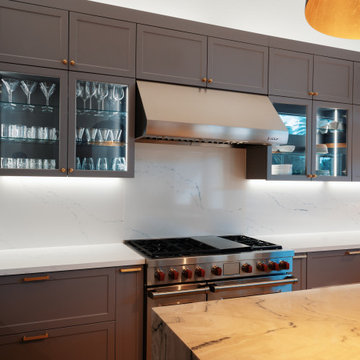
Modern kitchen countertops strike a perfect balance between functionality and aesthetics. Our countertops, made from durable materials, are designed to withstand daily use while maintaining a stylish appearance. Ample workspace and integrated sink options facilitate meal preparation and cleaning processes.
 Tile Doctor Ltd
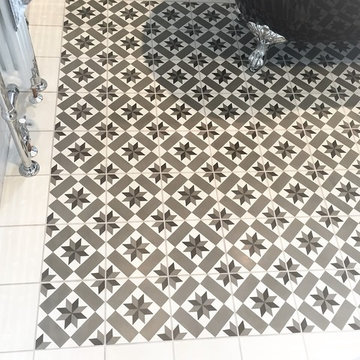
I’m often asked if you should seal a tile before grouting and the answer is a definite yes, and this Encaustic Cement tiled bathroom floor installation in Stockport is a great example as to why. The tiles had not been sealed before grouting and then, once the tiler went to grout the newly installed tiles with a grey grout, the colour ran into the tiles, staining them and leaving them looking grubby and dirty. Had the tiles been sealed it would of made the process of removing the grout from the surface of the tile much easier.
If you haven’t come across them before Encaustic cement tiles are often hand painted and are available in a range of beautifully artistic patterns, so it was a real shame that these tiles were allowed to be spoilt by an avoidable mistake. As you can imagine, the property owner was keen to have the tiles professionally restored, and she contacted me to get the job done. I took some photographs but I’m not sure that they do justice to the problem.
Rather than use a liquid cleaning product, I opted to use diamond encrusted handheld burnishing pads to remove the grout stains. Our burnishing system comprises four pads of varying grits. I started with the Coarse grit burnishing pads applying to the tiles it with a small amount of water as lubricant to grind down the grubby marks. Following this I worked my way through the system, applying Medium, Fine and Very Fine pads to gradually restore the appearance of the floor. Once the burnishing process has been completed I rinsed the tiles and then accelerated the drying process using a heat gun to prepare them to be sealed.
Removing any excess moisture before sealing is essential as even a small amount can cloud the sealer and prevent it from properly protecting the tiles from dirt and stains. Once satisfied that the floor was dry, I proceeded to seal it using Tile Doctor Colour Grow. As an impregnating sealer Colour Grow penetrates deep into the pores of the stone to fill them and thus prevent dirt from becoming ingrained. Colour Grow’s colour intensifying properties also really accentuated the patterns of the Encaustic Cement tiles.
Now that these fantastic tiles have been properly sealed it will be far easier for the customer to keep them clean in future. Needless to say, she was very happy with the result. We recommend topping up your sealer on a regular basis to ensure problems like those which occurred here do not damage the appearance of your tiles.
Steve Keary
Greater Manchester Tile Doctor
Sponsored
Columbus, OH
Hope Restoration & General Contracting
Columbus Design-Build, Kitchen & Bath Remodeling, Historic Renovations
 Home Of Kitchens INC
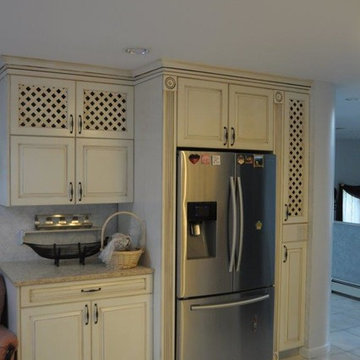
 This beautiful and cozy two-tone kitchen was designed, fabricated and installed by Drabott Custom Woodwork Inc. Design was achieved with use of our Feng-shui specialist who also picked a perfect location for the water flow with maximized flow of Chi Energy. Featuring custom milled curved doors, curved glass panel and open shelving with hand carved decorative fencing. Hand-carved company logo is ading to the rich custom feel, integrated at over-the-sink valance. Island hood is dressed with a custom enclosure with spotlights each controlled separtately. Sectional fridge area features vented cabinet doors with custom mesh panels. Bosch appliances through-out including five burners 36" cooktop and a 30" built-in gas oven.
All exterior is finished using custom mixed high-end finishing products by Magnalac and Magnamax, antique glazing was applied to achieve the anticue ivory look and then sealed to withstand washing/cleaning process without colors fading.
 Home Of Kitchens INC
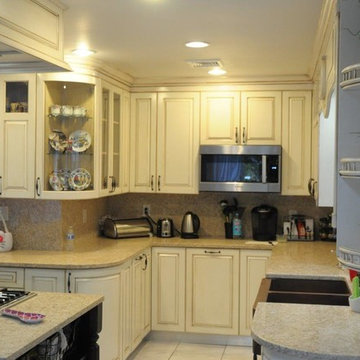
 This beautiful and cozy two-tone kitchen was designed, fabricated and installed by Drabott Custom Woodwork Inc. Design was achieved with use of our Feng-shui specialist who also picked a perfect location for the water flow with maximized flow of Chi Energy. Featuring custom milled curved doors, curved glass panel and open shelving with hand carved decorative fencing. Hand-carved company logo is ading to the rich custom feel, integrated at over-the-sink valance. Island hood is dressed with a custom enclosure with spotlights each controlled separtately. Sectional fridge area features vented cabinet doors with custom mesh panels. Bosch appliances through-out including five burners 36" cooktop and a 30" built-in gas oven.
All exterior is finished using custom mixed high-end finishing products by Magnalac and Magnamax, antique glazing was applied to achieve the anticue ivory look and then sealed to withstand washing/cleaning process without colors fading.
 Get My Rugs LLC
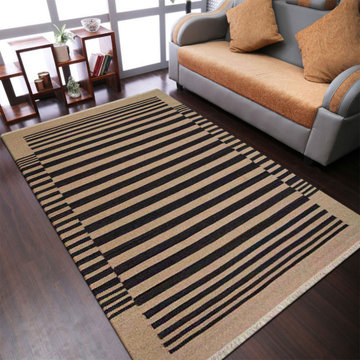
Introducing our Hand-Woven Flat Weave Contemporary Area Rug, a testament to artisanal craftsmanship and timeless elegance. Skillfully crafted by hand, this exquisite rug features a flat weave construction that highlights the natural beauty of wool in a captivating Cream Charcoal hue. Versatile and stylish, this rug effortlessly enhances any room with its understated sophistication. Its lightweight design makes it easy to move and position, allowing you to effortlessly update your space whenever inspiration strikes. Crafted with eco-friendly materials and a commitment to sustainability, this rug is not only a stylish addition to your home but also a conscious choice for the planet. The anti-slip backing ensures stability, providing peace of mind in high-traffic areas. Experience the perfect blend of style and functionality with our Hand-Woven Flat Weave Contemporary Area Rug. Whether you're seeking to add warmth to your living room or revitalize your bedroom decor, this rug promises to elevate your space with its timeless charm and easy-to-maintain beauty.
[FEATURES]
*PATTERN - Contemporary
*COLOR - Cream Charcoal
*MATERIAL - Wool
*MATERIAL COMPOSITION - 70% Wool; 30% Cotton
*CONSTRUCTION - Handmade
*WEAVE - Hand Woven Flat Weave Kilim
*COUNTRY OF ORIGIN - India
*BRAND - RUGSOTIC CARPETS
*MANUFACTURER - GET MY RUGS LLC
*SHIPPING - Free Shipping
*OCCASION - All
*ROOM TYPE - Living Room, Bed Room, Study Room, Guest Room, Kids Room, Office
*CARE INSTRUCTION - Vacuum Cleaning
*ECO-FRIENDLY - Yes
*NATURAL FIBRE - Yes
*PILE - High Pile
*PILE HEIGHT - 0.75 Inches
*BACK MATERIAL - Cotton
*USAGE - Indoor
*DURABLE - Yes
*ANTI-SKID - Yes
*Order Handling Time - 2 Business days
*Washable - No
*RUG PAD NEEEDED - No
*ITEM CONDITION - New
*REVERSIBLE - No
*[WEAVE / CONSTRUCTION] Handmade by skilled artisan’s adept in the art of rug weaving, dedicating numerous hours to meticulously craft this artistic area rug to perfection. As the name resembles the hand-woven flat weave rugs are thinly woven with low pile and flat surface. Flat weave rug is woven with fabric by interlocking horizontal & vertical threads, to create a flat rug in a variety of colors & designs. These are light-weight but end up lacking the soft velvety feel often associated with rugs.
*[MATERIAL] The area rug is woven using wool, renowned for its exceptional quality due to its luxurious texture, feel, and practical advantages. Wool stands out in the rug-making industry for its numerous qualities such as high durability, warmth, and rich appearance and feel.
*[PATTERN] This modern area rugs with Contemporary design elevates the elegance of your living space and complement various home décor styles including transitional, modern, contemporary, and bohemian.
*[ECO-FRIENDLY] By selecting this handmade area rug, woven with eco-friendly natural fibers and crafted without the use of harmful chemicals, you demonstrate your commitment to a healthier environment and your support for traditional craftsmanship.
*[DURABLE & EASY CARE] Crafted with meticulous precision and using top-quality materials, these area rugs boast unparalleled durability, making them suitable for high-traffic areas while providing exceptional underfoot comfort. Moreover, they require minimal maintenance, needing only occasional vacuuming to keep them looking their best.
*[USAGE AREA] Area rugs are versatile decor elements that can elevate the ambiance and functionality of any room in your home. From the living room to the bedroom, and even outdoor spaces, study rooms, runway, dining room and office room here's how you can make the most of area rugs throughout your home.
*[SHAPE & SIZE] This Rectangle area rug is of 6'x9' size. Ensure that the rug is the appropriate size and shape for the space, considering the furniture arrangement and the room's dimensions.
*[SERVICES] Free Shipping | Quick Order Dispatch | Easy Return | Accessible Customer Support - With quality product we deliver exceptional services to customers.
*[BRAND] RUGSOTIC CARPETS is a name synonymous with quality area rugs, rooted in decades of manufacturing expertise. Our commitment to excellence extends beyond product quality to supporting thousands of skilled weavers and artisans. We prioritize environmental friendliness and climate sustainability in our weaving processes, while also fostering the continuous skill development of our weavers through training initiatives. From spinning and dyeing yarn with natural ingredients in our in-house units to the meticulous weaving of our area rugs, quality checks at every stage ensure the delivery of products that uphold high moral values and exceed customer expectations.
*[SHIPPING]Free shipping across USA (except Puerto Rico, Alaska & Hawaii). Easy 30 days free returns. In case of damaged or wrong product delivered, the return shipment cost will be borne by us, in any other case, it will be paid by the customer.
*[WEAVE DESCRIPTION]As the name resembles the hand woven flat weave rugs are thinly woven with low pile and flat surface. Flat weave rug are woven with fabric on loom by interlocking horizontal & vertical threads, to create a flat rug in a variety of colors & designs. These are rugged & very easy to clean, light-weight but end up lacking the soft velvety feel often associated with rugs. These are usually much lighter than rugs of other weave & call for a good quality rug-pad to be used underneath.
*[MATERIAL DESCRIPTION]In the universe of rug-fabrics, wool is considered one of the finest, owing to the touch, feel & practical benefits of this natural wonder-fiber. Wool has many qualities that place it far ahead in the rug-making business – e.g. high durability, warmth, rich look & feel etc. Wool is a pre-eminent choice for a classy rug that can last you for decades.
*[PILE DESCRIPTION]Hand woven flat weave rugs are low pile rugs which make the rugs light in weight and easy to clean. These rugs are more flexible and can be folded or rolled up easily. Despite its low pile, this rug's exceptional construction makes it suitable for high-traffic areas.
*[PROPER SET UP & CARE]Flat weave rugs are thin and with no pile its doesn't sheds, for which just adequate vacuum cleaning is good enough to maintain the durability of rug. The rugs are good to be used in medium traffic area. Since the rugs are thin it can be easily used under the furniture as well.
*[FLOOR PROTECTION]Though this rug will not cause damage to your flooring, you can use the rug pads on its lower surface and protect the floor from any unexpected scratch. By utilizing a rug pad, you can enhance the thickness of flat weave rugs, compensating for their thinner nature compared to other styles of woven rugs.
*[CLEANING METHOD]The vacuum cleaning is the best way to get rid of dirt and dust. You may also choose the option of professional dry cleaning to make it look rejuvenating all the time.
24