
Search results for "Common issues" in Home Design Ideas
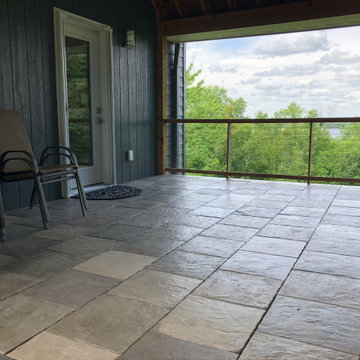
 DekTek Tile
This Minnesota covered porch was built using DekTek Tile's Cobblestone Gray tile decking from the Elevate Collection. DekTek Tile is ultra low maintenance only requiring that the deck be resealed once every 3 years for the maximum beauty. No need to worry about sanding, staining, scrubbing off algae, & all other common decking issues with wood or composite decks.
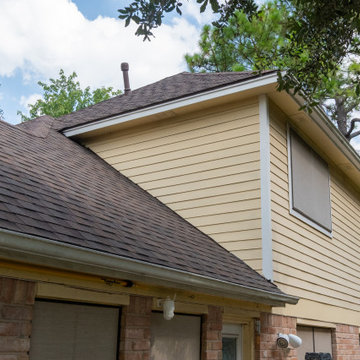
 Deskins Group LLC
This exterior repair project began after our client had their home re‑roofed a little over a year earlier. Like many homeowners, they didn’t realize the roofing crew had damaged several areas of siding and removed key trim pieces during the installation. It’s a common issue: most roofing companies have a single day to complete their work, and if siding or trim is in the way, it often gets cracked, loosened, or pulled off entirely.
At Deskins Siding & Exteriors, we specialize in identifying and repairing the exterior damage that often goes unnoticed after a roof replacement. During our inspection, we found multiple areas that needed attention, including:
• Damaged or missing Hardie siding
• Removed or broken trim
• Holes left behind during the roofing process
• Rotten soffit and deteriorated wood that required replacement
We restored each affected area using proper materials, matched profiles, and seamless Sherwin‑Williams paint blending to ensure the repairs disappeared into the home’s original exterior. The result is a clean, structurally sound finish that protects the home and enhances curb appeal.
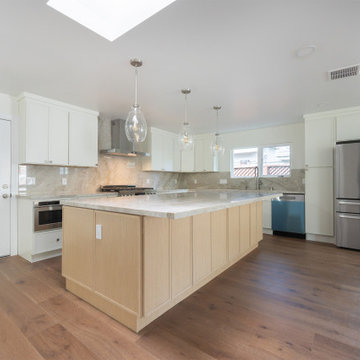
 Lemon Remodeling & Services
Planning a Modern Kitchen Remodel
Every successful kitchen remodeling project begins with careful planning. Before construction starts, it is important to evaluate the existing layout, cabinet storage, lighting conditions, appliance placement, and how the kitchen connects to surrounding living spaces.
For this project, the primary design goals included:
Creating a brighter open concept kitchen
Improving functionality and circulation
Increasing pantry and cabinet storage
Maximizing natural light with skylight integration
Creating a clean and timeless design aesthetic
The final layout centered around a large kitchen island that functions as both a workspace and gathering area. Open concept kitchens remain highly desirable because they improve communication between living areas while helping the home feel larger and more connected.
Importance of Natural Light
Natural lighting plays a major role in modern kitchen remodeling. In this renovation, the skylight significantly improved brightness throughout the space and helped create a softer, more inviting atmosphere during the day.
Combined with recessed lighting and pendant fixtures above the island, the layered lighting design provides both functional task lighting and balanced ambient illumination.
Construction and Material Selection
Kitchen remodeling projects require coordination between multiple construction trades including demolition, framing, electrical, plumbing, drywall, flooring, cabinetry, countertops, and finish carpentry.
Bi-Color Kitchen Remodel Design
One of the standout features of this project is the bi-color kitchen remodel design. The warm natural wood island creates contrast against the surrounding white cabinetry while maintaining a clean and balanced appearance.
This approach helps:
Add visual depth to the kitchen
Create separation between functional zones
Prevent the space from feeling overly monochromatic
Introduce warmth into modern kitchen designs
The oversized island also provides additional storage, countertop workspace, and seating opportunities for everyday use and entertaining.
Countertops, Cabinetry, and Finishes
The kitchen includes:
Quartz countertops with waterfall-style edges
Custom shaker-style cabinetry
Stainless steel appliances
Modern pendant lighting
Wide plank engineered hardwood flooring
Full-height backsplash surfaces
The neutral color palette was selected to create a timeless appearance while allowing flexibility for future décor and furniture changes.
Pantry Kitchen Renovation
Storage planning is one of the most important aspects of kitchen remodeling. The pantry kitchen renovation focused on improving organization and accessibility while maximizing usable storage space.
Modern pantry systems help homeowners:
Reduce countertop clutter
Improve kitchen organization
Store small appliances more efficiently
Increase long-term functionality
Thoughtful storage design can significantly improve the daily usability of a kitchen without increasing square footage.
Real Estate Value and Long-Term Benefits
Kitchen remodeling remains one of the highest-value residential renovation projects in the Bay Area real estate market. A professionally designed open concept kitchen can improve buyer perception, increase property appeal, and modernize outdated layouts.
Features such as large islands, skylights, pantry storage, and bi-color cabinetry continue to remain highly desirable among homeowners and future buyers alike.
Common Kitchen Remodeling Mistakes
Some common mistakes homeowners should avoid include:
Insufficient lighting design
Poor circulation planning
Limited storage solutions
Choosing low-durability materials
Overcrowded layouts
Inadequate electrical preparation
Working with experienced remodeling professionals can help avoid costly design and construction issues later in the process.
Common Questions
How long does a kitchen remodel usually take?
Most kitchen remodeling projects take approximately 6–12 weeks depending on the project scope, inspections, material lead times, and structural modifications.
Do kitchen remodels require permits?
Permits are often required when plumbing, electrical, structural, or layout changes are involved. Requirements vary depending on the city and scope of work.
What is a bi-color kitchen remodel?
A bi-color kitchen remodel uses two cabinet finishes or tones to create visual contrast and a more customized design appearance.
Does an open concept kitchen increase home value?
Open concept kitchens are highly desirable because they improve functionality, natural lighting, and overall flow throughout the home.
Conclusion
A well-planned kitchen remodeling project combines thoughtful design, quality craftsmanship, and durable materials to create a space that is both functional and visually appealing. Features such as skylight integration, open concept layouts, pantry kitchen renovations, and bi-color cabinetry continue to remain popular among Bay Area homeowners seeking timeless and practical kitchen designs.
Careful planning, professional coordination, and attention to detail are essential for creating a kitchen that performs well aesthetically and functionally for many years.
------->
If you’re planning a kitchen remodeling project, consulting with an experienced contractor can help simplify the design and construction process while avoiding costly mistakes.
Book a consultation:
calendly.com/lemonremodeling
Find the right local pro for your project

 Tile Doctor Ltd
I was contacted about a Georgian property in the Kent village of Leeds , to see if I could do anything to improve a Travertine tiled floor. The use of Travertine was extensive and had been installed throughout the ground floor including the kitchen, dining room, utility and bathroom WC. Travertine is probably my favourite stone, but it is acid sensitive and attracts dirt easily, due to its ‘holey’ composition.
Initially we discussed the floor over the phone where I got to know about the issues they were experiencing, and I detailed the renovation process I normally use to restore it including the products and timelines. Naturally they wanted to me to provide a quote for the work however its tricky to do that accurately without seeing the floor, so I arranged a date to pop over.
Upon arriving I could see the tiles and the wide grout joints had extensive, ingrained dirt indicating the previous sealer had long since worn away. This is a common issue with stone floors, and to re-assure myself and the client it could be resolved I cleaned a small area in the utility room with pleasing results!
This test clean helped me to understand which products and methods would work best on the floor and later that day I emailed over a detailed quote for the renovation. Happy with the quote I received a reply the same day asking when I could start.
My colleague and I arrived on the agreed date and work started with adding protection to all areas that required it. We use a lot of water during the cleaning process and some materials such as MDF can become damaged with water ingress, so it makes sense to do this.
To get the floor clean, a coarse Carbide Brush fitted to a rotary machine was run over the Travertine tiles to scrub in a strong solution of Tile Doctor Pro-Clean. This process generates a lot of slurry as the dirt was washed out of the stone and grout which is extracted with a wet vacuum as we progressed.
Next it was on hands and knees with more Tile Doctor Pro-Clean and handheld brushes run over stubborn areas and along the grout lines to take them from 80% up to 100%.
Happy with the results, the next step was to renovate the stone using a series of diamond encrusted burnishing pads. Using only water for lubrication this process starts with the application of a coarse 400-grit burnishing pad attached to the floor buffer. This produces a lot of slurry which again was removed with a wet vacuum.
This left the Travertine clean, but the pores of the stone had been opened giving the floor a matt finish and more absorbent than it was originally. To further refine the appearance of the stone the next two burnishing pads were applied which are 800 and 1500-grit. These pads polish the stone and close the pores, restoring the natural sheen in the process. After each pad was applied the slurry was rinsed off the floor with water and extracted with the wet vacuum. Once complete the floor was left to dry off fully overnight.
I arrived the next day and took several moisture readings from the floor to check that it had dried off sufficiently overnight. The results were good, so work moved onto sealing the Travertine with two coats of Tile Doctor Ultra Seal which is a natural look impregnating sealer. It works by soaking into the stone, occupying the pores and thereby preventing dirt from becoming ingrained there. This ensures dirt remains on the surface where it is easily cleaned away.
The final step in the floor’s renovation was to apply the last of the diamond polishing pads which is a very fine 3000-grit. This pad further improves the polished appearance of the stone resulting in a satisfying sheen.
The work made a massive difference to the floor, and I received an email the next day from one of the owners who was really pleased with the transformation:
”Floors look brilliant. Very pleased.”
For the care and maintenance of polished sealed floors I recommend the use of Tile Doctor’s Stone Soap which is a gentle but effective cleaning product that won’t impact the sealer and contains a patina enhancer. When it comes to sealed floors my mantra is:
“If you look after the sealer, the sealer will look after the floor!”
Graham Davis
North Kent Tile Doctor
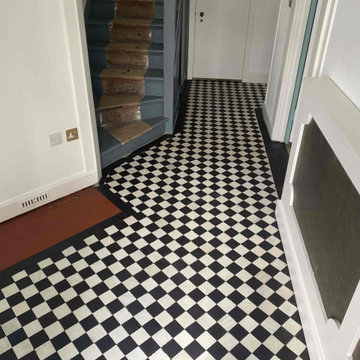 Tile Doctor Ltd
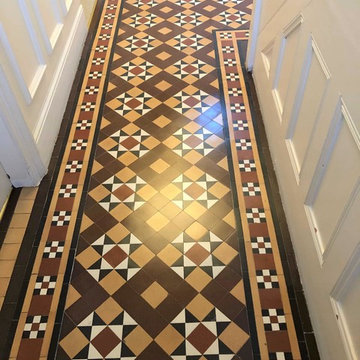
This client from North London had recently bought a property in Highgate N6 and during renovation had discovered an original Victorian tiled floor in the hallway. The floor was laid in a classic black and white diamond pattern but unfortunately a large section was missing and had been filled with concrete. Furthermore, most of the remaining floor had been covered in cement and glue.
I carried out a survey of the floor to determine the main issues and was then able to email over a quote later that day that included rebuilding the missing section of flooring. I suspect the floor had been excavated at some point in the past to install central heating and then rather than have the excavated section restored it was simply back filled and then levelled with a cement screed before finally gluing down a carpet on top.
Once the quote was accepted, I sourced replacement tiles from the Vintage Floor Tile company. Situated in Kent they are a reclamation yard that specialises in supplying original geometric and encaustic tiles including the major historical makers such as Minton and Craven Dunnill.
Armed with replacement tiles I started by removing the concrete that had been used to backfill the missing section and prepare a new surface for tiling with quick drying cement. When ready I was able to carefully build back the original pattern using the replacements. The tiles were secured with tile adhesive and once that had gone off, they were grouted.
The floor was left to set fully overnight and then the next day I was able to return and clean the whole floor using a strong dilution of Tile Doctor Remove and Go. As usual this was left to soak into the tiles for a good ten minutes before being scrubbed into the tiles using a black scrubbing pad. The Tile Doctor Remove and Go did a good job of cleaning the floor and the cleaning solution soon turned black with dirt during the scrubbing. The floor was rinsed with water and the soil extracted with a wet vacuum. After inspecting the floor any areas that needed further work were hand scrubbed and rinsed again until I was happy the floor was clean.
The last part of the cleaning process was to give the tiles an acid wash using Tile Doctor Acid Gel which further cleans the floor by removing old cement residue and grout haze. It also neutralises efflorescent salts in the tiles which are a common issue with floors of this age with no damp proof membrane. After another rinse and extraction, the floor was given a final rinse and then dried as much as possible using the wet vacuum.
I left the floor to dry out for a couple of days before returning to apply a protective sealer. Tile and Stone should be dry before sealing so I use a damp meter first to double check. All was well so to seal the tiles I proceeded to apply the first of what would be three coats of sealer. I used Tile Doctor Colour Grow for this, it works by impregnating the tile occupying the pores and thereby preventing dirt from becoming ingrained there. This product also enhances the black and white colour of the tiles and makes the floor much easier to clean.
Once done the floor was transformed and needless to say my customer was very pleased with the result. For the aftercare of Victorian Tiled floors, I recommend the use of a ph neural tile cleaner such as Tile Doctor Neutral Cleaner; most supermarket tile cleaners are simply too strong for use on sealed floors and can strip off the sealer prematurely.
Andrew Newstead
North London Tile Doctor
 Trusscore
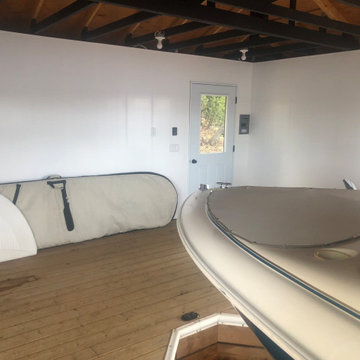
A common issue faced by cottage owners is rising and falling water levels. That’s precisely what the Sweetnams on Lake Muskoka were dealing with. With these changing conditions, they wanted to finish their new boathouse to stand the test of time and tide.
When it comes to finishing your boathouse interior, owners should be on the lookout for a wall panel that:
? Can handle getting wet
? Is easy to clean
? Won’t swell, stain, or develop mold
? Will stand up to hot summer days and frozen winters
Trusscore checks all those boxes! ☑️
We’re not trying to pier pressure you, but to learn more about why you should choose Trusscore for your boathouse, visit the website link.
 Tile Doctor Ltd
It’s not just major restoration work we do at Tile Doctor, sometimes a simple clean and seal is all that is required and that was the case at this property in Evesham. This medieval market town lies within the Vale of Evesham and is encompassed by the River Avon. It is located between the larger towns of Worcester, Cheltenham and Stratford-upon-Avon.
I was contacted by the owner and I arranged a visit to view their Victorian Hallway. The floor was in very good condition, but the previous sealer was now in-effective and the floor was dull and needed a good clean and seal. The colours were starting to fade, and it was due some attention. Sealers do wear off over time so if you have a similar floor to this it’s worth bearing that in mind. We discussed the work required and the cost involved, my quote was accepted, and the work scheduled.
On arrival I set up my equipment and covered any areas of carpet to protect from splashing during cleaning. I then used Tile Doctor Remove and Go spraying the product onto the floor allowing it to dwell for 10 minutes thus breaking down any sealers. This product is a non-flammable, multi-purpose stripper which works best when left to soak in for some time before scrubbing. This product is also great for drawing out ingrained stains and removing heavy grease build up.
The floor was then pasted with Tile Doctor Acid Gel which works to neutralise any alkaline salts in the tiles that can cause efflorescence later. This is a common issue with old floors which often do not have a damp proof membrane in place. I then went to work with my scrubbing machine and a black pad and worked the products into the tile. The resulting slurry was then rinsed off with water and removed with a wet vacuum.
I then went over the floor with microfibres and water to remove any remaining marks before leaving it to dry off overnight and ready for sealing.
I returned the following day and started by checking the floor was dry using a moisture meter. To seal the floor, I chose Tile Doctor Seal and Go Extra which is a fully breathable semi- gloss sealer which made a huge difference to the floor. Choosing a fully breathable sealer is important for floors that don’t have a damp proof membrane as you want to encourage any dampness to rise through the tile and not get trapped underneath where it might spread into the walls.
The deep clean and new seal brought out the vibrant colours in the tiles which were now shining through enhances by the lovely sheen which customer was very pleased with.
For aftercare I left the customer with a bottle of Tile Doctor Neutral Tile Cleaner which being concentrated goes a long way. Once diluted with water the product becomes completely pH neutral which unlike most household cleaners and washing up liquids which contain bleaches won’t prematurely degrade the sealer with use.
Mark Conway
Worcestershire Tile Doctor
 Trusscore
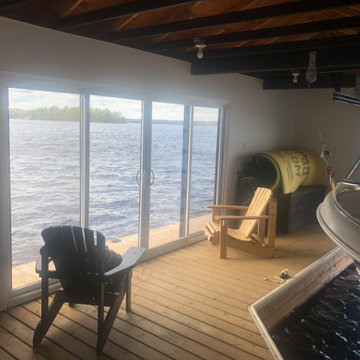
A common issue faced by cottage owners is rising and falling water levels. That’s precisely what the Sweetnams on Lake Muskoka were dealing with. With these changing conditions, they wanted to finish their new boathouse to stand the test of time and tide.
When it comes to finishing your boathouse interior, owners should be on the lookout for a wall panel that:
? Can handle getting wet
? Is easy to clean
? Won’t swell, stain, or develop mold
? Will stand up to hot summer days and frozen winters
Trusscore checks all those boxes! ☑️
We’re not trying to pier pressure you, but to learn more about why you should choose Trusscore for your boathouse, visit the website link.

 User
UserA common issue among clients is moving to a new home and hoping the current furniture will fit. What do you do if it doesn’t work? Well for these clients, they were blessed to be able to start new and so starting from scratch helped them achieve the look they truly wanted. New furniture to scale, a warm and inviting color scheme with the right touch on accessories created a room that is show-stopping gorgeous!
Photo Credit - Don Molyneaux
 User
UserA common issue among clients is moving to a new home and hoping the current furniture will fit. What do you do if it doesn’t work? Well for these clients, they were blessed to be able to start new and so starting from scratch helped them achieve the look they truly wanted. New furniture to scale, a warm and inviting color scheme with the right touch on accessories created a room that is show-stopping gorgeous!
Photo Credit - Don Molyneaux
 Laqfoil Ltd.
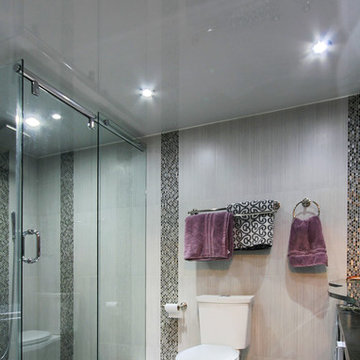
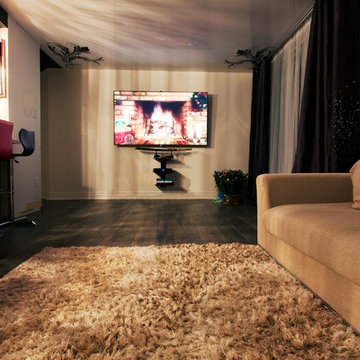
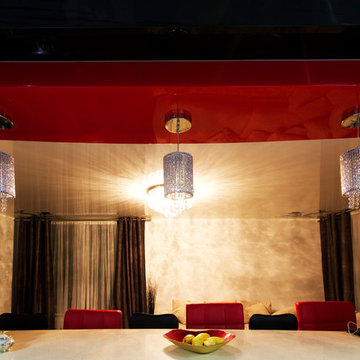
The issues that annoyed the family in this condo are common to new condo units: Low ceilings covered with a popcorn finish, small rooms, low light in the bedrooms and living room, and no ceiling light fixtures. Concrete ceilings are not only difficult to drill into to install fixtures, installing wiring behind them for such fixtures is impossible. There are often conduits for building services embedded in the concrete along with structural steel reinforcements, so drilling without x-raying first is dangerous.
Laqfoil stretch ceiling provided a solution to all of these issues for this condo unit. A high gloss finish was chosen, as the reflections visually double the height of the space. Installing a stretch ceiling also naturally conceals the popcorn ceiling behind it, but in this case, was also used to conceal the wiring necessary to add ceiling lights in every room. The wiring was simply attached to the existing popcorn ceiling. Laqfoil stretch ceiling is supported around the perimeter only, by tracks, or profiles which are only about 0.75" thick. The ceiling membrane itself is less than one millimetre thick.
We also added a small vector graphic, printed in each corner of the living room ceiling, for a unique aesthetic effect.
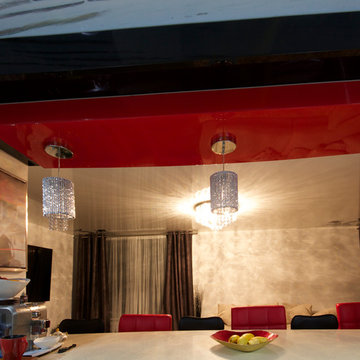
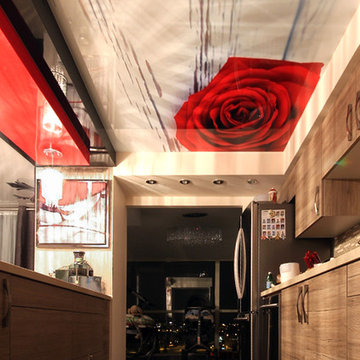
We constructed a suspended bulkhead above the island and covered it with red high gloss membrane, to visually separate the kitchen and living room while keeping the design's open concept. This also provided a supporting structure for 3 mini chandelier pendant lights.
A red rose depicted on a black and white textured ground was chosen for the kitchen ceiling and applied using digital wide format printing technology, to tie the red, black and white colour scheme with the kitchen cabinets' texture.
 Laqfoil Ltd.
The issues that annoyed the family in this condo are common to new condo units: Low ceilings covered with a popcorn finish, small rooms, low light in the bedrooms and living room, and no ceiling light fixtures. Concrete ceilings are not only difficult to drill into to install fixtures, installing wiring behind them for such fixtures is impossible. There are often conduits for building services embedded in the concrete along with structural steel reinforcements, so drilling without x-raying first is dangerous.
Laqfoil stretch ceiling provided a solution to all of these issues for this condo unit. A high gloss finish was chosen, as the reflections visually double the height of the space. Installing a stretch ceiling also naturally conceals the popcorn ceiling behind it, but in this case, was also used to conceal the wiring necessary to add ceiling lights in every room. The wiring was simply attached to the existing popcorn ceiling. Laqfoil stretch ceiling is supported around the perimeter only, by tracks, or profiles which are only about 0.75" thick. The ceiling membrane itself is less than one millimetre thick.
We also added a small vector graphic, printed in each corner of the living room ceiling, for a unique aesthetic effect.
We constructed a suspended bulkhead above the island and covered it with red high gloss membrane, to visually separate the kitchen and living room while keeping the design's open concept. This also provided a supporting structure for 3 mini chandelier pendant lights.
A red rose depicted on a black and white textured ground was chosen for the kitchen ceiling and applied using digital wide format printing technology, to tie the red, black and white colour scheme with the kitchen cabinets' texture.
 Laqfoil Ltd.
The issues that annoyed the family in this condo are common to new condo units: Low ceilings covered with a popcorn finish, small rooms, low light in the bedrooms and living room, and no ceiling light fixtures. Concrete ceilings are not only difficult to drill into to install fixtures, installing wiring behind them for such fixtures is impossible. There are often conduits for building services embedded in the concrete along with structural steel reinforcements, so drilling without x-raying first is dangerous.
Laqfoil stretch ceiling provided a solution to all of these issues for this condo unit. A high gloss finish was chosen, as the reflections visually double the height of the space. Installing a stretch ceiling also naturally conceals the popcorn ceiling behind it, but in this case, was also used to conceal the wiring necessary to add ceiling lights in every room. The wiring was simply attached to the existing popcorn ceiling. Laqfoil stretch ceiling is supported around the perimeter only, by tracks, or profiles which are only about 0.75" thick. The ceiling membrane itself is less than one millimetre thick.
We also added a small vector graphic, printed in each corner of the living room ceiling, for a unique aesthetic effect.
We constructed a suspended bulkhead above the island and covered it with red high gloss membrane, to visually separate the kitchen and living room while keeping the design's open concept. This also provided a supporting structure for 3 mini chandelier pendant lights.
A red rose depicted on a black and white textured ground was chosen for the kitchen ceiling and applied using digital wide format printing technology, to tie the red, black and white colour scheme with the kitchen cabinets' texture.
 Laqfoil Ltd.
The issues that annoyed the family in this condo are common to new condo units: Low ceilings covered with a popcorn finish, small rooms, low light in the bedrooms and living room, and no ceiling light fixtures. Concrete ceilings are not only difficult to drill into to install fixtures, installing wiring behind them for such fixtures is impossible. There are often conduits for building services embedded in the concrete along with structural steel reinforcements, so drilling without x-raying first is dangerous.
Laqfoil stretch ceiling provided a solution to all of these issues for this condo unit. A high gloss finish was chosen, as the reflections visually double the height of the space. Installing a stretch ceiling also naturally conceals the popcorn ceiling behind it, but in this case, was also used to conceal the wiring necessary to add ceiling lights in every room. The wiring was simply attached to the existing popcorn ceiling. Laqfoil stretch ceiling is supported around the perimeter only, by tracks, or profiles which are only about 0.75" thick. The ceiling membrane itself is less than one millimetre thick.
We also added a small vector graphic, printed in each corner of the living room ceiling, for a unique aesthetic effect.
We constructed a suspended bulkhead above the island and covered it with red high gloss membrane, to visually separate the kitchen and living room while keeping the design's open concept. This also provided a supporting structure for 3 mini chandelier pendant lights.
A red rose depicted on a black and white textured ground was chosen for the kitchen ceiling and applied using digital wide format printing technology, to tie the red, black and white colour scheme with the kitchen cabinets' texture.
 Laqfoil Ltd.
The issues that annoyed the family in this condo are common to new condo units: Low ceilings covered with a popcorn finish, small rooms, low light in the bedrooms and living room, and no ceiling light fixtures. Concrete ceilings are not only difficult to drill into to install fixtures, installing wiring behind them for such fixtures is impossible. There are often conduits for building services embedded in the concrete along with structural steel reinforcements, so drilling without x-raying first is dangerous.
Laqfoil stretch ceiling provided a solution to all of these issues for this condo unit. A high gloss finish was chosen, as the reflections visually double the height of the space. Installing a stretch ceiling also naturally conceals the popcorn ceiling behind it, but in this case, was also used to conceal the wiring necessary to add ceiling lights in every room. The wiring was simply attached to the existing popcorn ceiling. Laqfoil stretch ceiling is supported around the perimeter only, by tracks, or profiles which are only about 0.75" thick. The ceiling membrane itself is less than one millimetre thick.
We also added a small vector graphic, printed in each corner of the living room ceiling, for a unique aesthetic effect.
We constructed a suspended bulkhead above the island and covered it with red high gloss membrane, to visually separate the kitchen and living room while keeping the design's open concept. This also provided a supporting structure for 3 mini chandelier pendant lights.
A red rose depicted on a black and white textured ground was chosen for the kitchen ceiling and applied using digital wide format printing technology, to tie the red, black and white colour scheme with the kitchen cabinets' texture.
 Laqfoil Ltd.
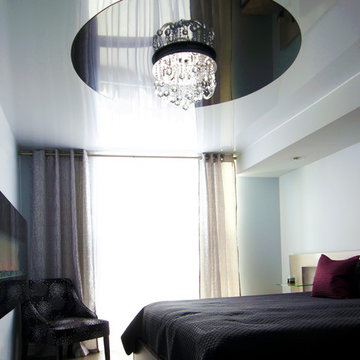
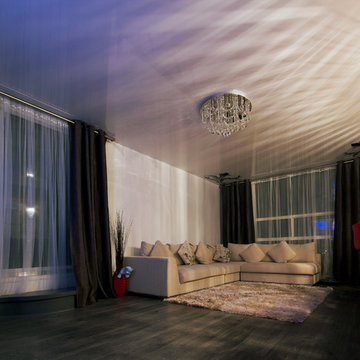
The stretch ceiling here is white high gloss, with a black graphic printed in the corners. Off screen, there is blue lighting on the left, which is reflecting off the ceiling. The issues that annoyed the family in this condo are common to new condo units: Low ceilings covered with a popcorn finish, small rooms, low light in the bedrooms and living room, and no ceiling light fixtures. Concrete ceilings are not only difficult to drill into to install fixtures, installing wiring behind them for such fixtures is impossible. There are often conduits for building services embedded in the concrete along with structural steel reinforcements, so drilling without x-raying first is dangerous.
Laqfoil stretch ceiling provided a solution to all of these issues for this condo unit. A high gloss finish was chosen, as the reflections visually double the height of the space. Installing a stretch ceiling also naturally conceals the popcorn ceiling behind it, but in this case, was also used to conceal the wiring necessary to add ceiling lights in every room. The wiring was simply attached to the existing popcorn ceiling. Laqfoil stretch ceiling is supported around the perimeter only, by tracks, or profiles which are only about 0.75" thick. The ceiling membrane itself is less than one millimetre thick.
We also added a small vector graphic, printed in each corner of the living room ceiling, for a unique aesthetic effect.
 Laqfoil Ltd.
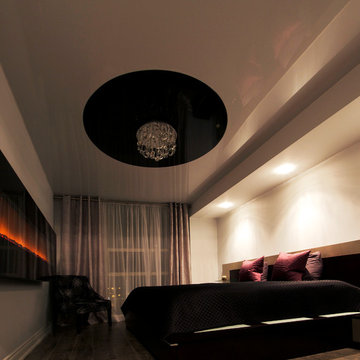
The issues that annoyed the family in this condo are common to new condo units: Low ceilings covered with a popcorn finish, small rooms, low light in the bedrooms and living room, and no ceiling light fixtures. Concrete ceilings are not only difficult to drill into to install fixtures, installing wiring behind them for such fixtures is impossible. There are often conduits for building services embedded in the concrete along with structural steel reinforcements, so drilling without x-raying first is dangerous.
Laqfoil stretch ceiling provided a solution to all of these issues for this condo unit. A high gloss finish was chosen, as the reflections visually double the height of the space. Installing a stretch ceiling also naturally conceals the popcorn ceiling behind it, but in this case, was also used to conceal the wiring necessary to add ceiling lights in every room. The wiring was simply attached to the existing popcorn ceiling. Laqfoil stretch ceiling is supported around the perimeter only, by tracks, or profiles which are only about 0.75" thick. The ceiling membrane itself is less than one millimetre thick.
We also added a small vector graphic, printed in each corner of the living room ceiling, for a unique aesthetic effect.
We constructed a suspended bulkhead above the island and covered it with red high gloss membrane, to visually separate the kitchen and living room while keeping the design's open concept. This also provided a supporting structure for 3 mini chandelier pendant lights.
A red rose depicted on a black and white textured ground was chosen for the kitchen ceiling and applied using digital wide format printing technology, to tie the red, black and white colour scheme with the kitchen cabinets' texture.
 Laqfoil Ltd.
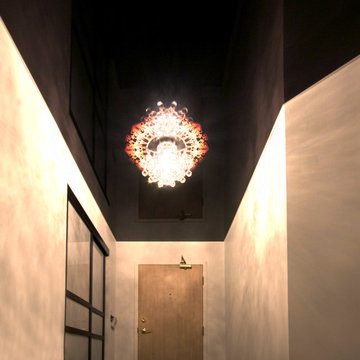
The issues that annoyed the family in this condo are common to new condo units: Low ceilings covered with a popcorn finish, small rooms, low light in the bedrooms and living room, and no ceiling light fixtures. Concrete ceilings are not only difficult to drill into to install fixtures, installing wiring behind them for such fixtures is impossible. There are often conduits for building services embedded in the concrete along with structural steel reinforcements, so drilling without x-raying first is dangerous.
Laqfoil stretch ceiling provided a solution to all of these issues for this condo unit. A high gloss finish was chosen, as the reflections visually double the height of the space. Installing a stretch ceiling also naturally conceals the popcorn ceiling behind it, but in this case, was also used to conceal the wiring necessary to add ceiling lights in every room. The wiring was simply attached to the existing popcorn ceiling. Laqfoil stretch ceiling is supported around the perimeter only, by tracks, or profiles which are only about 0.75" thick. The ceiling membrane itself is less than one millimetre thick.
We also added a small vector graphic, printed in each corner of the living room ceiling, for a unique aesthetic effect.
We constructed a suspended bulkhead above the island and covered it with red high gloss membrane, to visually separate the kitchen and living room while keeping the design's open concept. This also provided a supporting structure for 3 mini chandelier pendant lights.
A red rose depicted on a black and white textured ground was chosen for the kitchen ceiling and applied using digital wide format printing technology, to tie the red, black and white colour scheme with the kitchen cabinets' texture.
 Laqfoil Ltd.
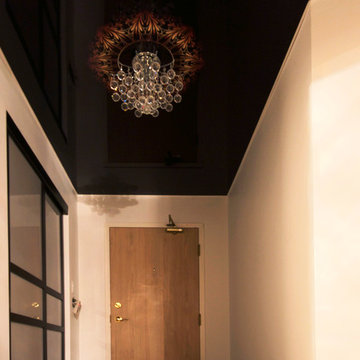
The issues that annoyed the family in this condo are common to new condo units: Low ceilings covered with a popcorn finish, small rooms, low light in the bedrooms and living room, and no ceiling light fixtures. Concrete ceilings are not only difficult to drill into to install fixtures, installing wiring behind them for such fixtures is impossible. There are often conduits for building services embedded in the concrete along with structural steel reinforcements, so drilling without x-raying first is dangerous.
Laqfoil stretch ceiling provided a solution to all of these issues for this condo unit. A high gloss finish was chosen, as the reflections visually double the height of the space. Installing a stretch ceiling also naturally conceals the popcorn ceiling behind it, but in this case, was also used to conceal the wiring necessary to add ceiling lights in every room. The wiring was simply attached to the existing popcorn ceiling. Laqfoil stretch ceiling is supported around the perimeter only, by tracks, or profiles which are only about 0.75" thick. The ceiling membrane itself is less than one millimetre thick.
We also added a small vector graphic, printed in each corner of the living room ceiling, for a unique aesthetic effect.
We constructed a suspended bulkhead above the island and covered it with red high gloss membrane, to visually separate the kitchen and living room while keeping the design's open concept. This also provided a supporting structure for 3 mini chandelier pendant lights.
A red rose depicted on a black and white textured ground was chosen for the kitchen ceiling and applied using digital wide format printing technology, to tie the red, black and white colour scheme with the kitchen cabinets' texture.
 Laqfoil Ltd.
The issues that annoyed the family in this condo are common to new condo units: Low ceilings covered with a popcorn finish, small rooms, low light in the bedrooms and living room, and no ceiling light fixtures. Concrete ceilings are not only difficult to drill into to install fixtures, installing wiring behind them for such fixtures is impossible. There are often conduits for building services embedded in the concrete along with structural steel reinforcements, so drilling without x-raying first is dangerous.
Laqfoil stretch ceiling provided a solution to all of these issues for this condo unit. A high gloss finish was chosen, as the reflections visually double the height of the space. Installing a stretch ceiling also naturally conceals the popcorn ceiling behind it, but in this case, was also used to conceal the wiring necessary to add ceiling lights in every room. The wiring was simply attached to the existing popcorn ceiling. Laqfoil stretch ceiling is supported around the perimeter only, by tracks, or profiles which are only about 0.75" thick. The ceiling membrane itself is less than one millimetre thick.
We also added a small vector graphic, printed in each corner of the living room ceiling, for a unique aesthetic effect.
We constructed a suspended bulkhead above the island and covered it with red high gloss membrane, to visually separate the kitchen and living room while keeping the design's open concept. This also provided a supporting structure for 3 mini chandelier pendant lights.
A red rose depicted on a black and white textured ground was chosen for the kitchen ceiling and applied using digital wide format printing technology, to tie the red, black and white colour scheme with the kitchen cabinets' texture.
8