
Search results for "Conducting" in Home Design Ideas

 The Redesign Company
design by christina britt lewis, photography by angela statzer
Home office photo in Charlotte
Home office photo in Charlotte

 Penza Bailey Architects
An intimate understanding of the clients led to the immaculate renovation of this Baltimore County project by Penza Bailey Architects. After conducting a feasibility study to assist the clients in selecting the right home, the firm got to work, removing traditional trim and dated finishes to craft a contemporary retreat. In addition to cosmetic upgrades, the home received a four-foot addition to expand the living and dining rooms, now with expansive windows overlooking the new resort style pool, cabana, and complementing pool house perfect for summer gatherings or solo swims. Inside, a four-foot expansion enhances the open-concept floor plan. Contemporary finishes, like the wide plank flooring, outfit the more casual office located in the pool house and complement the main home’s aesthetic.
 Bespoke By Acorn
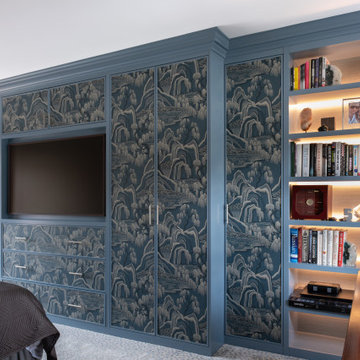
Acorn Bespoke Carpentry and Joinery were commissioned by interior designer Amelia Carter to build and install this stunning suite of bespoke fitted wardrobes for her client’s residential property.
The high-end bedroom storage solution is exquisitely customised with premium materials, tailored layouts and specialised finishes.
Key features of this luxury wardrobe design include micro shaker doors, high quality wallpaper panel inserts, integrated TV and desk space, with no mounting brackets or cables on show.
These custom-made built-in wardrobes feature a distinctive breakfront design, where the middle section protrudes slightly forward from the two flanking side units, creating a 3D architectural look.
We installed the decorative cornice across the front of the cabinetry, so it ties in seamlessly with the rest of the room.
Micro shaker door style
The door style is micro shaker (or slim shaker). The defining feature is a very slim outer frame, significantly narrower than a typical shaker door design. Traditional shaker cabinets have a relatively thick frame giving a sense of prominence to the design. In contrast, the slimmer frame of micro shaker cabinets gives the doors a more current, refined and understated look.
Wallpapered inset panels
The wardrobe doors feature wallpapered inset panels. The paper is Indigo Garden by Borrastapeter. The hand-painted print picturing a garden landscape is inspired by traditional Japanese art. The timelessly elegant pattern gives a restful ambience to the room, transforming the doors into works of art. We custom-matched the paint colour and flawlessly spray-applied with a 30% sheen finish.
Bespoke radiator cover
The bespoke radiator cover elegantly conceals a tall, unsightly radiator. This was crafted by us in aluminium with a colour-matched finish. The grille pattern allows heat to pass through, while also adding visual sophistication to the room, perfectly merging decoration and utility. Unlike wood, which can block heat, aluminium has excellent thermal conductivity and is lightweight and durable.
Built-in desk and display shelves
A built-in desk with an open shelving unit is set on the righthand side and forms a seamless part of the wardrobe. The display area is illuminated with LED lighting integrated into the backs of the shelves.
Find the right local pro for your project
 Advanced Alterations & Installation
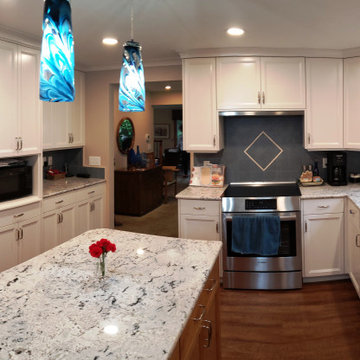
Example of a mid-sized classic l-shaped vinyl floor and brown floor enclosed kitchen design in Portland with an undermount sink, shaker cabinets, white cabinets, granite countertops, blue backsplash, porcelain backsplash, stainless steel appliances, an island and white countertops
 GreenTowers, LLC
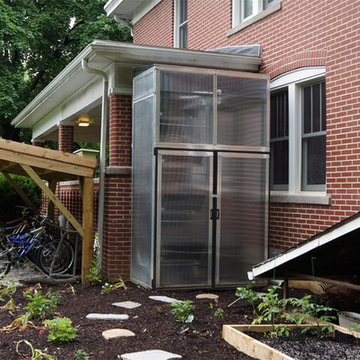
The Rotating Living Wall is our take on a traditional, static, living wall. The rotation of the system brings the planter to you, meaning that this living wall is easy to maintain and can grow food. We have spent two years conducting research on its productivity at Penn State, and greenhouses currently use this system to increase their growing efficiency.
 Tile Doctor Ltd
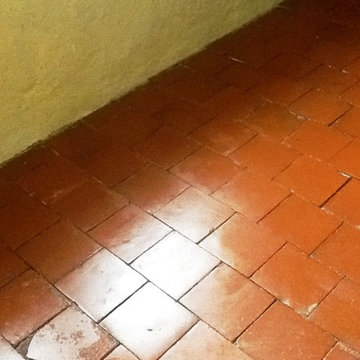
Here’s an interesting work I recently completed on a red Quarry tiled floor at a house in the town of Abington, Northampton. In post-war Britain (more specifically in the 1940s and 1950s), many new homes were built with Quarry tiled hallways and kitchens, so quite a popular feature back then. These floors are typically quite hard wearing and therefore ideal for such high traffic areas; additionally they don’t need a great deal of maintenance but their appearance will degrade over time.
In this particular house, the Quarry tiled floor had been covered with linoleum for many years, causing significant patches of visible black mould. The floor also had a loose tile (which I promptly reset to mitigate the potential tripping hazard) and splashes of paint due to a lack of precaution while the house was being renovated. Needless to say, the floor needed a lot of work.
Before beginning the cleaning I made sure to vacuum up all of the loose debris from the floor. I then applied Tile Doctor Remove & Go to the tiles, left it to dwell for a short period, and then agitated the area with a black stripping pad, adding water to aid the process. This helped to break down any old and ineffectual sealer, along with the paint splashes marking the tiles, leaving a much cleaner and more refined appearance.
I followed this up with Tile Doctor Grout Clean-Up to eliminate the odd speck of cement and grout haze dating back to when the floor was first installed; Gout Clean-up has an acid base so it’s not advised to leave it on the tiles for too long, consequently as soon as I was happy it had done the job I rinsed it off with water and give the floor a thorough wash down.
I used a wet-vacuum machine to extract as much water as possible and gave the floor a once over with steam cleaner which improves the evaporation of any remaining moisture by heating up the tiles.
After completing the cleaning process, I left the house to allow time for the floor to dry completely. Upon my return, I conducted a damp test which showed the floor needed to dry further before sealing so I left an industrial fan in place for a couple of hours to help speed things up.
Once I was satisfied that the floor was dry enough to take the sealant, I sealed the floor using Tile Doctor Colour Grow which is an interesting product that will not only provide durable stain protection but also improves the natural colours of the tile.
While the floor required a lot of time and work to restore, I think you will agree the results were certainly worth waiting for.
Phil Vissian
Northamptonshire Tile Doctor
 Panda Windows & Doors
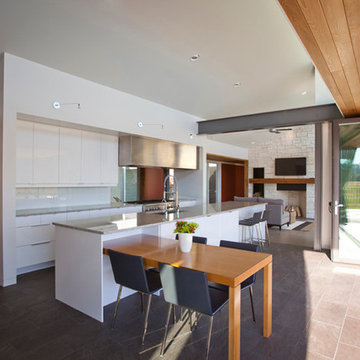
The Belfast Residence in Ohio is a new construction, custom modern house situated on a 150 acre farm. Panda solved the challenge of extending the intimate space of the kitchen into the expansiveness of the backyard by installing fully retractable TS.60 All Aluminum Thermally Broken Folding Door Systems. Custom designed for this space, this elegant and durable folding door system spans the entire wall of the kitchen. This door system uses cutting-edge aluminum extrusions with a polyamide bar to connect the frame together while reducing heat or cold transfer. When closed, this Bi-Fold door system provides a protective barrier that lowers u-factors, limits condensation, increases energy performance, and most of all reduces thermal conductivity.
The architectural firm, Drawing Dept. designed a cantilevered roof reaching out over the pool on axis with a sunken fire pit, drawing the geometry of the house further out into the landscape. As a result, the heart of the home unrestrictedly extends toward the fire pit for optimal physical and visual connection.
Impressive architectural design intertwined with Panda’s custom Bi-Fold doors can create unimaginable opportunities. No wonder this home was awarded the 2013 Merit Award from the American Institute of Architects (AIA) Cincinnati and the 2013 Honor Award from the CDA + Cincinnati Magazine for its exterior space!
Panda’s custom designed Bi-Fold Doors ensure that a homeowner can equally and cohesively enjoy their interior and exterior spaces. Views from the house and views of the house should hold equal merit.
To view more of Panda’s Bi-Fold Doors, please check out our gallery http://www.panda-windows.com/products/by-type/folding-doors.
Architect: Drawing Dept.
Contractor: Camery Hensley Construction
Photography: Ross Van Pelt
 Kowalske Kitchen & Bath
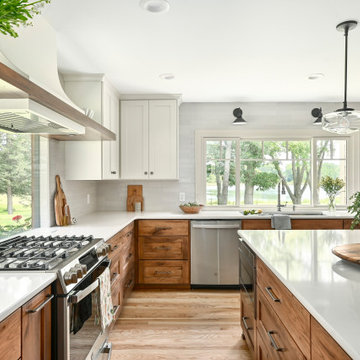
Kowalske Kitchen & Bath was hired as the remodeling contractor for this first floor remodel in the countryside of Oconomowoc, WI. By opening the kitchen up to the living room, the layout is better for hosting family gatherings. The entire family can be together in the kitchen and living room – cooking or spending time together. Highlights of this country kitchen include a window seat, walk-in pantry and space for their treasured piano.
Project Goals
+ Restore the beauty of their family home, that was built by the homeowner’s grandfather
+ Cooking functionality for their family farm
+ Add a workstation sink for easy food prep
+ Pantry storage space for canned items & wine collection
+ Design that honors the mid-century ranch bones of the house her grandfather built and their own traditional style
Challenges & Issues
+ Needed space to highlight their piano, since the homeowner is an avid pianist
+ Old layout didn’t have good views of their outdoor space – the lake, gardens and chicken coop
+ Kitchen was too small and cut off from the rest of the home
+ The heat and air conditioning did not function well due to several past additions
Country Kitchen Features:
Cooking Kitchen – We created a larger kitchen by expanding into the old dining room. The homeowners needed more space for canning vegetables, cooking and entertaining.
Mid-Century Country Design – The ranch home was built in the 1950s so we kept the mid-century and country kitchen design aesthetic by using hickory wood, tall verticals and long horizontals.
Kitchen Window Seat – A custom window seat with a curved backrest creates a gathering spot in the kitchen. This connects the home to the outdoor view of the lake where the family fishes and ice skates in winter. The bench is large enough to be used as a guest bed when they have visitors. The cozy nook has shelving, art lights, and a hidden radiator underneath to keep it warm and toasty.
Window Backsplash – Along the range wall, a new window backsplash features the beautiful view of the farm driveway, trees and gardens.
Minimalistic Hood – The hood with the wood shelf mimics the new fireplace mantel and ties the country kitchen and living room together.
New Pantry – The old kitchen area was converted into the new pantry and a laundry room. The pantry is their working kitchen where they can store food, their wine collection, and have countertop space for small appliances. Butcher block countertops, colorful wallpaper and a new window make the pantry inviting. Adjustable shelves allow for flexible storage options. The pocket door can be closed when they have guests.
Recycled Ash Flooring in Kitchen – The homeowners chose an eco-friendly flooring for their country kitchen. The beautiful varied width wood planks are from recycled ash trees from Milwaukee parks.
Workstation Sink – This sink has sliding platforms that hold bowls, colanders and cutting boards to multiply the countertop by going deep instead of wide. The sink can be used to chop, rinse, prep, dry dishes, hold hot dishes and clean up after a meal more efficiently.
Country House Living Room:
New Tile Floor – To better conduct the heat, we replaced the old wood floors with porcelain tile. New radiators, insulation, ductwork, and enclosing the basement staircase improved the function of their HVAC.
Fireplace Makeover – To create a new focal point for the living room, we installed a new fire box, new mantle, and floor to ceiling stone. The goal was to draw the eye up to the vaulted beamed ceiling.
Open Concept Layout – The wall between the kitchen and living room was removed to connect the two spaces. We added new cabinetry along the wall with a tall bookcase. Since they didn’t use their formal dining room, a small dining table was added to the living room.
New Railing & Stairs – The staircase to the kitchen area was tricky because we needed to find a style that would make it feel airy. We did a glass enclosure with a simple metal railing and moved the staircase to the center of the room to allow room for the piano.
 Bespoke By Acorn
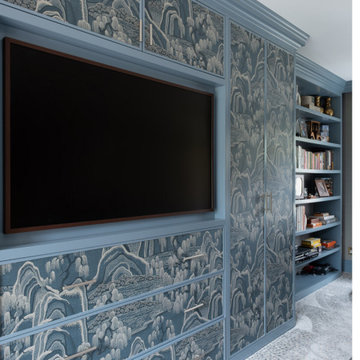
Acorn Bespoke Carpentry and Joinery were commissioned by interior designer Amelia Carter to build and install this stunning suite of bespoke fitted wardrobes for her client’s residential property.
The high-end bedroom storage solution is exquisitely customised with premium materials, tailored layouts and specialised finishes.
Key features of this luxury wardrobe design include micro shaker doors, high quality wallpaper panel inserts, integrated TV and desk space, with no mounting brackets or cables on show.
These custom-made built-in wardrobes feature a distinctive breakfront design, where the middle section protrudes slightly forward from the two flanking side units, creating a 3D architectural look.
We installed the decorative cornice across the front of the cabinetry, so it ties in seamlessly with the rest of the room.
Micro shaker door style
The door style is micro shaker (or slim shaker). The defining feature is a very slim outer frame, significantly narrower than a typical shaker door design. Traditional shaker cabinets have a relatively thick frame giving a sense of prominence to the design. In contrast, the slimmer frame of micro shaker cabinets gives the doors a more current, refined and understated look.
Wallpapered inset panels
The wardrobe doors feature wallpapered inset panels. The paper is Indigo Garden by Borrastapeter. The hand-painted print picturing a garden landscape is inspired by traditional Japanese art. The timelessly elegant pattern gives a restful ambience to the room, transforming the doors into works of art. We custom-matched the paint colour and flawlessly spray-applied with a 30% sheen finish.
Bespoke radiator cover
The bespoke radiator cover elegantly conceals a tall, unsightly radiator. This was crafted by us in aluminium with a colour-matched finish. The grille pattern allows heat to pass through, while also adding visual sophistication to the room, perfectly merging decoration and utility. Unlike wood, which can block heat, aluminium has excellent thermal conductivity and is lightweight and durable.
Built-in desk and display shelves
A built-in desk with an open shelving unit is set on the righthand side and forms a seamless part of the wardrobe. The display area is illuminated with LED lighting integrated into the backs of the shelves.

 Pennsylvania Landscape & Nursery Association
Terren Landscapes http://www.terrenlandscapes.com
2014 PLNA Awards for Landscape Excellence Winner
Category: Residential $60,000-$120,000
Award Level: Silver
Project Description:
We were contracted by the family to create a master plan for the property. They
were experiencing extreme drainage and erosion problems due to the surrounding properties’
drastic grade changes. Erosion had caused the rear lawn to sink in various areas and the existing
rear patio spaces were failing. The client wanted to rebuild their patios and walkways, repave
their driveway and give their home more visual appeal. Most importantly, they wanted an
environmentally friendly solution.
Our design solution was to create a rain garden that would slow storm water runoff, allow
for percolation, and promote infiltration, while permitting excess clean water to enter the storm
drain at the street with slower velocity. The rain garden acts as a temporary holding space that
allows the earth to slowly absorb water, rather than overwhelm the nearby storm drain. Our first
objective was to conduct a percolation test to determine the amount of clay soil that needed to be
removed before reaching the sandy loam layer. A percolation test and storm water calculations
were generated to accommodate a 1” rain event. Based on our calculations and the small size of
the property, we determined a depth of 18” was necessary for optimal holding capacity. We
removed 18” of clay soil until a layer of sandy loam was encountered. Next, the soil was amended
with compost and sand to create a highly porous planting media for the basin of the garden. We
piped the three existing rear downspouts to the rain garden area to capture for infiltration and
alleviate runoff throughout the rear lawn and patio space. We installed an 18” wide over-flow
standpipe at a 24” depth into the ground that outlets to a stone swale that carries the water to the
property edge. As an added means of holding the maximum amount of water, we designed the
standpipe to sit 14” above grade. The height of this standpipe allows this rain garden to capture
14” of water before reaching the overflow capacity. We placed geotextile fabric to help reduce
migration of the stones into the soil and aid in the prevention of weeds and erosion. We heavily
planted the rain garden to further aid in absorption and to attract local wildlife. A native plant
palette of butterfly weed, Panicum, Joe-Pye weed, and asters form a colorful backdrop while the
basin was filled with obligate wetland plants such as royal ferns, irises and cardinal flowers. The
upper edges in the foreground are planted with Echinacea, Rudbeckia and Monarda, satisfying
the local bird community and adding bright seasonal colors. This garden effectively collects and
cleanses rainwater while creating a habitat for birds, frogs, and butterflies.
Our next challenge was to redesign the existing patios and walkways without increasing
impervious surfaces. According to township regulations this property was currently at its
maximum capacity, therefore we designed the front and rear patios with a slightly smaller
footprint to decrease their existing impervious surfaces.
New planting beds were designed throughout the entire property. Plants were chosen that
were tolerant of specific site conditions. For the rear yard, we choose a backdrop of witch hazel
and hollies to provide an evergreen screen as well as early spring color. We placed hydrangea
throughout to add summer color. We planted ostrich fern under the existing spruce tree to create
a lush floor. This area became an additional backdrop for the rain garden as well as a screen for
the neighboring property. We choose a combination of ‘Blue Star’ juniper and creeping jenny to
soften the existing rear wall with creepers. Around the rear patio areas we choose a combination
of Liatris, Rudbeckia and ‘Lo and Behold’ butterfly bush. This combination of plants works in
harmony with the rain garden and attracts additional butterflies.
For the front of the property we worked with an existing Japanese maple that provided
dense shade. We choose a shade-tolerant combination of Heuchera, Astilbe, ferns and hostas for
this area. We added more hydrangeas to the front foundation of the house to provide lush
layering of plant material and visual interest with additional summer blooms.
Overall, we were able to exceed the client’s needs and expectations in transforming their
property into a colorful paradise that attracts wildlife from season to season. The plant palette
provides seasonal interest and the rain garden has successfully decreased storm water runoff.
The new hardscape surfaces were designed and built with a slightly smaller footprint to decrease
impervious surfaces. This project is a positive example of how all properties, regardless of size,
can make an ecological difference by decreasing impervious surfaces and maintaining proper
storm water management.
Photo Credit:
Terren Landscapes

 Home service
Your kitchen is more than just a cooking space; it's the heart of your home—a place for family gatherings, shared meals, and unforgettable memories. If you're here, chances are you're dreaming of a kitchen upgrade that better serves your needs while enhancing its beauty and functionality. Whether you're aiming for a sleek modern design, a functional workspace, or a charming rustic vibe, finding the right kitchen remodel services is key to turning that dream into reality.
This guide will walk you through everything you need to know about choosing the best kitchen remodel near me. From understanding your specific needs to identifying reliable services, we've got you covered.
Understanding Your Unique Kitchen Remodeling Needs
Before hiring a kitchen remodel service, it’s essential to pinpoint why you're looking to remodel in the first place. Knowing your priorities will help you make informed decisions and ensure you choose a service that aligns with your vision.
1. Functionality Upgrades
Is your kitchen outdated or inefficient? Maybe you're dealing with limited countertop space or outdated appliances that make cooking a hassle. A remodel can help optimize the layout and incorporate modern solutions, such as smart appliances or ergonomic cabinets.
2. Aesthetic Enhancements
Perhaps you’re looking to give your kitchen a fresh, stylish look that reflects your personality. Whether it’s a chic industrial design or a cozy farmhouse style, professional remodelers can help bring your aesthetic dreams to life.
3. Improved Home Value
A beautifully renovated kitchen is one of the top features potential buyers look for. According to real estate experts, a well-designed kitchen remodel can deliver up to a 70%-80% return on investment.
4. Lifestyle Changes
Has your family grown? Do you cook at home more often now? Your kitchen should adapt to these shifts, accommodating more people or making meal prep seamless.
Clearly outlining your specific goals will make it easier to choose home remodeling contractor professionals who can meet (and exceed) your expectations.
Researching for the Best Kitchen Remodel Services Near Me
Once you’ve defined your needs, the next step is to start researching. But how do you pinpoint the best kitchen remodelers in your area? Here are actionable tips:
1. Read Reviews and Testimonials
Start by checking online reviews on platforms like Google, Yelp, and Houzz. Look for consistently positive feedback, with special attention paid to customer comments about quality, communication, and timelines.
2. Check Portfolios
A picture is worth a thousand words—and reading about a remodeling company’s success isn’t enough. Browse their portfolio to ensure the quality of their work aligns with what you’re envisioning.
3. Ask for Recommendations
Word of mouth is still one of the best ways to find trustworthy services. Ask friends, family, or coworkers if they’ve worked with a remodeling service they’d recommend.
4. Look for Professional Credentials
Make sure the companies you’re vetting hold all required licenses, certifications, and insurance. It’s a sign of their professionalism and ensures accountability.
5. Conduct Interviews
Consider meeting with a few top contenders. Ask about their experience, approach to projects similar to yours, and estimated costs. Don’t shy away from asking detailed questions—it’s important to feel confident in your choice.
By thoroughly researching, you'll narrow down your options and find a remodeler who matches your vision, budget, and style.
Key Factors to Consider Before Hiring
Deciding on the right kitchen remodel near me is about more than just skills. Here are some critical factors to weigh before signing any contracts.
1. Set a Clear Budget
It’s important to have a realistic budget in mind before you begin. A reliable remodeler will respect your financial boundaries and offer solutions that maximize your investment without overspending.
2. Outline Your Timeline
Discussing deadlines ensures the project starts and finishes on time. Make sure the remodeler can meet your schedule without compromising quality.
3. Communication is Key
Clear communication is essential. You want experts who listen carefully to your needs, explain their process, and keep you updated throughout the project.
4. Warranties and Guarantees
Always ask if the service provides warranties for craftsmanship and materials. It’s a sign they stand by the quality of their work.
Why RightWay Home Builders is the Solution to Your Kitchen Remodeling Needs
Looking for trusted experts who deliver stunning, functional kitchens? Meet RightWay Home Builders, a leading name in local remodeling services. Here's why they're a standout choice for your kitchen remodel project.
1. Proven Expertise: With over 10 years of experience in the industry, their portfolio boasts beautifully transformed kitchens that reflect each client’s unique style.
2. Customer-Centric Approach: RightWay prioritizes the client experience. From the initial consultation to the project's completion, their team ensures you’re heard every step of the way.
3. Comprehensive Services: From initial designs to installation, RightWay Home Builders handles every stage of remodeling with precision and care.
Their happy customers say it all. “RightWay took my outdated kitchen and turned it into something from a magazine. Their attention to detail was amazing, and they were a pleasure to work with!” - Sarah M.
Why Visit RightWayHomeBuilders.com?
Booking your dream remodel has never been simpler. RightWay’s website offers a streamlined process where you can request a consultation, view portfolios, and even access exclusive home remodeling tips. Don’t wait! Visit https://www.rightwayhomebuilders.com to kick-start your remodeling adventure.
FAQs About Kitchen Remodeling
1. How much does a kitchen remodel cost?
The cost depends on the size of your kitchen and the scope of the project, but the average remodel.
2. How long does the remodeling process take?
Most remodeling projects take 6 to 12 weeks, depending on the complexity.
3. Will a kitchen remodel increase my home’s value?
Absolutely! A well-done remodel can boost your home value significantly and make it more appealing to buyers.
4. Can I stay home during the remodel?
While it’s possible, the noise and dust might be inconvenient. Many clients prefer staying elsewhere temporarily.
Conclusion
Your dream kitchen is closer than you think. Whether you're upgrading for better functionality, fresh aesthetics, or added value, investing in the right kitchen remodel service will ensure your vision comes to life.
Explore your options, do your research, and don’t hesitate to reach out to trusted experts like RightWay Home Builders. Begin the first step today—schedule your consultation at RightWayHomeBuilders.com and take the leap toward the ultimate kitchen transformation.
 Asbury Remodeling & Construction, LLC
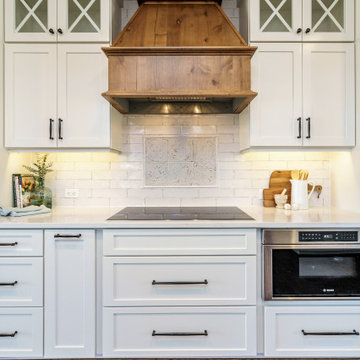
Beautiful open kitching, dining room and living room. Tile wall with floating shelves. Jennaire appliances with induction cooktop and Bluestar oven. A mix of white and stained cabinets create a warm and inviting space.
 Premier Copper Products
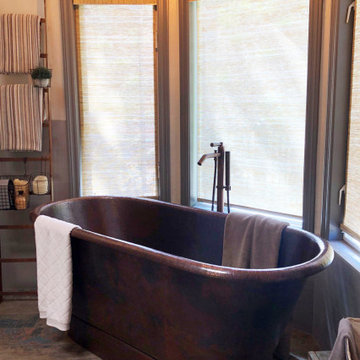
Envelop yourself in luxury! Our freestanding copper bathtubs transform ordinary bathrooms into spa-like sanctuaries. The richness of the copper coupled with its natural heat-conducting elements allow you to luxuriate in the tub longer, elevating bath time bliss and bathroom style to unprecedented levels.
 Progressive Design Build
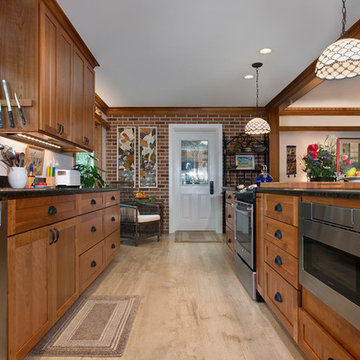
When a Historic District home was renovated in Fort Myers, a dream kitchen was created: open plan enough for gathering, with clearly delineated areas for cooking, reading and entertaining.
Challenge
Bill and Alison’s existing kitchen was small and dysfunctional. Each room seemed independent, and there was no flow through the house. The house felt small, with one entry and exit point.
As a planning consultant, Bill was no stranger to construction. He was a general contractor himself and had built several custom homes in years past. As a gardening enthusiast and professional educator, Alison also had an eye for design. They started with design, layout and planning on their own, but soon realized they needed help. After interviewing several contractors who seemed overwhelmed and unenthused by their project, they reached out to Progressive Design Build.
Solution
Mike was not only enthused about the project, but he established trust with Bill and Alison. Within a few short weeks he was hired to begin the planning phase, conducting thorough research on the project, meeting key subcontractors and establishing a realistic budget.
When the project began, internal walls were removed to open up the kitchen/dining areas and an island was built, giving the space an open and modern functionality. The eating area was enlarged, and a visual connection to the outside was established using Marvin insulated glass windows with Low E coatings—which rejects solar heat gain without reducing visible light passing through the glass.
In order to allow for the open concept layout that Bill and Alison desired, we built new structural beams to transfer the live load. The sliding patio doors opened onto a small terrace with a wrought iron handrail creating access to the private courtyard and garden area.
Finishing details included custom cherry cabinets and wood trimming, 16” x 32” natural stone flooring, granite countertops and historically correct plaster finishes.
Result
The project was completed within budget and two weeks ahead of schedule.
“That planning phase was the best money we spent on the project,” exclaimed Bill. “It was incredibly gratifying being able to watch the subcontractors and suppliers come and go with shared leadership and attention to details.”
 Alan Mascord Design Associates Inc
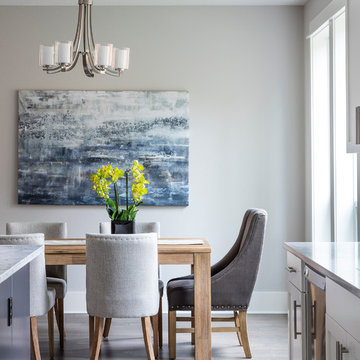
Park Place Homes chose design 22199 - The Hood River, and made some minor modifications to suit their specific site and client needs. The stock plan package was complimented by site planning and drafting services. The home construction and interior design was masterfully conducted by Park Place Homes.
 White Fox Lane Design, Co.
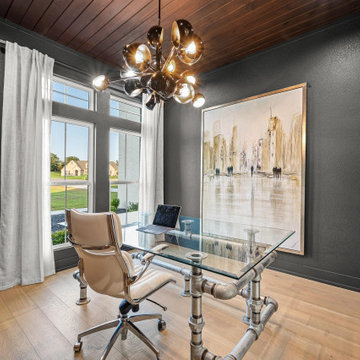
For the husband’s office he wanted dark, masculine and a place to conduct meetings. We convinced him to do a full black paint and I’m so thrilled with the outcome
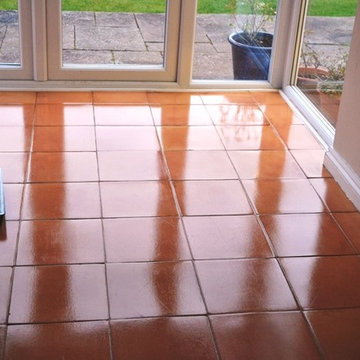 Tile Doctor Ltd
Having an effective sealer in place is essential for ensuring the long term condition of tiled floors in fact a lack of sealer can make cleaning the tiles exceptionally difficult as the sealer prevents dirt becoming ingrained in the tile.
This property owner, living in the former spa town of Matlock in Derbyshire, was experiencing problems with their Terracotta tiled kitchen floor since they had applied some kind of wax to act as a sealer, and this had worn off within a few weeks. After this happened the tiles were not sealed again, making cleaning a big problem. Terracotta is a highly porous stone and thus easily soaks in spillages and stains, and allows dirt to become very easily trapped.
In this situation, the property owner resolved to contact me about some professional maintenance. I suggested that the tiles would need a deep clean followed by the application of a fresh, high quality sealer. The work was agreed on and I made my way down to the property the following week.
When I arrived at the property and saw the tiles first hand it became clear that a professional clean had been in need for a long time: greasy looking stains were particularly prevalent and covered large areas of the kitchen floor.
To remove I mixed a strong solution of Tile Doctor Pro Clean, which is a multi-purpose, high-alkaline cleaner, stripper and degreaser, and, working in small areas, applied it to the floor. Working in small sections was important because the stone is very porous and quickly soaked in any product laid down. I scrubbed the cleaner into the stone using a rotary machine fitted with a black scrubbing pad, with the dirt and stains coming away nicely. Pro Clean is highly versatile and can be used for similar cleaning purposes on most types of natural stone floor.
After cleaning each section, I quickly removed the excess dirty water and chemicals with my wet vax machine. Once the whole floor had been cleaned I rinsed it several times with fresh water just to make sure all cleaning chemicals were gone. I then left the floor to dry completely for 36 hours.
When I returned to the property, I conducted several damp tests to check for any areas of the floor that needed further drying. As is almost always the case, there were a few areas that remained slightly damp, and I set about speeding the drying process along using my heat gun. In fact, it actually took me more than three hours to get the floor completely dry, but this was worth the effort as even the slightest excess moisture can damage the performance of the sealer.
Once the floor was finally dried I began sealing the floor with one coat of Tile a Doctor Colour Grow sealer. Colour Grow is an impregnating sealer that penetrates deep into the pores of the stone, thus acting as a shield against ingrained dirt, and also raises the colour of the tiles to provide an aesthetically appealing appearance. sealer. After sealing with Colour Grow, I left the floor to dry for couple of hours and then applied six coats of Tile Doctor Seal & Go, which is a topical sealer that builds up durable protection on the surface of the tiles.
The combination of through cleaning and the application of not one, but two high quality sealers really did wonders for the appearance of these Terracotta tiles. Looking at the final results you wouldn’t have believed they had been without a proper clean and seal for so long! Needless to say the customer was exceptionally pleased and will surely be able to keep her floor looking great for a long time to come.
Tony Olmet
Derbyshire Tile Doctor
 Premier Copper Products
Envelop yourself in luxury! Our freestanding copper bathtubs transform ordinary bathrooms into spa-like sanctuaries. The richness of the copper coupled with its natural heat-conducting elements allow you to luxuriate in the tub longer, elevating bath time bliss and bathroom style to unprecedented levels.

 Lynne Lawson's Decorating Den Interiors
Lynne and Laura created this inviting space for their client to receive guests and conduct business. The golden walls and intricate details in the furniture bring a warm traditional flare to this home office.
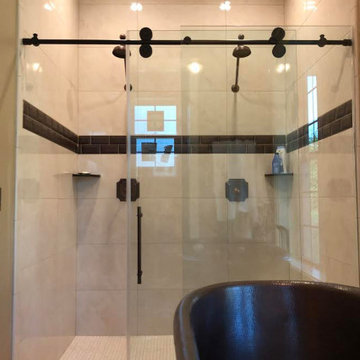 Premier Copper Products
Envelop yourself in luxury! Our freestanding copper bathtubs transform ordinary bathrooms into spa-like sanctuaries. The richness of the copper coupled with its natural heat-conducting elements allow you to luxuriate in the tub longer, elevating bath time bliss and bathroom style to unprecedented levels.
28