
Search results for "Cutting techniques" in Home Design Ideas
 Maverick City Builders
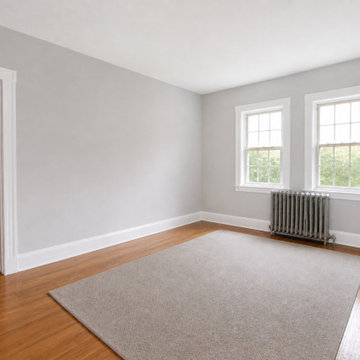
This whole home interior painting and trim upgrade project in Lancaster highlights how a professionally executed finish can completely transform the look, feel, and flow of an entire living space. The project began with a dated interior featuring worn paint, visible wall imperfections, and aging trim that no longer reflected a clean, modern aesthetic. While the home’s structure remained solid, the overall appearance felt dull and lacked the brightness, consistency, and refinement homeowners are looking for today.
Our team began with a comprehensive preparation process across the entire home, which is one of the most critical steps in achieving a high-quality and long-lasting paint finish. Every surface was carefully cleaned, patched, and sanded to create a smooth and uniform base. All floors, fixtures, and furnishings were fully protected using professional-grade coverings, and trim lines throughout the home were precisely taped to ensure sharp, clean edges. This level of preparation not only enhances the final appearance but also ensures durability and consistency from room to room.
As the project progressed, premium-quality paints were applied using a combination of rolling and precision cutting techniques to achieve a smooth, even finish across all wall and ceiling surfaces. The selected color palette focused on modern, neutral tones designed to maximize natural light and create a cohesive, open feel throughout the home. At the same time, all trim, baseboards, and interior details were upgraded with a crisp white finish, adding contrast, depth, and a polished look that ties every space together.
During the final stages, detailed touch-ups and trim refinements were completed in every room to achieve a flawless, professional-grade result. Each edge, corner, and transition was carefully inspected and perfected, ensuring consistency and craftsmanship at every level. The transformation is especially noticeable when comparing the before and after, as the home evolves from a worn, outdated environment into a bright, modern, and refreshed living space.
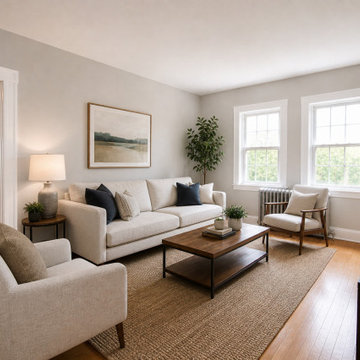
Once completed, the home was staged to highlight its full potential and demonstrate how a whole home painting upgrade can dramatically improve both aesthetics and functionality. The final result is a clean, cohesive, and welcoming interior that feels updated, spacious, and move-in ready.
Projects like this showcase the value of expert craftsmanship and attention to detail in full-home interior renovations. Whether you are preparing your property for sale or looking to modernize your living space, a whole home interior painting and trim upgrade remains one of the most effective ways to increase both visual appeal and overall property value in Lancaster, MA and surrounding areas.
Our team started with a detailed preparation process, which is one of the most critical steps in achieving a high-quality paint finish. All surfaces were carefully cleaned, patched, and sanded to ensure a smooth and even base. Floors and furniture were fully protected using professional-grade coverings, and trim areas were precisely taped to guarantee clean, sharp lines. This level of preparation ensures that the final result is not only visually appealing but also long-lasting.
As the painting phase progressed, high-quality paints were applied using a combination of rolling and cutting techniques to create a consistent, smooth finish across all wall surfaces. The color selection focused on modern, neutral tones that enhance natural light and create a more open, inviting atmosphere. At the same time, the trim and baseboards were upgraded with a crisp, clean white finish, adding contrast and definition throughout the space.
During the final stages, detailed touch-ups and trim work were completed to achieve a flawless result. Every corner, edge, and transition was carefully inspected and refined, ensuring a professional-grade finish that stands out. The transformation is most noticeable when comparing the before and after stages, where the room evolves from a dated and worn environment into a bright, modern living area.
The completed space was then staged to showcase its full potential, demonstrating how a simple upgrade like interior painting and trim work can dramatically improve both aesthetics and functionality. The result is a clean, polished, and welcoming environment that feels refreshed and ready for everyday living.
Projects like this demonstrate the impact of expert craftsmanship and attention to detail in interior renovations. Whether you are preparing your home for sale or simply looking to update your living space, professional painting and trim upgrades offer one of the most effective ways to enhance your home’s value and appearance.

 safe ZOnea
Ask a kitchen designer in Chicago which countertop question comes up most and you will hear the same answer: white or off-white quartz, and which shade. Homeowners walk into showrooms with a photo saved on their phone, usually a bright, veined slab from a magazine spread, and leave an hour later realizing there are a dozen versions of that same look. The confusion is not about taste. It is about the fact that "white quartz" covers a huge range of patterns, undertones, and price points, and nobody explains the differences before the sale.
Older bungalows and newer builds alike are getting stripped of their dated laminate and butcher block in favor of quartz, and the reasons are practical rather than trendy. Quartz does not need sealing, resists the kind of staining that granite can suffer over decades, and holds up to the freeze-thaw humidity swings that Chicago basements and kitchens go through every year. Once a homeowner commits to quartz, though, the real decision starts: which white, and does the pattern justify the difference in cost.
This piece walks through three specific slabs that keep showing up in Chicago renovation projects, why designers reach for them in different rooms, and what actually separates a flat white surface from one with real depth. None of this requires a design background to follow. It is mostly about paying attention to how a slab behaves under kitchen lighting, how busy the vending gets, and how it photographs versus how it looks in person.
Why White Quartz Took Over Chicago Kitchens
Ten years ago, granite dominated Chicago kitchen remodels almost by default. It was durable, it looked expensive, and every fabricator in the metro area carried a wide range of colors. Quartz has since taken over that position, and the shift happened faster than most contractors expected. Engineered stone gave homeowners a more predictable surface, since natural granite varies slab to slab while quartz is manufactured to a consistent pattern batch after batch.
The other driver is light. Chicago winters are long and gray, and a lot of kitchens, especially in older two-flats and courtyard buildings, do not get much direct sun. A dark granite countertop in a dim kitchen can make the whole room feel smaller. White and light-toned quartz reflects what little natural light comes through the windows, and it makes a galley kitchen or a north-facing space feel noticeably brighter without touching the cabinetry or the layout.
There is also a resale argument that local real estate agents bring up constantly. White quartz photographs well for listings, reads as updated and low-maintenance to buyers touring in person, and does not compete visually with whatever cabinet color the next owner might prefer. It is a safer bet than a bold veined marble look or a colored quartz that might feel dated in five years.
Arctic White and the Cost Question
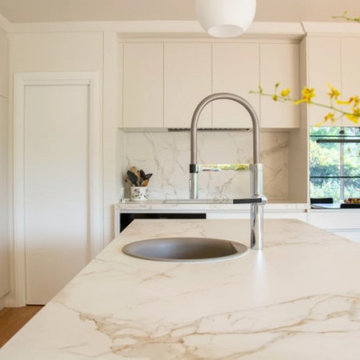
Among the flatter, more uniform whites, arctic white quartz price comes up constantly in budget conversations because the slab sits at a more approachable point than the heavily veined Italian-marble-inspired patterns. It reads as clean and bright without the busy movement that some homeowners find overwhelming in a small kitchen. Fabricators in the Chicago area tend to keep it in stock precisely because demand stays steady across both new construction and remodel projects.
Part of what keeps this slab affordable relative to its heavily patterned cousins comes down to manufacturing complexity. A quartz surface with minimal veining and a consistent white base is simpler to produce at scale than one that mimics the irregular, high-contrast movement of natural Calacatta marble. That production difference shows up directly in what a homeowner pays per square foot, and it is worth asking a fabricator to walk through that pricing before assuming every white quartz costs the same.
Homeowners planning a full kitchen, including an island, backsplash, and perimeter counters, often use a flatter white like this specifically because it lets other elements carry the visual interest. A patterned tile backsplash or a bold cabinet color reads more clearly against a calm countertop than against one already fighting for attention with heavy veining. Designers frequently pair simpler whites with statement lighting fixtures for exactly this reason.
What Makes Calacatta Patterns Different
Calacatta refers to a family of marble originally quarried in Italy, known for a bright white background broken up by bold, often gold-toned veining that moves in thick, dramatic streaks rather than thin gray lines. Natural Calacatta marble is soft, porous, and expensive to maintain, which is exactly why quartz manufacturers spent years developing engineered versions that replicate the look without the upkeep headaches.
The challenge with any Calacatta-style quartz is getting the veining to look organic instead of printed. Early generations of engineered stone struggled with repetitive patterns that gave away the fact the slab was manufactured rather than cut from actual marble. Modern digital printing and layering techniques have closed that gap considerably, and the better Calacatta-inspired quartz lines now vary the veining across each slab batch so two counters in the same kitchen do not look identical.
Chicago designers gravitate toward Calacatta patterns for kitchens that function as the visual centerpiece of an open floor plan, which describes a large share of the gut renovations happening in neighborhoods like Lincoln Park, Roscoe Village, and the North Shore suburbs. When the kitchen island is visible from the living room and dining area, a dramatic veined surface becomes part of the home's overall design language rather than a purely functional work surface.
Calacatta Arno Under Kitchen Lighting
One of the more popular options in this category, calacatta arno quartz, balances a warm white base with soft gray and gold veining that avoids looking too stark under the cooler LED lighting common in newer Chicago builds. Homeowners touring showrooms sometimes make the mistake of judging a slab entirely under warm incandescent lighting, then get surprised when the same surface looks slightly different once installed under their kitchen's actual fixtures.
What separates this particular pattern from flatter competitors is how the veining clusters rather than spreading evenly across the slab. That clustering mimics the way real quarried marble forms, with denser mineral deposits in some sections and cleaner stretches in others. Fabricators cutting a large island slab from a single piece will often orient the pattern intentionally so the busiest veining lands somewhere visually interesting rather than getting cut off at an edge.
Because the background reads warmer than a stark white, this pattern tends to pair well with brass or matte gold hardware, a combination that has been showing up repeatedly in Chicago kitchen remodels over the past few renovation seasons. Cabinet painters report a similar trend, with more clients requesting warm white or greige cabinet colors specifically because they complement this kind of veined quartz better than a cooler, blue-toned white would.
Silestone's Version of the Calacatta Look
Manufacturers compete directly in this Calacatta-inspired category, and silestone eternal calacatta gold represents one brand's specific take on the pattern, distinguished by richer gold veining set against a brighter white base than some competing slabs in the same family. Silestone has built a reputation around anti-bacterial surface treatments in addition to the standard quartz durability, a detail some homeowners specifically ask about for kitchens used heavily by families with young children.
The veining in this particular slab tends to run in longer, more continuous lines compared to the clustered pattern found in some other Calacatta-style options, which gives large island surfaces a sense of visual flow from one end to the other. Fabricators working with bigger islands, the kind increasingly common in open-concept Chicago remodels, often favor patterns like this because there is less need to worry about seams interrupting a busy, disconnected pattern.
Price positioning for this slab tends to sit toward the upper end of the engineered quartz category, reflecting both the brand's manufacturing process and the complexity of replicating that continuous gold veining consistently across production batches. Homeowners weighing this option against other Calacatta-style quartz should ask their fabricator directly about batch availability, since premium patterns sometimes have longer lead times than standard stock colors.
Living With Quartz Day to Day
Beyond how a slab looks in a showroom or a listing photo, the daily experience of owning quartz countertops matters more once the renovation dust settles. Quartz resists scratching far better than laminate and holds up to the acidic spills, hot pans, and general abuse of an active kitchen without the sealing maintenance that natural stone requires every year or two. That low-maintenance reputation is a large part of why quartz overtook granite in the first place.
Heat resistance is a detail that gets less attention than it should. While quartz handles moderate heat well, manufacturers generally recommend using a trivet or pad for very hot pots straight off the stove, since sudden temperature shock can occasionally cause stress marks in the resin binder that holds the engineered stone together. This is a minor precaution rather than a major limitation, but it is worth mentioning to anyone assuming quartz is entirely indestructible.
Cleaning routines stay simple across almost every pattern in this category. A damp cloth and mild soap handle daily messes, and the nonporous surface means wine, coffee, and tomato-based sauces do not soak in the way they can with unsealed granite or marble. Homeowners moving from an older stone counter often mention how much less they worry about everyday spills once quartz is installed, which is a quality-of-life change that rarely makes it into the initial design conversation.
Choosing Between the Three
There is no single correct answer among these three slabs, and that is exactly why they keep coming up together in the same design conversations across Chicago renovation projects. A flatter white with minimal veining suits kitchens where other elements need to carry the visual interest, while a bolder Calacatta-inspired pattern makes sense when the countertop itself is meant to be the centerpiece of an open floor plan.
Budget matters too, and it is worth having a direct conversation with a fabricator about where each option lands before falling in love with a specific slab in a showroom. Lighting, cabinet color, and how the kitchen connects to the rest of the home all play into which pattern will actually look right once installation is finished rather than just in a photo.
Whatever direction a homeowner leans, seeing a full slab in person under actual kitchen lighting remains the single most useful step before signing off. Photos only go so far once the countertop is sitting in the room it will live in for years.
Find the right local pro for your project
 Maverick City Builders
This whole home interior painting and trim upgrade project in Lancaster highlights how a professionally executed finish can completely transform the look, feel, and flow of an entire living space. The project began with a dated interior featuring worn paint, visible wall imperfections, and aging trim that no longer reflected a clean, modern aesthetic. While the home’s structure remained solid, the overall appearance felt dull and lacked the brightness, consistency, and refinement homeowners are looking for today.
Our team began with a comprehensive preparation process across the entire home, which is one of the most critical steps in achieving a high-quality and long-lasting paint finish. Every surface was carefully cleaned, patched, and sanded to create a smooth and uniform base. All floors, fixtures, and furnishings were fully protected using professional-grade coverings, and trim lines throughout the home were precisely taped to ensure sharp, clean edges. This level of preparation not only enhances the final appearance but also ensures durability and consistency from room to room.
As the project progressed, premium-quality paints were applied using a combination of rolling and precision cutting techniques to achieve a smooth, even finish across all wall and ceiling surfaces. The selected color palette focused on modern, neutral tones designed to maximize natural light and create a cohesive, open feel throughout the home. At the same time, all trim, baseboards, and interior details were upgraded with a crisp white finish, adding contrast, depth, and a polished look that ties every space together.
During the final stages, detailed touch-ups and trim refinements were completed in every room to achieve a flawless, professional-grade result. Each edge, corner, and transition was carefully inspected and perfected, ensuring consistency and craftsmanship at every level. The transformation is especially noticeable when comparing the before and after, as the home evolves from a worn, outdated environment into a bright, modern, and refreshed living space.
Once completed, the home was staged to highlight its full potential and demonstrate how a whole home painting upgrade can dramatically improve both aesthetics and functionality. The final result is a clean, cohesive, and welcoming interior that feels updated, spacious, and move-in ready.
Projects like this showcase the value of expert craftsmanship and attention to detail in full-home interior renovations. Whether you are preparing your property for sale or looking to modernize your living space, a whole home interior painting and trim upgrade remains one of the most effective ways to increase both visual appeal and overall property value in Lancaster, MA and surrounding areas.
Our team started with a detailed preparation process, which is one of the most critical steps in achieving a high-quality paint finish. All surfaces were carefully cleaned, patched, and sanded to ensure a smooth and even base. Floors and furniture were fully protected using professional-grade coverings, and trim areas were precisely taped to guarantee clean, sharp lines. This level of preparation ensures that the final result is not only visually appealing but also long-lasting.
As the painting phase progressed, high-quality paints were applied using a combination of rolling and cutting techniques to create a consistent, smooth finish across all wall surfaces. The color selection focused on modern, neutral tones that enhance natural light and create a more open, inviting atmosphere. At the same time, the trim and baseboards were upgraded with a crisp, clean white finish, adding contrast and definition throughout the space.
During the final stages, detailed touch-ups and trim work were completed to achieve a flawless result. Every corner, edge, and transition was carefully inspected and refined, ensuring a professional-grade finish that stands out. The transformation is most noticeable when comparing the before and after stages, where the room evolves from a dated and worn environment into a bright, modern living area.
The completed space was then staged to showcase its full potential, demonstrating how a simple upgrade like interior painting and trim work can dramatically improve both aesthetics and functionality. The result is a clean, polished, and welcoming environment that feels refreshed and ready for everyday living.
Projects like this demonstrate the impact of expert craftsmanship and attention to detail in interior renovations. Whether you are preparing your home for sale or simply looking to update your living space, professional painting and trim upgrades offer one of the most effective ways to enhance your home’s value and appearance.

 Wood Anchor
Interior Design Show 2016, Toronto, ON, Canada
The windrow table and imbue light were designed and built to showcase our studios unique and adventurous operation.
These pieces of sculptural furniture are inspired by elements found in our Manitoba landscape, by the raw material of nature, and our intimate understanding of process.
Every component to these pieces was made in house, from the milling and drying of salvaged trees to the forging and machining of custom aluminum parts.
The aim is to constantly stretch the limits of materials and seek new methods of making.
Imbue Light--200 year old white bur oak salvaged from development sites (trees in areas of development typically are land filled), cast aluminum in wood molds, cast and machined aluminum.
The Oak is cut green on our sawmill and then bent into the beautiful folding continuous rings and then dried. The oak is left raw to celebrate the color and strength that this wood has.
The aluminum is cast in wood molds, a technique Wood Anchor developed from countless hours of experimenting and becoming familiar with our materials. This leaves the aluminum with a beautiful purple/blue coloring and a texture that is reminiscent rough stone. Areas of the aluminum are polished to contrast the cast pieces and pay homage to the countless hours that we spend perfecting our craft.
Windrow Table--150 year old black ash salvaged from urban development (trees in areas of development typically are land filled), sheet aluminum is sculpted and seam welded by hand, the ground and polished.
The Ash is selected based on it’s suitability for the piece. It’s then cut on our sawmill, kiln dried and machined into a perfect table top.
The aluminum is cut and sculpted by hand using heat. There is no pattern for the piece; the artist creates it from his mind, studying the form as it develops. It is seam welded and the ground and polished by hand paying attention to every detail.
2016 © Ray Chan Photo, All Rights Reserved
 Wood Anchor
Interior Design Show 2016, Toronto, ON, Canada
The windrow table and imbue light were designed and built to showcase our studios unique and adventurous operation.
These pieces of sculptural furniture are inspired by elements found in our Manitoba landscape, by the raw material of nature, and our intimate understanding of process.
Every component to these pieces was made in house, from the milling and drying of salvaged trees to the forging and machining of custom aluminum parts.
The aim is to constantly stretch the limits of materials and seek new methods of making.
Imbue Light--200 year old white bur oak salvaged from development sites (trees in areas of development typically are land filled), cast aluminum in wood molds, cast and machined aluminum.
The Oak is cut green on our sawmill and then bent into the beautiful folding continuous rings and then dried. The oak is left raw to celebrate the color and strength that this wood has.
The aluminum is cast in wood molds, a technique Wood Anchor developed from countless hours of experimenting and becoming familiar with our materials. This leaves the aluminum with a beautiful purple/blue coloring and a texture that is reminiscent rough stone. Areas of the aluminum are polished to contrast the cast pieces and pay homage to the countless hours that we spend perfecting our craft.
Windrow Table--150 year old black ash salvaged from urban development (trees in areas of development typically are land filled), sheet aluminum is sculpted and seam welded by hand, the ground and polished.
The Ash is selected based on it’s suitability for the piece. It’s then cut on our sawmill, kiln dried and machined into a perfect table top.
The aluminum is cut and sculpted by hand using heat. There is no pattern for the piece; the artist creates it from his mind, studying the form as it develops. It is seam welded and the ground and polished by hand paying attention to every detail.
2016 © Ray Chan Photo, All Rights Reserved
 Wood Anchor
Interior Design Show 2016, Toronto, ON, Canada
The windrow table and imbue light were designed and built to showcase our studios unique and adventurous operation.
These pieces of sculptural furniture are inspired by elements found in our Manitoba landscape, by the raw material of nature, and our intimate understanding of process.
Every component to these pieces was made in house, from the milling and drying of salvaged trees to the forging and machining of custom aluminum parts.
The aim is to constantly stretch the limits of materials and seek new methods of making.
Imbue Light--200 year old white bur oak salvaged from development sites (trees in areas of development typically are land filled), cast aluminum in wood molds, cast and machined aluminum.
The Oak is cut green on our sawmill and then bent into the beautiful folding continuous rings and then dried. The oak is left raw to celebrate the color and strength that this wood has.
The aluminum is cast in wood molds, a technique Wood Anchor developed from countless hours of experimenting and becoming familiar with our materials. This leaves the aluminum with a beautiful purple/blue coloring and a texture that is reminiscent rough stone. Areas of the aluminum are polished to contrast the cast pieces and pay homage to the countless hours that we spend perfecting our craft.
Windrow Table--150 year old black ash salvaged from urban development (trees in areas of development typically are land filled), sheet aluminum is sculpted and seam welded by hand, the ground and polished.
The Ash is selected based on it’s suitability for the piece. It’s then cut on our sawmill, kiln dried and machined into a perfect table top.
The aluminum is cut and sculpted by hand using heat. There is no pattern for the piece; the artist creates it from his mind, studying the form as it develops. It is seam welded and the ground and polished by hand paying attention to every detail.
2016 © Ray Chan Photo, All Rights Reserved
Sponsored
Columbus, OH

Hope Restoration & General Contracting
Columbus Design-Build, Kitchen & Bath Remodeling, Historic Renovations
 Harmonic Horticulture and Construction
I think that many carpenters today consider nails and screws to be what holds a structure together. As a result, I think that many structures today are held together by little more than nails and screws. I often see knee braces bolted to the side of a post for a pergola when they should be positioned between the post and beam to take the load directly. Fasteners should not be load-bearing! They should be used to pin a piece of lumber into a position that allows it to shoulder the load directly.
Nails and screws are fast. When used appropriately, they can keep costs down by reducing the time it takes to build something. But they are not the answer to everything. Joist hangars do little to stop a deck from pulling away from a house, just as nailing from the side is not a replacement for putting a post directly under a beam.
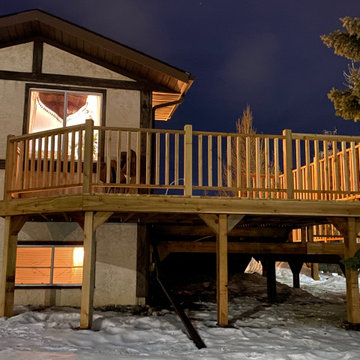
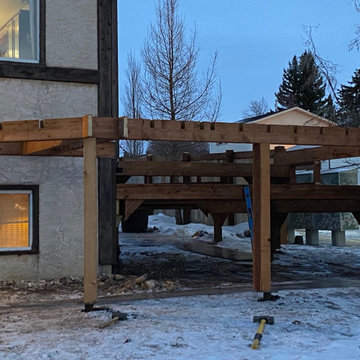
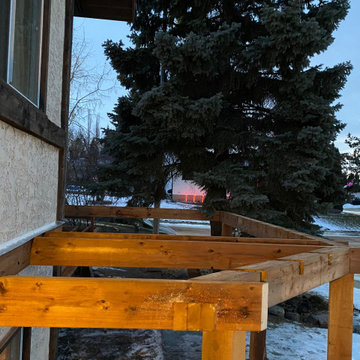
On more than one occasion I've solved a challenging framing problem by employing lap-joints. I've used lap-jointed framing to build curves without having to bend wood, and in the example shown I've used them simply to avoid having to look at an unsightly beam underneath a raised section of deck.
I cut notches half way through my beam where the joists will go, then I cut a corresponding notch into each joist that allows it to fit into the notch in the beam. This allows the joists to cantilever 'through' the beam, which gives me a number of advantages. Using this technique, I can build deck frames tight to the ground without having to rim the structure with joist-hangared beams. I can also use the cantilever to sculpt the edge of the deck into nearly any shape.
As the lumber is locked in from every direction, it is also a far stronger joint than a joist-hangared butt-end, as it resists pulling away, and it is stronger than joist-on-beam because it does not allow for any twisting or 'flopping' of the joists. The beam and joist are locked together, and they each replace the missing pieces of one another, so there is no strength lost in either member.
-Tyler Collins, Operations Manager
 Harmonic Horticulture and Construction
I think that many carpenters today consider nails and screws to be what holds a structure together. As a result, I think that many structures today are held together by little more than nails and screws. I often see knee braces bolted to the side of a post for a pergola when they should be positioned between the post and beam to take the load directly. Fasteners should not be load-bearing! They should be used to pin a piece of lumber into a position that allows it to shoulder the load directly.
Nails and screws are fast. When used appropriately, they can keep costs down by reducing the time it takes to build something. But they are not the answer to everything. Joist hangars do little to stop a deck from pulling away from a house, just as nailing from the side is not a replacement for putting a post directly under a beam.
On more than one occasion I've solved a challenging framing problem by employing lap-joints. I've used lap-jointed framing to build curves without having to bend wood, and in the example shown I've used them simply to avoid having to look at an unsightly beam underneath a raised section of deck.
I cut notches half way through my beam where the joists will go, then I cut a corresponding notch into each joist that allows it to fit into the notch in the beam. This allows the joists to cantilever 'through' the beam, which gives me a number of advantages. Using this technique, I can build deck frames tight to the ground without having to rim the structure with joist-hangared beams. I can also use the cantilever to sculpt the edge of the deck into nearly any shape.
As the lumber is locked in from every direction, it is also a far stronger joint than a joist-hangared butt-end, as it resists pulling away, and it is stronger than joist-on-beam because it does not allow for any twisting or 'flopping' of the joists. The beam and joist are locked together, and they each replace the missing pieces of one another, so there is no strength lost in either member.
-Tyler Collins, Operations Manager
 Luxury Antonovich Design AE
Modern Apartment Interior Fit-Out and Renovation Masterpiece
In the heart of Dubai’s vibrant urban landscape, Antonovich Group has once again redefined luxury living with the completion of a stunning modern apartment interior fit-out and renovation project. Renowned for their meticulous craftsmanship and innovative design solutions, Antonovich Group has transformed a bare apartment into a sophisticated sanctuary that seamlessly blends style, functionality, and cutting-edge technology. This project exemplifies their expertise in modern apartment interior fit-out, furniture design, and renovation execution, setting a new benchmark for elite residential spaces.
Comprehensive Interior Fit-Out Solutions
Antonovich Group’s interior fit-out services were pivotal in bringing this project to life. The fit-out process involved transforming the raw space into a fully functional apartment, complete with custom installations and high-end finishes. Key elements of the fit-out included:
• Space Optimization: The team employed clever space-planning techniques to maximize the apartment’s layout, creating an open-plan design that promotes seamless movement between living, dining, and kitchen areas. Glass partitions and sliding doors were used to maintain privacy without sacrificing the airy feel.
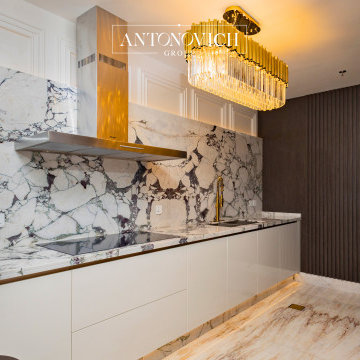
• Premium Materials: High-quality materials such as marble flooring, hardwood accents, and sleek metal finishes were incorporated to add a touch of sophistication. These materials not only elevate the aesthetic but also ensure durability and longevity.
• Smart Home Integration: The apartment features a state-of-the-art smart home system, including automated lighting, voice-controlled appliances, and climate control, enhancing convenience and modern living. This aligns with current trends in apartment renovations, as highlighted by Antonovich Group’s commitment to integrating cutting-edge technologies.
Bespoke Furniture: The Heart of the Design
A standout feature of this project is the custom-made furniture designed and manufactured by Antonovich Group’s own production facilities. Each piece was tailored to complement the apartment’s modern aesthetic while maximizing functionality. Highlights include:
• Statement Seating: Plush sofas and armchairs in soft, neutral fabrics create inviting seating areas in the living room, prioritizing both comfort and style.
• Sleek Storage Solutions: Built-in wardrobes and cabinetry were designed to optimize space, incorporating hidden compartments and intelligent storage systems to keep the apartment clutter-free.
• Elegant Dining Set: A custom dining table with marble accents serves as a focal point, blending seamlessly with the open-plan layout and adding a touch of grandeur.
Renovation Execution: Precision and Craftsmanship
The renovation execution phase was where Antonovich Group’s expertise truly shone. The apartment required minor structural updates to accommodate the open-plan layout and smart home integrations. The team’s ability to perform these renovations without compromising the building’s fixed structure was a testament to their experience with high-end apartment projects.
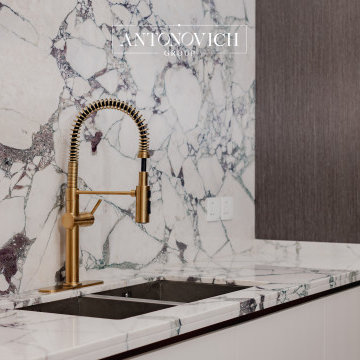 Luxury Antonovich Design AE
Modern Apartment Interior Fit-Out and Renovation Masterpiece
In the heart of Dubai’s vibrant urban landscape, Antonovich Group has once again redefined luxury living with the completion of a stunning modern apartment interior fit-out and renovation project. Renowned for their meticulous craftsmanship and innovative design solutions, Antonovich Group has transformed a bare apartment into a sophisticated sanctuary that seamlessly blends style, functionality, and cutting-edge technology. This project exemplifies their expertise in modern apartment interior fit-out, furniture design, and renovation execution, setting a new benchmark for elite residential spaces.
Comprehensive Interior Fit-Out Solutions
Antonovich Group’s interior fit-out services were pivotal in bringing this project to life. The fit-out process involved transforming the raw space into a fully functional apartment, complete with custom installations and high-end finishes. Key elements of the fit-out included:
• Space Optimization: The team employed clever space-planning techniques to maximize the apartment’s layout, creating an open-plan design that promotes seamless movement between living, dining, and kitchen areas. Glass partitions and sliding doors were used to maintain privacy without sacrificing the airy feel.
• Premium Materials: High-quality materials such as marble flooring, hardwood accents, and sleek metal finishes were incorporated to add a touch of sophistication. These materials not only elevate the aesthetic but also ensure durability and longevity.
• Smart Home Integration: The apartment features a state-of-the-art smart home system, including automated lighting, voice-controlled appliances, and climate control, enhancing convenience and modern living. This aligns with current trends in apartment renovations, as highlighted by Antonovich Group’s commitment to integrating cutting-edge technologies.
Bespoke Furniture: The Heart of the Design
A standout feature of this project is the custom-made furniture designed and manufactured by Antonovich Group’s own production facilities. Each piece was tailored to complement the apartment’s modern aesthetic while maximizing functionality. Highlights include:
• Statement Seating: Plush sofas and armchairs in soft, neutral fabrics create inviting seating areas in the living room, prioritizing both comfort and style.
• Sleek Storage Solutions: Built-in wardrobes and cabinetry were designed to optimize space, incorporating hidden compartments and intelligent storage systems to keep the apartment clutter-free.
• Elegant Dining Set: A custom dining table with marble accents serves as a focal point, blending seamlessly with the open-plan layout and adding a touch of grandeur.
Renovation Execution: Precision and Craftsmanship
The renovation execution phase was where Antonovich Group’s expertise truly shone. The apartment required minor structural updates to accommodate the open-plan layout and smart home integrations. The team’s ability to perform these renovations without compromising the building’s fixed structure was a testament to their experience with high-end apartment projects.
 Harmonic Horticulture and Construction
I think that many carpenters today consider nails and screws to be what holds a structure together. As a result, I think that many structures today are held together by little more than nails and screws. I often see knee braces bolted to the side of a post for a pergola when they should be positioned between the post and beam to take the load directly. Fasteners should not be load-bearing! They should be used to pin a piece of lumber into a position that allows it to shoulder the load directly.
Nails and screws are fast. When used appropriately, they can keep costs down by reducing the time it takes to build something. But they are not the answer to everything. Joist hangars do little to stop a deck from pulling away from a house, just as nailing from the side is not a replacement for putting a post directly under a beam.
On more than one occasion I've solved a challenging framing problem by employing lap-joints. I've used lap-jointed framing to build curves without having to bend wood, and in the example shown I've used them simply to avoid having to look at an unsightly beam underneath a raised section of deck.
I cut notches half way through my beam where the joists will go, then I cut a corresponding notch into each joist that allows it to fit into the notch in the beam. This allows the joists to cantilever 'through' the beam, which gives me a number of advantages. Using this technique, I can build deck frames tight to the ground without having to rim the structure with joist-hangared beams. I can also use the cantilever to sculpt the edge of the deck into nearly any shape.
As the lumber is locked in from every direction, it is also a far stronger joint than a joist-hangared butt-end, as it resists pulling away, and it is stronger than joist-on-beam because it does not allow for any twisting or 'flopping' of the joists. The beam and joist are locked together, and they each replace the missing pieces of one another, so there is no strength lost in either member.
-Tyler Collins, Operations Manager
 Tilemall
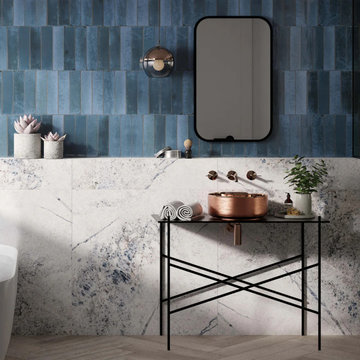
Handmade tiles have been used as decorative and functional building materials for centuries. Crafted using traditional techniques and materials, each tile is unique and offers a personal touch to any space. Whether used as a splashback in a kitchen or as a decorative feature in a bathroom, handmade tiles can add a touch of elegance and charm to any home. In this comprehensive blog, we will explore the world of handmade tiles, including the benefits of using them and tips for incorporating them into your home.
What are Handmade Tiles?
Handmade tiles are tiles made by hand using traditional techniques such as moulding, cutting, and firing. They are often made from natural materials such as clay, stone, or glass and can be used in a variety of spaces including flooring, walls, and splashbacks. The craftsmanship involved in making each tile ensures that no two tiles are exactly alike, resulting in a unique and personalised look.
Sponsored
Columbus, OH
Hope Restoration & General Contracting
Columbus Design-Build, Kitchen & Bath Remodeling, Historic Renovations
 User
UserExquisite Worktops and High-end Kitchen Guide
Homeowners
The fuel to every person's happiness: food; is stored in a kitchen. We gotta agree that even if life is created in a bedroom, it is certainly lived in a kitchen. Hence, It is undeniable that every homeowner would want to invest mindfully in creating a proper outlook of a place that nourishes the heart of both its family and its guests. While designing a kitchen unlike other spaces of a home one must pay attention to the choice of materials for worktops, floors, sinks, etc that suit the hygiene purposes alongside the aesthetic point of view, which might usually result in a very high budget plan. So this is where practicality hits a common man as no matter what one`s wishlist is, execution ultimately depends on their capability of expenditure.
However, with sufficient guidance on kitchen design planning, one can drastically minimise the expenses without necessarily having to purchase cheap worktops. The choice of the right materials is just as important as the ability to financially invest in the same, if not more. This means if a person has enough knowledge of what they are looking for, they can cleverly create an exquisite look under a much lesser budget-friendly scheme.
Key Points to Consider When on a Mission to Create a High-end Kitchen Under Restrained Pockets
Estimating a Budget Plan:
Setting a realistic budget before the investment is a very important aspect which shouldn't be overlooked. According to NKBA, a proper guide to setting one`s kitchen budget while planning a new one should look like- 29% cabinets and hardware, 17% installation, 14% appliances and ventilation, 10% countertops, 7% flooring, 5% walls and ceilings, 5% lighting, 5% faucets and plumbing, 4% doors and windows, 4% design fees and 1% miscellaneous.
Pick Your Beautiful Stone for Work-top:
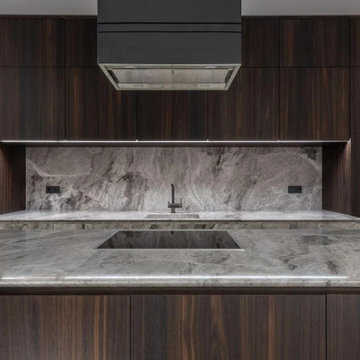
As we all know, beauty is not just conventional, so natural stones, as well as engineered stones, are beautiful in their own way. Engineered countertops are still impressively resistant to scratch and stains. They can almost replicate the intrinsic character and sparkle of granite and marbles. The manufacturing technique of engineered stones has made it so that, wherever they are incorporated, they add a sense of style and class. And with minimal maintenance, they can last for a very long time in a household. One can even go for the mix and matching technique where one can use both expensive and inexpensive buys in such a way that the former occupies the areas on display while the latter covers up for other units.
Being on a budget, though, must not mean hiring inexperienced fabricators to compromise on cost. The short-term result might be tempting but doing so will only increase the future risk thus being more of a loss than an advantage. However, if one is confident enough in their skills, DIY-ing the fittings will drastically reduce the cost of expenditure.
Reusing and Recycling Off Cuts:
While extending or renovating one always has the option to think about how some materials from the previous space can be given a second life. Worktops can be altered to fit a new plan, cupboard doors can be fitted to the kitchen and given a fresh look by repainting, and old appliances can be sold on to help contribute towards pitching in some money for purchasing new ones. The stone remnants and offcuts can always be utilised for smaller projects. Check out these Remnants that are available within your region.
Flooring:
Renovating a floor on a tight budget doesn't necessarily mean that one doesn't care about durability or looks. Ideally, one will still want a decent lifespan and great finish even if it's the most affordable kitchen floor out there. To avail this best possible combination of durability, style, and affordability, consider laminate and vinyl flooring designs. They mimic wood and tile flooring convincingly enough.
Work-top Lights:
Light fixtures are easy and impactful and one of the easiest ways to upgrade a room's look. Impeccable lighting not only makes the room look stunning but also provides effective task lighting to make the space easier and more enjoyable to use. If the plan is to introduce new lighting to an existing kitchen, one can try using battery-operated LED spotlights and strips that don’t need wiring in. Installing them over worktops, under cabinets and inside open or glass-fronted cupboards can create an expensive appearance.
Colour Details:
Choosing the right colour of paint has the potential to drastically change the outlook. For example, just visualise a completely white kitchen worktop. Done? Now similarly, a completely black kitchen. You can't deny that both would bring out completely different aesthetic values. Colour is one of the best ways to inject personality into a space but it's important to get the proportions right. For a guaranteed unregretted approach, you can choose neutral tones for the structural elements that are more costly and difficult to replace, including cabinets, floors, worktops, kitchen countertops, and appliances. Then introduce colour with less-expensive updates to the walls, backsplash, window treatments, lighting, and other accents. With this strategy, you can easily and affordably swap out your colour scheme as your tastes and popular trends change.
Creating Interest:
Worktops
One unique way to enhance the design is by introducing an interesting element to catch the eye and provide a focal point.
Decorating Walls:
Attractive wallpapers add a sense of style to the kitchen. It is a great way to freshen up a room without needing to do a lot of work or spending much money. In a rental property, one can try vinyl wall decals or temporary wallpaper. However, overdoing the work in the hype of excitement will make it worse than doing good.
Open Shelf:
One can utilize an empty wall for open shelves. It adds more storage and creates a display area. Go for a decorative or contrasting shelf to add character. Keeping the shelves clear of clutter and using them as a design piece to show off styled arrangements of recipe books, beautiful objects and interesting pieces is always recommended.
Upgrading Cabinet Doors:
Replacing the cabinet doors is a simple way to give the appearance a brand-new look. As long as the units are standard size and the main framework is in good condition, one can just swap the doors without having to worry about the worktop, splashback, plumbing or electrics. Another simple way to upgrade the units is to replace the handles. Vintage cabinets can be given a modification to look contemporary or vice versa with this simple trick. Similarly, cheap, basic-looking handles can be replaced with beautiful handmade ceramic knobs or adding a stylish leather door pull can upgrade the kitchen’s chic factor.
With all these points and our collection of stones, you will have an exquisite kitchen right in front of you. Our service charges are minimum to make kitchen renovation an achievable dream for all homeowners. Email info@work-tops.com for free quotes and to know about our special offers.
 Sunshine Cabinets & Woodworks Ltd
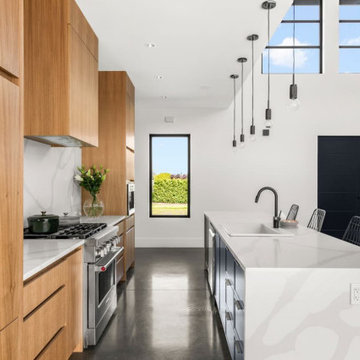
If you’re on the fence about which type of cabinets you want for your home, you may want to consider Oak cabinets as they come in a range of colours and are a very durable type of material.
When Oak comes to mind, it’s often recognized for its deep warm tones and you can easily forget the lighter colours or the fact there are different type of species of Oak. Like the photo above, the designer @rebeccas_design chose this White Rift Cut Oak for her beautiful home. This particular type of Oak is popular for its light golden undertones and consistent grains throughout that give a very clean contemporary look. Not just for its beauty but White Oak is also water resistant and a little more resilient than it’s counterpart, Red Oak.
These type of cabinets have been around for years and have been popular for most - and if you think these cabinets will look too traditional, think again. Through the years there have been a number of new techniques that have rejuvenated the material in stylish ways, and when paired with an amazing designer you can achieve the kitchen of your dreams.
For more information, contact one of our design experts today!
Sales@sunshinecabinets.ca
 Crystal Lake Glass
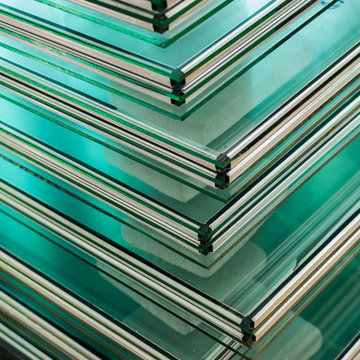
We offer glass cutting, processing and decoration in Toronto and GTA. We use a variety of manufacturing techniques, including glass cutting, laminating, grinding and drilling. We also specialize in glass insulation, straight edge cutting, polishing and stack bending. Order glass cutting from CLG.
 Betz Pools Limited
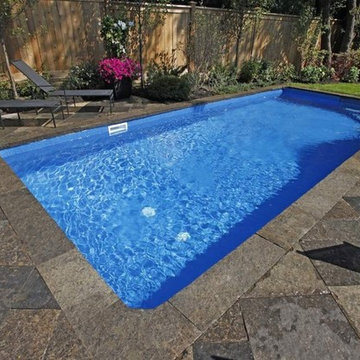
How does a landscaping contractor finish his own small urban yard? With a small pool and subtle design elements that borrow from the timeless elegance of simplicity. The lot is slightly pie-shaped, so the deck on one side has been cut short with a planting bed that helps to soften the converging lines. Also, the square-cut Wiarton Ebel pebble-top stones have been placed diagonally in the dry-laid deck to create visual balance. The pool's entry steps are placed appropriately at a 45-degree angle and the lounge furniture is aligned with the flagstones of the deck. Simple lines never looked so good. (14 x 28, rectangular)

 Maverick City Builders
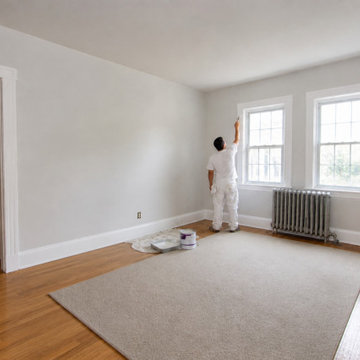
This whole home interior painting and trim upgrade project in Lancaster highlights how a professionally executed finish can completely transform the look, feel, and flow of an entire living space. The project began with a dated interior featuring worn paint, visible wall imperfections, and aging trim that no longer reflected a clean, modern aesthetic. While the home’s structure remained solid, the overall appearance felt dull and lacked the brightness, consistency, and refinement homeowners are looking for today.
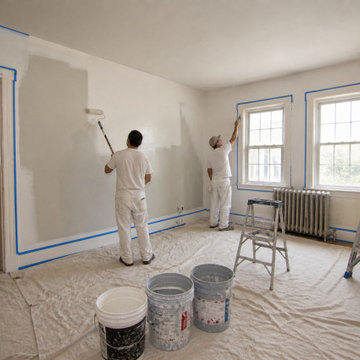
Our team began with a comprehensive preparation process across the entire home, which is one of the most critical steps in achieving a high-quality and long-lasting paint finish. Every surface was carefully cleaned, patched, and sanded to create a smooth and uniform base. All floors, fixtures, and furnishings were fully protected using professional-grade coverings, and trim lines throughout the home were precisely taped to ensure sharp, clean edges. This level of preparation not only enhances the final appearance but also ensures durability and consistency from room to room.
As the project progressed, premium-quality paints were applied using a combination of rolling and precision cutting techniques to achieve a smooth, even finish across all wall and ceiling surfaces. The selected color palette focused on modern, neutral tones designed to maximize natural light and create a cohesive, open feel throughout the home. At the same time, all trim, baseboards, and interior details were upgraded with a crisp white finish, adding contrast, depth, and a polished look that ties every space together.
During the final stages, detailed touch-ups and trim refinements were completed in every room to achieve a flawless, professional-grade result. Each edge, corner, and transition was carefully inspected and perfected, ensuring consistency and craftsmanship at every level. The transformation is especially noticeable when comparing the before and after, as the home evolves from a worn, outdated environment into a bright, modern, and refreshed living space.
Once completed, the home was staged to highlight its full potential and demonstrate how a whole home painting upgrade can dramatically improve both aesthetics and functionality. The final result is a clean, cohesive, and welcoming interior that feels updated, spacious, and move-in ready.
Projects like this showcase the value of expert craftsmanship and attention to detail in full-home interior renovations. Whether you are preparing your property for sale or looking to modernize your living space, a whole home interior painting and trim upgrade remains one of the most effective ways to increase both visual appeal and overall property value in Lancaster, MA and surrounding areas.
Our team started with a detailed preparation process, which is one of the most critical steps in achieving a high-quality paint finish. All surfaces were carefully cleaned, patched, and sanded to ensure a smooth and even base. Floors and furniture were fully protected using professional-grade coverings, and trim areas were precisely taped to guarantee clean, sharp lines. This level of preparation ensures that the final result is not only visually appealing but also long-lasting.
As the painting phase progressed, high-quality paints were applied using a combination of rolling and cutting techniques to create a consistent, smooth finish across all wall surfaces. The color selection focused on modern, neutral tones that enhance natural light and create a more open, inviting atmosphere. At the same time, the trim and baseboards were upgraded with a crisp, clean white finish, adding contrast and definition throughout the space.
During the final stages, detailed touch-ups and trim work were completed to achieve a flawless result. Every corner, edge, and transition was carefully inspected and refined, ensuring a professional-grade finish that stands out. The transformation is most noticeable when comparing the before and after stages, where the room evolves from a dated and worn environment into a bright, modern living area.
The completed space was then staged to showcase its full potential, demonstrating how a simple upgrade like interior painting and trim work can dramatically improve both aesthetics and functionality. The result is a clean, polished, and welcoming environment that feels refreshed and ready for everyday living.
Projects like this demonstrate the impact of expert craftsmanship and attention to detail in interior renovations. Whether you are preparing your home for sale or simply looking to update your living space, professional painting and trim upgrades offer one of the most effective ways to enhance your home’s value and appearance.
 Maverick City Builders
This whole home interior painting and trim upgrade project in Lancaster highlights how a professionally executed finish can completely transform the look, feel, and flow of an entire living space. The project began with a dated interior featuring worn paint, visible wall imperfections, and aging trim that no longer reflected a clean, modern aesthetic. While the home’s structure remained solid, the overall appearance felt dull and lacked the brightness, consistency, and refinement homeowners are looking for today.
Our team began with a comprehensive preparation process across the entire home, which is one of the most critical steps in achieving a high-quality and long-lasting paint finish. Every surface was carefully cleaned, patched, and sanded to create a smooth and uniform base. All floors, fixtures, and furnishings were fully protected using professional-grade coverings, and trim lines throughout the home were precisely taped to ensure sharp, clean edges. This level of preparation not only enhances the final appearance but also ensures durability and consistency from room to room.
As the project progressed, premium-quality paints were applied using a combination of rolling and precision cutting techniques to achieve a smooth, even finish across all wall and ceiling surfaces. The selected color palette focused on modern, neutral tones designed to maximize natural light and create a cohesive, open feel throughout the home. At the same time, all trim, baseboards, and interior details were upgraded with a crisp white finish, adding contrast, depth, and a polished look that ties every space together.
During the final stages, detailed touch-ups and trim refinements were completed in every room to achieve a flawless, professional-grade result. Each edge, corner, and transition was carefully inspected and perfected, ensuring consistency and craftsmanship at every level. The transformation is especially noticeable when comparing the before and after, as the home evolves from a worn, outdated environment into a bright, modern, and refreshed living space.
Once completed, the home was staged to highlight its full potential and demonstrate how a whole home painting upgrade can dramatically improve both aesthetics and functionality. The final result is a clean, cohesive, and welcoming interior that feels updated, spacious, and move-in ready.
Projects like this showcase the value of expert craftsmanship and attention to detail in full-home interior renovations. Whether you are preparing your property for sale or looking to modernize your living space, a whole home interior painting and trim upgrade remains one of the most effective ways to increase both visual appeal and overall property value in Lancaster, MA and surrounding areas.
Our team started with a detailed preparation process, which is one of the most critical steps in achieving a high-quality paint finish. All surfaces were carefully cleaned, patched, and sanded to ensure a smooth and even base. Floors and furniture were fully protected using professional-grade coverings, and trim areas were precisely taped to guarantee clean, sharp lines. This level of preparation ensures that the final result is not only visually appealing but also long-lasting.
As the painting phase progressed, high-quality paints were applied using a combination of rolling and cutting techniques to create a consistent, smooth finish across all wall surfaces. The color selection focused on modern, neutral tones that enhance natural light and create a more open, inviting atmosphere. At the same time, the trim and baseboards were upgraded with a crisp, clean white finish, adding contrast and definition throughout the space.
During the final stages, detailed touch-ups and trim work were completed to achieve a flawless result. Every corner, edge, and transition was carefully inspected and refined, ensuring a professional-grade finish that stands out. The transformation is most noticeable when comparing the before and after stages, where the room evolves from a dated and worn environment into a bright, modern living area.
The completed space was then staged to showcase its full potential, demonstrating how a simple upgrade like interior painting and trim work can dramatically improve both aesthetics and functionality. The result is a clean, polished, and welcoming environment that feels refreshed and ready for everyday living.
Projects like this demonstrate the impact of expert craftsmanship and attention to detail in interior renovations. Whether you are preparing your home for sale or simply looking to update your living space, professional painting and trim upgrades offer one of the most effective ways to enhance your home’s value and appearance.
8