
Search results for "Deciding" in Home Design Ideas
 Knight Architects LLC
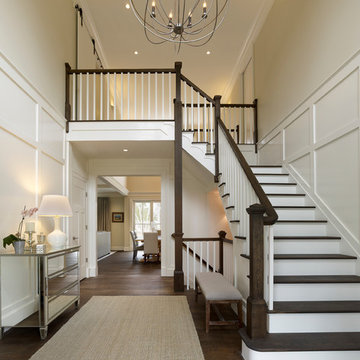
A beautiful two story entry with large iron openwork globe and classic candelabra lights is welcoming and beautiful. Rift and quarter sawn oak flooring adds to the richness and warmth of this home. Don Pearse Photographers Inc.
 Designs by KS
Project: Kitsilano House
Builder: Grenor Homes
About this Project
When our clients asked us to design their new house in the heart of Kitsilano, they wanted a space that showcased their personalities, travels, and experiences. Naturally, our team was instantly excited and eager to make this house a home.
Layout:
Prior to the renovation, the family room was adjacent to the kitchen and the formal living room at the other end of the space; in the middle was the dinning area. We looked at the main floor as an entire space and decided to combine the two living spaces into one and move the dining area towards the kitchen.
The Kitchen:
had always been an L shape with an island; previously there was a kitchen table by the windows. In the space planning period, we decided to eliminate the kitchen table to increase the overall size of the kitchen, giving us a bigger island for casual eating.
The perimeter of the kitchen has many great features; a coffee nook, a freezer column, double ovens, a cooktop with drawers below, an appliance garage in the awkward corner, a pantry with ample storage and free-standing fridge.
The Island also has many key features; a built-in unit for garbage/recycling/compost, a slide out tray underneath the sink for easy access to cleaning products, a dishwasher, and a bank of four drawer. On the outside of the island is an open shelf for cookbooks and display items. Below the countertop overhang is additional hidden storage for the items not accessed frequently.
Dinning Area:
we utilized the pre-existing niche by incorporating floating shelves in an asymmetrical design, which became the perfect area for the clients to display the art collected during their travels.
Bar Area:
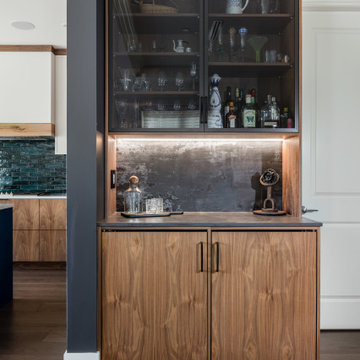
The space between the kitchen and powder room became the perfect place to add a bar. Storage, counter space, and 2 bar fridges brought this little entertaining area to life.
Fireplace:
Using existing fireplace unit we cladded the surround with Dekton material, paneled the wall above with Walnut and a mantel made from Quarkus. These materials repeat them selves through the entire space.
 Michaela Dodd
Photo: Michaela Dodd © 2015 Houzz
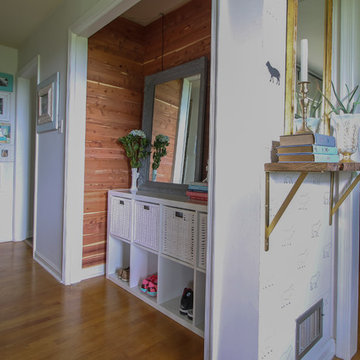
Inspiration for a timeless entryway remodel in DC Metro
Inspiration for a timeless entryway remodel in DC Metro
Find the right local pro for your project
 Custom Gardens, LLC
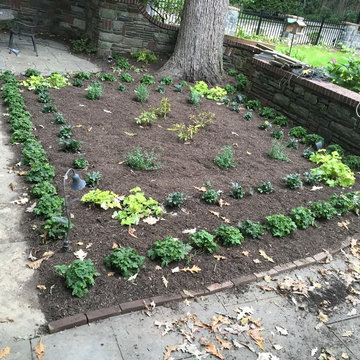
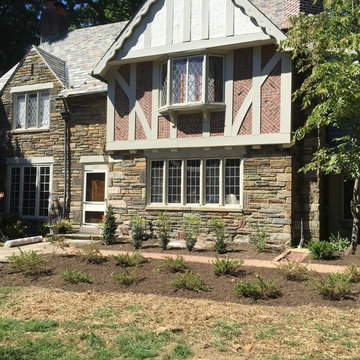
This is a lovely old home that experienced major renovations last year. We
were very fortunate to be requested by the owners to update their
landscaping upon completion of the renovations. The project relied heavily
on collaboration with the owners who made the key decisions in choosing the
plants that I suggested and deciding upon concepts. We decided to re-create
the formal garden by using informal plants. We also decided that the flower
color should be white throughout the formal garden. We spent time deciding
upon color preferences, plants they like (such as lilac), and the "look" of
the plants. We wanted them to fit the architecture of the house. The goal
was to come up with interesting and unusual plants that provided lots of
year round color and did not require lots of maintenance. The landscape
will require periodic maintenance to monitor the plants and keep everything
looking good. We used lots of Native plants where appropriate and re-used
many of the plants on site. For example, we removed the cranesbill geranium
from the old formal garden but discarded the dead and dying boxwood. We
used the cranesbill geranium in beds against the back of the house. The
plants will form a low carpet that flowers and reduces weed growth. We moved
a very large pink flowering crape myrtle that was blocking the view to a
corner of the house where it brackets the corner with another large pink
crape myrtle on the other side of the corner.

 Custom Gardens, LLC
This is a lovely old home that experienced major renovations last year. We
were very fortunate to be requested by the owners to update their
landscaping upon completion of the renovations. The project relied heavily
on collaboration with the owners who made the key decisions in choosing the
plants that I suggested and deciding upon concepts. We decided to re-create
the formal garden by using informal plants. We also decided that the flower
color should be white throughout the formal garden. We spent time deciding
upon color preferences, plants they like (such as lilac), and the "look" of
the plants. We wanted them to fit the architecture of the house. The goal
was to come up with interesting and unusual plants that provided lots of
year round color and did not require lots of maintenance. The landscape
will require periodic maintenance to monitor the plants and keep everything
looking good. We used lots of Native plants where appropriate and re-used
many of the plants on site. For example, we removed the cranesbill geranium
from the old formal garden but discarded the dead and dying boxwood. We
used the cranesbill geranium in beds against the back of the house. The
plants will form a low carpet that flowers and reduces weed growth. We moved
a very large pink flowering crape myrtle that was blocking the view to a
corner of the house where it brackets the corner with another large pink
crape myrtle on the other side of the corner.
 Tile Doctor Ltd
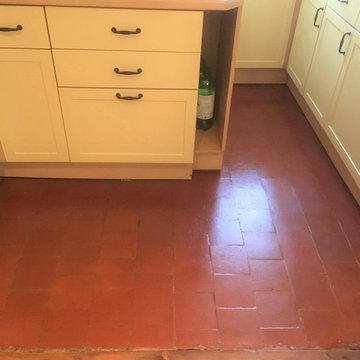
I received a call from this client in Old Marston around two miles north east of the centre of Oxford. They had lifted a lino floor in their kitchen and found an old Quarry Tiled floor underneath and decided to see if they could have it restored.
I went over to survey the floor and could see that the tiles had been covered with a thin layer of levelling screed to ensure the lino didn’t sink into the recesses. I ran some tests to demonstrate how the screed could be removed which worked well and it was apparent that the tiles underneath were intact and could be renovated. I submitted a quotation for removing all the screed, deep cleaning the Quarry tiles and then sealing the tiles to protect them. The client was really pleased that we could restore the floor and the quote was accepted, with a date booked to do the work.
To start the work, I applied undiluted Tile Doctor Grout Clean-up worked in with a small carbide brush attached to a hand-held rotary buffer. The combination of the acid in the Tile Doctor Grout Clean-up combined with the scrubbing action of the brush were effective at removing most of the screed. The small bits of remaining screed were carefully removed by hand, using a floor scraper. The floor was then rinsed with water and the soil removed with a wet vacuum.
For the second phase of the cleaning process I applied Tile Doctor Oxy-Gel which was scrubbed into the floor with a stiff brush rinsing after with water and the soil extracted again using the wet vacuum. After cleaning the floor to remove the dirt I could still see some evidence of the screed on the tiles, so I decided to give the floor an Acid Wash using Tile Doctor Acid Gel which was scrubbed into the floor and rinsed off as before. Tile Doctor Acid Gel is of course an acidic product so once it was removed, I decided to rinse the floor with Tile Doctor Neutral Cleaner to neutralise the pH levels in the floor. The wet vacuum was used again to remove as much moisture from the Quarry tiles as possible before leaving the now clean floor to dry off fully overnight.
I returned to seal this floor the next day. First, I checked the floor was fully dry with the damp meter, it was within the recommended range, so I was ready to complete the sealing process.
The client was not too sure if they wanted a matt or sheen finish, so I first put a coat of Tile Doctor Colour Grow on the floor to show them the matt finish. Colour Grow is an impregnating sealer that enhances natural colour and protects from within by occupying the pores in the tile. After reviewing the floor, they decided it was not for them, so I followed up by applying several coats of Tile Doctor Seal & Go which adds a nice sheen finish and is compatible with Colour Grow.
The combination of sealers worked very well together, and they were very satisfied with the final result and of course that we had been able to restore the Quarry tiles.
Barry Woodward
Oxfordshire Tile Doctor
Sponsored
Columbus, OH

Hope Restoration & General Contracting
Columbus Design-Build, Kitchen & Bath Remodeling, Historic Renovations
 Corvus Construction
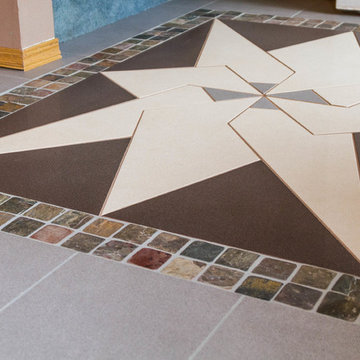
Sometimes great things come from small things and this entryway project was exactly like that. This very small yet interesting project started almost by accident.
Entryway TileI had completed a tile job a few months before and had some high quality porcelain tile left over. It was nice tile so I was hesitant to toss it out but after moving the pile around my shop for several months I finally decided to throw it away. While loading my pickup with miscellaneous construction garbage – and this great tile – one of my neighbors stopped by for a chat about some of my recent projects.
I showed him the great left over tile that I was throwing away and asked him if he had any interest in taking it off my hands – for free. He said he was actually thinking about replacing his existing tile landing at his house because although it had been redone just a few years ago, it had cracked. We went over and took a look at his landing and decided the scrap tile might be a perfect solution.
tile floorI told my neighbor “you come up with any design you want, and I’ll bring that to life.” He came up with an idea and sketched out the idea within a couple of days. As soon as I looked at the sketches, I knew it was going to be a very challenging project, but I also knew it would be a rewarding project I would be proud to put the Corvus name on.
We took the final sketch and imported it into a graphics design program to make the focal point of the design work within the existing space and fine tune the look of the project to fit the available space of the entryway. This was going to be a highly customized undertaking that was going to be all about the details.
Because every tile had to be custom cut, I printed out the final design from the program to create a stencil to trace the outline on each tile. After all of the painstaking tile cutting, I laid it out in a mock-up on the entry floor. Then we were ready to overcome our next challenge – the flexing and moving sub floor.
The existing tile landing that we were replacing had been installed just a few years earlier but had already cracked down the center. This fracture made me realize that we needed to find a way to somehow decouple the substrate from the finished tile surface to prevent the same problem from cropping up again.
tile floor entrywayI decided to go with a Schluter-DITRA™ tile underlay for this job. Working with DITRA™ was surprisingly simple. The only thing you need to remember is to use unmodified thinset mortar when setting tile over this substrate, because modified thinset would take a very long time to cure. We also decided to use QuartzLock™ urethane grout for the floor because it expands and contracts when the floor flexes under foot traffic and could help prevent future cracking.
In the end the project came out great! My neighbor is thrilled and can’t wait to show it off to anyone that stops by. This is a great example of how custom work can really amp up the appeal of your home and how a small change can make a big difference in the look of your home.
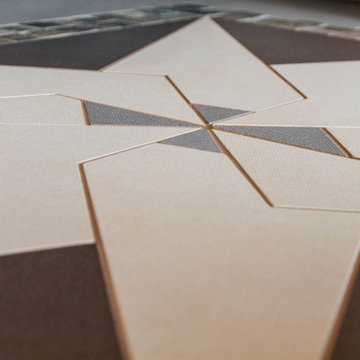 Corvus Construction
Sometimes great things come from small things and this entryway project was exactly like that. This very small yet interesting project started almost by accident.
Entryway TileI had completed a tile job a few months before and had some high quality porcelain tile left over. It was nice tile so I was hesitant to toss it out but after moving the pile around my shop for several months I finally decided to throw it away. While loading my pickup with miscellaneous construction garbage – and this great tile – one of my neighbors stopped by for a chat about some of my recent projects.
I showed him the great left over tile that I was throwing away and asked him if he had any interest in taking it off my hands – for free. He said he was actually thinking about replacing his existing tile landing at his house because although it had been redone just a few years ago, it had cracked. We went over and took a look at his landing and decided the scrap tile might be a perfect solution.
tile floorI told my neighbor “you come up with any design you want, and I’ll bring that to life.” He came up with an idea and sketched out the idea within a couple of days. As soon as I looked at the sketches, I knew it was going to be a very challenging project, but I also knew it would be a rewarding project I would be proud to put the Corvus name on.
We took the final sketch and imported it into a graphics design program to make the focal point of the design work within the existing space and fine tune the look of the project to fit the available space of the entryway. This was going to be a highly customized undertaking that was going to be all about the details.
Because every tile had to be custom cut, I printed out the final design from the program to create a stencil to trace the outline on each tile. After all of the painstaking tile cutting, I laid it out in a mock-up on the entry floor. Then we were ready to overcome our next challenge – the flexing and moving sub floor.
The existing tile landing that we were replacing had been installed just a few years earlier but had already cracked down the center. This fracture made me realize that we needed to find a way to somehow decouple the substrate from the finished tile surface to prevent the same problem from cropping up again.
tile floor entrywayI decided to go with a Schluter-DITRA™ tile underlay for this job. Working with DITRA™ was surprisingly simple. The only thing you need to remember is to use unmodified thinset mortar when setting tile over this substrate, because modified thinset would take a very long time to cure. We also decided to use QuartzLock™ urethane grout for the floor because it expands and contracts when the floor flexes under foot traffic and could help prevent future cracking.
In the end the project came out great! My neighbor is thrilled and can’t wait to show it off to anyone that stops by. This is a great example of how custom work can really amp up the appeal of your home and how a small change can make a big difference in the look of your home.
 Custom Gardens, LLC
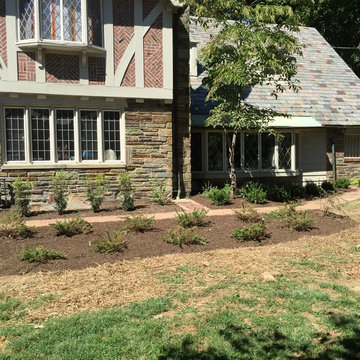
This is a lovely old home that experienced major renovations last year. We
were very fortunate to be requested by the owners to update their
landscaping upon completion of the renovations. The project relied heavily
on collaboration with the owners who made the key decisions in choosing the
plants that I suggested and deciding upon concepts. We decided to re-create
the formal garden by using informal plants. We also decided that the flower
color should be white throughout the formal garden. We spent time deciding
upon color preferences, plants they like (such as lilac), and the "look" of
the plants. We wanted them to fit the architecture of the house. The goal
was to come up with interesting and unusual plants that provided lots of
year round color and did not require lots of maintenance. The landscape
will require periodic maintenance to monitor the plants and keep everything
looking good. We used lots of Native plants where appropriate and re-used
many of the plants on site. For example, we removed the cranesbill geranium
from the old formal garden but discarded the dead and dying boxwood. We
used the cranesbill geranium in beds against the back of the house. The
plants will form a low carpet that flowers and reduces weed growth. We moved
a very large pink flowering crape myrtle that was blocking the view to a
corner of the house where it brackets the corner with another large pink
crape myrtle on the other side of the corner.
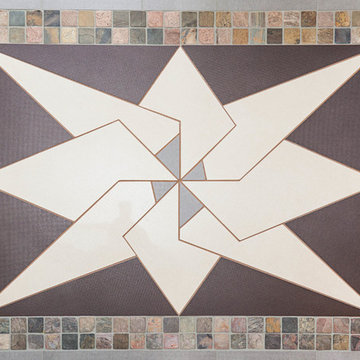 Corvus Construction
Sometimes great things come from small things and this entryway project was exactly like that. This very small yet interesting project started almost by accident.
Entryway TileI had completed a tile job a few months before and had some high quality porcelain tile left over. It was nice tile so I was hesitant to toss it out but after moving the pile around my shop for several months I finally decided to throw it away. While loading my pickup with miscellaneous construction garbage – and this great tile – one of my neighbors stopped by for a chat about some of my recent projects.
I showed him the great left over tile that I was throwing away and asked him if he had any interest in taking it off my hands – for free. He said he was actually thinking about replacing his existing tile landing at his house because although it had been redone just a few years ago, it had cracked. We went over and took a look at his landing and decided the scrap tile might be a perfect solution.
tile floorI told my neighbor “you come up with any design you want, and I’ll bring that to life.” He came up with an idea and sketched out the idea within a couple of days. As soon as I looked at the sketches, I knew it was going to be a very challenging project, but I also knew it would be a rewarding project I would be proud to put the Corvus name on.
We took the final sketch and imported it into a graphics design program to make the focal point of the design work within the existing space and fine tune the look of the project to fit the available space of the entryway. This was going to be a highly customized undertaking that was going to be all about the details.
Because every tile had to be custom cut, I printed out the final design from the program to create a stencil to trace the outline on each tile. After all of the painstaking tile cutting, I laid it out in a mock-up on the entry floor. Then we were ready to overcome our next challenge – the flexing and moving sub floor.
The existing tile landing that we were replacing had been installed just a few years earlier but had already cracked down the center. This fracture made me realize that we needed to find a way to somehow decouple the substrate from the finished tile surface to prevent the same problem from cropping up again.
tile floor entrywayI decided to go with a Schluter-DITRA™ tile underlay for this job. Working with DITRA™ was surprisingly simple. The only thing you need to remember is to use unmodified thinset mortar when setting tile over this substrate, because modified thinset would take a very long time to cure. We also decided to use QuartzLock™ urethane grout for the floor because it expands and contracts when the floor flexes under foot traffic and could help prevent future cracking.
In the end the project came out great! My neighbor is thrilled and can’t wait to show it off to anyone that stops by. This is a great example of how custom work can really amp up the appeal of your home and how a small change can make a big difference in the look of your home.
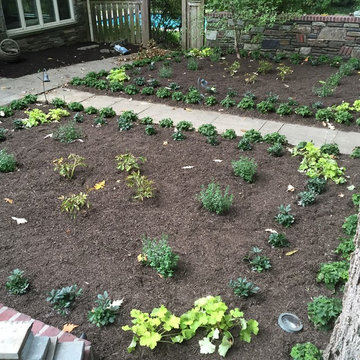 Custom Gardens, LLC
This is a lovely old home that experienced major renovations last year. We
were very fortunate to be requested by the owners to update their
landscaping upon completion of the renovations. The project relied heavily
on collaboration with the owners who made the key decisions in choosing the
plants that I suggested and deciding upon concepts. We decided to re-create
the formal garden by using informal plants. We also decided that the flower
color should be white throughout the formal garden. We spent time deciding
upon color preferences, plants they like (such as lilac), and the "look" of
the plants. We wanted them to fit the architecture of the house. The goal
was to come up with interesting and unusual plants that provided lots of
year round color and did not require lots of maintenance. The landscape
will require periodic maintenance to monitor the plants and keep everything
looking good. We used lots of Native plants where appropriate and re-used
many of the plants on site. For example, we removed the cranesbill geranium
from the old formal garden but discarded the dead and dying boxwood. We
used the cranesbill geranium in beds against the back of the house. The
plants will form a low carpet that flowers and reduces weed growth. We moved
a very large pink flowering crape myrtle that was blocking the view to a
corner of the house where it brackets the corner with another large pink
crape myrtle on the other side of the corner.
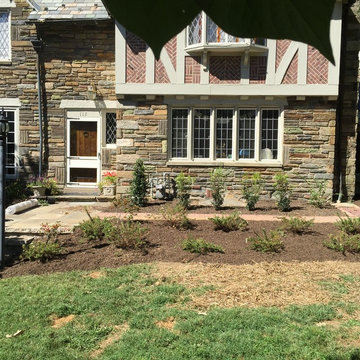 Custom Gardens, LLC
This is a lovely old home that experienced major renovations last year. We
were very fortunate to be requested by the owners to update their
landscaping upon completion of the renovations. The project relied heavily
on collaboration with the owners who made the key decisions in choosing the
plants that I suggested and deciding upon concepts. We decided to re-create
the formal garden by using informal plants. We also decided that the flower
color should be white throughout the formal garden. We spent time deciding
upon color preferences, plants they like (such as lilac), and the "look" of
the plants. We wanted them to fit the architecture of the house. The goal
was to come up with interesting and unusual plants that provided lots of
year round color and did not require lots of maintenance. The landscape
will require periodic maintenance to monitor the plants and keep everything
looking good. We used lots of Native plants where appropriate and re-used
many of the plants on site. For example, we removed the cranesbill geranium
from the old formal garden but discarded the dead and dying boxwood. We
used the cranesbill geranium in beds against the back of the house. The
plants will form a low carpet that flowers and reduces weed growth. We moved
a very large pink flowering crape myrtle that was blocking the view to a
corner of the house where it brackets the corner with another large pink
crape myrtle on the other side of the corner.
Sponsored
Columbus, OH
Hope Restoration & General Contracting
Columbus Design-Build, Kitchen & Bath Remodeling, Historic Renovations
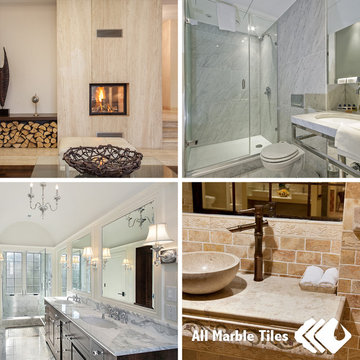
 All Marble Tiles
Marble tiles vs. Travertine tiles
It is a daunting task in renovating an existing or building a new home. All the right choices have to be made as you are going to live with your decisions for a while, unless you are a billionaire whom can afford renovations every six months. Most of us can’t. Part of that decision making process, is to decide what type, color and quality tile to use. Do you want to go with marble, porcelain or travertine tiles? What does your budget allow you to spend? There are so many things to decide. A good idea is to try and understand the differences between all the types of tiles.
In this article, the difference between marble and travertine tiles are going to be explained. Many tiles look like marble, but there are distinct differences:
1) Marble tiles:
Known throughout the centuries for its beauty and proper use in the building of homes for the rich or immaculate sculptures of great minds or the ancient gods; marble has a strong historical background and as such is the first choice for most people, that is, if they can afford it.
• Marble is a saltwater rock, usually mined close to the sea. It is a far more durable than travertine.
• Marble tiles come in various colors from mineral deviations in the marble;
• Marble is more suitable for internal use; though it can be used externally as long as its guarded from the forces of nature;
• The finish options with marble is restricted due to its nature to break;
• Marble tiles are more expensive;
2) Travertine tiles:
This tile is often wrongly referred to as “travertine-marble”. Travertine is closely associated with marble, yet there are important differences.
• Both are natural stone, but travertine tiles are limestone and thus sedimentary and marble tiles, while also a type of limestone, is metamorphic, i.e. marble is formed in tremendous heat;
• Travertine is quarried near fresh water rivers and natural dams;
• The color spectrum of Travertine tiles are far less than marble due to its natural colors;
• Travertine tiles are porous and marble denser;
• Travertine tiles are far more suited for outdoor use because of its durability;
• Travertine tiles has more finish options than marble;
• Travertine tiles are cheaper than marble because it’s widely available.
So, in effect, they are both made from natural stone; Travertine tiles just being more widely found than marble. Decide which atmosphere you want to create at which cost; then decide on the proper tile choice. http://AllMarbleTiles.com
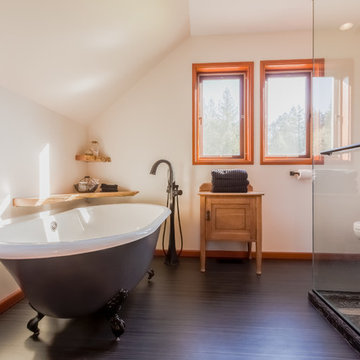
 b. van hecke
Bathroom - large contemporary master white tile and subway tile dark wood floor bathroom idea in Vancouver with furniture-like cabinets, light wood cabinets, a two-piece toilet, beige walls, an undermount sink, granite countertops and a hinged shower door
 Authenticity, LLC
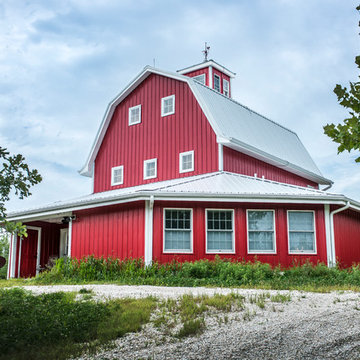
Architect: Michelle Penn, AIA This barn home is modeled after an existing Nebraska barn in Lancaster County. Heating is by passive solar design, supplemented by a geothermal radiant floor system. Cooling uses a whole house fan and a passive air flow system. The passive system is created with the cupola, windows, transoms and passive venting for cooling, rather than a forced air system. Because fresh water is not available from a well nor county water, water will be provided by rainwater harvesting. The water will be collected from a gutter system, go into a series of nine holding tanks and then go through a water filtration system to provide drinking water for the home. A greywater system will then recycle water from the sinks and showers to be reused in the toilets. Low-flow fixtures will be used throughout the home to conserve water.
Photo Credits: Jackson Studios

 TKS Design Group
Download our free ebook, Creating the Ideal Kitchen. DOWNLOAD NOW
Lakefront property in the northwest suburbs of Chicago is hard to come by, so when we were hired by this young family with exactly that, we were immediately inspired by not just the unusually large footprint of this 1950’s colonial revival but also the lovely views of the manmade lake it was sited on. The large 5-bedroom home was solidly stuck in the 1980’s, but we saw tons of potential. We started out by updating the existing staircase with a fresh coat of paint and adding new herringbone slate to the entry hall.
The powder room off the entryway also got a refresh - new flooring, new cabinets and fixtures. We ran the new slate right through into this space for some consistency. A fun wallpaper and shiplap trim add a welcoming feel and set the tone for the home.
Next, we tackled the kitchen. Located away from the rest of the first floor, the kitchen felt a little isolated, so we immediately began planning for how to better connect it to the rest of the first floor. We landed on removing the wall between the kitchen and dining room and designed a modified galley style space with separate cooking and clean up zones. The cooking zone consists of the refrigerator, prep sink and cooktop, along with a nice long run of prep space at the island. The cleanup side of the kitchen consists of the main sink and dishwasher. Both areas are situated so that the user can view the lake during prep work and cleanup!
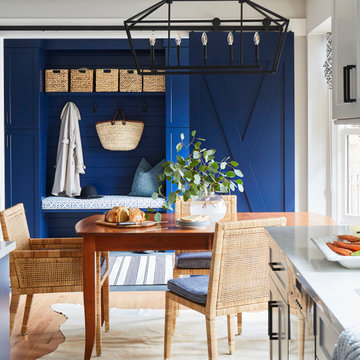
One of the home’s main puzzles was how to incorporate the mudroom and area in front of the patio doors at the back of the house. We already had a breakfast table area, so the space by the patio doors was a bit of a no man’s land. We decided to separate the kitchen proper from what became the new mudroom with a large set of barn doors. That way you can quickly hide any mudroom messes but have easy access to the light coming in through the patio doors as well as the outdoor grilling station. We also love the impact the barn doors add to the overall space.
The homeowners’ first words to us were “it’s time to ditch the brown,” so we did! We chose a lovely blue pallet that reflects the home’s location on the lake which is also vibrant yet easy on the eye. Countertops are white quartz, and the natural oak floor works well with the other honey accents. The breakfast table was given a refresh with new chairs, chandelier and window treatments that frame the gorgeous views of the lake out the back.
We coordinated the slate mudroom flooring with that used in the home’s main entrance for a consistent feel. The storage area consists of open and closed storage to allow for some clutter control as needed.
Next on our “to do” list was revamping the dated brown bar area in the neighboring dining room. We eliminated the clutter by adding some closed cabinets and did some easy updates to help the space feel more current. One snag we ran into here was the discovery of a beam above the existing open shelving that had to be modified with a smaller structural beam to allow for our new design to work. This was an unexpected surprise, but in the end we think it was well worth it!
We kept the colors here a bit more muted to blend with the homeowner’s existing furnishings. Open shelving and polished nickel hardware add some simple detail to the new entertainment zone which also looks out onto the lake!
Next we tackled the upstairs starting with the homeowner’s son’s bath. The bath originally had both a tub shower and a separate shower, so we decided to swap out the shower for a new laundry area. This freed up some space downstairs in what used to be the mudroom/laundry room and is much more convenient for daily laundry needs.
We continued the blue palette here with navy cabinetry and the navy tile in the shower. Porcelain floor tile and chrome fixtures keep maintenance to a minimum while matte black mirrors and lighting add some depth the design. A low maintenance runner adds some warmth underfoot and ties the whole space together.
We added a pocket door to the bathroom to minimize interference with the door swings. The left door of the laundry closet is on a 180 degree hinge to allow for easy full access to the machines. Next we tackled the master bath which is an en suite arrangement. The original was typical of the 1980’s with the vanity outside of the bathroom, situated near the master closet. And the brown theme continued here with multiple shades of brown.
Our first move was to segment off the bath and the closet from the master bedroom. We created a short hall from the bedroom to the bathroom with his and hers walk-in closets on the left and right as well as a separate toilet closet outside of the main bathroom for privacy and flexibility.
The original bathroom had a giant soaking tub with steps (dangerous!) as well as a small shower that did not work well for our homeowner who is 6’3”. With other bathtubs in the home, they decided to eliminate the tub and create an oversized shower which takes up the space where the old tub was located. The double vanity is on the opposite wall and a bench is located under the window for morning conversations and a place to set a couple of towels.
The pallet in here is light and airy with a mix of blond wood, creamy porcelain and marble tile, and brass accents. A simple roman shade adds some texture and it’s top-down mechanism allows for light and privacy.
This large whole house remodel gave our homeowners not only the ability to maximize the potential of their home but also created a lovely new frame from which to view their fabulous lake views.
Designed by: Susan Klimala, CKD, CBD
Photography by: Michael Kaskel
For more information on kitchen and bath design ideas go to: www.kitchenstudio-ge.com
 TKS Design Group
Download our free ebook, Creating the Ideal Kitchen. DOWNLOAD NOW
This homeowner’s daughter originally contacted us on behalf of her parents who were reluctant to begin the remodeling process in their home due to the inconvenience and dust. Once we met and they dipped their toes into the process, we were off to the races. The existing bathroom in this beautiful historical 1920’s home, had not been updated since the 70’/80’s as evidenced by the blue carpeting, mirrored walls and dropped ceilings. In addition, there was very little storage, and some health setbacks had made the bathroom difficult to maneuver with its tub shower.
Once we demoed, we discovered everything we expected to find in a home that had not been updated for many years. We got to work bringing all the electrical and plumbing up to code, and it was just as dusty and dirty as the homeowner’s anticipated! Once the space was demoed, we got to work building our new plan. We eliminated the existing tub and created a large walk-in curb-less shower.
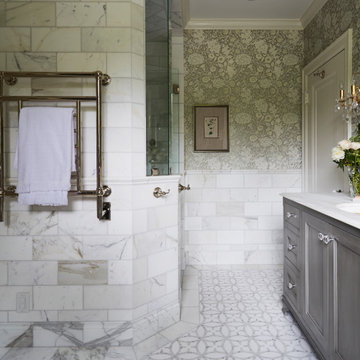
An existing closet was eliminated and in its place, we planned a custom built in with spots for linens, jewelry and general storage. Because of the small space, we had to be very creative with the shower footprint, so we clipped one of the walls for more clearance behind the sink. The bathroom features a beautiful custom mosaic floor tile as well as tiled walls throughout the space. This required lots of coordination between the carpenter and tile setter to make sure that the framing and tile design were all properly aligned. We worked around an existing radiator and a unique original leaded window that was architecturally significant to the façade of the home. We had a lot of extra depth behind the original toilet location, so we built the wall out a bit, moved the toilet forward and then created some extra storage space behind the commode. We settled on mirrored mullioned doors to bounce lots of light around the smaller space.
We also went back and forth on deciding between a single and double vanity, and in the end decided the single vanity allowed for more counter space, more storage below and for the design to breath a bit in the smaller space. I’m so happy with this decision! To build on the luxurious feel of the space, we added a heated towel bar and heated flooring.
One of the concerns the homeowners had was having a comfortable floor to walk on. They realized that carpet was not a very practical solution but liked the comfort it had provided. Heated floors are the perfect solution. The room is decidedly traditional from its intricate mosaic marble floor to the calacutta marble clad walls. Elegant gold chandelier style fixtures, marble countertops and Morris & Co. beaded wallpaper provide an opulent feel to the space.
The gray monochromatic pallet keeps it feeling fresh and up-to-date. The beautiful leaded glass window is an important architectural feature at the front of the house. In the summertime, the homeowners love having the window open for fresh air and ventilation. We love it too!
The curb-less shower features a small fold down bench that can be used if needed and folded up when not. The shower also features a custom niche for storing shampoo and other hair products. The linear drain is built into the tilework and is barely visible. A frameless glass door that swings both in and out completes the luxurious feel.
Designed by: Susan Klimala, CKD, CBD
Photography by: Michael Kaskel
For more information on kitchen and bath design ideas go to: www.kitchenstudio-ge.com
 Dura Supreme Cabinetry
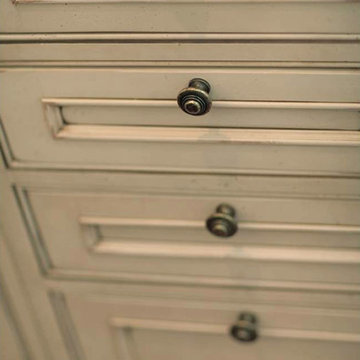
A decidedly painterly palette of cabinet finishes from Dura Supreme Cabinetry pleases the most discerning of color connoisseurs. A painter’s palette could not be more abundantly appointed with the nearly limitless color selections available from Dura Supreme. The rich, hand-wiped stains and color saturated paints are beautiful on their own or enhanced with layers of glaze and hand-detailing to create an antiqued appearance. Many of Dura Supreme's glazed finishes reveal the soft brush strokes and subtle variations of the artisan (craftsman) that created the finish. And if you still can’t find the exact shade of your heart’s desire, Dura Supreme will create the perfect color just for you with our Custom Color-Match Program AND our Personal Paint Match Program.
Request a FREE Dura Supreme Brochure Packet:
http://www.durasupreme.com/request-brochure
Find a Dura Supreme Showroom near you today:
http://www.durasupreme.com/dealer-locator
16