
Search results for "Deposit" in Home Design Ideas
 Coral Classics by A&P
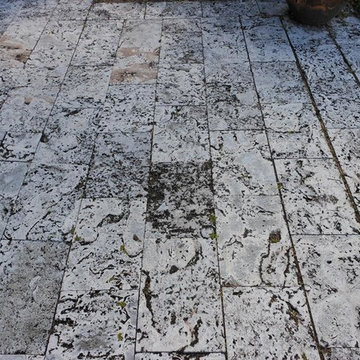
Waterfront home in Miami Beach that we supplied the authentic florida keystone tiles. notice the natural patina that occurs over time, now this is what a coral stone pool deck is suppose to look like NICE.
The islands of the Lower Keys in the Florida Keys, as well as some barrier islands east of Miami bordering Biscayne Bay, are mainly oolitic limestone, which was formed by deposition when shallow seas covered the area between periods of glaciation. The material consolidated and eroded during later exposure above the ocean surface.
 Coral Classics by A&P
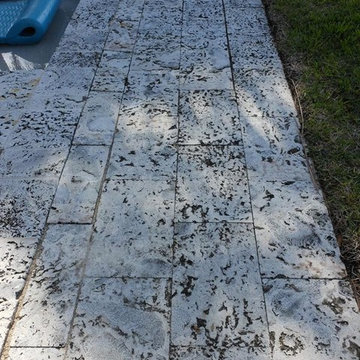
Waterfront home in Miami Beach that we supplied the authentic florida keystone tiles. notice the natural patina that occurs over time, now this is what a coral stone pool deck is suppose to look like NICE.
The islands of the Lower Keys in the Florida Keys, as well as some barrier islands east of Miami bordering Biscayne Bay, are mainly oolitic limestone, which was formed by deposition when shallow seas covered the area between periods of glaciation. The material consolidated and eroded during later exposure above the ocean surface.
 Coral Classics by A&P
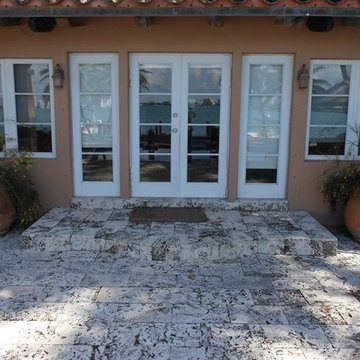
Waterfront home in Miami Beach that we supplied the authentic florida keystone tiles. notice the natural patina that occurs over time, now this is what a coral stone pool deck is suppose to look like NICE.
The islands of the Lower Keys in the Florida Keys, as well as some barrier islands east of Miami bordering Biscayne Bay, are mainly oolitic limestone, which was formed by deposition when shallow seas covered the area between periods of glaciation. The material consolidated and eroded during later exposure above the ocean surface.
Find the right local pro for your project
 Coral Classics by A&P
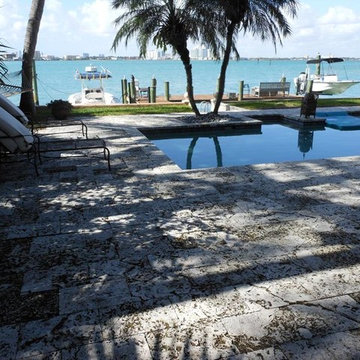
Waterfront home in Miami Beach that we supplied the authentic florida keystone tiles. notice the natural patina that occurs over time, now this is what a coral stone pool deck is suppose to look like NICE.
The islands of the Lower Keys in the Florida Keys, as well as some barrier islands east of Miami bordering Biscayne Bay, are mainly oolitic limestone, which was formed by deposition when shallow seas covered the area between periods of glaciation. The material consolidated and eroded during later exposure above the ocean surface.

 Natart Juvenile
The Rustico collection was inspired by old Tuscan furniture and incorporates contemporary lines and harkens to a time gone by when sturdy oak furniture was hand-hewn and lasted a lifetime. This collection showcases our new brushed finish technique, which was inspired by the natural drift process resulting from years of use. The brushed finishing process, called 'decape', opens the pores of the oak allowing us to deposit a white patina in its grooves, imparting a mild 'weathered' look. This unisex collection is accented by an open mortise & tenon detail and is offered in three new finishes - owl, mink, and sugar cane, as well as our classic white. The Rustico "5-in-1" Convertible Crib is highlighted by chunky top moldings with an open mortise & tenon detail, an elegantly framed back panel and one-piece corner posts. It offers long term value with five configurations: crib, toddler bed, daybed, double bed headboard and complete double bed. For a softer, elegant look you can chose the Rustico "5-in-1" Convertible with the Upholstered Headboard Panel. The headboard panel features three upholstered inserts which are available in our sturdy 100,000 double rub tested fabric of either fog linen weave or talc linen weave. This 100% solid oak collection has a refined simplicity which easily meshes with both contemporary and classic decor and is sure to provide many years of functionality and enjoyment.

 Cofree
★ 【Quick Make & Perfect Ice】- Making 9 bullet ice in 6-8 minutes, and up to 1.1 lbs of ice cube per hour. Round ice is more smooth and don’t hurt mouth compared with square ice. Middle hollow shape make ice float on drink.
★ 【Automatic Smart Design】- Just need few steps.Add the water, Press the power and chose the ice cube size. Just waiting 6-8 minutes, enjoy your iced drinks. Simple to understand and illuminated with LED lights. Warning lights and an automatic shut off function are activated once the ice basket is full or when water needs to be refilled.Timing function allow you close it in timing.
★ 【Smart-Clean Function】- In areas with hard water, minerals can stick to ice maker internal during the ice making cycle, eventually forming hard, scaly deposits in the ice maker, which can lead to stinky and impure ice cubes. With the self-clean function, cleaning ice maker could be no longer messy. Sponge or rag? No need. Just add some water, and clicking a few buttons.
★ 【Portable & Multifunctional Use】- An ideal choice for barbeques, outdoor parties, or basement bars because of the no water hookup design. Since it’s flexible, light and easy to store,Measuring at 7 lbs you can bring it nearly anywhere.

 Quarry Mill
Appleton natural thin stone veneer from the Quarry Mill adds color and texture variation to the exterior of this beautiful home. Appleton thin stone veneer is cut from natural Wisconsin granite. The raw stone was deposited years ago as glaciers moved through the state. The stone is unearthed as large boulders the size of a suv and is then broken down via our splitting and sawing processes to make the finished thin veneer. Appleton has shades of soft red, off white, greys and blues. The stone is considered a fieldledge style with its mix of linear type stone blended with mosaic irregular pieces. Appleton is a versatile stone and fits well on both large and small projects. The stone is shown with a standard half-inch grey raked mortar joint between the individual pieces. This is the most common installation method, however, other joint options and mortar colors can be used.

 Dutton Kitchen & Bath
We transformed two bathrooms, laundry room and bedrooms with new closet spaces, Porcelain 12x24 tiled floors with grey accents, custom made base made from the floor tiles, new showers with white Dal Tile 9x12 ceramic tiles and decorative accents, recessed niches for shower goods, fold down seats with satin nickel trim and teak wood, strategically placed grab bars, hand held shower heads, new pressure balanced shower valves, frameless and Euro shower doors that are also sealed on the interior to fight our calcium water deposits, LED can lights and Vanity lights for energy efficiency, JK Cabinetry in white with Zodiac solid surface counter tops with under mount sinks, New ADA height toilets and soft close seat. The toilet topper adds additional storage and custom look. Dedicated circuitry to the outlet and separate for the exhaust fan and lights. The exhaust fan is operated by a timer switch for ease of use

 Roux MacNeill Studio
Our client tasked us with creating a versatile workspace for their family, including a daughter in college. Space was at a premium in their downtown loft, so we needed to create an efficient space that could be changed in the future to fulfill other needs. Our solution was a custom metal desk on casters, topped with concrete quartz. The office has little natural light, so white lacquered cabinets and metallic wallpaper were used to add life to the space.

 C2 | Studio Landscape Architecture
A conceptual framework of long, straight lines anchors the landscape design for this proposed contemporary house set in a rural wetland environment. Against this datum, the site’s subtleties reveal themselves for interpretation and appreciation. The iconic element of a strong axial grass ‘runway’ serves both as a horizontal extrusion against which to read the natural topography and also as a platform for viewing the site’s wetlands. A monolithic retaining wall stratifies the entry area into a lower, private parking court and an upper, public one, which is further defined by a series of rough-hewn stone planters containing formal plantings of dogwoods. These planters break the plane of the retaining wall and extend to the ground, alluding to the substantial bedrock deposits that underlie much of the site. Stepped down from this plane is the fire pit terrace, nestled into the rocky structure of the site and offering views towards a vernal pond.
Scott Carman
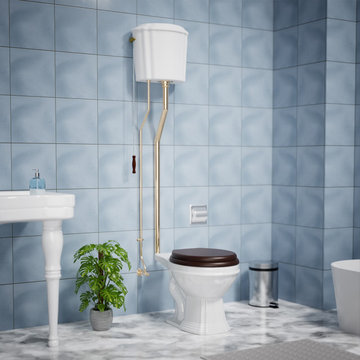
 Renovators Supply Manufacturing
VICTORIAN HIGH TANK PULL CHAIN WHITE ROUND BOWL TOILET
The old is the trendy now. People have started placing these vintage toilets in their bathroom for a traditional charm. All the materials used to manufacture this toilet are of highest quality - The one that lasts long!
FEATURES
ADA and ANSI Compliant Toilet
Old Fashion Antique Gravity Flush Upscale Design
White Round Vitreous China High Tank and Toilet Bowl
Protective RENO-GLOSS finish resists stains
PERFECT-HEIGHT bowl reduces daily body strain
Includes mounting hardware, supply line and angle stop
Stainless Steel Rear Entry Pipes with Brass coloured PVD Physical Vapor Deposition Finish
Adjustable overall height 74 in. to 78 in. and Rough-in 12 in. to 15 in.
Wooden Toilet seat is sold separately
100% SATISFACTION GUARANTEE
These are carefully wrapped to avoid any scratches or damage in the transit process. Renovators Supply offers you great value products for your money and a perfect way to spend wisely. We also provide 60 days guarantee with no fee.
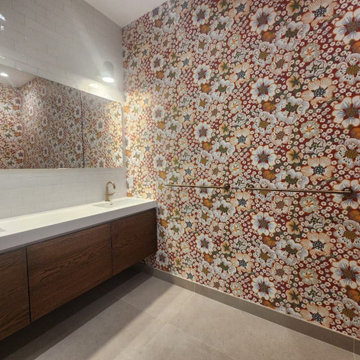
 Elite Wallpaper Installers
Luxury Bathroom Wallpaper Installation in Arvada – Where Rocky Mountain Charm Meets Lasting Quality"
Elevate your bathroom with our 5-star rated wallpaper installation service, designed for Arvada homeowners who demand both beauty and durability. We combine moisture-proof performance with designer aesthetics to create spa-like retreats that stand up to Colorado's climate.
Why Arvada Chooses Our Bathroom Wallpaper Services
✔ Altitude-Adapted Materials – Special vinyl formulations for dry Colorado air
✔ Historic Home Expertise – Perfect for Olde Town Arvada's character
✔ Steam-Resistant Installations – Professional sealing around showers/tubs
✔ Free Mineral Deposit Inspection – Prevents bubbling in hard water areas
Signature Arvada Styles
?️ Mountain Modern – Aspen tree and granite-inspired designs
⚒️ Gold Rush Vintage – Nod to Arvada's mining history
? Spa Sanctuary – Neutral textures with subtle metallic accents
? Prairie Charm – Sunflower and wheat field motifs
Our Premium Service Includes:
✅ In-Home Design Consultation (Free with installation)
✅ 3D Augmented Reality Preview
✅ 72-Hour Post-Installation Check
✅ Colorado's Only 5-Year Moisture Warranty

 Gappsi
Stucco is a popular building material that is mainly used in residential exterior siding. It is a combination of sand, Portland cement, limestone and sometimes water. Plaster can be applied to wood, block and concrete. When applying stucco to wood framing, it is usually attached to a wire lath that is attached to the structural framing. Wood framing must be protected by a water resistant moisture barrier such as, asphalt building paper or different types of building wraps before the wire lath and stucco are applied. New stucco should cure for thirty days before prime and paint are applied. A common problem found in stucco due to the trapped moisture that migrates towards the stucco surface, it sometimes carries mineral deposits within it. This can cause a discoloration and sometimes adhesion problems. New stucco can sometimes develop cracks during the curing process. As water is eliminated and the stucco hardens, hairline cracks tend to occur. Once you apply the primer and paint with a paint roller it typically fills the narrow cracks. The roller helps push the paint into the cracks. Larger stucco cracks require a stucco patch filler to bridge the gap. When painting new you must include a primer coat and one or two finishing coats. All paints and primers should be used for exterior surfaces.

 C2 | Studio Landscape Architecture
A conceptual framework of long, straight lines anchors the landscape design for this proposed contemporary house set in a rural wetland environment. Against this datum, the site’s subtleties reveal themselves for interpretation and appreciation. The iconic element of a strong axial grass ‘runway’ serves both as a horizontal extrusion against which to read the natural topography and also as a platform for viewing the site’s wetlands. A monolithic retaining wall stratifies the entry area into a lower, private parking court and an upper, public one, which is further defined by a series of rough-hewn stone planters containing formal plantings of dogwoods. These planters break the plane of the retaining wall and extend to the ground, alluding to the substantial bedrock deposits that underlie much of the site. Stepped down from this plane is the fire pit terrace, nestled into the rocky structure of the site and offering views towards a vernal pond.
Scott Carman
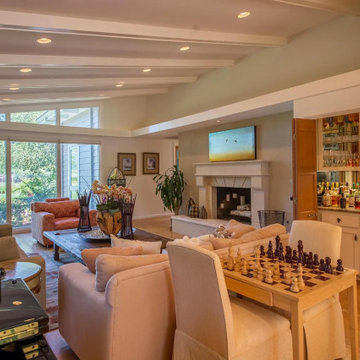
 Prima Luxe Property
Welcome to the pinnacle of Napa Valley living! This exquisite 5-bedroom, 6-bathroom estate in St. Helena offers an unparalleled blend of comfort, luxury, and natural beauty. Nestled among rolling vineyards, this stunning retreat is designed to delight both avid entertainers and those seeking a peaceful escape in the heart of wine country.
? Property Highlights
✔ Sumptuous Living Spaces – Bright and airy layout with high ceilings, generously sized rooms, and elegant finishes.✔ Resort-Style Amenities – Private heated pool, relaxing hot tub, and rejuvenating sauna—perfect for unwinding after a day of wine tasting.✔ Outdoor Perfection – Includes a private guest house, batting cage, tennis court surrounded by lush vineyards, chipping green, and complimentary wine for your enjoyment.✔ Luxury Conveniences – Stay eco-friendly with an EV charger, keep your belongings organized with ample storage, and enjoy year-round comfort with central air and central heat. Washer/dryer included for effortless daily living.✔ Effortless Maintenance – Electricity, gas, air conditioning, and water are all covered, allowing you to fully immerse yourself in the Napa Valley lifestyle.✔ Pet-Friendly – Four-legged companions are welcome to share in the comfort of this spectacular home.
? Lease Details
✔ Monthly Rent: $35,000
✔ Security Deposit: $10,000
Please book your vacation here!

 C2 | Studio Landscape Architecture
A conceptual framework of long, straight lines anchors the landscape design for this proposed contemporary house set in a rural wetland environment. Against this datum, the site’s subtleties reveal themselves for interpretation and appreciation. The iconic element of a strong axial grass ‘runway’ serves both as a horizontal extrusion against which to read the natural topography and also as a platform for viewing the site’s wetlands. A monolithic retaining wall stratifies the entry area into a lower, private parking court and an upper, public one, which is further defined by a series of rough-hewn stone planters containing formal plantings of dogwoods. These planters break the plane of the retaining wall and extend to the ground, alluding to the substantial bedrock deposits that underlie much of the site. Stepped down from this plane is the fire pit terrace, nestled into the rocky structure of the site and offering views towards a vernal pond.
Scott Carman
 C2 | Studio Landscape Architecture
A conceptual framework of long, straight lines anchors the landscape design for this proposed contemporary house set in a rural wetland environment. Against this datum, the site’s subtleties reveal themselves for interpretation and appreciation. The iconic element of a strong axial grass ‘runway’ serves both as a horizontal extrusion against which to read the natural topography and also as a platform for viewing the site’s wetlands. A monolithic retaining wall stratifies the entry area into a lower, private parking court and an upper, public one, which is further defined by a series of rough-hewn stone planters containing formal plantings of dogwoods. These planters break the plane of the retaining wall and extend to the ground, alluding to the substantial bedrock deposits that underlie much of the site. Stepped down from this plane is the fire pit terrace, nestled into the rocky structure of the site and offering views towards a vernal pond.
Scott Carman
 C2 | Studio Landscape Architecture
A conceptual framework of long, straight lines anchors the landscape design for this proposed contemporary house set in a rural wetland environment. Against this datum, the site’s subtleties reveal themselves for interpretation and appreciation. The iconic element of a strong axial grass ‘runway’ serves both as a horizontal extrusion against which to read the natural topography and also as a platform for viewing the site’s wetlands. A monolithic retaining wall stratifies the entry area into a lower, private parking court and an upper, public one, which is further defined by a series of rough-hewn stone planters containing formal plantings of dogwoods. These planters break the plane of the retaining wall and extend to the ground, alluding to the substantial bedrock deposits that underlie much of the site. Stepped down from this plane is the fire pit terrace, nestled into the rocky structure of the site and offering views towards a vernal pond.
Scott Carman
19