
Search results for "Determination" in Home Design Ideas


 TKS Design Group
Download our free ebook, Creating the Ideal Kitchen. DOWNLOAD NOW
The homeowner and his wife had lived in this beautiful townhome in Oak Brook overlooking a small lake for over 13 years. The home is open and airy with vaulted ceilings and full of mementos from world adventures through the years, including to Cambodia, home of their much-adored sponsored daughter. The home, full of love and memories was host to a growing extended family of children and grandchildren. This was THE place. When the homeowner’s wife passed away suddenly and unexpectedly, he became determined to create a space that would continue to welcome and host his family and the many wonderful family memories that lay ahead but with an eye towards functionality.
We started out by evaluating how the space would be used. Cooking and watching sports were key factors. So, we shuffled the current dining table into a rarely used living room whereby enlarging the kitchen. The kitchen now houses two large islands – one for prep and the other for seating and buffet space. We removed the wall between kitchen and family room to encourage interaction during family gatherings and of course a clear view to the game on TV. We also removed a dropped ceiling in the kitchen, and wow, what a difference.
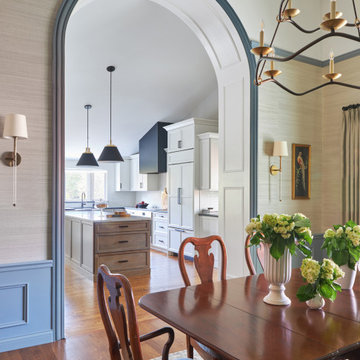
Next, we added some drama with a large arch between kitchen and dining room creating a stunning architectural feature between those two spaces. This arch echoes the shape of the large arch at the front door of the townhome, providing drama and significance to the space. The kitchen itself is large but does not have much wall space, which is a common challenge when removing walls. We added a bit more by resizing the double French doors to a balcony at the side of the house which is now just a single door. This gave more breathing room to the range wall and large stone hood but still provides access and light.
We chose a neutral pallet of black, white, and white oak, with punches of blue at the counter stools in the kitchen. The cabinetry features a white shaker door at the perimeter for a crisp outline. Countertops and custom hood are black Caesarstone, and the islands are a soft white oak adding contrast and warmth. Two large built ins between the kitchen and dining room function as pantry space as well as area to display flowers or seasonal decorations.
We repeated the blue in the dining room where we added a fresh coat of paint to the existing built ins, along with painted wainscot paneling. Above the wainscot is a neutral grass cloth wallpaper which provides a lovely backdrop for a wall of important mementos and artifacts. The dining room table and chairs were refinished and re-upholstered, and a new rug and window treatments complete the space. The room now feels ready to host more formal gatherings or can function as a quiet spot to enjoy a cup of morning coffee.

 Affordable Chic
Mid-sized trendy master multicolored tile and porcelain tile porcelain tile alcove bathtub photo in Minneapolis with shaker cabinets, white cabinets, a two-piece toilet, beige walls, an undermount sink and quartz countertops
Find the right local pro for your project

 Paradise Found Construction
As the “nest” began to empty and her available time to maintain the home lessened, Ursula realized that it was time to sell.
The 1996 home still had the original kitchen and baths, and was in need of general repair and new flooring. The HVAC system, water heater, and washer and dryer had been replaced as they aged, but the kitchen appliances, exterior, windows, and roof needed replacing. Jeff wanted to repair and update the home with quality materials and workmanship so that it would provide the most value to the new owners and sell as quickly as possible, so we got to work determining what the best use of the budget would be to accomplish this goal.
We focused on updating the major interior design elements that would provide the most enjoyment, durability, and energy efficiency for the new homeowners as well as meticulously replaced worn exterior components with tasteful color palette selections.
We repaired and refinished all of the kitchen cabinets and added granite counter tops and a stainless steel sink. All of the Kitchen appliances were replaced with new energy efficient stainless models.
All bathroom cabinetry was repaired and refinished, all of the faucets and shower trims were replaced, and all of the toilets with EPA WaterSense rated low-flow toilets. The master bathroom shower glass was replaced with updated semi-frameless glass.
All of the hardwood flooring was refinished as well as general repair on the walls and new paint throughout.
The end result was bright, open, and comfortable updated home ready for its new occupants.
Design Features
Durable and nicely renovated cabinetry.
Granite Kitchen counter tops.
Stainless Kitchen appliances.
Stainless Kitchen sink and brushed nickel faucets.
Brushed Nickel cabinetry and door hardware.
Low-flow EPA WaterSense rated toilets.
Refinished natural oak hardwood flooring.
New carpet.
New architectural roof shingles.
Replaced window sashes.
Complete exterior repair and painting.
Light and bright No-VOC paints and finishes.
Energy Efficient and Green Features
Energy efficient EPA Energy Star appliances.
EPA WaterSense rated low-flow toilets.
Durable No-VOC cabinetry.
Low-flow faucets.
Energy efficient LED lighting throughout.
No-VOC paints and finishes.
 Story Homes
A few years ago, the owners added two stories with finished basement to their Edina home. It was a big project that greatly expanded and enhanced the first-floor kitchen, dining room and living room. The project also added a second-floor bedroom/home office.
Their home has another two bedrooms and ¾ bath on the first floor, plus a beautiful master bedroom and ¾ bath on the second floor which they’ve been using for years.
Looking into the future they began to consider aging in place: What living on one floor might look like. They determined that the only thing that needed attention was the first-floor bath – it was pretty dated. So, they built their dream bath. They began with tearing everything out, right down to the studs.
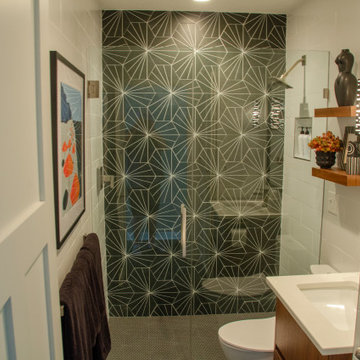
The new 5’ X 9’ ¾ bath includes a 5’ X 3’ walk-in glass enclosed shower, with a twist. The shower control has been moved from the typical location (just below the shower head) to the opposite wall, just inside the shower door. This allows one to turn on the shower and wait for it to get hot without having to step into the shower and then just stand there and get wet with cold water. A small detail that has proven to be a good idea.
The shower floor is made using 3/4" x 3/4" Penny round matte Porcelain mosaic tile set in charcoal grout. The back shower wall and the remaining bathroom floor is constructed with Aster 9" x 10" hexagon glazed Porcelain patterned wall & floor tile. Hexagonal tile adds an unusual feature that establishes a unique, interesting, repeated design.
The main bath’s walls feature white matt finish 6" x 18" ceramic Subway Wall tile in white grout.
A TOTO center flushing toilet looks great on the dark hexagonal floor tile.
The custom vanity features a walnut base with white Silestone top and undermounted Kohler sink with brushed nickel fixtures.
Another interesting feature are two 3” X 6” X 18” floating Walnut shelves – just the right touch to add character to the bath without taking up too much space.
Finally, the dimmable can lighting is enhanced with two black cylinder slotted pendant lights on either side of the vanity.
This project fulfills the promise of down-the-road one floor living with an efficient, comfortable ¾ bath.
 Story Homes
A few years ago, the owners added two stories with finished basement to their Edina home. It was a big project that greatly expanded and enhanced the first-floor kitchen, dining room and living room. The project also added a second-floor bedroom/home office.
Their home has another two bedrooms and ¾ bath on the first floor, plus a beautiful master bedroom and ¾ bath on the second floor which they’ve been using for years.
Looking into the future they began to consider aging in place: What living on one floor might look like. They determined that the only thing that needed attention was the first-floor bath – it was pretty dated. So, they built their dream bath. They began with tearing everything out, right down to the studs.
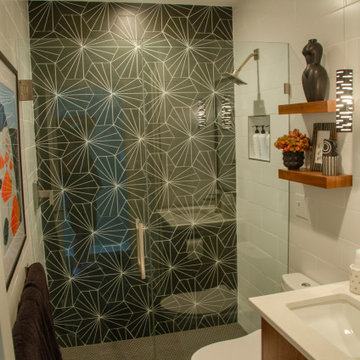
The new 5’ X 9’ ¾ bath includes a 5’ X 3’ walk-in glass enclosed shower, with a twist. The shower control has been moved from the typical location (just below the shower head) to the opposite wall, just inside the shower door. This allows one to turn on the shower and wait for it to get hot without having to step into the shower and then just stand there and get wet with cold water. A small detail that has proven to be a good idea.
The shower floor is made using 3/4" x 3/4" Penny round matte Porcelain mosaic tile set in charcoal grout. The back shower wall and the remaining bathroom floor is constructed with Aster 9" x 10" hexagon glazed Porcelain patterned wall & floor tile. Hexagonal tile adds an unusual feature that establishes a unique, interesting, repeated design.
The main bath’s walls feature white matt finish 6" x 18" ceramic Subway Wall tile in white grout.
A TOTO center flushing toilet looks great on the dark hexagonal floor tile.
The custom vanity features a walnut base with white Silestone top and undermounted Kohler sink with brushed nickel fixtures.
Another interesting feature are two 3” X 6” X 18” floating Walnut shelves – just the right touch to add character to the bath without taking up too much space.
Finally, the dimmable can lighting is enhanced with two black cylinder slotted pendant lights on either side of the vanity.
This project fulfills the promise of down-the-road one floor living with an efficient, comfortable ¾ bath.
 Novu Designs
Our goal is to make your kitchen remodel as comfortable as possible. After establishing rapport with our client, we used our ingenuity to redesign and build their ideal kitchen in this stunning 10-foot-ceiling Brooklyn home. The warm tones of wood, quartz, and rich greens strike the ideal balance in creating this appealing design.
How did we achieve this look?
The Backsplash
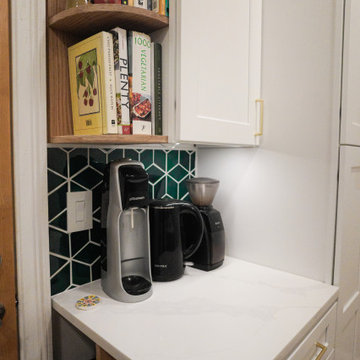
Our client wanted a simple kitchen remodel in the shaker design, but she also wanted to include green. Initially, we proposed green cabinets to create a bold green look in the kitchen. The main objective was to incorporate our complimenting colors while keeping a feeling of lightness. After going through a number of ideas and 3D prototypes, installing as many cabinets as we could without overpowering the kitchen was our goal of optimizing space. We determined that the best way to brighten the space would be to install white shaker cabinets in addition to higher lumen recessed LED lighting. We decided that finding exquisite green backsplash tiles would be the best way to give it the desired green pop. After numerous searches, we came across a company called Mercury Mosaics.
While there were many green backsplash tiles to choose from, we opted for the mercury mosaics bluegrass diamond tiles. We loved these tiles because its created an illusion of cubes but at times, diamonds. The pattern is an art of illusion and its really gave us the personality we were looking for.
The Flooring of Choice
The flooring of choice was made by our client. We wanted the floors to feel soft and natural while capturing every bit of warmth to balance the whites and the greens and bring them together. While we could’ve opted for wood look tiles or luxury vinyl plank flooring, we ended up going with a premium slightly distressed white oak engineered hardwood flooring from Floor and Decor.
Accents
Although the flooring and the backsplash brought most of the kitchen together, we were still missing the cherry on top. The hardware and maybe something else?
We decided on thin profiled brushed brass hardware to give us that luxurious feel we were looking for every time we opened the cabinet. The cherry on top for us were the hand made quarter round oak shelves which really tied in the floors and cabinets together and gave us that final pop we were looking for. It truly added the perfect character for our client who is also a teen-fiction author of multiple books.
 Paradise Found Construction
As the “nest” began to empty and her available time to maintain the home lessened, Ursula realized that it was time to sell.
The 1996 home still had the original kitchen and baths, and was in need of general repair and new flooring. The HVAC system, water heater, and washer and dryer had been replaced as they aged, but the kitchen appliances, exterior, windows, and roof needed replacing. Jeff wanted to repair and update the home with quality materials and workmanship so that it would provide the most value to the new owners and sell as quickly as possible, so we got to work determining what the best use of the budget would be to accomplish this goal.
We focused on updating the major interior design elements that would provide the most enjoyment, durability, and energy efficiency for the new homeowners as well as meticulously replaced worn exterior components with tasteful color palette selections.
We repaired and refinished all of the kitchen cabinets and added granite counter tops and a stainless steel sink. All of the Kitchen appliances were replaced with new energy efficient stainless models.
All bathroom cabinetry was repaired and refinished, all of the faucets and shower trims were replaced, and all of the toilets with EPA WaterSense rated low-flow toilets. The master bathroom shower glass was replaced with updated semi-frameless glass.
All of the hardwood flooring was refinished as well as general repair on the walls and new paint throughout.
The end result was bright, open, and comfortable updated home ready for its new occupants.
Design Features
Durable and nicely renovated cabinetry.
Granite Kitchen counter tops.
Stainless Kitchen appliances.
Stainless Kitchen sink and brushed nickel faucets.
Brushed Nickel cabinetry and door hardware.
Low-flow EPA WaterSense rated toilets.
Refinished natural oak hardwood flooring.
New carpet.
New architectural roof shingles.
Replaced window sashes.
Complete exterior repair and painting.
Light and bright No-VOC paints and finishes.
Energy Efficient and Green Features
Energy efficient EPA Energy Star appliances.
EPA WaterSense rated low-flow toilets.
Durable No-VOC cabinetry.
Low-flow faucets.
Energy efficient LED lighting throughout.
No-VOC paints and finishes.
 Story Homes
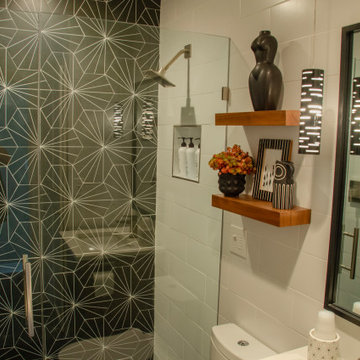
A few years ago, the owners added two stories with finished basement to their Edina home. It was a big project that greatly expanded and enhanced the first-floor kitchen, dining room and living room. The project also added a second-floor bedroom/home office.
Their home has another two bedrooms and ¾ bath on the first floor, plus a beautiful master bedroom and ¾ bath on the second floor which they’ve been using for years.
Looking into the future they began to consider aging in place: What living on one floor might look like. They determined that the only thing that needed attention was the first-floor bath – it was pretty dated. So, they built their dream bath. They began with tearing everything out, right down to the studs.
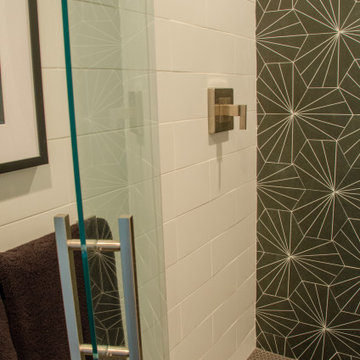
The new 5’ X 9’ ¾ bath includes a 5’ X 3’ walk-in glass enclosed shower, with a twist. The shower control has been moved from the typical location (just below the shower head) to the opposite wall, just inside the shower door. This allows one to turn on the shower and wait for it to get hot without having to step into the shower and then just stand there and get wet with cold water. A small detail that has proven to be a good idea.
The shower floor is made using 3/4" x 3/4" Penny round matte Porcelain mosaic tile set in charcoal grout. The back shower wall and the remaining bathroom floor is constructed with Aster 9" x 10" hexagon glazed Porcelain patterned wall & floor tile. Hexagonal tile adds an unusual feature that establishes a unique, interesting, repeated design.
The main bath’s walls feature white matt finish 6" x 18" ceramic Subway Wall tile in white grout.
A TOTO center flushing toilet looks great on the dark hexagonal floor tile.
The custom vanity features a walnut base with white Silestone top and undermounted Kohler sink with brushed nickel fixtures.
Another interesting feature are two 3” X 6” X 18” floating Walnut shelves – just the right touch to add character to the bath without taking up too much space.
Finally, the dimmable can lighting is enhanced with two black cylinder slotted pendant lights on either side of the vanity.
This project fulfills the promise of down-the-road one floor living with an efficient, comfortable ¾ bath.
 Story Homes
A few years ago, the owners added two stories with finished basement to their Edina home. It was a big project that greatly expanded and enhanced the first-floor kitchen, dining room and living room. The project also added a second-floor bedroom/home office.
Their home has another two bedrooms and ¾ bath on the first floor, plus a beautiful master bedroom and ¾ bath on the second floor which they’ve been using for years.
Looking into the future they began to consider aging in place: What living on one floor might look like. They determined that the only thing that needed attention was the first-floor bath – it was pretty dated. So, they built their dream bath. They began with tearing everything out, right down to the studs.
The new 5’ X 9’ ¾ bath includes a 5’ X 3’ walk-in glass enclosed shower, with a twist. The shower control has been moved from the typical location (just below the shower head) to the opposite wall, just inside the shower door. This allows one to turn on the shower and wait for it to get hot without having to step into the shower and then just stand there and get wet with cold water. A small detail that has proven to be a good idea.
The shower floor is made using 3/4" x 3/4" Penny round matte Porcelain mosaic tile set in charcoal grout. The back shower wall and the remaining bathroom floor is constructed with Aster 9" x 10" hexagon glazed Porcelain patterned wall & floor tile. Hexagonal tile adds an unusual feature that establishes a unique, interesting, repeated design.
The main bath’s walls feature white matt finish 6" x 18" ceramic Subway Wall tile in white grout.
A TOTO center flushing toilet looks great on the dark hexagonal floor tile.
The custom vanity features a walnut base with white Silestone top and undermounted Kohler sink with brushed nickel fixtures.
Another interesting feature are two 3” X 6” X 18” floating Walnut shelves – just the right touch to add character to the bath without taking up too much space.
Finally, the dimmable can lighting is enhanced with two black cylinder slotted pendant lights on either side of the vanity.
This project fulfills the promise of down-the-road one floor living with an efficient, comfortable ¾ bath.
 Novu Designs
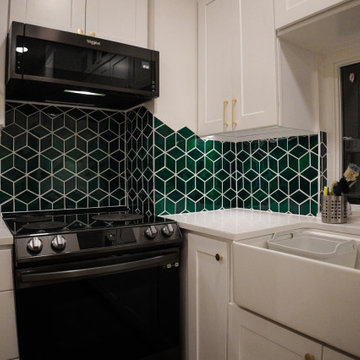
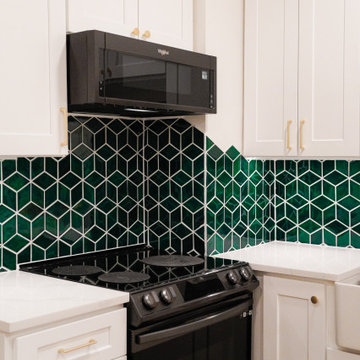
Our goal is to make your kitchen remodel as comfortable as possible. After establishing rapport with our client, we used our ingenuity to redesign and build their ideal kitchen in this stunning 10-foot-ceiling Brooklyn home. The warm tones of wood, quartz, and rich greens strike the ideal balance in creating this appealing design.
How did we achieve this look?
The Backsplash
Our client wanted a simple kitchen remodel in the shaker design, but she also wanted to include green. Initially, we proposed green cabinets to create a bold green look in the kitchen. The main objective was to incorporate our complimenting colors while keeping a feeling of lightness. After going through a number of ideas and 3D prototypes, installing as many cabinets as we could without overpowering the kitchen was our goal of optimizing space. We determined that the best way to brighten the space would be to install white shaker cabinets in addition to higher lumen recessed LED lighting. We decided that finding exquisite green backsplash tiles would be the best way to give it the desired green pop. After numerous searches, we came across a company called Mercury Mosaics.
While there were many green backsplash tiles to choose from, we opted for the mercury mosaics bluegrass diamond tiles. We loved these tiles because its created an illusion of cubes but at times, diamonds. The pattern is an art of illusion and its really gave us the personality we were looking for.
The Flooring of Choice
The flooring of choice was made by our client. We wanted the floors to feel soft and natural while capturing every bit of warmth to balance the whites and the greens and bring them together. While we could’ve opted for wood look tiles or luxury vinyl plank flooring, we ended up going with a premium slightly distressed white oak engineered hardwood flooring from Floor and Decor.
Accents
Although the flooring and the backsplash brought most of the kitchen together, we were still missing the cherry on top. The hardware and maybe something else?
We decided on thin profiled brushed brass hardware to give us that luxurious feel we were looking for every time we opened the cabinet. The cherry on top for us were the hand made quarter round oak shelves which really tied in the floors and cabinets together and gave us that final pop we were looking for. It truly added the perfect character for our client who is also a teen-fiction author of multiple books.
 Novu Designs
Our goal is to make your kitchen remodel as comfortable as possible. After establishing rapport with our client, we used our ingenuity to redesign and build their ideal kitchen in this stunning 10-foot-ceiling Brooklyn home. The warm tones of wood, quartz, and rich greens strike the ideal balance in creating this appealing design.
How did we achieve this look?
The Backsplash
Our client wanted a simple kitchen remodel in the shaker design, but she also wanted to include green. Initially, we proposed green cabinets to create a bold green look in the kitchen. The main objective was to incorporate our complimenting colors while keeping a feeling of lightness. After going through a number of ideas and 3D prototypes, installing as many cabinets as we could without overpowering the kitchen was our goal of optimizing space. We determined that the best way to brighten the space would be to install white shaker cabinets in addition to higher lumen recessed LED lighting. We decided that finding exquisite green backsplash tiles would be the best way to give it the desired green pop. After numerous searches, we came across a company called Mercury Mosaics.
While there were many green backsplash tiles to choose from, we opted for the mercury mosaics bluegrass diamond tiles. We loved these tiles because its created an illusion of cubes but at times, diamonds. The pattern is an art of illusion and its really gave us the personality we were looking for.
The Flooring of Choice
The flooring of choice was made by our client. We wanted the floors to feel soft and natural while capturing every bit of warmth to balance the whites and the greens and bring them together. While we could’ve opted for wood look tiles or luxury vinyl plank flooring, we ended up going with a premium slightly distressed white oak engineered hardwood flooring from Floor and Decor.
Accents
Although the flooring and the backsplash brought most of the kitchen together, we were still missing the cherry on top. The hardware and maybe something else?
We decided on thin profiled brushed brass hardware to give us that luxurious feel we were looking for every time we opened the cabinet. The cherry on top for us were the hand made quarter round oak shelves which really tied in the floors and cabinets together and gave us that final pop we were looking for. It truly added the perfect character for our client who is also a teen-fiction author of multiple books.
 New Generation Wallcovering Inc.
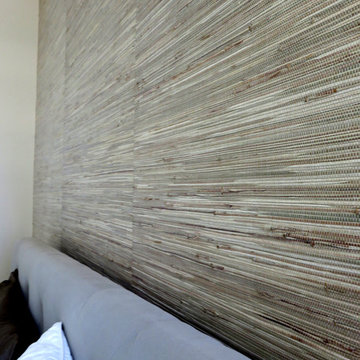
This grass cloth by York Wallcoverings is beautiful to look at. Installed as an accent wall, it adds flair to this bedroom. To create an even look, we trimmed the panels down to 29" wide from the standard 36".

 Vintage Cellars & Saunas
This gorgeous contemporary glass front custom wine cellar in Corona Del Mar, Newport Beach, California is an eye catcher. The sleek, glass ultra modern wine room was a unique and exciting project for our team here at Vintage Cellars. The stone bar extends into the wine cellar itself, but due to mechanical, cooling, and condensation concerns, our expert custom wine cellar team knew that extra measures needed to be taken to ensure the end quality remained top notch.
The bar itself was divided into two sections, one cut section outside to make up the main seating area and the other inside the glass wine room. The stone bar, which is porous, takes up a good portion of the front facing glass panel. Had the bar simply extended into the wine cellar and been sealed off at the joints, the stone would have eventually transferred in enough heat and moisture to cause condensation. Proper wine cellar design and planning enabled this wine cellar to not only look fantastic, but function perfectly as well.
One interesting unique feature in this Corona Del Mar, Newport Beach, Orange County, California glass and metal wine cellar is an extension of floor to ceiling frames mounted to the backside of the stone bar. This feature was made to seamlessly show consistency in floor to ceiling vintageview frames throughout.
Corona Del Mar, Newport Beach, Laguna Beach, Huntington Beach, Newport Coast, Ladera Ranch, Coto De Caza, Laguna Hills, San Clemente, Dana Point, Seal Beach, Laguna Niguel still remain the areas in Orange County that we build wine cellars most often.
Contemporary wine cellars such as this are becoming more and more popular in modern design trends. Interior Design, Architecture, and Construction all play a part in ensuring that the client’s vision comes to reality. This project was no different. Working closely with David Close Homes, Vintage Cellars was able to meet with the client and team involved, determine the ultimate wine cellar wine room wine closet goals, and see them to the finish.
Upon walking into this glass and metal modern contemporary wine cellar, you become quickly surrounded with triple deep bottles from many of the world’s best wineries. On the left below the countertop is a black stained poplar wine racking system for single 750ml bottles. Above lies room for display case storage, room for large format bottles, and label forward vintageview design racking to the ceiling. On the middle wall of this wine room is room for case storage below, similarly with triple deep vintageview floor to ceiling frames dying into more case storage above. On the right side of this wall lies a vertical space for single large format case storage.
Ultra Modern wine cellars such as this are all the rage in contemporary homes in San Diego, Orange County, and Los Angeles. This glass enclosed wine cellar with a sleek modern contemporary racking system is truly a showpiece in this home in Corona Del Mar, Newport Beach, California. Wine Racking, Wine Cellar Cooling, Wine Cellar design, Wine Cellar Build out and Wine Cellar Installation is what Vintage Cellars does best. Timeless Luxury.

 Paula McDonald Design Build & Interiors
Located in Manhattan’s Upper East Side, this outdated yet expansive NYC apartment with incredible views was an exceptional joy to renovate. With all of the additional space available, we were able to create a large, open, sun filled living area and open kitchen.


 The Fabricsmith
The kitchen has stationary rod pocket panels on metal rod to frame the large windows and french doors.
Note how the large roman is 3 separate romans under one long valance. There is a 3" gap between the bulkhead on left and the window frame. Metal rod is mounted just below bulkhead and the rod pocket panel follows the line down from the bulkhead. Design by Brittany Bowser from South Eastern Galleries in Charleston, SC
 User
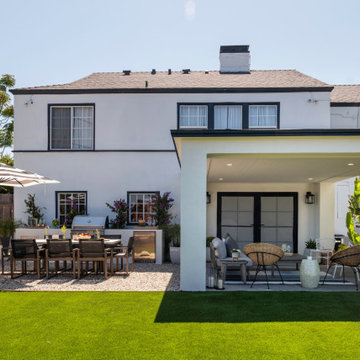
All Weather teamed up with the Property Brothers and actress and comedian Ali Wong on this week’s episode of HGTV’s hit show Celebrity IOU. In the Ali Wong’s Renovation Surprise for A Dear Friend episode, Ali takes sledgehammers and crowbars into her own hands to help transform her best friend, Citadelle’s barren basement and backyard into the perfect indoor-outdoor entertaining space.
Ali credits much of her early success to her best friend, Citadelle, whose tireless support helped her when she first started out in Los Angeles. “I really wouldn’t be where I am if it wasn’t for her,” noted Ali. Citadelle opened up space in her home for Ali while she went on auditions. So years later, Ali knew it was time to give back in a big way. “Her friendship has been such a gift” said Ali. “I was supposed to stay there for two weeks and it ended up being a year.”
With the help of Drew and Jonathan Scott, Ali was determined to update the entire lower level of Citadelle’s home inside and out and making these spaces as entertainment-friendly as possible for the whole family, including Citadelle’s husband and kids, to enjoy. The multipurpose downstairs basement makeover included turning the family room into a classy lounge with a built in bar, removing the basic stand up shower and replacing it with a luxurious spa tub with stone tiles and converting the guest bedroom into “an office by day and bedroom by night” courtesy of a hidden pull down Murphy bed.
All Weather Series 7000 French Swing Doors extend and connect the indoor lounge area to the new outdoor living spaces. The ultimate backyard includes a stylish fireplace, white pergola, outdoor seating and dining area, an outdoor kitchen/grill and new turf for the yard and play structure areas. THE PROPERTY BROTHERS also painted the entire house white with black trim, leveled the backyard and basically doubled the livable square footage of the home. Check out the PROJECT PHOTOS here.
Now in its third season, Celebrity IOU gives celebrities a chance to show their deepest gratitude and to surprise someone who is important in their life by giving their living space a complete transformation, courtesy of the Drew and Jonathan Scott.
 Novu Designs
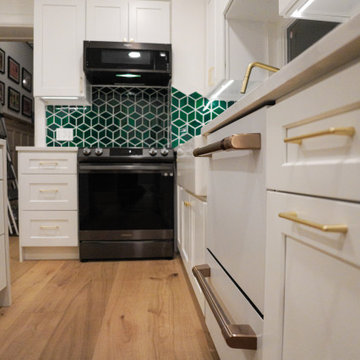
Our goal is to make your kitchen remodel as comfortable as possible. After establishing rapport with our client, we used our ingenuity to redesign and build their ideal kitchen in this stunning 10-foot-ceiling Brooklyn home. The warm tones of wood, quartz, and rich greens strike the ideal balance in creating this appealing design.
How did we achieve this look?
The Backsplash
Our client wanted a simple kitchen remodel in the shaker design, but she also wanted to include green. Initially, we proposed green cabinets to create a bold green look in the kitchen. The main objective was to incorporate our complimenting colors while keeping a feeling of lightness. After going through a number of ideas and 3D prototypes, installing as many cabinets as we could without overpowering the kitchen was our goal of optimizing space. We determined that the best way to brighten the space would be to install white shaker cabinets in addition to higher lumen recessed LED lighting. We decided that finding exquisite green backsplash tiles would be the best way to give it the desired green pop. After numerous searches, we came across a company called Mercury Mosaics.
While there were many green backsplash tiles to choose from, we opted for the mercury mosaics bluegrass diamond tiles. We loved these tiles because its created an illusion of cubes but at times, diamonds. The pattern is an art of illusion and its really gave us the personality we were looking for.
The Flooring of Choice
The flooring of choice was made by our client. We wanted the floors to feel soft and natural while capturing every bit of warmth to balance the whites and the greens and bring them together. While we could’ve opted for wood look tiles or luxury vinyl plank flooring, we ended up going with a premium slightly distressed white oak engineered hardwood flooring from Floor and Decor.
Accents
Although the flooring and the backsplash brought most of the kitchen together, we were still missing the cherry on top. The hardware and maybe something else?
We decided on thin profiled brushed brass hardware to give us that luxurious feel we were looking for every time we opened the cabinet. The cherry on top for us were the hand made quarter round oak shelves which really tied in the floors and cabinets together and gave us that final pop we were looking for. It truly added the perfect character for our client who is also a teen-fiction author of multiple books.
 Novu Designs
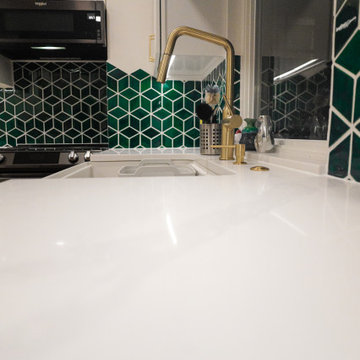
Our goal is to make your kitchen remodel as comfortable as possible. After establishing rapport with our client, we used our ingenuity to redesign and build their ideal kitchen in this stunning 10-foot-ceiling Brooklyn home. The warm tones of wood, quartz, and rich greens strike the ideal balance in creating this appealing design.
How did we achieve this look?
The Backsplash
Our client wanted a simple kitchen remodel in the shaker design, but she also wanted to include green. Initially, we proposed green cabinets to create a bold green look in the kitchen. The main objective was to incorporate our complimenting colors while keeping a feeling of lightness. After going through a number of ideas and 3D prototypes, installing as many cabinets as we could without overpowering the kitchen was our goal of optimizing space. We determined that the best way to brighten the space would be to install white shaker cabinets in addition to higher lumen recessed LED lighting. We decided that finding exquisite green backsplash tiles would be the best way to give it the desired green pop. After numerous searches, we came across a company called Mercury Mosaics.
While there were many green backsplash tiles to choose from, we opted for the mercury mosaics bluegrass diamond tiles. We loved these tiles because its created an illusion of cubes but at times, diamonds. The pattern is an art of illusion and its really gave us the personality we were looking for.
The Flooring of Choice
The flooring of choice was made by our client. We wanted the floors to feel soft and natural while capturing every bit of warmth to balance the whites and the greens and bring them together. While we could’ve opted for wood look tiles or luxury vinyl plank flooring, we ended up going with a premium slightly distressed white oak engineered hardwood flooring from Floor and Decor.
Accents
Although the flooring and the backsplash brought most of the kitchen together, we were still missing the cherry on top. The hardware and maybe something else?
We decided on thin profiled brushed brass hardware to give us that luxurious feel we were looking for every time we opened the cabinet. The cherry on top for us were the hand made quarter round oak shelves which really tied in the floors and cabinets together and gave us that final pop we were looking for. It truly added the perfect character for our client who is also a teen-fiction author of multiple books.
177