
Search results for "Difficult experience" in Home Design Ideas
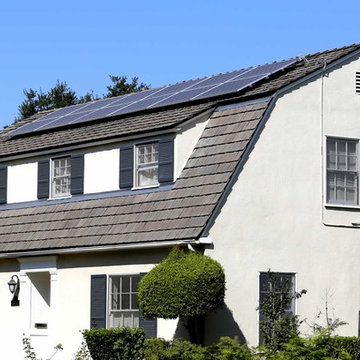
 JNA Solar
Panel Type: SolarWorld SunModule Plus 275W Mono
“My husband and I would like to share our experience with Zeev Zanzuri from JNA Solar Solutions. Zeev was referred to us by a friend who recommended him highly. At this point, we had already signed a contract with another solar company and were feeling very frustrated and disappointed.
Zeev was very patient and understanding as we had many questions and concerns. We live in the city of San Marino, in the San Gabriel Valley, a city well known for being extremely difficult for contractors to get permits approved. The previous solar company misrepresented their prior experience with the city of San Marino and were unable to get our permits approved. This resulted in unnecessary delays and aggravation.
Whatever Zeev promised, he delivered. He got the approvals from the city, explained our energy savings in detail and provided consistently great customer service. He was always responsive to our calls and followed up with us after the job was done to see if we had any problems.
We are thrilled with our solar system and wouldn’t hesitate to recommend Zeev Zanzuri and JNA Solar Solutions to friends, family, and neighbors.”
San Marino, CA.

 Atlas Roofing - Shingles
DARIS BROWN, WRITER
If you think choosing the right shingle color is hard, you are not alone. With an endless array of colors to choose from, getting started can be difficult. But don't worry – we’ve got a great system to help you pick the perfect shingle color. If you are ready to look at shingles in a way you probably never have before, our three-step process can help you choose the color that works best for your home.
Choosing By Style
Before you can start flipping through a collection of earth-tone samples, you need to determine which shingle style best fits your home — and your price range. You don’t want to waste time falling in love with a beautiful shade of brown (let’s say hickory) if it’s not available in a style you like.
Most homeowners are not aware that shingles come in different styles, including three-tab, architectural and slate-look.
Three-Tab: These shingles have a traditional, flatter look and are considered the most affordable. They also are available in a wide range of colors.
Slate: These asphalt shingles, as the name reveals, are meant to mimic the look of slate but offer the easy care and affordability of asphalt. They come in a variety of colors.
Architectural: Also known as laminated or dimensional shingles, architectural shingles are manufactured with aesthetic appeal in mind. Layered to resemble wood shake, they are thicker and provide a more dimensional, interesting look than traditional three-tab shingles.
Choosing By Features
By comparing the available features, you can systematically narrow down your options to determine the best shingle available. Here are a few features to consider:
Class 4 Impact Resistance – Do you live in an area of the country that experiences regular hailstorms? Class 4 impact resistant shingles deliver superior impact resistance to help protect your home during hail season.
Algae Resistance – How humid is your region? Do you see roofs all around you with black streaks? Shingles manufactured with Scotchgard Protector help resist those ugly black streaks caused by algae.
High Wind Rating – Do you get nervous anytime a strong wind blows? Shingles with high wind resistance, up to 130 mph wind speed coverage, are designed to stay put – and look good in the process.
Comprehensive Warranty Protection – Do you want to feel secure with your investment? For maximum protection and warranty coverage, have a full roof system installed and receive an enhanced Premium Protection Period for total peace of mind.
Extensive Color Palette – Are you tired of plain black shingles? Get ready for an explosion of color, as there are many different options available. Woodland Green, Desert Shake, Burnt Sienna and Pristine Oyster are a few of the many great colors you can explore.
Choosing By Color
By choosing shingle style and features first, you can significantly narrow your list of colors. Now go through your shortened list and pick the best color for your home. You could match the shingle color to your shutters or door. If you want to enhance your home, lighter-colored shingles can help make it look bigger. Finally, opposites attract. If you have a light-colored home, you can go with a dark roof, and vice-versa for a dark-colored home. The contrast will help your entire home pop. Don’t be afraid to spread out your sample boards and make a side-by-side comparison to help with your selection process. Likewise, don't hesitate to lean on the advice of your roofer. Years of experience and thousands of homes roofed make them a valuable resource for homeowners trying to choose the best shingle color.
Choosing By Heart
While many homeowners will go straight to color, taking a methodical approach often provides better results. Take a step back. Decide what style you truly like and what features are available, and the best color for your home will fall right into your lap. Visit AtlasRoofing.com for a quick start to your shingle selection process. Atlas offers a broad range of beautiful designer colors and styles, which makes it easy to find an exceptional shingle to boost your home’s curb appeal.
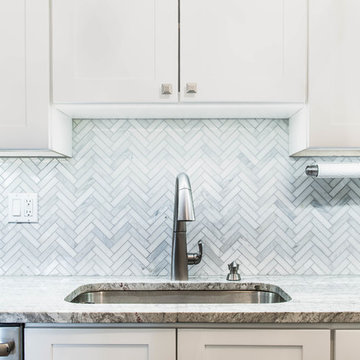
 RAJ Kitchen and Bath, LLC
 “Full apartment design”.
IF you have not yet seen this apartment conversion before, we strongly urge you to go to the bottom left of this page and click on the short 2-minutes video. It would put a lot of things into perspective when you come back and continue reading this.
It is true we were literally handed the keys and told a list of things that they wanted to have happen and we were to go into the apartment, look at the space and come up with a design that would satisfy all of that need. UNTIL we showed up! The unit had really seen some better days but we knew we had to look past that and come up with a concept that would work for them.
The immediate challenges were centered around 3 big ideas:
1. Adding a second bedroom to the already small footprint
2. Figuring out a way to make the kitchen bigger, better and brighter
3. Creating a master room walk in closet
It’s always difficult to add new rooms into existing footprint without expanding out or up and not incurring any opportunity cost. In this case, that was exactly what we had to do. Item one and two above had to be tackled as one. We went ahead and switched out the location of the dining room and eliminating an area where there was a “nook” type eat-in area. By doing so, we were able to cut right into that footprint and change the layout of the kitchen.
That one move allowed us to dig into the kitchen design because it was now the main focal point in the apartment. It was no longer an option to keep it in that tiny hole where it was, so we had to ensure that this design was functional and aesthetically pleasing at the same time. By adding the table into the space where an Island typically would go, we were able to both cut cost and still provide a dining experience. The Table serves as an Island as well when cooking.
We then proceeded to block in the existing doorway to the dining room. By doing this, we were able to create a full room which allowed us to put a door on the other side and called that room Bedroom #2. This was easier to do because all of the mechanicals were already in that space (light, heater and windows). By shifting things around, we also achieved a huge wall to wall closet from inside. PERFECT!
Then we moved into the Single bedroom. We thought it was a big room with a small closet, so by creatively adding an L shaped wall and steal some footprint into the bedroom side, we were able to put a door on that new room and design it for the walk-in closet. Even after this, the bedroom still holds a queen size bed with 2 night stands, a TV on the wall, a sitting chair and plenty of room to walk around. This was done by rethinking the location for the bed and night stands.
The bathroom was gutted to make sure there was no leaks and rebuild from the ground up. We kept all of the plumbing where it was, added a new vanity, medicine cabinet, tiles and lighting and it was done.
From there, the rest of the unit had new flooring all throughout, paint, and lighting. After completion and walk through, this project was handed over back to the clients.
Execution and collaboration between all the trades were: Reggie and his team from Premier Interiors and Rohan from RD Mechanical Services.
p.s. Please see our website to see the video.
Find the right local pro for your project
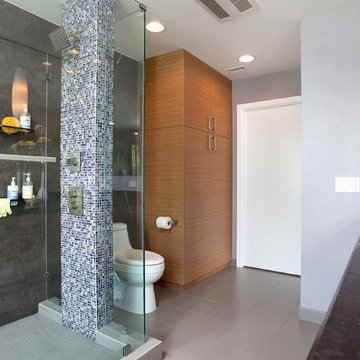
 Jackson Design & Remodeling
Jackson Design and Remodeling
Inspiration for a contemporary bathroom remodel in San Diego
Inspiration for a contemporary bathroom remodel in San Diego
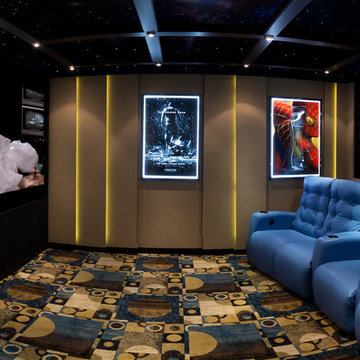
 Abinader Home Theaters, Inc.
Room Size: 13.9′ x 13.9′
This small, square room proves we can create a home theater in any space. The client was afraid the room was too small for a true home theater experience. Normally, it is very difficult to achieve a good viewing experience when the screen is a short distance from the seating. The small, square room also posed an incredible acoustical challenge. However, we converted the bedroom and bathroom into a full theater with viewing room and movie munchies area behind tie-back drapes.
 Barron Designs
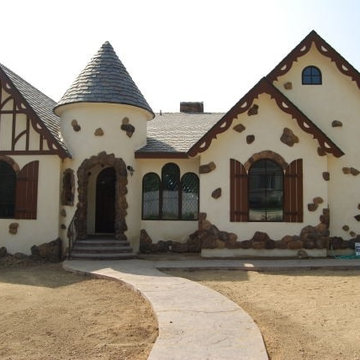
Faux wood planks mean that this Tudor owner won't have to replace the wood trim every few years like those using real wood on their exterior have to do.
Our client said, "I am pretty proud of this since I did most of it myself. I am a 58-year old woman and I never had any experience with carpentry but I have been a hobby seamstress. For this house project I made up some paper patterns and put the patterns on the wood so I would know where to cut and how to put it together. The lace cut fascia board you see, I cut out myself with a jigsaw and router, after my husband showed me how to hold the tools. Never touched them before in my life.
I also designed and cut the Tudor trim you see on the left side of the house. I also cut and put together the shutters you see flanking the windows. All a very fun project and not that difficult. My husband helped me put up the fascia board and the Tudor trim but I managed the shutters myself. I think it turned out pretty cute. No one can tell it isn't wood."
 The Tiny Project
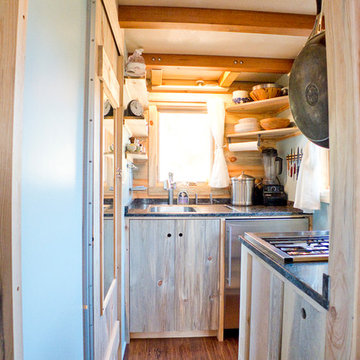
Alek Lisefski / tiny-project.com
Inspiration for a contemporary kitchen remodel in San Francisco
Inspiration for a contemporary kitchen remodel in San Francisco
 RAJ Kitchen and Bath, LLC
 “Full apartment design”.
IF you have not yet seen this apartment conversion before, we strongly urge you to go to the bottom left of this page and click on the short 2-minutes video. It would put a lot of things into perspective when you come back and continue reading this.
It is true we were literally handed the keys and told a list of things that they wanted to have happen and we were to go into the apartment, look at the space and come up with a design that would satisfy all of that need. UNTIL we showed up! The unit had really seen some better days but we knew we had to look past that and come up with a concept that would work for them.
The immediate challenges were centered around 3 big ideas:
1. Adding a second bedroom to the already small footprint
2. Figuring out a way to make the kitchen bigger, better and brighter
3. Creating a master room walk in closet
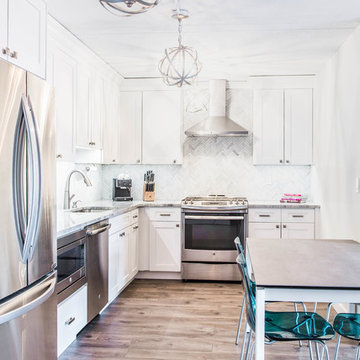
It’s always difficult to add new rooms into existing footprint without expanding out or up and not incurring any opportunity cost. In this case, that was exactly what we had to do. Item one and two above had to be tackled as one. We went ahead and switched out the location of the dining room and eliminating an area where there was a “nook” type eat-in area. By doing so, we were able to cut right into that footprint and change the layout of the kitchen.
That one move allowed us to dig into the kitchen design because it was now the main focal point in the apartment. It was no longer an option to keep it in that tiny hole where it was, so we had to ensure that this design was functional and aesthetically pleasing at the same time. By adding the table into the space where an Island typically would go, we were able to both cut cost and still provide a dining experience. The Table serves as an Island as well when cooking.
We then proceeded to block in the existing doorway to the dining room. By doing this, we were able to create a full room which allowed us to put a door on the other side and called that room Bedroom #2. This was easier to do because all of the mechanicals were already in that space (light, heater and windows). By shifting things around, we also achieved a huge wall to wall closet from inside. PERFECT!
Then we moved into the Single bedroom. We thought it was a big room with a small closet, so by creatively adding an L shaped wall and steal some footprint into the bedroom side, we were able to put a door on that new room and design it for the walk-in closet. Even after this, the bedroom still holds a queen size bed with 2 night stands, a TV on the wall, a sitting chair and plenty of room to walk around. This was done by rethinking the location for the bed and night stands.
The bathroom was gutted to make sure there was no leaks and rebuild from the ground up. We kept all of the plumbing where it was, added a new vanity, medicine cabinet, tiles and lighting and it was done.
From there, the rest of the unit had new flooring all throughout, paint, and lighting. After completion and walk through, this project was handed over back to the clients.
Execution and collaboration between all the trades were: Reggie and his team from Premier Interiors and Rohan from RD Mechanical Services.
p.s. Please see our website to see the video.
 Dynamic Garage Door
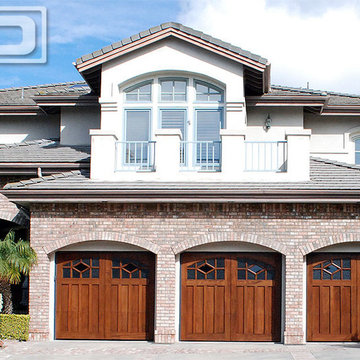
Authentic custom garage door designs are truly difficult to find. Dynamic Garage Doors; however, are custom-made to your specifications and home's architectural style.
These three single-car garage doors are uniquely designed in an overall Arts & Crafts design with craftsman and traditional influences. The fusion of architectural styles yield a minimalistic, fine-lined garage door design that show divine architectural beauty. Our garage door designers are well rounded in various architectural styles and that is why we are able to intertwine architectural elements from various styles together to create unique garage door designs that come out of our imagination and our client's unique taste.
Crafted out of mahogany and stained in a rich tone really bring out the grain of the wood to its full glory. The design of the garage door windows feature an embedded diamond window panel that took skilled craftsmanship from our finish carpenters to achieve. Though simple and elegant, the culmination of this arts and crafts style garage door was made possible with delicate hands and years of experience in wood crafting. We choose our wood workers wisely and our world-class garage doors are proof of our hard-working team of designers, craftsmen and installation technicians.
To get prices on our custom garage doors please contact our design center in Orange County, CA at (855) 343-3667!
We install in California but will ship out of the state as well.
 Aquatica Plumbing Group
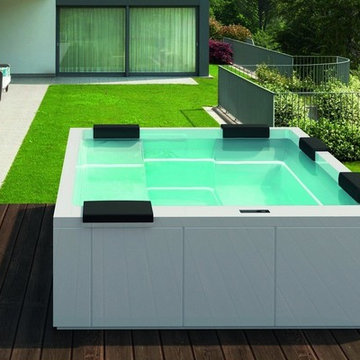
Designed by renowned international designer Marc Sadler, manufactured by Gruppo Treesse in Italy and adapted to US electrical and plumbing standards by Aquatica Plumbing Group Inc., Maya Indoor/Outdoor Spa Pro takes the home spa experience to a whole new level allowing you to enjoy all benefits of hydrotherapy in the privacy. Minimalist aesthetics and true Italian quality perfectly blends with the latest furnishing trends and harmonizes with the surroundings, transforming your garden or home into a cozy place. If you are a music lover, we definitely recommend you to enhance the experience by adding Bluetooth Audio which will be concealed under the bath and provide clean and rich sound for maximum relaxation.
Maya Spa Pro’s add-ons allow you to fully modify and accessorize your perfect spa just the way you always wanted. For comfortable soaking, we recommend Maya Spa Pro Headrests which are wonderfully comfortable and ergonomically designed in classic black color. This gel is durable, elastic, soft, non-toxic and unbreakable, and you can choose up to 5 pieces to add to your Maya Spa.
Maya Spa Pro brings a whole new system of minimalistic and invisible hydromassage that no competition can match. Although it is simply beautiful to look at, more importantly, Maya Spa Pro is superbly therapeutic, delivers revitalizing and soothing pleasure, provides the best in a hydro spa treatment. Its innovative design makes it possible to install indoor or outdoor, built-in or freestanding, giving our customers the freedom to customize their product according to personal preference. Stylish Spa Pro Panels will turn your Maya Spa Pro into fully freestanding unity and Spa Pro Pneumatic Elevator will allow you to gently lift and lower the spa, allowing you an easy access to all plumbing and electrical components that would otherwise be difficult to access. To protect your Spa from different seasons and weather, we offer Spa Pro Top Cover - a durable and high-quality cover that will sit perfectly on the top of Maya Spa Pro.
 Abinader Home Theaters, Inc.
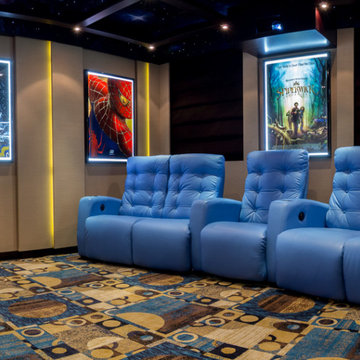
Room Size: 13.9′ x 13.9′
This small, square room proves we can create a home theater in any space. The client was afraid the room was too small for a true home theater experience. Normally, it is very difficult to achieve a good viewing experience when the screen is a short distance from the seating. The small, square room also posed an incredible acoustical challenge. However, we converted the bedroom and bathroom into a full theater with viewing room and movie munchies area behind tie-back drapes.
 Paradise Found Construction
Michelle and Dominic had purchased their home in Wake Forest several years earlier with the idea in mind that it would serve as a family-centric place where they could gather with extended family. Situated in a quiet residential neighborhood with large lots, it was the perfect place for them to raise and home school their 4 children.
As their family grew, the children’s daily activities were split between the 1st and 2nd floors, making it difficult to coordinate activities amongst them all. And their extended family get-togethers had become cramped and increasingly difficult to accommodate everyone comfortably. They were in need of added living space that could serve their family’s needs as well as provide extra entertaining areas to host family gatherings.
With our experience in helping homeowners secure financing for their Home Improvement projects, we worked with Dominic and Michelle to prepare all of the necessary documentation required to apply for an FHA 203K Home Renovation loan. As a result, they were able to finance the full cost of the construction of their new Family Room Addition.
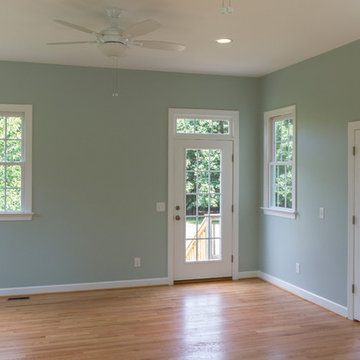
Our solution was to add a 1st floor living space that harmonized with the existing floor plan and décor, was central to the existing Kitchen, and flexible enough to facilitate large groups and accommodate the whole family’s daily activities and access to the outdoors.
As a result of their newly added flexible living area, they are now able to comfortably gather with their extended family as well accommodate the whole family’s needs, giving them the opportunity spend more quality time with their family and friends.
Design Features
Harmony with the home’s existing architecture and décor.
Seamless Transition into the adjoining Kitchen and Living Room, separating the two with a light and bright 15-Lite Double French Door.
Light and bright natural hardwood flooring.
A bright and open floor plan achieved by introducing a double 15-Lite French door in the Kitchen and generous amount of double-hung Low-E windows.
Window Well in the Roof to accommodate required foot-print placement.
Easy access to the outdoors and the large deck and yard.
Extra storage space for tools and outdoor equipment.
Energy Efficient and Green Features
1st floor HVAC Compressor and Air Handler replaced with a more efficient 15 Seer unit.
Floor penetrations and perimeter bottom plates caulked and air sealed.
No-VOC Paints and Finishes.
Durable Exterior Construction
No-Maintenance Composite and PVC Low-E Windows
Cement Fiber Siding
Cement Fiber and PVC Trim
Life-time Architectural Shingles
Metal Roof Flashing with Gutter Kick-Outs
Superior Window Flashing and Water Intrusion sealing measures
 Kowalske Kitchen & Bath
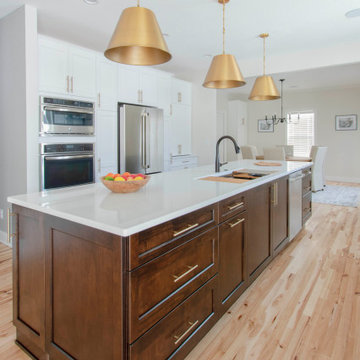
A Sussex family hired us as the design build remodel company to makeover this kitchen. This remodeling project had three main goals: improve storage, update the layout/style and enhance the functionality.
IMPROVE STORAGE
The original home builder put in very narrow cabinets. The small, narrow cabinets made it difficult for the homeowners to store items. They also said it was important to have a kitchen that works for their children. The new design incorporates an appliance cabinet and wide drawers for storing items. The kids have easy access to snack drawers and lower dish storage for plastic cups and plates. Also, we added two built-in cabinets in the dining room for more storage.
UPDATE THE LAYOUT & STYLE
While the area was large, it didn’t maximize the space or fit their contemporary style. They wanted plenty of counter prep space and enough room for friends and family to gather. We added a large wood island with seating – perfect for hosting parties and family dinners. The space is bright with white shaker cabinetry and subway tile backsplash. Warm touches include satin bronze light fixtures and hardware.
ENHANCE THE FUNCTIONALITY
This Sussex kitchen features a Galley Sink Workstation. Having a sink workstation facing the center of the room allows the homeowners to stay part of the conversation while preparing a meal or cleaning up. Sink workstations are one of the hottest kitchen trends.
HOMEOWNER REVIEW
“We recently completed our kitchen remodel with Kowalske and we can’t say enough good things about our experience. Not only was every member of the team amazing, the work that was done in our kitchen was very high quality. We have recommended Kowalske to all of our friends and plan to use them for our master bath remodel in the future!” – Nicole, homeowner (Houzz Review)
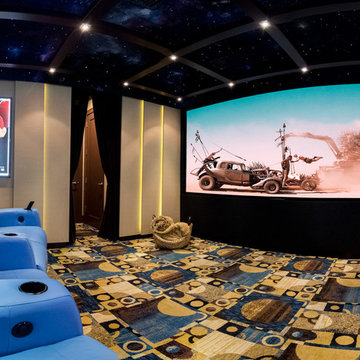 Abinader Home Theaters, Inc.
Room Size: 13.9′ x 13.9′
This small, square room proves we can create a home theater in any space. The client was afraid the room was too small for a true home theater experience. Normally, it is very difficult to achieve a good viewing experience when the screen is a short distance from the seating. The small, square room also posed an incredible acoustical challenge. However, we converted the bedroom and bathroom into a full theater with viewing room and movie munchies area behind tie-back drapes.
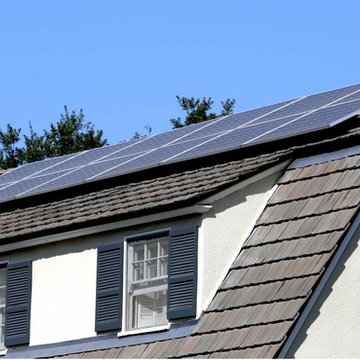 JNA Solar
Panel Type: SolarWorld SunModule Plus 275W Mono
“My husband and I would like to share our experience with Zeev Zanzuri from JNA Solar Solutions. Zeev was referred to us by a friend who recommended him highly. At this point, we had already signed a contract with another solar company and were feeling very frustrated and disappointed.
Zeev was very patient and understanding as we had many questions and concerns. We live in the city of San Marino, in the San Gabriel Valley, a city well known for being extremely difficult for contractors to get permits approved. The previous solar company misrepresented their prior experience with the city of San Marino and were unable to get our permits approved. This resulted in unnecessary delays and aggravation.
Whatever Zeev promised, he delivered. He got the approvals from the city, explained our energy savings in detail and provided consistently great customer service. He was always responsive to our calls and followed up with us after the job was done to see if we had any problems.
We are thrilled with our solar system and wouldn’t hesitate to recommend Zeev Zanzuri and JNA Solar Solutions to friends, family, and neighbors.”
San Marino, CA.
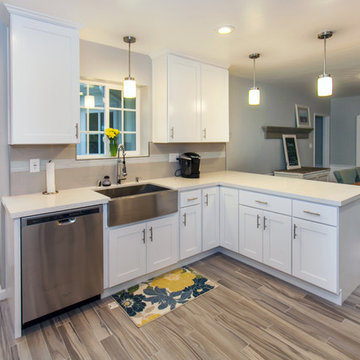
 Pearl Remodeling
Mid-sized trendy l-shaped porcelain tile open concept kitchen photo in Los Angeles with a farmhouse sink, shaker cabinets, white cabinets, quartz countertops, gray backsplash, glass tile backsplash, stainless steel appliances and a peninsula
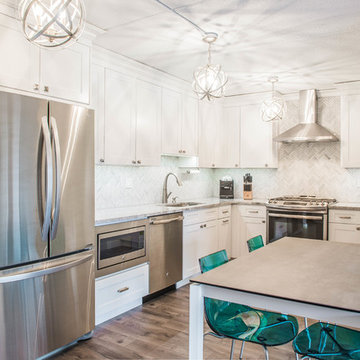 RAJ Kitchen and Bath, LLC
 “Full apartment design”.
IF you have not yet seen this apartment conversion before, we strongly urge you to go to the bottom left of this page and click on the short 2-minutes video. It would put a lot of things into perspective when you come back and continue reading this.
It is true we were literally handed the keys and told a list of things that they wanted to have happen and we were to go into the apartment, look at the space and come up with a design that would satisfy all of that need. UNTIL we showed up! The unit had really seen some better days but we knew we had to look past that and come up with a concept that would work for them.
The immediate challenges were centered around 3 big ideas:
1. Adding a second bedroom to the already small footprint
2. Figuring out a way to make the kitchen bigger, better and brighter
3. Creating a master room walk in closet
It’s always difficult to add new rooms into existing footprint without expanding out or up and not incurring any opportunity cost. In this case, that was exactly what we had to do. Item one and two above had to be tackled as one. We went ahead and switched out the location of the dining room and eliminating an area where there was a “nook” type eat-in area. By doing so, we were able to cut right into that footprint and change the layout of the kitchen.
That one move allowed us to dig into the kitchen design because it was now the main focal point in the apartment. It was no longer an option to keep it in that tiny hole where it was, so we had to ensure that this design was functional and aesthetically pleasing at the same time. By adding the table into the space where an Island typically would go, we were able to both cut cost and still provide a dining experience. The Table serves as an Island as well when cooking.
We then proceeded to block in the existing doorway to the dining room. By doing this, we were able to create a full room which allowed us to put a door on the other side and called that room Bedroom #2. This was easier to do because all of the mechanicals were already in that space (light, heater and windows). By shifting things around, we also achieved a huge wall to wall closet from inside. PERFECT!
Then we moved into the Single bedroom. We thought it was a big room with a small closet, so by creatively adding an L shaped wall and steal some footprint into the bedroom side, we were able to put a door on that new room and design it for the walk-in closet. Even after this, the bedroom still holds a queen size bed with 2 night stands, a TV on the wall, a sitting chair and plenty of room to walk around. This was done by rethinking the location for the bed and night stands.
The bathroom was gutted to make sure there was no leaks and rebuild from the ground up. We kept all of the plumbing where it was, added a new vanity, medicine cabinet, tiles and lighting and it was done.
From there, the rest of the unit had new flooring all throughout, paint, and lighting. After completion and walk through, this project was handed over back to the clients.
Execution and collaboration between all the trades were: Reggie and his team from Premier Interiors and Rohan from RD Mechanical Services.
p.s. Please see our website to see the video.
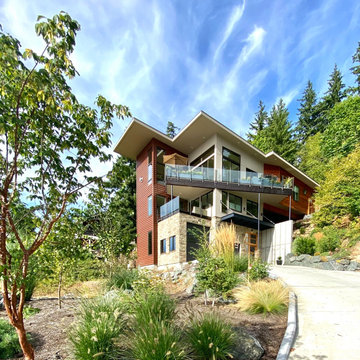
 Christensen Design Management
History:
Client was given a property, that was extremely difficult to build on, with a very steep, 25-30' drop. They tried to sell the property for many years, with no luck. They finally decided that they should build something on it, for themselves, to prove it could be done. No access was allowed at the top of the steep incline. Client assumed it would be an expensive foundation built parallel to the hillside, somehow.
Program:
The program involved a level for one floor living, (LR/DR/KIT/MBR/UTILITY) as an age-in-place for this recently retired couple. Any other levels should have additional bedrooms that could also feel like a separate AirBnB space, or allow for a future caretaker. There was also a desire for a garage with a recreational vehicle and regular car. The main floor should take advantage of the primary views to the southwest, even though the lot faces due west. Also a desire for easy access to an upper level trail and low maintenance materials with easy maintenance access to roof. The preferred style was a fresher, contemporary feel.
Solution:
A concept design was presented, initially desired by the client, parallel to the hillside, as they had originally envisioned.
An alternate idea was also presented, that was perpendicular to the steep hillside. This avoided having difficult foundations on the steep hillside, by spanning... over it. It also allowed the top, main floor to be farther out on the west end of the site to avoid neighboring view blockage & to better see the primary southwest view. Savings in foundation costs allowed the installation of a residential elevator to get from the garage to the top, main living level. Stairs were also available for regular exercise. An exterior deck was angled towards the primary SW view to the San Juan Islands. The roof was originally desired to be a hip style on all sides, but a better solution allowed for a simple slope back to the 10' high east side for easier maintenance & access, since the west side was almost 50' high!
The clients undertook this home as a speculative, temporary project, intending for it to add value, to sell. However, the unexpected solution, and experience in living here, has them wanting to stay forever.
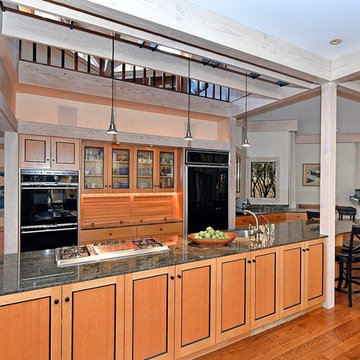
 Sarah Susanka, FAIA
The kitchen is located across from the living room, offering spectacular views to the trees and lake beyond. Although it's difficult to tell from a photo, the experience of being in this kitchen is a bit like being at the helm of a boat. It's definitely the primary activity place, and is connected to all other spaces on the main level.
Architect: Sarah Susanka, FAIA; Photo courtesy of Bob Parish
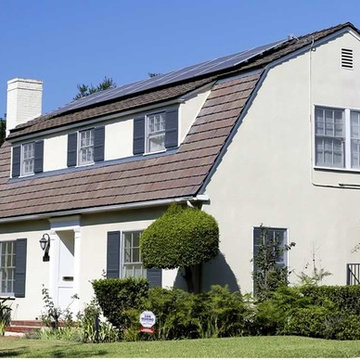 JNA Solar
Panel Type: SolarWorld SunModule Plus 275W Mono
“My husband and I would like to share our experience with Zeev Zanzuri from JNA Solar Solutions. Zeev was referred to us by a friend who recommended him highly. At this point, we had already signed a contract with another solar company and were feeling very frustrated and disappointed.
Zeev was very patient and understanding as we had many questions and concerns. We live in the city of San Marino, in the San Gabriel Valley, a city well known for being extremely difficult for contractors to get permits approved. The previous solar company misrepresented their prior experience with the city of San Marino and were unable to get our permits approved. This resulted in unnecessary delays and aggravation.
Whatever Zeev promised, he delivered. He got the approvals from the city, explained our energy savings in detail and provided consistently great customer service. He was always responsive to our calls and followed up with us after the job was done to see if we had any problems.
We are thrilled with our solar system and wouldn’t hesitate to recommend Zeev Zanzuri and JNA Solar Solutions to friends, family, and neighbors.”
San Marino, CA.
6