
Search results for "Discover extra" in Home Design Ideas

 Closet Factory
This beautiful walk-in closet by Closet Factory Houston epitomizes organization and features double-hanging clothes rods, shoes shelves and clear glass doors.

 Beachy Boheme Interiors
This charming kids guest room was design with fun and whimsy in mind. The client wanted to transform a spare bedroom into a guest room for kids. We achieved some fun and flare with a new coat of paint and Eskayel wallpaper to give the space character and movement. We furnished the room with a daybed that includes a trundle to accommodate two children. We added boho elements like a bright vintage Moroccan rug and mixed textures with pillows and blankets that have graphic patterns. The cave chair serves as a reading nook for bedtime stories and the mirrors on the walls add a bit of Middle Eastern flare. Photos by Amber Thrane.

 User
UserASID Design Excellence First Place Residential – Kitchen and Bathroom: Michael Merrill Design Studio was approached three years ago by the homeowner to redesign her kitchen. Although she was dissatisfied with some aspects of her home, she still loved it dearly. As we discovered her passion for design, we began to rework her entire home--room by room, top to bottom.
Find the right local pro for your project

 TOC design & construction inc.
DESIGNED BY TOC design
CONSTRUCTION BY TOC design & Construction inc.
PHOTOS BY : Tania Scardellato
I was fortunate to have a young family approach me in desperate need to renovate there only 3 piece bathroom. This space was In dire need of a remodel, with old brown wall to wall tiles and a dated bulky yellow brown single sink vanity.
Storage was a must, lighting a necessity, and proper accessibility to the shower bath area.
We had a tight budget to respect, but a full gut of this bathroom was required. And a good thing too, once we started doing the demolition we noticed that mildew and rotting floors and walls had accumulated throughout the years. Doing it right the first time is no joke when dealing with water and electrical issues.
We discarded all reminisce of old and built from scratch, new walls, new plumbing, new electrical ,new insulation and a new window, a new fan that actually exhausted outside ( I say this laughing as you would be amazed at how many fans are installed but don’t exhaust outside, and you the client would never know unless you go inside the attic space.
Once all the hard stuff was done, the rest is just a matter of smart design. If you have a small bathroom here are some tips to guide you.
10 tips for making a small bathroom feel larger
Is your tiny bathroom cramping your functionality and style, leaving you longing for the enormous bathrooms gracing the pages of design magazines? Even if your bathroom is a fraction of the size, all it takes is some design savvy to make the most of the space you have. Consider these 10 smart tips that will help your bathroom look, feel and function like those larger contenders.
1-Get creative with corners
Space is at a premium in small bathrooms, so it's important to maximize every inch. Corners, for example, provide extra space for shelving, storage units and even hooks. Get creative and install unique design solutions that are not only functional, but also eye-catching. If you love the airiness of floating cabinets, add baskets or decorative boxes under for extra storage. If you are installing floating cabinets insure that they are installed securely to studs or plywood at wall.
2- Let solid colors shine
Busy patterns have a shrinking effect and make small bathrooms seem even smaller. Conversely, light natural hues make a space feel more open. If you're itching to get creative with design, experiment with textures but keep overpowering patterns to a minimum. Tone on tone is the best to achieve this.
3 - Maximize your bathtub
A bathtub takes up a significant portion of the room, but modern, compact options with curved basins, can make the tub feel larger when in use, all while conserving space.
4 - Select a smaller faucet
A faucet is jewelry for the bathroom. And just as accessories can overpower an outfit, a big bulky faucet isn't flattering in a small bath. Single-handle designs conserve counter space, while a wall-mount installation frees it up all together and can create quite the wow-factor, if the budget can accommodate the required changes to plumbing behind the wall.
5 - Make vanity storage simple
If you're in a storage war with your small bathroom, you're not alone in the battle. Toiletries and personal supplies without a place to call home only add clutter and chaos. Store smart with a space-saving vanity, the dual sink vanity shown here, looks quite simple, but in reality it has 4 sets of full extension drawers, and the vanity tower adds extra storage without overpowering the use of space.
6 - Show off the shower
Shower curtains may be pretty, but they interrupt the visual flow of a bathing space and make it feel significantly smaller. In bathrooms with small footprints, opt for a clear glass sliding shower door that doesn't require the clearance of one with a hinged design. Or as shown in this design and for fraction less expensive a half hinged panel installed on a fixed tempered glass panel. If you're embarking on a big remodel, create the illusion of more space by using same tile in the shower that's used throughout; instead of seeing them as two separate zones, the eye will read them as one.
7 - Discover the treasure of hidden storage
Work with a contractor, and you just might find some serious storage potential hidden behind your walls. Whether it's utilizing space between the studs for shallow shelving or a creating a small linen closet by annexing space from an adjacent room, even small additions can make a big difference.
8 - Focal Point
Tile is a beautiful, durable addition to any bathroom. For dainty spaces, consider installing tile at a diagonal to accentuate the focal point or as in this bathroom I used an oversized textured pattern to bring depth to the space at the window wall.
9 - Choose the right lights
Strategically install light to reflect and brighten a small bathroom to make it appear larger. Recessed lighting is an affordable solution for tiny rooms, offering ample light while taking up little space. Wall sconces alongside a mirror also reflect off the walls and make a room feel bright and airy. I always recommend going with LED lighting at 2800 to 3000K.
10 – Accessorize
This is your time to shine in your decorating skills, have fun with your towels, you can change the color scheme daily just by adding pops of color in your accessories, make sure to get items that serve a dual purpose, like baskets, boxes they can always be used as hampers, storing of towels and even a nice display for your guest.

 Dura Supreme Cabinetry
Soak your senses in a tranquil spa environment with sophisticated bathroom furniture from Dura Supreme. Coordinate an entire collection of bath cabinetry and furniture and customize it for your particular needs to create an environment that always looks put together and beautifully styled. Any combination of Dura Supreme’s many cabinet door styles, wood species, and finishes can be selected to create a one-of a-kind bath furniture collection.
A double sink vanity creates personal space for two, while drawer stacks create convenient storage to keep your bath uncluttered and organized. This soothing at-home retreat features Dura Supreme’s “Style One” furniture series. Style One offers 15 different configurations (for single sink vanities, double sink vanities, or offset sinks) and multiple decorative toe options to create a personal environment that reflects your individual style. On this example, a matching decorative toe element coordinates the vanity and linen cabinets.
The bathroom has evolved from its purist utilitarian roots to a more intimate and reflective sanctuary in which to relax and reconnect. A refreshing spa-like environment offers a brisk welcome at the dawning of a new day or a soothing interlude as your day concludes.
Our busy and hectic lifestyles leave us yearning for a private place where we can truly relax and indulge. With amenities that pamper the senses and design elements inspired by luxury spas, bathroom environments are being transformed from the mundane and utilitarian to the extravagant and luxurious.
Bath cabinetry from Dura Supreme offers myriad design directions to create the personal harmony and beauty that are a hallmark of the bath sanctuary. Immerse yourself in our expansive palette of finishes and wood species to discover the look that calms your senses and soothes your soul. Your Dura Supreme designer will guide you through the selections and transform your bath into a beautiful retreat.
Request a FREE Dura Supreme Brochure Packet:
http://www.durasupreme.com/request-brochure
Find a Dura Supreme Showroom near you today:
http://www.durasupreme.com/dealer-locator

 Elms Interior Design
Photography by Michael J. Lee
Large transitional u-shaped porcelain tile and beige floor open concept kitchen photo in Boston with an undermount sink, shaker cabinets, quartz countertops, white backsplash, ceramic backsplash, stainless steel appliances, an island and white countertops
Large transitional u-shaped porcelain tile and beige floor open concept kitchen photo in Boston with an undermount sink, shaker cabinets, quartz countertops, white backsplash, ceramic backsplash, stainless steel appliances, an island and white countertops

 MIG Furniture Design, Inc.
877-777-3771 Kitchen Design NYC.
Modern Kitchen Design by Spar, Italy - Tropea Composition 20.
Request a free estimate for your Kitchen Design and Remodeling project within NYC, NY, CT, NJ, PA.
You can customize this kitchen according to your space and needs and discover many others proposals. Custom cabinets are available.
MATERIAL/CONSTRUCTION:
DOOR: In MDF, thickness 20 mm, polymer coated, recessed handle socket.
INTERNAL: White melamine.
STRUCTURE: White melamine. Visible sides will be finished, an extra surcharge will be applied depending on the cabinet dimension.
Visit our retail store or contact us at 877-777-3771, a furniture consultant will design with you your ideal kitchen.
 Aniko Nicholson Design
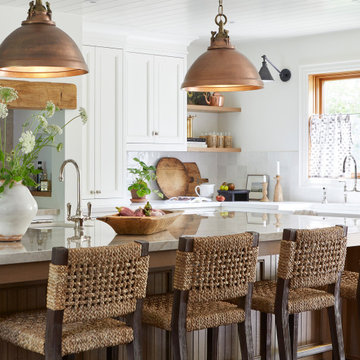
In this open concept kitchen, you'll discover an inviting, spacious island that's perfect for gatherings and gourmet cooking. With meticulous attention to detail, custom woodwork adorns every part of this culinary haven, from the richly decorated cabinets to the shiplap ceiling, offering both warmth and sophistication that you'll appreciate.
The glistening countertops highlight the wood's natural beauty, while a suite of top-of-the-line appliances seamlessly combines practicality and luxury, making your cooking experience a breeze. The prominent farmhouse sink adds practicality and charm, and a counter bar sink in the island provides extra convenience, tailored just for you.
Bathed in natural light, this kitchen transforms into a welcoming masterpiece, offering a sanctuary for both culinary creativity and shared moments of joy. Count on the quality, just like many others have. Let's make your culinary dreams come true. Take action today and experience the difference.

 Gallery KBNY
The owner of this historic and landmarked town-home renovation in Hudson Square, originally built in 1826, hired Gallery Kitchen and Bath to fully gut-renovate this 3-unit row-home. The scope of work included a full-scale renovation of the owners unit, including the renovation of the kitchen, one 4-piece master ensuite bathroom, one 3-piece bathroom with a walk-in steam shower, and a beautiful powder room. Additional work in the owners unit also included flooring, electrical upgrade, major plumbing work, new HVAC system, restoration of a fireplace, installation of a fully integrated smart home system and landmarked approved windows.
CELLAR RENOVATION IN NYC LANDMARKED TOWN-HOME
Rounding out the owners unit we renovated the cellar, which was converted into an entertainment space and featured a custom glass curtain wall, along with a custom staircase with an exposed brick wall. During the demolition phase of the cellar, our team discovered 56 wine jugs filled with wine from the prohibition era, leading us to name this project the prohibition house. For the two tenant units, Gallery Kitchen and Bath undertook the renovation of 2 kitchens, 4 bathrooms, new hardwood flooring throughout, along with detailed carpentry work in the entire home.
WHY GALLERY KITCHEN AND BATH
After interviewing multiple contractors, our client decided on Gallery Kitchen and Bath primarily because of our turnkey design, selection, and build process. In a renovation of this magnitude it is crucial to have a centralized full service contractor under one roof to handle all of the aspects and simultaneous moving parts of the project. Decentralizing the entire process by having multiple unaffiliated vendors handle various parts of the process can easily become chaotic, time consuming, and costly.
Because Gallery Kitchen and Bath undertook the entire process, from the design of the entire space to the selection and procurement of all finishes and fixtures, down to the procurement of all permits and LPC filings, it made a seemingly chaotic project a’lot more manageable.
PHASE 1: DESIGN, SELECTION, PROCUREMENT
Our client wanted the renovation to incorporate a fully modern design into his Hudson Square town-house. Being that this is a landmarked property, the exterior facade had to be restored and kept with the original aesthetic, the interior of the home however was a whole different story.
In keeping up with the modern aesthetic, our designers went to work to design a custom kitchen that included fully custom flat panel base cabinets in a white high gloss finish and an absolute matte black appliance/pantry wall. The kitchen design also included a white quartz countertop and backsplash with a waterfall edge island. To bring warmth to the modern kitchen, our designers incorporated a rifted and quartered select oak wood floor in a herringbone pattern, and custom blended stain with matte polyurethane finish. For continuity, the wood floor was also extended throughout the entire owners unit.
In the ensuite bathroom we created a “wet area” which houses a standalone soaking tub as well as a beautiful rainfall shower, completely leveled with the rest of the floor in the bathroom. Some highlights within this space include a tiled square drain, large niche cutouts with a carrera marble accents. Once again, to bring warmth to this modern bathroom, our designers incorporated a floating rustic oak vanity and carrera marble mosaic floor tile.
Last on the list on the owners unit floor was the cellar, which our client wanted to utilize as an entertainment space for his friends and family. During the design phase, we incorporated an open concept layout, wedding the indoor and outdoor space with a custom glass curtain wall. The design also included custom walnut built-ins that serve as a custom wet bar and storage piece.
With the design approved and selections made our office liaisons moved to procure all of the material selections and finishes.
PHASE 2: DEMO
Because this home is almost two centuries old, we had to take extra precaution during the interior demolition phase of the project. One specific area that we had to pay special attention to was the existing brick. Over time the mortar in old brick homes deteriorates and turns into dust – for this reason it was extremely important that a thorough and ongoing inspection of the exteriors and interior walls took place during the demolition of the space.
After 14 30-yard debris containers and 56 wine filled jugs from the prohibition era later , the demolition of this historic Hudson Square town-home came to an end. If you are wondering whether we tried the wine? After notifying the owner we agreed to open one of the jugs and try them together – nothing but vinegar.
PHASE 3: BUILD
One of the challenges in a renovation project of this scope is nailing down the logistics and delivery of fixtures and finish material. Adding to this challenge was a narrow entry door that required us to use a boom truck in order to deliver some of the larger materials on site. To ensure a succinct time schedule, we boomed all of the materials through the 3rd floor for the entire project and worked our renovation work from top floor to cellar. This technique also insured that any unexpected water issues during the renovation process would not damage a finished floor.
With all roughing and framing complete, the Gallery KBNY team proceeded to execute on the design plan.
THE REVEAL
From what was once a dilapidated town-home with nothing but potential, to a glamorous and luxurious modern interior space – the prohibition house was complete. Ready to speak with us about your renovation project? Contact us to schedule your free consultation and let Gallery KBNY show you why our all-inclusive approach to your renovation is the smartest way to renovating in NYC.

 Renovations by Garman LLC
The client was dismayed to discover their preferred commercial grade rubber playground floor tiles were financially infeasible for the small residential area (200 square feet). We researched and presented comparable soft, but durable, options for their consideration. They settled on a dark green commercial grade carpeting with extra trick padding that semi-resembles astro turf. The result is a soft, cushy feeling, which the client ultimately determined was preferable, as rubber would have created brush burns while children crawled.

 FRONTGATE
Discover open-air serenity with the Provence Collection by Summer Classics®. The highly detailed double lattice design offers casual elegance to any outdoor decor. Features a tough, powder coated finish that is weather resistant. Extra plush Sunbrella® fabric cushions are included and remain colorfast and easy to clean even after seasons in the sun.

 Acumen Builders
Renovating an old storage space for a new office, we discovered this wonderful original brick wall. My client insisted we keep it. Adding tall base moulding to hide the electrical along with the mahogany doors and oak floor makes the space outstanding.
The crown moulding detail in the bedroom was inspired by the original Phoenix post office built in 1936.
The bath room tile detail is part of bringing this 1930's home back closer to the original craftsman style.
 TOC design & construction inc.
DESIGNED BY TOC design
CONSTRUCTION BY TOC design & Construction inc.
PHOTOS BY : Tania Scardellato
I was fortunate to have a young family approach me in desperate need to renovate there only 3 piece bathroom. This space was In dire need of a remodel, with old brown wall to wall tiles and a dated bulky yellow brown single sink vanity.
Storage was a must, lighting a necessity, and proper accessibility to the shower bath area.
We had a tight budget to respect, but a full gut of this bathroom was required. And a good thing too, once we started doing the demolition we noticed that mildew and rotting floors and walls had accumulated throughout the years. Doing it right the first time is no joke when dealing with water and electrical issues.
We discarded all reminisce of old and built from scratch, new walls, new plumbing, new electrical ,new insulation and a new window, a new fan that actually exhausted outside ( I say this laughing as you would be amazed at how many fans are installed but don’t exhaust outside, and you the client would never know unless you go inside the attic space.
Once all the hard stuff was done, the rest is just a matter of smart design. If you have a small bathroom here are some tips to guide you.
10 tips for making a small bathroom feel larger
Is your tiny bathroom cramping your functionality and style, leaving you longing for the enormous bathrooms gracing the pages of design magazines? Even if your bathroom is a fraction of the size, all it takes is some design savvy to make the most of the space you have. Consider these 10 smart tips that will help your bathroom look, feel and function like those larger contenders.
1-Get creative with corners
Space is at a premium in small bathrooms, so it's important to maximize every inch. Corners, for example, provide extra space for shelving, storage units and even hooks. Get creative and install unique design solutions that are not only functional, but also eye-catching. If you love the airiness of floating cabinets, add baskets or decorative boxes under for extra storage. If you are installing floating cabinets insure that they are installed securely to studs or plywood at wall.
2- Let solid colors shine
Busy patterns have a shrinking effect and make small bathrooms seem even smaller. Conversely, light natural hues make a space feel more open. If you're itching to get creative with design, experiment with textures but keep overpowering patterns to a minimum. Tone on tone is the best to achieve this.
3 - Maximize your bathtub
A bathtub takes up a significant portion of the room, but modern, compact options with curved basins, can make the tub feel larger when in use, all while conserving space.
4 - Select a smaller faucet
A faucet is jewelry for the bathroom. And just as accessories can overpower an outfit, a big bulky faucet isn't flattering in a small bath. Single-handle designs conserve counter space, while a wall-mount installation frees it up all together and can create quite the wow-factor, if the budget can accommodate the required changes to plumbing behind the wall.
5 - Make vanity storage simple
If you're in a storage war with your small bathroom, you're not alone in the battle. Toiletries and personal supplies without a place to call home only add clutter and chaos. Store smart with a space-saving vanity, the dual sink vanity shown here, looks quite simple, but in reality it has 4 sets of full extension drawers, and the vanity tower adds extra storage without overpowering the use of space.
6 - Show off the shower
Shower curtains may be pretty, but they interrupt the visual flow of a bathing space and make it feel significantly smaller. In bathrooms with small footprints, opt for a clear glass sliding shower door that doesn't require the clearance of one with a hinged design. Or as shown in this design and for fraction less expensive a half hinged panel installed on a fixed tempered glass panel. If you're embarking on a big remodel, create the illusion of more space by using same tile in the shower that's used throughout; instead of seeing them as two separate zones, the eye will read them as one.
7 - Discover the treasure of hidden storage
Work with a contractor, and you just might find some serious storage potential hidden behind your walls. Whether it's utilizing space between the studs for shallow shelving or a creating a small linen closet by annexing space from an adjacent room, even small additions can make a big difference.
8 - Focal Point
Tile is a beautiful, durable addition to any bathroom. For dainty spaces, consider installing tile at a diagonal to accentuate the focal point or as in this bathroom I used an oversized textured pattern to bring depth to the space at the window wall.
9 - Choose the right lights
Strategically install light to reflect and brighten a small bathroom to make it appear larger. Recessed lighting is an affordable solution for tiny rooms, offering ample light while taking up little space. Wall sconces alongside a mirror also reflect off the walls and make a room feel bright and airy. I always recommend going with LED lighting at 2800 to 3000K.
10 – Accessorize
This is your time to shine in your decorating skills, have fun with your towels, you can change the color scheme daily just by adding pops of color in your accessories, make sure to get items that serve a dual purpose, like baskets, boxes they can always be used as hampers, storing of towels and even a nice display for your guest.
 Seves Glass Block Inc
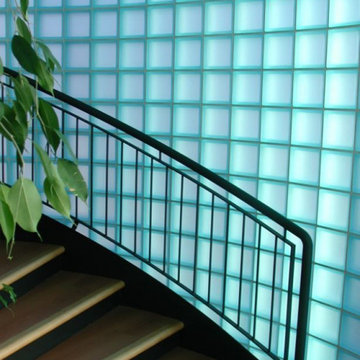
THE AMBIANCE OF LIGHT. Add a touch of drama to a space that transitions from room to room such as a stairway or hallway. Seves Glass Block provides the extra ambiance without sacrificing transmission of light. Discover how designers and contractors are utilizing glass block in new ways in our North American Design Guide @ sevesglassblockinc.com

 Tulip Remodeling
At Tulip Remodeling, we offer comprehensive home remodeling services, from kitchens to bathrooms, all while respecting your schedule and budget, and ensuring your 100% satisfaction. Contact us now for your free estimate https://calendly.com/tulipremodeling
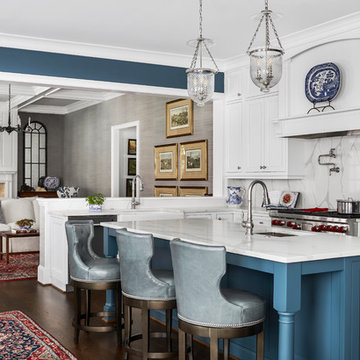
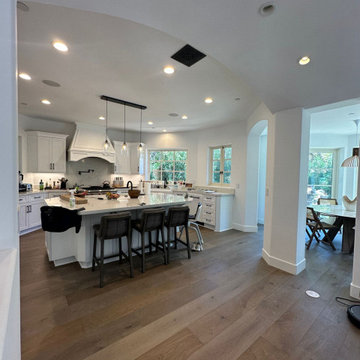
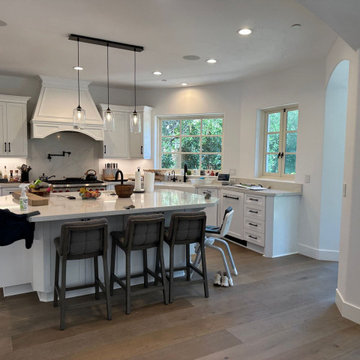
Discover this beautifully remodeled open-concept white kitchen! This kitchen has undergone a complete transformation. The floors have been newly tiled with elegant gray parquet, and we've added a luxurious marble backsplash and marble kitchen countertops. The centerpiece of this kitchen is a spacious central island, perfect for sharing a meal or providing extra cooking space. You'll also find stylish pendant lighting and energy-efficient LED recessed lighting.

 All Marble Tiles
Achieve a Royalty Look with Calacatta Gold Tiles
We all have that dream home we want to have. Better yet, some of us dream of a fantastic renovation of our homes; transforms them into glossy nests we can always be glad to perch in. For those of us who are already on the way to the dream house, you probably are shopping for material to use. So how about we introduce you to the good old Calacatta Gold marble?
If you are asking what that is, we can say it’s a unique way of inspiring royalty to your home using tiles. Calacatta Gold is a special stone tile mined in the hearts of Italy, on the Appian Mountains. Ever since it was discovered, it has been heavily used as a floor tile as well as wall tile, creating remarkable artistic visuals with a touch of natural gold in it. Calacatta gold tile also has one unique trait you won’t notice in most tiles; you can easily mix it with other slab colors, specifically gold extra, Calacatta Borghini, Crema and Super Extra.
Calacatta gold is also one of the few tiles with a unique pencil vein detail centering the white hue background and grey veins on the tile as well. This is the perfect choice for artistic walls and floors but be sure to use the right slab colors if you want to bring in more colors; if the slab and tile don’t match in color tones then it may affect the overall look of your walls/floors.
There are plenty of places in the house you can experiment with the pristine Calacatta gold tile. How about the living room wall that is a background for your TV and home theater system? Calacatta wall tile will create a covetable golden hue that will always shine before you. Moreover, you will definitely fall in love with your walls in the morning, when a streak of sunlight illuminates the golden yellows.
Installing the beautiful Calacatta gold tile is a pretty easy job as well. However you just need to be careful to use white thinset instead of grey. White thinsets will absorb the trowel lines whereas grey may leave behind ugly marks which may taint the exquisite nature of the tiles. If you also want your Calacatta floor tile or wall tile to last longer make sure it is properly sealed with grout.
You still have that dream home in mind? We already have you covered on the best tiles to you use. Just think Calacatta gold tile all the way, all your friends will definitely take selfies beside your shiny golden walls.
http://AllMarbleTiles.com

 David Heide Design Studio
Arts and crafts enclosed light wood floor living room library photo in Minneapolis with gray walls, a standard fireplace, a tile fireplace and no tv
 Tulip Remodeling
At Tulip Remodeling, we offer comprehensive home remodeling services, from kitchens to bathrooms, all while respecting your schedule and budget, and ensuring your 100% satisfaction. Contact us now for your free estimate https://calendly.com/tulipremodeling
Discover this beautifully remodeled open-concept white kitchen! This kitchen has undergone a complete transformation. The floors have been newly tiled with elegant gray parquet, and we've added a luxurious marble backsplash and marble kitchen countertops. The centerpiece of this kitchen is a spacious central island, perfect for sharing a meal or providing extra cooking space. You'll also find stylish pendant lighting and energy-efficient LED recessed lighting.
 All Marble Tiles
Achieve a Royalty Look with Calacatta Gold Tiles
We all have that dream home we want to have. Better yet, some of us dream of a fantastic renovation of our homes; transforms them into glossy nests we can always be glad to perch in. For those of us who are already on the way to the dream house, you probably are shopping for material to use. So how about we introduce you to the good old Calacatta Gold marble?
If you are asking what that is, we can say it’s a unique way of inspiring royalty to your home using tiles. Calacatta Gold is a special stone tile mined in the hearts of Italy, on the Appian Mountains. Ever since it was discovered, it has been heavily used as a floor tile as well as wall tile, creating remarkable artistic visuals with a touch of natural gold in it. Calacatta gold tile also has one unique trait you won’t notice in most tiles; you can easily mix it with other slab colors, specifically gold extra, Calacatta Borghini, Crema and Super Extra.
Calacatta gold is also one of the few tiles with a unique pencil vein detail centering the white hue background and grey veins on the tile as well. This is the perfect choice for artistic walls and floors but be sure to use the right slab colors if you want to bring in more colors; if the slab and tile don’t match in color tones then it may affect the overall look of your walls/floors.
There are plenty of places in the house you can experiment with the pristine Calacatta gold tile. How about the living room wall that is a background for your TV and home theater system? Calacatta wall tile will create a covetable golden hue that will always shine before you. Moreover, you will definitely fall in love with your walls in the morning, when a streak of sunlight illuminates the golden yellows.
Installing the beautiful Calacatta gold tile is a pretty easy job as well. However you just need to be careful to use white thinset instead of grey. White thinsets will absorb the trowel lines whereas grey may leave behind ugly marks which may taint the exquisite nature of the tiles. If you also want your Calacatta floor tile or wall tile to last longer make sure it is properly sealed with grout.
You still have that dream home in mind? We already have you covered on the best tiles to you use. Just think Calacatta gold tile all the way, all your friends will definitely take selfies beside your shiny golden walls.
http://AllMarbleTiles.com
5