
Search results for "Existed" in Home Design Ideas
 SDM Design, Inc.
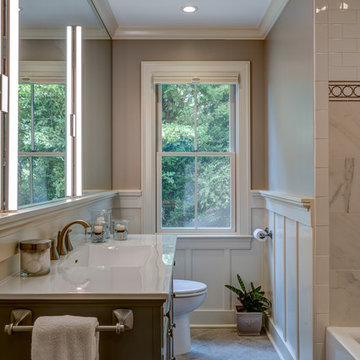
This was and still is a 2,700 s.f. brick rancher yet this project resulted in a complete makeover while still maintaining the original footprint and exterior structure. The house was built in 1954 in a lovely location across the street from the Grove Park Inn Golf Club.
During our initial meeting, my clients, who had recently moved to Asheville, expressed that they enjoyed cooking and engaging with their family and friends while doing so. They wanted the bathrooms updated, a more functional master bedroom and a larger kitchen. The house had a traditional layout with 3 bedrooms, 2 baths, a small kitchen, separate dining and living rooms with an adjoining 570 s.f. family room. It didn’t take long before we all agreed that the large family room would be converted to their master bedroom suite. In order to expand the kitchen, a wall between the existing kitchen and dining was removed, stairs leading to the basement were relocated, a bump out in the existing kitchen became a pantry and one of the adjacent bedrooms was opened up to the new kitchen as the new dining room. Both baths were redesigned and a powder room was created by rearranging existing closets. An existing curved wall in the hallway prompted the design of large open arches between the newly created spaces. This concept extended to the design on curved counter surfaces in the kitchen along with a reflected curved dropped ceiling over the cooking area.
The exterior of the house was enhanced with bay windows, a new copper-roofed front porch overlooking the Grove Park Inn properties with the Blue Ridge Mountains beyond. A circular drive was designed for the convenience of guests. Exterior double-hung windows were replaced with French patio doors in the new kitchen/dining and living areas. This allows easy access to the new front porch and back deck while enhancing the openness of the home.
 Landis Architects | Builders
Michael Wilkinson
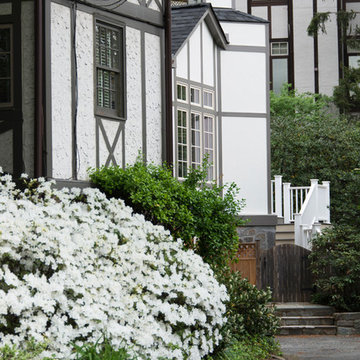
The existing home has stucco siding. Matching the exterior of the addition to the Tudor home's stucco was outside the client's budget. Instead, we used Hardiepanel that has a stucco pattern. Wide Tru Exterior trim matches the width of the trim on the existing house. We mimicked the trim pattern of the existing house.
We removed the existing rear deck as well as a 4-foot wide segment along the side of the house that led to a sliding door to a small office. The clients didn’t need outdoor access from the office, so we replaced the sliding door with a casement window.
The foundation of the addition is piers. The pizza oven base acts as one of the piers. A large chimney was necessary for venting for the pizza oven. However, our designer used exterior elements and visual tricks to down-scale the tall chimney so it does not seem as imposing.
 LaMantia Design and Remodeling
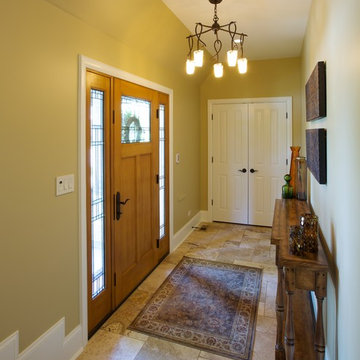
The clients came to LaMantia requesting a more grand arrival to their home. They yearned for a large Foyer and LaMantia architect, Gail Lowry, designed a jewel. This lovely home, on the north side of Chicago, had an existing off-center and set-back entry. Lowry viewed this set-back area as an excellent opportunity to enclose and add to the interior of the home in the form of a Foyer.
Before
Before
Before
Before
With the front entrance now stepped forward and centered, the addition of an Arched Portico dressed with stone pavers and tapered columns gave new life to this home.
The final design incorporated and re-purposed many existing elements. The original home entry and two steps remain in the same location, but now they are interior elements. The original steps leading to the front door are now located within the Foyer and finished with multi-sized travertine tiles that lead the visitor from the Foyer to the main level of the home.
After
After
After
After
After
After
The details for the exterior were also meticulously thought through. The arch of the existing center dormer was the key to the portico design. Lowry, distressed with the existing combination of “busy” brick and stone on the façade of the home, designed a quieter, more reserved facade when the dark stained, smooth cedar siding of the second story dormers was repeated at the new entry.
Visitors to this home are now first welcomed under the sheltering Portico and then, once again, when they enter the sunny warmth of the Foyer.
Find the right local pro for your project
 Lionel F Bailey AIA Architect LLC
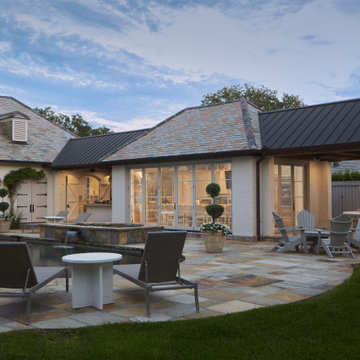
The owners are restaurateurs with a special passion for preparing and serving meals to their patrons. This love carried over into their new outdoor living/cooking area addition. The project required taking an existing detached covered pool pavilion and expanding it into an outdoor living and kitchen destination for themselves and their guests.
To start, the existing pavilion is turned into an enclosed air-conditioned kitchen space with accordion French door units on three sides to allow it to be used comfortably year round and to encourage easy circulation through it from each side. The newly expanded spaces on each side include a fireplace with a covered sitting area to the right and a covered BBQ area to the left, which ties the new structure to an existing garage storage room. This storage room is converted into another prep kitchen to help with support for larger functions.
The vaulted roof structure is maintained in the renovated center space which has an existing slate roof. The two new additions on each side have a flat ceiling clad in antique tongue and groove wood with a lower pitched standing seam copper roof which helps define their function and gives dominance to the original structure in the center.
With their love of entertaining through preparing and serving food, this transformed outdoor space will continue to be a gathering place enjoyed by family and friends in every possible setting.
 Kitchen Tech
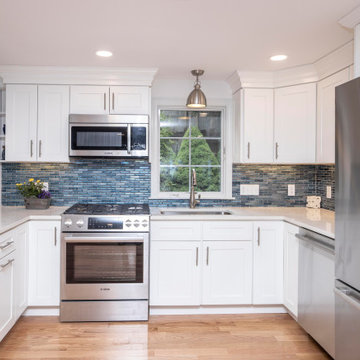
This ocean blue transformation just screams true living on Cape Cod. A 16’x22’ addition was built to the left side of the existing house. The addition included a single car garage and the second level finished living space with a cathedral ceiling. The original kitchen, dining room and living areas were reconfigured and two existing bathrooms were upgraded. New windows were installed throughout the entire house and trimmed on the exterior with Azek.
In the Kitchen stunning JSI Cabinets were used throughout. The back and side of the peninsula cabinets were finished with bead board. MSI calacatta vicenza quartz counter-tops were installed with a Dowell single bowl under mount stainless steel kitchen sink paired with a Kohler Cruette pull down spray kitchen faucet.
The existing two bathrooms were upgraded. On the main floor bath a 36” JSI Dover vanity Wolf granite vanity top with white oval undermount sink (wheat) were installed with a floor bath Kohler enameled cast iron tub. A Kohler Highline comfort height toilet and Kohler Devonshire bath and shower valve with trim Kohler Devonshire center set bathroom sink faucet. The walls in the bathroom had bead board applied at a height of 42” with a top cap. Basement level bathroom had a Sterling 36”x 34” shower stall installed. A JSI Dover vanity Wolf granite vanity top with white oval undermount sink (wheat). A Kohler Highline comfort height toilet Kohler Devonshire shower valve with trim Kohler Devonshire center set bathroom sink faucet. The walls in the bathroom also featured bead board applied at a height of 42” trimmed with a top cap.
The Laundry Existing closet areas on the main floor level at the bathroom was reconfigured for a stacked washer and dryer. A 6 panel pocket door was installed to finalize the room.
 Castle Building & Remodeling
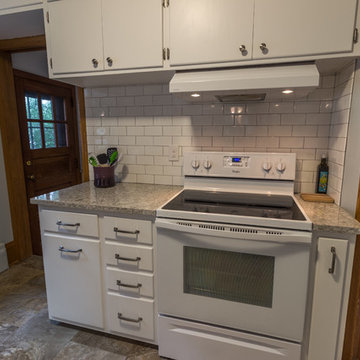
The clients came to Castle Building and Remodeling in need of a Kitchen refresh or remodel. They had lived in their home for over 17 years, and their kitchen was feeling heavy with dark wood millwork and cabinetry, and dated with sterile feeling white tile floor, countertops, and backsplash. They wanted their kitchen to feel more modern and design wise part of the rest of their home. They also wanted to play with open shelving and how that would feel in the space. We took the existing layout of the kitchen and removed all of their existing upper cabinets at their sink, cabinet at their back entrance, base cabinet at their cooktop, appliances (except for their dishwasher and refrigerator), flooring, countertops and worked in their existing footprint. We then replaced their flooring with new Adura Luxury Vinyl Tile, which brings softness to the foot, and easy clean ability. Any cabinetry, whether it be new or existing, was painted Sherwin Williams Extra White. All new backsplash subway tile, open floating shelves, and Cambria New Quay countertops are part of the overall design esthetic. Adding a window pass through at the sink, and creating a new wall where their refrigerator now sits, brings openness to the space. The end result was a more airy modern feeling kitchen, and feels more like the clients’ personality.
 Timberline Patio Covers
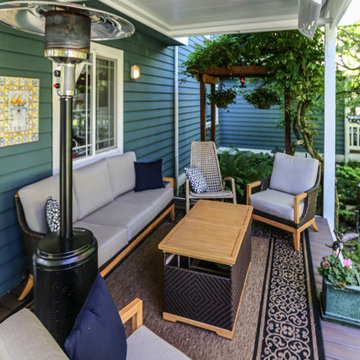
This project transformed an existing outdoor space into a functional, all-season retreat with the addition of a custom waterproof pergola system. Built using white UCS panels with an integrated gutter, the structure provides reliable weather protection while maintaining a clean, modern aesthetic.
The pergola was constructed on the home’s existing 6x6 pressure-treated posts, originally part of a trellis system, allowing for an efficient build while preserving the existing framework. Structural flexibility was built into the design, including provisions for an additional support post and potential height adjustments to ensure long-term performance and adaptability.
To enhance comfort and usability, integrated lighting and a patio heater were added, extending the functionality of the space into the evening and cooler months.
The end result is a refined outdoor living area that combines durability, protection from the elements, and year-round comfort—all while seamlessly blending with the home’s existing structure.

Sponsored
Columbus, OH

Hope Restoration & General Contracting
Columbus Design-Build, Kitchen & Bath Remodeling, Historic Renovations
 Kitchen Solvers of Rochester
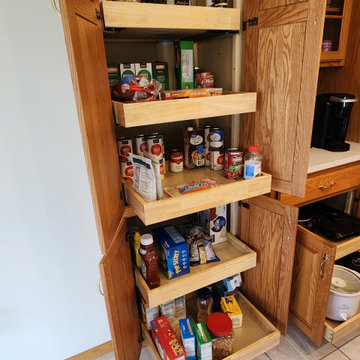
Our clients contacted us to help them update their kitchen. They wanted to first update the countertops, while also adding a backsplash and pullout drawers to their existing pantries. Some of their existing drawers were falling apart and they wanted to update those to soft closed drawer boxes as well. There was also an old appliance garage that they no longer used and wanted to know what we could do to remove that. We proposed to remove the existing cabinet and cut the appliance garage down. This really opened up the space for them, which they loved. We were now ready to install a new Calacatta Lucia quartz countertop and a Raku silver glossy tile backsplash. We also replaced the main and prep sink with new concrete undermount sinks. To finish this transformation, we installed all new dovetailed wood drawer boxes with full-extension undermount soft-close glides in all their existing drawers and the two pantries. Now our homeowners finally have the kitchen of their dreams!
 Jarrett Design
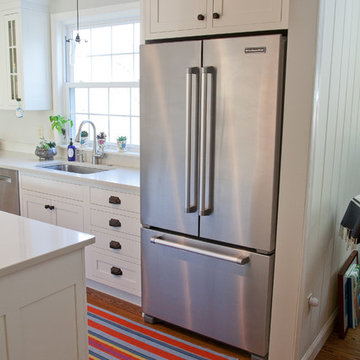
This remodel was a dated 1980s Cape Cod style home that desperately needed updating with the kitchen starting as the foundation for the rest of the home. The owners purchased the property in 2013 with the intent of replacing the existing kitchen installed in 2000, as well as updating most surfaces throughout the home. The space while moderately sized, felt cramped due to the L-shaped design and eat-in island that disrupted traffic flow from the mudroom, dining room and sliding doors to the patio. The owners knew they wanted to bring the light from the southern facing front of the home to the dark cave-like feeling of the kitchen. This was remedied by knocking down the wall between the existing dining room (now a lounge area), widening the entrance to the family room and creating a pathway to the existing formal living room (now the dining room). Also to create better traffic flow into the kitchen, the existing mudroom door was moved to the opposite side of the wall.
A large work island with cooktop, oven and convection/microwave was designed for efficiency and maintaining clean site lines. The work triangle allows for quick and easy meal prep and clean-up for the busy family. Space at the end of the kitchen was perfectly suited for a large kitchen table with views of the back yard, easy conversation with the cook at the island or those hanging in the newly appointed lounge area. The new doorway between the kitchen and dining room showcases the 10ft floor to ceiling bay window, allows more light to flood into the space and creates easy access between the two rooms for family gatherings. Given the home owners relocated to the area for job reasons and are not sure how long they will be in this home, we helped them achieve a balance of a design and finishes that they not only love, but would be appealing to many if another move was in their near future.
Matt Villano Photography
 Drury Design
THE SETUP
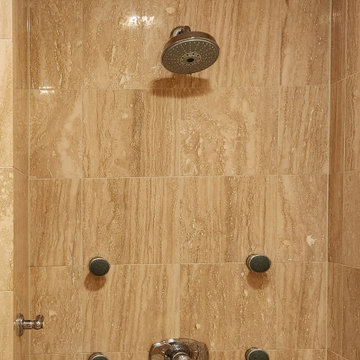
This client lives in a great high-rise condo in downtown Chicago. Alicia has already remodeled a few areas of her home, including her kitchen and home office. The bathroom is one of the last big places the client wanted to update. The existing bathroom had a large, outdated whirlpool tub in the corner. It was a darker space that had a lack of natural light. There are no windows (due to the bathroom’s location within the high-rise building). So, the idea was to brighten up the space and give the client an updated, elegant primary bathroom that is more her style and tailor-made for her routines.
Design Objectives:
- Make the space brighter.
- Create different daily routine stations to maximize functionality while keeping things clutter-free – a makeup station, a blow-dry station, and a sink-needs station.
- Achieve the client’s specific style and function needs while also keeping the look and design open to future possibilities: different users of the space/resale clients.
Design Challenges:
- Toilet cannot be moved. (In a high-rise, you can’t really move plumbing around too much when reimagining a space)
- Existing bathroom had a soffit that hid a lot of electrical wiring, so completely removing the soffit wasn’t an option.
- The blow-dry station needs to accommodate the client’s preference for standing up.
- Finding a place for the make-up station, which the client wants oriented for sitting.
- Create storage within the shower that can eliminate the clutter of personal care products that are actually needed every day. Do this, while keeping the client’s favorite things about the existing shower: the shower bench, a tub filler faucet (for rinsing shaving cream when shaving legs) and a low niche for placing her foot when shaving her legs.
THE RENEWED SPACE
Design Solutions:
- Extended a bit of wall near the toilet to give the commode its own area within the space, but without closing it off into a claustrophobic WC.
- Worked within the reality of the existing soffit situation, reshaping it to align with the new shower. Can lights were also added. Installed a beautiful ceiling light fixture that works within the new soffit shape, commanding attention and adding light, as if the sofit shape was chosen for it.
- Created a nice, furniture-looking 42”-high cabinet with pullout drawers to be the blow-dry station, complete with a mirror and a nice top. The pullout drawers are all powered, concealing a Dyson dryer and curling iron (and all the accoutrements) while keeping them plugged in, which is ideal for easy usage and put away. A stylish mirror on the wall above the cabinet, and proper lighting, make this the perfect blow-dry station. The top has a grommet that can accommodate a power cord should the client ever want to have a powered device on top of the cabinet.
- Put the sit-down makeup station where the tub used to be, putting the mirror back into a new recessed wall just a bit, allowing the area to have more room.
- Created a niche in the shower’s inner wall so that you can’t see it unless you are literally inside the shower. At the client’s request, it also has a hook so she can hang her loofa. Hiding the utility niche in this way allowed us to use the full main wall of the shower as a canvas for a beautiful accent stripe of raised decorative tile. The new shower has her old favorites, too: the tub filler, foot niche and bench.
Alicia’s client loves her new primary bathroom, especially the blow dry area. It is very accommodating for her, as a tall lady, while being very easy to use. The drawers store everything. Being powered, they make using already-plugged in appliances very easy to use and put away.
Her previous makeup station was a freestanding vanity with a single drawer, so beauty products were all over the surface top. With her new makeup station, everything is nicely tucked away and organized in drawers.
The new lighting is fantastic and the colors are light and soft. The clients loves the overall look and feel of her new bathroom and raves about how well the functionality-minded design makes her morning routine – and her life – easier and enjoyable!
 bsq Landscape Architects
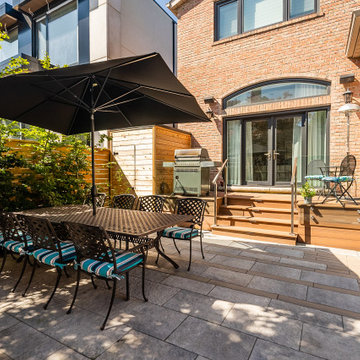
Creating a contemporary garden with an existing landscape can sometimes be a challenge especially if the existing architecture and landscape features may not be as modern feeling as one might want. Introducing carefully chosen elements with clean linear features and strong lines can all help to update a landscape to a much more modern standard.
Deliberate materials and paving elements combined with stainless steel, glass and composite decking along with colourful planters to add that “pop” have all done much to transform this existing landscape while working with the existing pool and house architecture.
 Michael Nash Design, Build & Homes
2011 NARI CAPITAL COTY GRAND AWARD WINNER
A single family home in Oakton, VA built in late 80’ was occupied by family of four for 10 years. The owner wishes to expand the living space, finish the basement, add a sunroom/breakfast area addition, eliminate the deck and put in a screen porch. Also convert the laundry room to office/mudroom area.
It took months of planning to get into the final design.
We have implemented a plan that had a two story back addition (both basement level and first level).
This required removing the cinder block wall of basement to add the seamless addition, and removing the entire first level back wall of kitchen to open up kitchen into sunroom.
The major challenge was to re-route all duct work going to second level, add ducts for basement and first level to existing system. Then add a second HVAC system in attic for entire second level. Then change all load structure for tow story addition to side wall and new walls to have entire width opened up.
The basement has gained a new bar area, a total new bathroom with shower and large vanities and all amenities, media area with gas fireplace and mantel surrounded with matching cherry bookcases and granite tops, recess lights, surround sound system, wood floor and steps, new sewer ejection system due to their difficult septic tank. The new French doors lead into back bricked patio
The first floor gained this new 16’x20’ cathedral ceiling sunroom/breakfast addition surrounded with large arched windows and French slider leading into new screen porch.
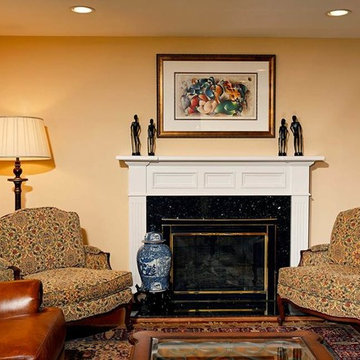
The kitchen lay-out gained three more feet in width. Also by removing partition wall between kitchen and existing family room. The first floor now has total open floor plan. The fireplace in existing family room was converted to gas and got marble surround and new mantel.
All bulkhead and part of partition walls contained massive plumbing and electrical that needed to be relocated in order to implement the new kitchen layout. This design has much more appliances and a beautiful large furniture style island that is the focal point of this kitchen done in espresso color cherry cabinetry and contrasting light color exotic stove top lighted by two crystal chandeliers.
The wrap around of cherry cabinetry in the kitchen with expended cabinetry into butler area and bookcases and bench in sunroom has given this couple lots to fill in.
The entire first floor and leading stairs to second floor and part of the second floor was all covered with new 5” wide exotic Santos Mahogany wood floors and new railings.
The powder room has been reconfigured to allow larger hallway and with new furniture style vanity this powder room even small than before but has better layout and space.
The old Laundry room and has been converted to a 10’x15’ area of multipurpose space. On the left wall there are locker style cabinetry and bench. One the left wall built in and desk area with tones of storage space. The washer and dryer are install into a closet, away from site. A set of French doors were installed into the new back deck and screen porch.
The large porcelain floors made the space look even larger and more utilitarian. Use of cherry cabinetry on deck and bookcase with recess lighting scaled up look of the space.
The new kitchen, family room and sun room with the rich cherry cabinetry and darker granite top, tumbled marble backsplash and wide board mahogany floors, upper scale stainless steel appliances and furniture style distressed look darker wood Island and light granite have made this project a breathtaking one.
The added side screen porch done with Trex decking and cathedral ceiling covered in beaded panel and corner gas fireplace all around covered with Ledgestone has given this family a place to retire in for all those autumn afternoons and much more.
The major overhaul of this home from replacement of all existing doors and windows, flooring, crown molding and trim, stairs, entire first floor reface, new siding , new roofing, new electrical, new HVAC, entire new basement, bathroom, mud room, screen porch and lots more makes these owner proud to stay in this home for years to come.
 Lily-Max Designs
Farmhouse Kitchen at the Lake
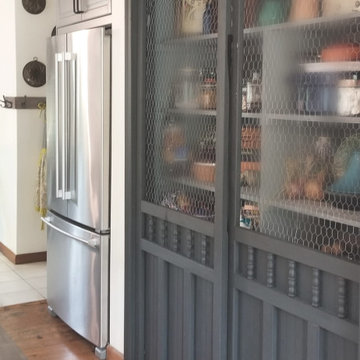
Our clients finally found their home on the lake, but it needed some updating. She loves to cook and entertain, and was excited to finally get her dream kitchen. It needed to feel comfortable, relaxed and timeless, but have ample storage and modern amenities.
- In an effort to keep costs reasonable, we did our best to stay within the footprint of the room. We kept the location of the sink under the window, and also kept the existing floors, which were a mix of wide plank pine and ceramic tile. We also kept the existing stove and dishwasher, but replaced the refrigerator and exhaust.
- We converted the existing two small closets into a much larger open pantry with sliding doors. We painted them black and added chicken wire.
- Kitchen cabinets are Bodbyn by IKEA. We chose glass front uppers to keep the space feeling light and airy. IKEA offered so many fun options for utensils, spices, trash/recycling, etc.
- Butcher block countertops
- Apron sink
- Stainless exhaust
- 3 x 12 White subway tile with and antique glaze (to complement the existing ceramic tile floor) – Ivy Hill Tile | Moze White
- Wall and Shiplap paint – Benjamin Moore | Sugar Cookie
- Pantry doors – Fushion Paints | Coal

Sponsored
Columbus, OH
Hope Restoration & General Contracting
Columbus Design-Build, Kitchen & Bath Remodeling, Historic Renovations
 Benson Homes LLC
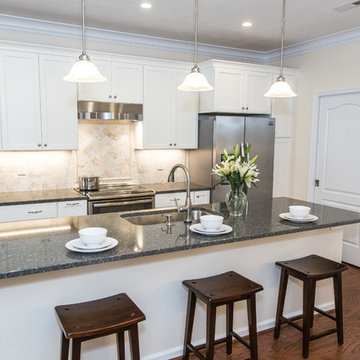
This remodeling story is a wonderful example of how removing and shifting walls can have an amazing impact on the functionality and visual appeal of an entire level of a home. When our clients reached out to us, they were looking to create an open concept Kitchen that would allow for easy entertaining. The couple had recently purchased this townhome so his mother could be closer to the family.
The existing floorplan offered first floor living, but the Kitchen was tucked in the back and was separated from the rest of the living space by a full wall with a small pass through into the Dining Room. Our design involved removing the dividing wall between the Dining Room and Kitchen as well as the fake columns and beam that separated the Dining Room and Living Room. The entire space was opened up to allow for easy flow and view throughout the first floor living space. The wall shared by the Kitchen and large Master Bedroom was shifted back just enough to provide a full wall of additional cabinetry including a much-needed large double Pantry cabinet. Now that we had opened up the Kitchen area we could focus on the cabinetry layout and selections.
The existing wood toned cabinets were replaced with white cabinets and crown molding to match the rest of the home. The larger, open space allowed for more cabinetry and the addition of an island with new undermount sink, dishwasher and convenient trash pullout along with seating for the grandchildren. A new range hood was installed and vented to the exterior of the house to replace the old recirculating hood. We were able to repurpose the some of the existing cabinets for use above the washer and dryer in the adjoining Laundry Room and swapped out the existing swinging door for a pocket door to free up traffic flow when doing Laundry and working in the Kitchen. The slate-look ceramic tile was replaced with a pre-engineered hardwood floor that creates a sense of warmth while easy to clean. The new Cambria countertop compliments the slate-look tile found in the Dining Room and Living Room and a natural field tile backsplash offsets the cabinets beautifully.
The single fluorescent ceiling light was outdated and did not provide adequate lighting for the new Kitchen. The new lighting plan was carefully thought out to provide general illumination through well placed recessed lighting; task lighting through pendant lighting over the island and under cabinet lighting; and aesthetic fluidity with an eye-catching chandelier for the Dining Room table. Special details include a touch faucet, under counter microwave and glass front cabinetry for displaying dishes.
By removing and shifting walls, we improved the entire flow of the first floor visually as well as functionally and created a beautiful, light-filled space for cooking and entertaining. Grandma can easily prepare meals in her new Kitchen and still chat with her guests and grandchildren who love to sit at the island as well as in the adjoining Dining Room and Living Room.
The Benson Homes team really enjoyed creating this space for this family and we hope they will enjoy spending time with friends and family for years to come.
 Timberline Patio Covers
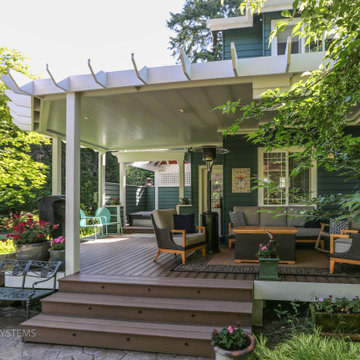
This project transformed an existing outdoor space into a functional, all-season retreat with the addition of a custom waterproof pergola system. Built using white UCS panels with an integrated gutter, the structure provides reliable weather protection while maintaining a clean, modern aesthetic.
The pergola was constructed on the home’s existing 6x6 pressure-treated posts, originally part of a trellis system, allowing for an efficient build while preserving the existing framework. Structural flexibility was built into the design, including provisions for an additional support post and potential height adjustments to ensure long-term performance and adaptability.
To enhance comfort and usability, integrated lighting and a patio heater were added, extending the functionality of the space into the evening and cooler months.
The end result is a refined outdoor living area that combines durability, protection from the elements, and year-round comfort—all while seamlessly blending with the home’s existing structure.
 Michael Nash Design, Build & Homes
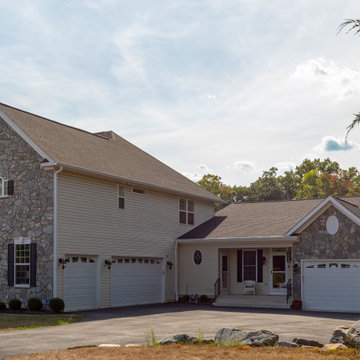
This Virginia couple recently moved into a five-acre lot in Haymarket, VA with the expectation of adding an in-law suite to the right side of their home.
The addition provides complete independence, with its own garage, secondary garage/storage space with built-in ramp, workshop, a master suite and closet, an aging-in-place bathroom, kitchen, and a main living area, along with a front porch overlooking the front of the home.
This couple wanted to maintain the exterior integrity with a seamless connection between the interior and exterior of the home. Matching the front gables, stone and siding fronts, replicating the fascia, windows and doors, garage doors and other details.
The front porch leads to the front door of the main living and kitchen area towards the rear portion. A side door leads into the mudroom and existing home.
The rear side includes a master bedroom suite which leads towards twelve feet of French doors on the back deck of the existing home, connecting the new deck to the existing porch. A large closet space with built-ins is placed just off the bedroom and connects to the master bathroom suite. This bathroom is equipped with large walk-in shower, frameless glass door, a soaking tub, beautiful tile setting, and double vanity space giving the luxury one needs.
The lead staircase connects the upstairs level to the basement level, which includes one multipurpose room, second garage, storage and a workshop. Lots of windows and doors allow plenty of daylight to enter this addition. Outside of the French doors, one can walk onto the basketball court and soccer.
Every element of the existing home was replicated for this addition such as, matching cabinetry, trim work, 10 foot ceiling, wide size wood plank, granite countertops and much more.
The front garage provides direct access from driveway and the interior ramp serves as a walkway.
This family is delighted to have their loved one living just few steps away from them.
 Bespoke Builders
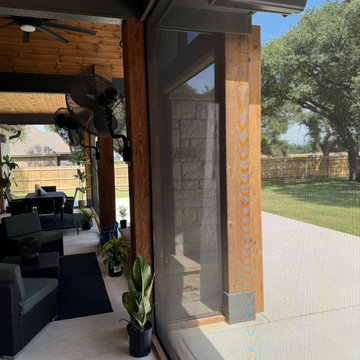
This custom screened-in patio in Central Texas transformed an existing covered outdoor area into a more comfortable and functional living space that can be enjoyed throughout more of the year. Bespoke Builders TX enclosed the patio using stained cedar framing and the ScreenEze screening system, creating a clean, durable finish that complements the home’s existing stone, rooflines, and outdoor architecture.
The enclosure was designed to preserve the open-air feel of the patio while providing protection from mosquitoes, insects, and debris. Large screened openings maintain clear views of the backyard and allow plenty of natural airflow, while the cedar framing adds warmth and architectural character to the space.
The finished patio also retains the existing outdoor fireplace, ceiling fans, recessed lighting, and tongue-and-groove wood ceiling, creating a comfortable outdoor room for relaxing, dining, and entertaining.
Bespoke Builders TX provides screened-in patio construction, ScreenEze installation, cedar framing, patio enclosures, porch remodeling, and outdoor living construction throughout Central Texas. We design custom screen enclosures around the existing home so the finished space feels like an intentional extension of the original architecture rather than an add-on.
Sponsored
Columbus, OH
Hope Restoration & General Contracting
Columbus Design-Build, Kitchen & Bath Remodeling, Historic Renovations
 George Ocampo
Sunset Heights Renovation
This Victorian style home was beautifully designed from the interior to the exterior. Our clients were looking to update the outdoor space, not only was it not functional, but it did not complement their Victorian home.
Although we had a yearlong waiting list for design, our clients were patient and hired us for 3D design.
Many times, our clients already have all the components in place, such as a pool, outdoor kitchen, fireplace, pergola etc., but they just don’t feel right.
The most important feature of our client’s new space was not only the components, but to be able to have a space that would allow them to create a lifetime of memories. From a visual perspective their existing space seemed limited and confined. Our design team was able to see past this and expanded its space to its full potential which allowed us to create multiple destinations for relaxation, enjoyment and most importantly entertainment.
As we began the design process, we were able to take a closer look at the existing space and noticed many safety concerns and how the existing materials did not accentuate the home either.
At the completion of their 3D design, we were able to present new ideas and materials that would enhance the value of the home as well as help them visualize the new space created with multiple destinations.
Ivory travertine coping & decking was a must as was the Talavera blue highlighted tiles for the newly renovated pool. A new working spa and functional outdoor kitchen with bar were two spaces we are sure they would enjoy while spending time outdoors. We enlarged the existing covered patio to expand the seating area to include chaise lounges, a loveseat and chairs under the pergola shade accent.
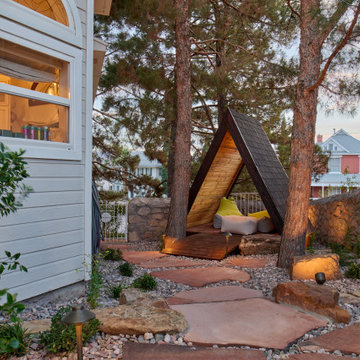
Newest favorite additions are the gas firepit and cabin play fort which can be highly utilized year-round. Our clients say, “The adults love hanging out in the fort too!”
Nestled in the Historic District, our client’s home is now filled with plenty of space and great energy for family gatherings, parties, watching sports, graduations and so much more. Who knows, maybe a future wedding or two! Memories of a lifetime will be made here for years to come!
Architecture and lifestyle are always our focus when designing feel good and functional spaces for our clients!
 Drury Design
The Setup
For this primary bathroom project, the homeowners sought to transform their outdated, beige-toned space into a bright, functional sanctuary. The existing bathroom felt cramped and lifeless, with a small shower and limited storage options. The goal was to create a fresh, updated bathroom that maximizes the existing footprint while addressing specific desires for a more open, organized space with timeless materials.
Design objectives:
Brighten the bathroom and eliminate the dated beige color scheme
Install a freestanding tub in a compact space
Create a larger, more open shower without encroaching on the existing foot print too much
Incorporate hidden storage solutions
Maintain the existing bathroom layout while improving functionality
Update lighting and fixtures to create a contemporary feel
The Remodel
Design challenges to be solved:
- Compact Space Utilization – The small bathroom required careful planning to accommodate a freestanding tub while maintaining functionality and avoiding overcrowding.
- Hidden Storage Integration – The clients wanted a discreet hamper solution that wouldn’t clutter the limited floor space.
- Shower Niche Placement – With plumbing limitations and the clients’ desire to preserve their wavy accent tile wall, finding the perfect niche spot became a creative puzzle.
- Tile and Finish Coordination – Selecting complementary white tile and floor materials that worked harmoniously together.
- Larger Shower Space – Make the shower feel more open and brighter
The Renewed Space
Design solutions:
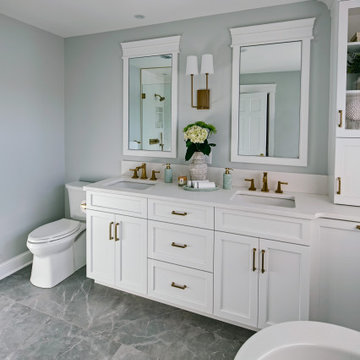
- Strategic Tub Placement – The freestanding tub was carefully positioned to maximize space, with its faucet strategically placed to allow easy access while preserving walking room. We reduced the counter depth just a bit by the tub, allowing more room for hamper cabinet and window access.
- Concealed Hamper Storage – A custom pull-out hamper was integrated into the vanity (right side, by tub), providing discreet storage within an 18-inch depth constraint.
- Shower Plumbing Wall Niche – We shifted the niche left, just enough to work around the plumbing infrastructure and still score a roomy storage spot that looks intentional.
- Sophisticated Selections – Porcelanosa curvy white tile, Kohler brushed gold fixtures, and a neutral grey tile floor created a simple, timeless aesthetic that will be loved years to come.
- Open Shower – Replacing the side wall with a clear glass surround, continuing the tile on the ceiling and extending the footprint opened up this area to the room while allowing more natural lighting into the shower space.
This bathroom transformation shows how thoughtful design turns challenges into opportunities. Brushed gold fixtures add warmth to the fresh white palette, while the perfectly balanced floor tile brings just the right depth. A partially glass-fronted vanity introduces subtle charm, giving the space a unique edge. Once cramped and outdated, this bathroom now feels bright, spacious, and serene—a testament to how every design detail makes a difference.
 Homeowner Services of Michigan LLC
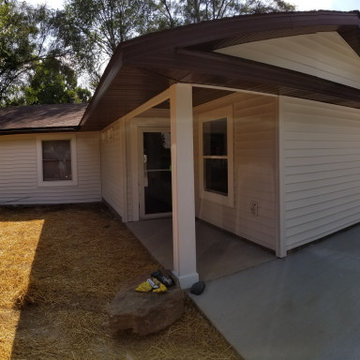
Homeowner Services of Michigan (HSM) is excited to share the details of a new 16' x 22' family room expansion in Ann Arbor, Michigan. This project reflects our dedication to meeting our clients' specific needs.
Our clients approached us needing more space for their growing family and wanted a seamless integration with their existing home. After thorough consultations, we developed a plan to bring their vision to life.
The project began with careful architectural planning. We worked with a local architect to create detailed plans and secured all necessary permits to ensure compliance with local building codes.
Site preparation involved demolishing an existing carport, grading, and excavation to prepare the building pad for the new foundation. This step was essential to ensure a stable base for the construction.
Our team then focused on structural framing, tying the new addition to the existing home. We ensured that the new structure matched the current architectural style for a seamless blend. The addition was then roofed and sheathed to provide a sturdy and weatherproof exterior.
Next, we addressed the electrical work, installing new circuits for lighting, HVAC, and receptacles, and adding smoke and carbon monoxide detectors to meet safety standards. A licensed journeyman electrician performed the electrical service to ensure high-quality and compliant installations.
Insulation and drywall installation followed. We installed batt insulation to meet or exceed Michigan Energy Code requirements. The interior surfaces were finished with drywall, taping, mudding, sanding, and priming to prepare for painting. Baseboard molding and trim around doors and windows added the finishing touches.
Exterior features were also important. We framed and installed new windows and a front entry door and added a front eyebrow vent feature to match the existing structure. Vinyl siding was installed to complete the exterior, ensuring a cohesive look and enhanced curb appeal.
Throughout the project, we maintained a clean and professional worksite, disposing of debris responsibly and minimizing disruption to the client's daily lives. Our focus was always on delivering quality and ensuring client satisfaction.
This home addition project highlights our commitment to understanding and fulfilling our clients' needs. We are proud to have added valuable space and enhanced the overall functionality and aesthetic of the home.
These folks had a vision, a budget, and a whole lot of patience. We got through this family room remodel during a global pandemic. What great people to work with!
108