
Search results for "Fortune" in Home Design Ideas

 Costa Bella Builders
Our client was a family with younger children that came to us through the recommendations of former customers. Their existing house had been remodeled by them 10 years earlier and was well-suited to the married couple. With the addition of two younger children, they realized that the house just didn’t function very well for their family. Fortunately, the husband and wife took their time thinking about what they wanted, and by the time they met with us, had their needs well laid out. We brought in local Architect, James Stroupe, and recommended him to the client as a collaborative professional who could help us achieve their goals. This proved to be the case. Jim quickly produced design drawings for them within six weeks that clearly reflected all of the client’s needs and preferences while at the same time dramatically re-creating the home in a beautiful contemporary design.
The new home required a complete reconstruction of the existing house that left only one bathroom unaltered. New square footage was added at the lower level to expand and reconfigure the living area, while an entirely new upstairs wing was constructed to create space for a new master suite with views out toward the ocean. The entire roof was rebuilt, all new windows and interior doors were added and the full exterior received a new modern looking stucco finish. Stainless steel cable railings were added to the decks to create an updated look, and fine hardwood accents were used to pull the design together.
Our efforts produced a new three bedroom, three bath home with a large and inviting ground floor patio area, wide open living areas on the first floor with new kitchen, bathroom and dining room. The photographs in this section show the striking results- clean lines, dramatic architectural touches, and light, open and airy interior spaces. Our client was very pleased with the results.

 Hearthstone Inc
Vice president of sales for Hearthstone Inc., Chris Wood, has been fortunate to help design many custom homes (and a few light commercial structures) nationwide during his 32 years in the business but he assures that Big Woods Speedway holds a special place in his heart. From initial sketch to completion, Big Woods Speedway took approximately (14) months. There are 1,808 wooden pegs, not nails, holding together 126050 lbs of massive timber beams.
Big Woods® Speedway rests on the corner of 10th and Main streets in historic downtown Speedway, Ind. The expansive timber frame structure hearkens back to the original brew pub in Nashville, Ind. But now, Big Woods Speedway has something to offer for everyone. The lofty ceilings, mammoth wood beams, liquor lounge, big-screen televisions, patio tables, Indy 500 tribute beers, house-smoked pulled pork, and from-scratch pizza provide an enjoyable experience for the whole family.
“Watching this small town brewery startup and grow exponentially since must be credited to the owner, Jeff McCabe,” says Wood. Wood had the chance to enjoy the atmosphere of the Big Wood Speedway’s finished project with three generations of his own family. Founded by by Tim O'Brien, Ed Ryan and Jeff McCabe, Big Woods is dedicated to creating great beers in styles and flavors that appeal not only to craft beer aficionados, but to the average beer drinker too.
“We're not just building structures,” says Wood, ‘These awesome heavy timber buildings are the result of building relationships.’” “The teamwork, location, owner involvement, and overall concept made the long hours and tight time schedule worth it,” he adds.

 Story Homes
“If everyone is moving forward together,
then success takes care of itself.”
- Henry Ford
It’s no secret that one big reason for Jacobson Construction’s success is because of our people. I’ve always hired the best people who work together as a team while respecting our customers. These are real professionals who work together and get the job done.
Sean, our project leader, has been with me since 1995, and my electrician has been with me even longer. Many of my current staff have been with me for over 15 years. I am fortunate to have these skilled professionals working with me.
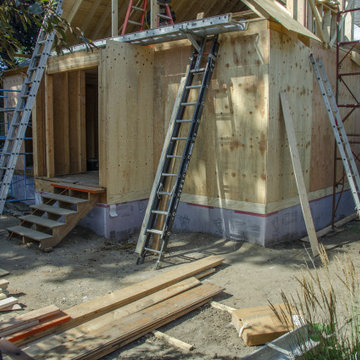
The addition is coming along. There’s a hole in the kitchen where there used to be a supporting wall. Framing’s done in the basement, and a gas fireplace is ready to be installed. The second-floor dormers are framed, and all of our windows have been delivered.
Now that it’s taking shape, looks like one of our new favorite spaces will be the new second-floor bedroom. Because it’s adjacent to the master suite it could make an ideal nursery and add value to my home.
Paying for things you can’t see is hard. For example, putting on a new roof is expensive, and because you can’t see it this seems like an even bigger expense.
What you can’t see on this addition is how much effort is made in securely tying the addition to the existing home – originally built in 1936.
We needed to support part of the old roof and all the new roof with stacked support posts. To do that we installed 3 stacked posts to carry the load from new footings in the basement to the beam three stories up.
The red marked beam in the photo at the top of the page is supported by footings three stories below, halfway into the existing home.
We also physically connected the new addition with beams that extend halfway into the current home.
Find the right local pro for your project
 Story Homes
“If everyone is moving forward together,
then success takes care of itself.”
- Henry Ford
It’s no secret that one big reason for Jacobson Construction’s success is because of our people. I’ve always hired the best people who work together as a team while respecting our customers. These are real professionals who work together and get the job done.
Sean, our project leader, has been with me since 1995, and my electrician has been with me even longer. Many of my current staff have been with me for over 15 years. I am fortunate to have these skilled professionals working with me.
The addition is coming along. There’s a hole in the kitchen where there used to be a supporting wall. Framing’s done in the basement, and a gas fireplace is ready to be installed. The second-floor dormers are framed, and all of our windows have been delivered.
Now that it’s taking shape, looks like one of our new favorite spaces will be the new second-floor bedroom. Because it’s adjacent to the master suite it could make an ideal nursery and add value to my home.
Paying for things you can’t see is hard. For example, putting on a new roof is expensive, and because you can’t see it this seems like an even bigger expense.
What you can’t see on this addition is how much effort is made in securely tying the addition to the existing home – originally built in 1936.
We needed to support part of the old roof and all the new roof with stacked support posts. To do that we installed 3 stacked posts to carry the load from new footings in the basement to the beam three stories up.
The red marked beam in the photo at the top of the page is supported by footings three stories below, halfway into the existing home.
We also physically connected the new addition with beams that extend halfway into the current home.
 Kitchen Tune-Up Franchise System
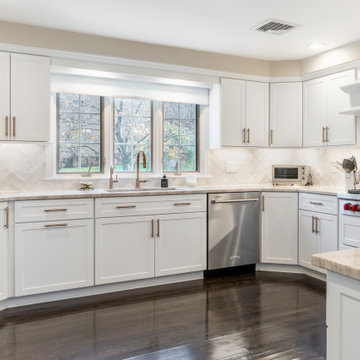
Your kitchen is the heart of your home, but if it's outdated and in desperate need of a makeover, it can be difficult to enjoy spending time in it. Fortunately, a kitchen reface update can completely transform your space and give it a fresh, modern look without the need for a full remodel. And if you're looking for a timeless and elegant design, a white shaker reface may be just what you need.
Why Choose a White Shaker Reface?
The white shaker style is a classic design that has been popular for decades. It features clean, simple lines and a versatile color that can be easily paired with a wide range of decor styles. White shaker cabinets are also a great choice for those who want a bright and airy kitchen, as the light color reflects natural light and makes the space feel larger.
When it comes to a reface update, choosing a white shaker design can help to modernize your kitchen and make it feel more up-to-date. Whether your existing cabinets are dark and dated, or simply in need of a refresh, a white shaker reface can give them a fresh new look that will stand the test of time.
The Refacing Process
One of the benefits of a reface update is that it is a much quicker and less invasive process than a full remodel. Instead of tearing out your existing cabinets and starting from scratch, a reface involves removing the doors and drawers and replacing them with new ones that are custom-made to fit your existing cabinets.
In the case of a white shaker reface, your new doors and drawers will feature the classic shaker style, with clean lines and a fresh white finish. You may also choose to update other elements of your kitchen, such as the hardware or countertops, to complete the look.

 Bynum Design Group
As master of the perfect mix, LaMont Bynum can magically transform a raw space or breathe new life into what already exists.
His education in interior design combined with his penchant for problem solving and passion for transforming lives led to him following his calling to become a designer. Lamont thrives on working with clients to refine a vision and make it reality. He believes happiness is not something you postpone for the future; it is something you design for the present.
LaMont is a native of Suffolk, VA, a small town with a rich heritage. A Southern gentleman, he developed an eye for color, good design and great style early on. He grew up in a family whose love for interior design led to friendly family design competitions. The “creative types” who raised him served as his primary source of inspiration.
A graduate of Howard University, Lamont worked in hospitality sales and marketing before opening Rite At Home, Atlanta‘s premier consignment furniture boutique, in 2012. He serves on the Board of Directors for Rebuilding Together Atlanta, an organization working to ensure that low-income homeowners — particularly older adults, military veterans, people with disabilities and families with children — are able to live in warmth, safety and independence. Also, he chairs the Board of Directors for the Adamsville Business and Community Partnership. Lamont is always looking for ways to impact communities through engagement and design.
He has worked with Fortune 500 companies to develop their work and fun spaces for employees and even designed their CEO’s personal living spaces. LaMont believes no project is too small or too big, everyone deserves an environment conducive to dream, relax and make life happen.
With timeless, sophisticated taste, LaMont’s design style is classy, inviting, and also incredibly detail oriented. His ability to transform both residential homes and commercial projects by layering rich textures, colors, and fabrics has placed him on Atlanta’s Top 25 Designer List four times.

 Jarrett Design
These clients win the award for ‘Most Jarrett Design Projects in One Home’! We consider ourselves extremely fortunate to have been able to work with these kind folks so consistently over the years.
The most recent project features their master bath, a room they have been wanting to tackle for many years. We think it was well worth the wait! It started off as an outdated space with an enormous platform tub open to the bedroom featuring a large round column. The open concept was inspired by island homes long ago, but it was time for some privacy. The water closet, shower and linen closet served the clients well, but the tub and vanities had to be updated with storage improvements desired. The clients also wanted to add organized spaces for clothing, shoes and handbags. Swapping the large tub for a dainty freestanding tub centered on the new window, cleared space for gorgeous his and hers vanities and armoires flanking the tub. The area where the old double vanity existed was transformed into personalized storage closets boasting beautiful custom mirrored doors. The bathroom floors and shower surround were replaced with classic white and grey materials. Handmade vessel sinks and faucets add a rich touch. Soft brass wire doors are the highlight of a freestanding custom armoire created to house handbags adding more convenient storage and beauty to the bedroom. Star sconces, bell jar fixture, wallpaper and window treatments selected by the homeowner with the help of the talented Lisa Abdalla Interiors provide the finishing traditional touches for this sanctuary.
Jacqueline Powell Photography

 Jack Calderone
This custom kitchen is part of an adventuresome project my wife and I embarked upon to create a complete apartment in the basement of our townhouse. We designed a floor plan that creatively and efficiently used all of the 385-square-foot-space, without sacrificing beauty, comfort or function – and all without breaking the bank! To maximize our budget, we did the work ourselves and added everything from thrift store finds to DIY wall art to bring it all together.
My wife is an avid reader and loves the look and smell of old books so when we were ready to decorate, the used book store was the natural place to go. We combed the children’s section and bought every old book with a blue or orange cover. Fortunately, the store was having a buy three get four free sale! We filled out the rest of the décor with thrift store finds.
 Tile Doctor Ltd
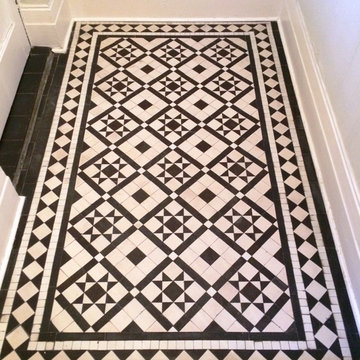
This job was at a house in near Windermere in South Cumbria, a place which is very popular amongst tourists to the Lake District. My client had a Black and White Victorian tiled floor in dire need of a clean and re-seal.
Prior to the application of any cleaning products, my first task was to run damp tests to make sure there were no inherent damp problems. With old floors of this type it’s good to know if there is a damp problem as this will affect the choice of sealer and also the length of time the floor requires to dry.
Fortunately, there were no damp issues present, and I was able to proceed however had the floor been damp and being December I would have offered to carry out the clean and seal in the Summer, when the water tables were lower and the damp levels would be more settled, thus creating a better environment for the sealer to operate in.
I started cleaning the Victorian tiles with Tile Doctor Remove & Go, a product which breaks down old sealers in preparation for a fresh seal to be applied. The product is diluted with water and then scrubbed into the floor with a scrubbing pad fitted to rotary machine; the resulting slurry is then removed using a wet vacuum.
Next step was to apply Tile Doctor Pro-Clean which was applied liberally to the floor, left to dwell for a short period and then agitated with a black scrubbing pad to lift out the ingrained dirt. I also paid special attention to cleaning the grout lines with a stiff scrubbing brush. The floor was then rinsed with clean water, and the resulting residue was extracted using a wet-vac machine.
After the cleaning was completed, the tiles were left for a couple of days to allow them ample time to dry. Upon my return to the house I checked the damp levels again and then applied two coats of the impregnating, colour enhancing sealer Tile Doctor Colour Grow which gives the black tiles more depth of colour, along with the robust surface seal and Matt finish my client had requested.
My client was exceptionally pleased the results – but really, the photographs speak for themselves.
Heidi Taylor
South Cumbria

 Jarrett Design
These clients win the award for ‘Most Jarrett Design Projects in One Home’! We consider ourselves extremely fortunate to have been able to work with these kind folks so consistently over the years.
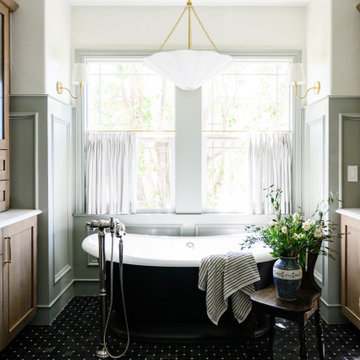
The most recent project features their master bath, a room they have been wanting to tackle for many years. We think it was well worth the wait! It started off as an outdated space with an enormous platform tub open to the bedroom featuring a large round column. The open concept was inspired by island homes long ago, but it was time for some privacy. The water closet, shower and linen closet served the clients well, but the tub and vanities had to be updated with storage improvements desired. The clients also wanted to add organized spaces for clothing, shoes and handbags. Swapping the large tub for a dainty freestanding tub centered on the new window, cleared space for gorgeous his and hers vanities and armoires flanking the tub. The area where the old double vanity existed was transformed into personalized storage closets boasting beautiful custom mirrored doors. The bathroom floors and shower surround were replaced with classic white and grey materials. Handmade vessel sinks and faucets add a rich touch. Soft brass wire doors are the highlight of a freestanding custom armoire created to house handbags adding more convenient storage and beauty to the bedroom. Star sconces, bell jar fixture, wallpaper and window treatments selected by the homeowner with the help of the talented Lisa Abdalla Interiors provide the finishing traditional touches for this sanctuary.
Jacqueline Powell Photography
 Costa Bella Builders
Our client was a family with younger children that came to us through the recommendations of former customers. Their existing house had been remodeled by them 10 years earlier and was well-suited to the married couple. With the addition of two younger children, they realized that the house just didn’t function very well for their family. Fortunately, the husband and wife took their time thinking about what they wanted, and by the time they met with us, had their needs well laid out. We brought in local Architect, James Stroupe, and recommended him to the client as a collaborative professional who could help us achieve their goals. This proved to be the case. Jim quickly produced design drawings for them within six weeks that clearly reflected all of the client’s needs and preferences while at the same time dramatically re-creating the home in a beautiful contemporary design.
The new home required a complete reconstruction of the existing house that left only one bathroom unaltered. New square footage was added at the lower level to expand and reconfigure the living area, while an entirely new upstairs wing was constructed to create space for a new master suite with views out toward the ocean. The entire roof was rebuilt, all new windows and interior doors were added and the full exterior received a new modern looking stucco finish. Stainless steel cable railings were added to the decks to create an updated look, and fine hardwood accents were used to pull the design together.
Our efforts produced a new three bedroom, three bath home with a large and inviting ground floor patio area, wide open living areas on the first floor with new kitchen, bathroom and dining room. The photographs in this section show the striking results- clean lines, dramatic architectural touches, and light, open and airy interior spaces. Our client was very pleased with the results.

 Hand painted wallpaper NSR Handcrafts
NSR handcrafts
hand painted wallpaper, chinoiserie wallpaper,
hand painted silk wallpaper, chinoiserie silk wallpaper
 Jarrett Design
These clients win the award for ‘Most Jarrett Design Projects in One Home’! We consider ourselves extremely fortunate to have been able to work with these kind folks so consistently over the years.
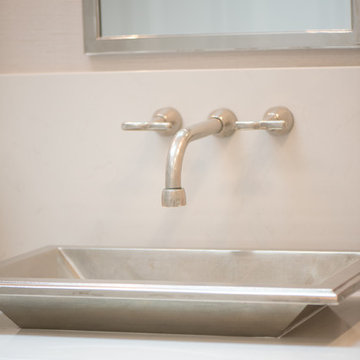
The most recent project features their master bath, a room they have been wanting to tackle for many years. We think it was well worth the wait! It started off as an outdated space with an enormous platform tub open to the bedroom featuring a large round column. The open concept was inspired by island homes long ago, but it was time for some privacy. The water closet, shower and linen closet served the clients well, but the tub and vanities had to be updated with storage improvements desired. The clients also wanted to add organized spaces for clothing, shoes and handbags. Swapping the large tub for a dainty freestanding tub centered on the new window, cleared space for gorgeous his and hers vanities and armoires flanking the tub. The area where the old double vanity existed was transformed into personalized storage closets boasting beautiful custom mirrored doors. The bathroom floors and shower surround were replaced with classic white and grey materials. Handmade vessel sinks and faucets add a rich touch. Soft brass wire doors are the highlight of a freestanding custom armoire created to house handbags adding more convenient storage and beauty to the bedroom. Star sconces, bell jar fixture, wallpaper and window treatments selected by the homeowner with the help of the talented Lisa Abdalla Interiors provide the finishing traditional touches for this sanctuary.
Jacqueline Powell Photography

 River Valley Landscapes
The property is one of the original farm houses located on the main street of a small town. It has been in the family for many years and our client just inherited the property. They were trying to have balance of preserving the old while realizing modern day living has its benefits too. The house had a large addition added using mostly old style materials, but designed with function and modern day luxuries. Our goal was to carry that theme to the outside.
Our first problem we had to address was how to transition between the first floor elevation changes. The lower room was the husband’s office. He stated in the future he may have clients over and it would be nice to have an area to sit outside. The wife’s main concern was to renew the four corner garden. She also felt it was very important to be able to see it from the kitchen area. Finally there was an old wishing well stuck right outside the kitchen. They both felt it would be neat to be able to incorporate this in some how. They wanted a patio area with a built in grill to accommodate there family and friends. They also wanted to keep a large play area for the kids.
We were able to pull this off successfully. We addressed the first issue by having a small lower level flagstone area. This area is large enough for 1 to 2 people to sit comfortably. It also provides a transition from his office to the larger patio area. We installed a simple small gravel sitting area opposite of the main patio. This provides our client a secluded place to relax or do business. Mrs.... told me she is amazed how much her and her husband enjoys this area. It is so peaceful looking at the small creek over a glass of wine.
We built a natural limestone retaining wall to create the patio terrace. The stone was chosen to extend the houses architectural elements into the landscape. Irregular broken flagstone was used to give it a more casual feel. We installed three Serviceberries into the patio terrace to replace some trees that were taken down during the remodeling. She was very concern that they would block the view of the four corner garden. We new they were crucial to nestle in the terrace, so we placed them for a couple days for her to decide. Fortunately she agreed they not only kept the view open, but helped frame the garden.
The four corner garden was designed to be viewed from afar and experienced up close. We wanted the space to have some formal structure while keeping with the casual farm house feel. Another natural limestone retaining wall was created. This leveled the garden terrace and helped associate it with the rest of the property. The four corner garden is nestled into the existing woods edge. This provides three distinct experiences to entering the garden; a more formal from the driveway, an open feel from the lower lawn, and a more natural / casual experience from the wooded area. The Plymouth brown gravel was used for the center of the garden. This helped highlight the stone post that was found during construction. The gravel also brings the sense of sound into the garden space. Lamb’s ear was chosen as a fun way to get kids interest in horticulture.
The balance of using the new to create the old feel is what makes this project a success. The property has already hosted a local historical society event and won an award for its preservation efforts. When Mrs.... can’t find her husband, she knows he is either reading the newspaper by the grill or resting in the hammock along the wood’s path.

 Robin's Nest Interiors
Updated Spec Home: Basement Bathroom
In our Updated Spec Home: Basement Bath, we reveal the newest addition to my mom and sister’s home – a half bath in the Basement. Since they were spending so much time in their Basement Family Room, the need to add a bath on that level quickly became apparent. Fortunately, they had unfinished storage area we could borrow from to make a nice size 8′ x 5′ bath.
Working with a Budget and a Sister
We were working with a budget, but as usual, my sister and I blew the budget on this awesome patterned tile flooring. (Don’t worry design clients – I can stick to a budget when my sister is not around to be a bad influence!). With that said, I do think this flooring makes a great focal point for the bath and worth the expense!
On the Walls
We painted the walls Sherwin Williams Sea Salt (SW6204). Then, we brought in lots of interest and color with this gorgeous acrylic wrapped canvas art and oversized decorative medallions.
All of the plumbing fixtures, lighting and vanity were purchased at a local big box store. We were able to find streamlined options that work great in the space. We used brushed nickel as a light and airy metal option.
As you can see this Updated Spec Home: Basement Bath is a functional and fabulous addition to this gorgeous home. Be sure to check out these other Powder Baths we have designed (here and here).
And That’s a Wrap!
Unless my mom and sister build an addition, we have come to the end of our blog series Updated Spec Home. I hope you have enjoyed this series as much as I enjoyed being a part of making this Spec House a warm, inviting, and gorgeous home for two of my very favorite people!

 Zag Built LLC
3House Media
Example of a mid-sized trendy open concept concrete floor and multicolored floor living room design in Denver with gray walls, a metal fireplace and a wall-mounted tv
Example of a mid-sized trendy open concept concrete floor and multicolored floor living room design in Denver with gray walls, a metal fireplace and a wall-mounted tv
 Jarrett Design
These clients win the award for ‘Most Jarrett Design Projects in One Home’! We consider ourselves extremely fortunate to have been able to work with these kind folks so consistently over the years.
The most recent project features their master bath, a room they have been wanting to tackle for many years. We think it was well worth the wait! It started off as an outdated space with an enormous platform tub open to the bedroom featuring a large round column. The open concept was inspired by island homes long ago, but it was time for some privacy. The water closet, shower and linen closet served the clients well, but the tub and vanities had to be updated with storage improvements desired. The clients also wanted to add organized spaces for clothing, shoes and handbags. Swapping the large tub for a dainty freestanding tub centered on the new window, cleared space for gorgeous his and hers vanities and armoires flanking the tub. The area where the old double vanity existed was transformed into personalized storage closets boasting beautiful custom mirrored doors. The bathroom floors and shower surround were replaced with classic white and grey materials. Handmade vessel sinks and faucets add a rich touch. Soft brass wire doors are the highlight of a freestanding custom armoire created to house handbags adding more convenient storage and beauty to the bedroom. Star sconces, bell jar fixture, wallpaper and window treatments selected by the homeowner with the help of the talented Lisa Abdalla Interiors provide the finishing traditional touches for this sanctuary.
Jacqueline Powell Photography
 Costa Bella Builders
Our client was a family with younger children that came to us through the recommendations of former customers. Their existing house had been remodeled by them 10 years earlier and was well-suited to the married couple. With the addition of two younger children, they realized that the house just didn’t function very well for their family. Fortunately, the husband and wife took their time thinking about what they wanted, and by the time they met with us, had their needs well laid out. We brought in local Architect, James Stroupe, and recommended him to the client as a collaborative professional who could help us achieve their goals. This proved to be the case. Jim quickly produced design drawings for them within six weeks that clearly reflected all of the client’s needs and preferences while at the same time dramatically re-creating the home in a beautiful contemporary design.
The new home required a complete reconstruction of the existing house that left only one bathroom unaltered. New square footage was added at the lower level to expand and reconfigure the living area, while an entirely new upstairs wing was constructed to create space for a new master suite with views out toward the ocean. The entire roof was rebuilt, all new windows and interior doors were added and the full exterior received a new modern looking stucco finish. Stainless steel cable railings were added to the decks to create an updated look, and fine hardwood accents were used to pull the design together.
Our efforts produced a new three bedroom, three bath home with a large and inviting ground floor patio area, wide open living areas on the first floor with new kitchen, bathroom and dining room. The photographs in this section show the striking results- clean lines, dramatic architectural touches, and light, open and airy interior spaces. Our client was very pleased with the results.
 Tile Doctor Ltd
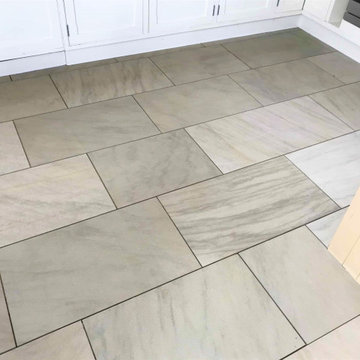
I received an enquiry from a property in Crowthorne to come and survey an unknown Flagstone Floor in a converted barn that was ready to be rented out. The owners where concerned the stone was letting the rest of the property down due to it being dirty and heavily stained, particularly around the kitchen and entrance areas. If your selling or renting out a property it really needs to look its best if you want to achieve a good price. Having spoken over the phone we agreed a date for me to pop over to complete a survey.
From further inspection I confirmed the stone was in fact a Sandstone, it was also clear that the sealer protecting the stone from ingrained dirt had worn away and was now allowing dirt and staining to ruin the appearance of the flagstones. It was a large floor so I measured up so I could work out the quantities of cleaning and sealing products needed and then walked the customer through the cleaning process. Later that day I sent over a detailed quotation which was accepted, and a date agreed for my return.
I should mention this work took place during the Covid restrictions, fortunately being a rental property, I was able to work in the property alone.
To deep clean the floor and remove the ingrained dirt and staining I used a strong dilution of Tile Doctor Pro-Clean. It is sprayed onto the floor and left to soak in for five minutes before agitating with a Black scrubbing pad fitted to a weighted buffing machine. The resultant slurry was then wet extracted away using a powerful high-pressure van mounted extracting system.
This action cleaned up most of the stone nicely however certain areas where heavily stained, particularly in the kitchen area where food and drink stains were more apparent. To tackle this, I applied a stronger cleaner/stripper product called Tile Doctor Remove and Go this time allowing ten minutes for it to soak in before scrubbing the surface with a very coarse 100-grit soft milling pad. This took quite a few attempts each time extracting the slurry away and then inspecting the floor to see if more work was needed.
Happy the stains have been removed, I then focused on renovating the surface Sandstone after the application of the coarse pad. This involves the application of several finer grit burnishing pads which close the pores and adds a subtle polish to the Sandstone. As I started with 100-grit pad it was necessary to gradually refine the surface with an incremental series of pads that included 200, 400 and finally 800-grit pads. Then to ensure a uniform finish across the floor I continued the 400 and 800 grit pads throughout the property. Water is used to lubricate the process and this turns into a fine slurry that is rinse extracted as before.
The cleaning process took up the whole of the first day and I am pleased to say the Sandstone floor looked very clean after I had finished.
The stone was then allowed dry off overnight with the aid of an industrial air mover and I returned later the next day to apply a new protective seal. In the meantime, my customer had been over to check out the floor and were over the moon with how it looked and wanted to keep the finish as natural as possible.
With this in mind, I applied Tile Doctor Ultra-Seal sealer to the Sandstone throughout, only two coats were needed. This is a premium sealer that is almost invisible and works by penetrating the stone thus preventing dirt from becoming ingrained. Once done the floor looked very clean and much brighter than before, it now had that wow factor which will help it attract a good yield in the rental market.
The trouble with rental properties of course is making sure the tenant uses the right product to maintain the floor and not a typical supermarket tile cleaner that are only designed for use on Ceramic and Porcelain tiles. In fact, these types of cleaning product can slowly strip the sealer off the floor so it’s always worth checking the label before purchasing. Fortunately Tile Doctor sells a product called Neutral Cleaner that is ideal for maintaining sealed stone floors, so I left them with a complimentary bottle and recommended they get some more to leave under the sink for the new tenant.
Dennis Buckland
Berkshire Tile Doctor
132