
Search results for "Isolate" in Home Design Ideas
 7 Day Kitchens
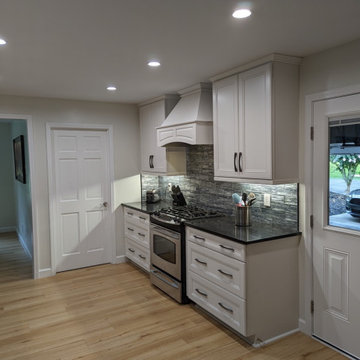
This charming family home in Belmont was in dire need of some tender loving care. The original builder-grade cabinetry and countertops were outdated and in need of an upgrade.
The kitchen was once isolated from the dining room and living room, making entertaining guests a real chore. Cooking in the kitchen meant being cut off from the rest of the household, leading to a disconnect during family time. So, we decided to make some sweeping changes.
The most transformative change was the removal of the load bearing wall separating the kitchen and living room. This created a spacious open-concept kitchen with a massive island, perfect for hosting and socializing. We upgraded the cabinets to reflect a contemporary aesthetic and added a stunning hood vent. The built-in hutch was replaced by a refrigerator and beverage center, providing ample storage space and more practical usage. The kitchen was also equipped with modern features such as roll-out trays, a trash can pull-out, spice racks, and utensil organizers. We replaced the older-style double door base cabinets with modern drawer bases for easy access, and increased the height of the cabinets from 30 inches to 36 inches, giving the kitchen a fresh, airy look and additional storage space.
The laundry room also received a makeover, with new cabinets above the washer and dryer and a tall linen/storage closet, making it more functional and storage-friendly. The small pantry closet was transformed into a sprawling 12 foot deep walk-in pantry with new shelves, cabinetry and lighting, providing ample space for all your pantry essentials. We also upgraded the flooring on the first floor with durable LVP flooring, elevating the overall aesthetic and feel of the home. All of these changes were completed in a mere 21 days, from start to finish.
 McCullough's Flooring
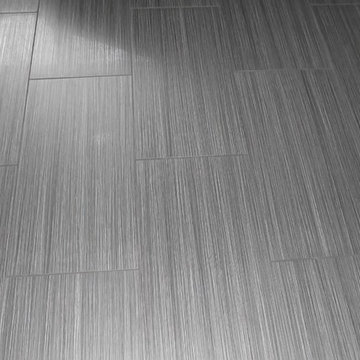
Gorgeous master bath finished with Dal-Tile's Fabrique porcelain tile in the color Noir Linen polished. Tile size is 12"x24" installed in a brick joint pattern. The floor boasts underfloor heating on a timed thermostat.
 Michael Nash Design, Build & Homes
2011 CAPITAL COTY AWARD HONORABLE MENTION AWARD WINNER
Built circa 1980, a young couple with three children originally purchased this home for their growing family. After four years of karate, soccer, piano and other activities, however, the home was becoming too small to meet their needs.
Problems started upon entering the front foyer. A 25-foot long dark hallway separated the family room and the kitchen, ending in a tiny powder room stuck in the middle of the layout. The kitchen was especially isolated, a cramped L-shaped design with a box bay breakfast bump out that was literally falling apart.
The new design started with the core of the problem—the maze and separation created by the long hallways.
First, the 25’ load bearing wall separating the foyer from family room was totally taken out and replaced with a long supporting beam. A French door replaced a small door and window leading to a screen porch . This action allowed lots of light to get into family and foyer. Then, the powder room was removed and the partition wall between the kitchen and family room was taken down. This created a large open concept design and greatly increased the size of the kitchen.
The box bay was demolished and replaced with new walls and a large window. The plumbing for main sink and dishwasher got relocated into this box bay allowing a total transformation of the space. Now there are cabinets and counters on all sides.
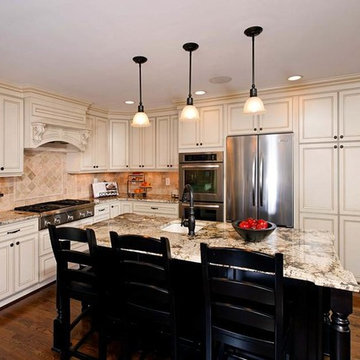
The doorway to the dining room was reconfigured to allow a butler area on its left. While the right side was occupied with new 36” gas range top with a decorative wood hood above it. The refrigerator, microwave/oven and pantries—the space’s tall elements—occupy one wall..
A large Island with a prep sink and beverage center for the kids occupies the center of the layout. Capable of seating up to four, family and friends can now keep the cook company. A large built-in desk area lets the kids do their homework so the parents can supervise while they prepare meals.
Light cabinetry with a touch of caramel glazing and exotic granite countertops by our designers contributed to this kitchen’s elegant design. The contrasting distressed island’s darker finish matches the dinette set and other furnishings.
New hardwood floors were installed throughout the first floor for a seamless look, while recess, pendant and task lighting make the space even brighter. Importantly, there’s plenty of space for parents and kids to hang out together. The kitchen is truly the heart of their home.
Find the right local pro for your project
 Chi Renovation & Design
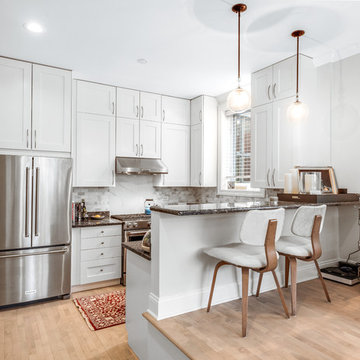
This little breakfast bar with modern lighting is an ideal space for a quick meal or great conversation.
Project designed by Skokie renovation firm, Chi Renovation & Design - general contractors, kitchen and bath remodelers, and design & build company. They serve the Chicago area and its surrounding suburbs, with an emphasis on the North Side and North Shore. You'll find their work from the Loop through Lincoln Park, Skokie, Evanston, Wilmette, and all the way up to Lake Forest.
For more about Chi Renovation & Design, click here: https://www.chirenovation.com/
To learn more about this project, click here:
https://www.chirenovation.com/portfolio/ranch-triangle-chicago-renovation/
 Cabinets by Design
Eileen Casey
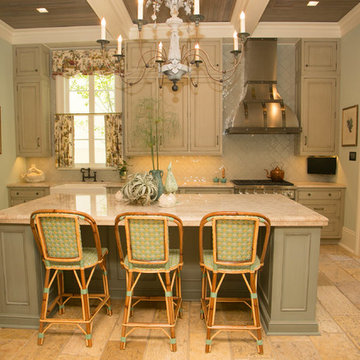
Enclosed kitchen - mid-sized traditional enclosed kitchen idea in New Orleans with a farmhouse sink, recessed-panel cabinets, beige cabinets, stainless steel appliances and an island
Enclosed kitchen - mid-sized traditional enclosed kitchen idea in New Orleans with a farmhouse sink, recessed-panel cabinets, beige cabinets, stainless steel appliances and an island
 Position By Design
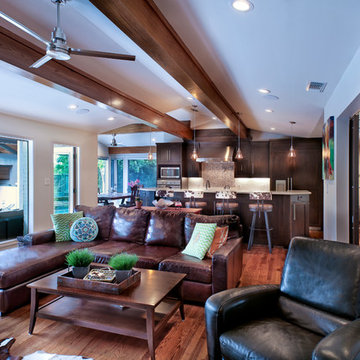
Final result: kitchen completely open to family room! Sightlines to negative edge pool. Greatly improved family interaction with social integration of spaces: planning area, kitchen, breakfast room, eat-on island, family room and formal dining (to right through barn doors). Todd Ramsey
 Gina Hadfield with Champions Real Estate Group
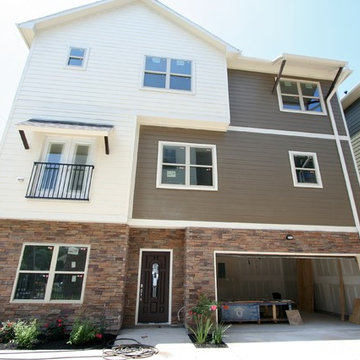
This new home will be completed and move-in ready in late May, 2014. Ideal for commuters & downtown workers, these homes are centrally located with easy,
almost immediate access to many freeways. The charming community is close to hike and bike trails, shops and many neighborhood restaurants the Houston Heights has to offer. The homes are enhanced with many energy features and fine finishes.
Photos taken by Gina Hadfield
 Roberts Architects & Construction
Wm Burlingham Photography
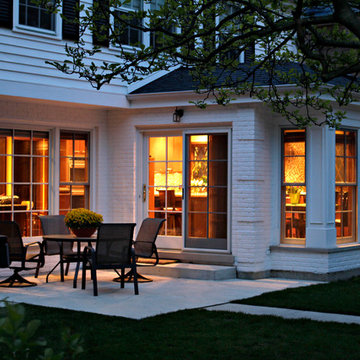
Inspiration for a small transitional backyard patio remodel in Chicago with no cover
Inspiration for a small transitional backyard patio remodel in Chicago with no cover
 Michael Nash Design, Build & Homes
2010 NARI CAPITAL COTY FINALIST AWARD WINNER
Project Scope:
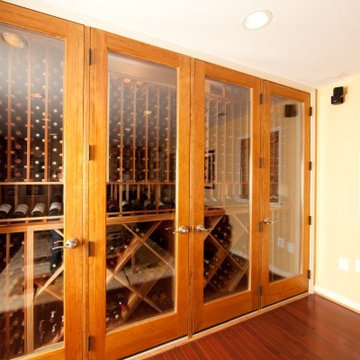
Transform a little-used room in the client’s lower level into an entertainment center, featuring a 1,500-bottle refrigerated wine cabinet, a wet bar, a custom-made bookshelves surround for existing hearth, and television hanging built-ins.
Challenges:
Primary technical challenge was to find a way to unobtrusively install a large “split system” chilling unit to service the wine cooler.
Solutions
The contractor started with a rectangular space that was appreciably stripped down, except for the fireplace at the far end. An adjacent room housed a professional pool table.
The client’s primary concern was how to situate the custom-built wine rack were to specify and fabricate. Although there was plenty of space in niche to the left of the stairway, there was no obvious way to locate the wine rack’s chilling unit for ducting and chiller unit.
Both client and contractor agreed that the logical setting for the rack would be along the short wall adjacent to the room’s entrance. But the short wall afforded no room for the chiller, a “split system” unit that needed adequate “breathing room” to avoid overheating
After many design sketches, the contractor had a tentative solution: house the chilling unit in a utility room behind the stairs leading to the basement. This would keep the unit out of sight and muffle the sound of the compressor.
Then question was how to “circumnavigate” the stairwell and run plumbing lines from the utility room – which was about 20 feet away — to the rack. A floor-level path would be exposed to possible damage and aesthetically unpleasing. Installing the line in the concrete slab flooring would be difficult and expensive – and any repairs to the line would mean tearing up the floor.The only alternative, the contractor suggested, would be to route the lines overhead – run them straight up from the chilling unit, over the joists above, and around the back of the stair case. Once past the staircase, it was straight shot above the joists to the short wall; the lines would then run behind the wall to the wine cooler resting on the floor.
This highly creative solution pleased the client greatly: it not only isolated the chilling unit, but allowed it to be easily serviced; the lines were protected and out of sight; and the wine rack – situated as it was in the room – seemed like it was part of the original house design.
At that point, the contractor needed a wine rack design that seemed equally “original” to the home – and here, too, the challenge was met. Custom-built cabinetry span the length of the wall, with two floor-level cabinets flanking the wine cooler. Above, twin glass-facing walnut displays – lighted and rising nearly to the ceiling – rest on a black marble countertop, showcasing the client’s impressive wine collection.
On the long wall perpendicular to the rack, a widescreen television hangs between two built-in bookcases designed by the contractor. The firm also fabricated the two bookcases now flanking the original fireplace in the far end wall – as well as the glass-faced hanging cabinets which are lighted above the newly installed wet bar.
 Michael Nash Design, Build & Homes
2011 CAPITAL COTY AWARD HONORABLE MENTION AWARD WINNER
Built circa 1980, a young couple with three children originally purchased this home for their growing family. After four years of karate, soccer, piano and other activities, however, the home was becoming too small to meet their needs.
Problems started upon entering the front foyer. A 25-foot long dark hallway separated the family room and the kitchen, ending in a tiny powder room stuck in the middle of the layout. The kitchen was especially isolated, a cramped L-shaped design with a box bay breakfast bump out that was literally falling apart.
The new design started with the core of the problem—the maze and separation created by the long hallways.
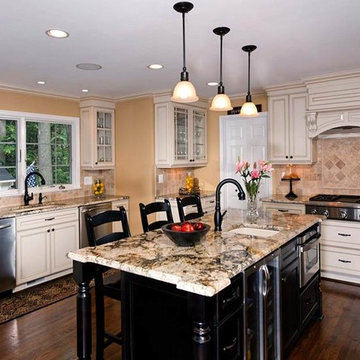
First, the 25’ load bearing wall separating the foyer from family room was totally taken out and replaced with a long supporting beam. A French door replaced a small door and window leading to a screen porch . This action allowed lots of light to get into family and foyer. Then, the powder room was removed and the partition wall between the kitchen and family room was taken down. This created a large open concept design and greatly increased the size of the kitchen.
The box bay was demolished and replaced with new walls and a large window. The plumbing for main sink and dishwasher got relocated into this box bay allowing a total transformation of the space. Now there are cabinets and counters on all sides.
The doorway to the dining room was reconfigured to allow a butler area on its left. While the right side was occupied with new 36” gas range top with a decorative wood hood above it. The refrigerator, microwave/oven and pantries—the space’s tall elements—occupy one wall..
A large Island with a prep sink and beverage center for the kids occupies the center of the layout. Capable of seating up to four, family and friends can now keep the cook company. A large built-in desk area lets the kids do their homework so the parents can supervise while they prepare meals.
Light cabinetry with a touch of caramel glazing and exotic granite countertops by our designers contributed to this kitchen’s elegant design. The contrasting distressed island’s darker finish matches the dinette set and other furnishings.
New hardwood floors were installed throughout the first floor for a seamless look, while recess, pendant and task lighting make the space even brighter. Importantly, there’s plenty of space for parents and kids to hang out together. The kitchen is truly the heart of their home.
 TKS Design Group
Download our free ebook, Creating the Ideal Kitchen. DOWNLOAD NOW
Lakefront property in the northwest suburbs of Chicago is hard to come by, so when we were hired by this young family with exactly that, we were immediately inspired by not just the unusually large footprint of this 1950’s colonial revival but also the lovely views of the manmade lake it was sited on. The large 5-bedroom home was solidly stuck in the 1980’s, but we saw tons of potential. We started out by updating the existing staircase with a fresh coat of paint and adding new herringbone slate to the entry hall.
The powder room off the entryway also got a refresh - new flooring, new cabinets and fixtures. We ran the new slate right through into this space for some consistency. A fun wallpaper and shiplap trim add a welcoming feel and set the tone for the home.
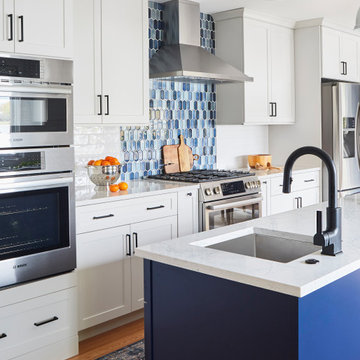
Next, we tackled the kitchen. Located away from the rest of the first floor, the kitchen felt a little isolated, so we immediately began planning for how to better connect it to the rest of the first floor. We landed on removing the wall between the kitchen and dining room and designed a modified galley style space with separate cooking and clean up zones. The cooking zone consists of the refrigerator, prep sink and cooktop, along with a nice long run of prep space at the island. The cleanup side of the kitchen consists of the main sink and dishwasher. Both areas are situated so that the user can view the lake during prep work and cleanup!
One of the home’s main puzzles was how to incorporate the mudroom and area in front of the patio doors at the back of the house. We already had a breakfast table area, so the space by the patio doors was a bit of a no man’s land. We decided to separate the kitchen proper from what became the new mudroom with a large set of barn doors. That way you can quickly hide any mudroom messes but have easy access to the light coming in through the patio doors as well as the outdoor grilling station. We also love the impact the barn doors add to the overall space.
The homeowners’ first words to us were “it’s time to ditch the brown,” so we did! We chose a lovely blue pallet that reflects the home’s location on the lake which is also vibrant yet easy on the eye. Countertops are white quartz, and the natural oak floor works well with the other honey accents. The breakfast table was given a refresh with new chairs, chandelier and window treatments that frame the gorgeous views of the lake out the back.
We coordinated the slate mudroom flooring with that used in the home’s main entrance for a consistent feel. The storage area consists of open and closed storage to allow for some clutter control as needed.
Next on our “to do” list was revamping the dated brown bar area in the neighboring dining room. We eliminated the clutter by adding some closed cabinets and did some easy updates to help the space feel more current. One snag we ran into here was the discovery of a beam above the existing open shelving that had to be modified with a smaller structural beam to allow for our new design to work. This was an unexpected surprise, but in the end we think it was well worth it!
We kept the colors here a bit more muted to blend with the homeowner’s existing furnishings. Open shelving and polished nickel hardware add some simple detail to the new entertainment zone which also looks out onto the lake!
Next we tackled the upstairs starting with the homeowner’s son’s bath. The bath originally had both a tub shower and a separate shower, so we decided to swap out the shower for a new laundry area. This freed up some space downstairs in what used to be the mudroom/laundry room and is much more convenient for daily laundry needs.
We continued the blue palette here with navy cabinetry and the navy tile in the shower. Porcelain floor tile and chrome fixtures keep maintenance to a minimum while matte black mirrors and lighting add some depth the design. A low maintenance runner adds some warmth underfoot and ties the whole space together.
We added a pocket door to the bathroom to minimize interference with the door swings. The left door of the laundry closet is on a 180 degree hinge to allow for easy full access to the machines. Next we tackled the master bath which is an en suite arrangement. The original was typical of the 1980’s with the vanity outside of the bathroom, situated near the master closet. And the brown theme continued here with multiple shades of brown.
Our first move was to segment off the bath and the closet from the master bedroom. We created a short hall from the bedroom to the bathroom with his and hers walk-in closets on the left and right as well as a separate toilet closet outside of the main bathroom for privacy and flexibility.
The original bathroom had a giant soaking tub with steps (dangerous!) as well as a small shower that did not work well for our homeowner who is 6’3”. With other bathtubs in the home, they decided to eliminate the tub and create an oversized shower which takes up the space where the old tub was located. The double vanity is on the opposite wall and a bench is located under the window for morning conversations and a place to set a couple of towels.
The pallet in here is light and airy with a mix of blond wood, creamy porcelain and marble tile, and brass accents. A simple roman shade adds some texture and it’s top-down mechanism allows for light and privacy.
This large whole house remodel gave our homeowners not only the ability to maximize the potential of their home but also created a lovely new frame from which to view their fabulous lake views.
Designed by: Susan Klimala, CKD, CBD
Photography by: Michael Kaskel
For more information on kitchen and bath design ideas go to: www.kitchenstudio-ge.com
 MH Akers Custom Homes
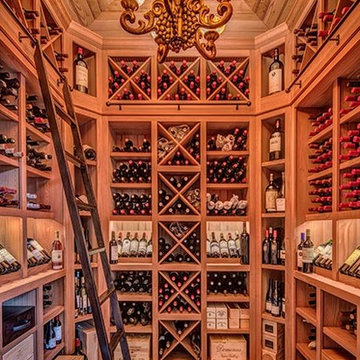
An old client and inveterate wine collector had purchased a new home and had asked MH Akers Custom Homes to transform an oversized upstairs closet into a wine cellar. He was looking for perfect wine storage conditions and functionality as well as a little jewel box of a space. We created, together with the client, a rough sketch of the layout and specifications then stripped the walls and ceiling of their drywall and the floor of its carpet and subfloor. A vapor barrier was installed on the warm sides of the walls, floor, and ceiling then polyurethane to seal cracks and finally blown cellulose insulation.
Grand_Wine_CellarFaced with an isolated second floor space, we didn’t have the luxury of access to the outside for placement of the cooling condenser unit. Working with our HVAC contractor and WineGuardian wine specialists, we chose a package unit to be placed in the attic above the wine storage room. In order to manage the ventilation of the unit itself, we ducted in from the shaded eaves of the home condenser intake air. Condenser exhaust air was ducted out of the attic through an existing large gable louver. A humidifier was added to the unit in order to optimize storage conditions, and a remote sensor was placed inside the storage space, while a thermo/humidistat was located in the hallway outside to allow easy monitoring and adjusting of the readings and settings…55 degrees Fahrenheit and 70% relative humidity last time I looked.
Storage cabinet design and selection of materials were finalized. We had vacillated between old growth heart pine and clear, all-heart redwood but chose the redwood in the end. We wanted to allow water vapor transmission all the way between the room itself and the warm-side barrier, so we clad walls and ceilings with unsealed 3/4” beaded tongue and groove redwood rather than glued up materials which might create an unwanted intermediate vapor barrier.
The entire conditioned wine storage space actually consists of the principal room plus a bulk storage area behind. In order to access the bulk storage area we fashioned the center section of the U-shaped cabinetry into an access door. Approximately 800 pounds loaded with wine, this seven foot high by five feet wide section pivots on two Igus slewing rings with the additional support of two heavy-duty rigid casters . . . a minor feat of engineering and completely imperceptible. We made double sure that the new stone floor was dead flat level and that the structural support under the bearing points was completely solid.
Steel library ladder, grape-cluster adorned chandelier, and nifty LED accent lighting completed the effect. A most satisfying project and a testament to the collaboration between client, builder, cabinetmaker, and sundry other tradesmen. A wine cellar de grand luxe and a little gem of a space. Let us help you create your very own special place.
 Quitterie Chailley
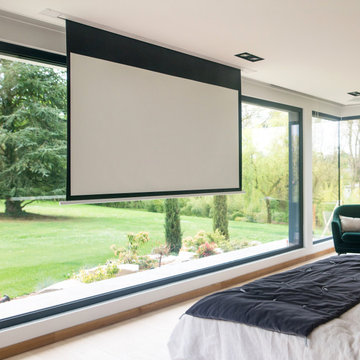
L’envie d’avoir une suite digne des grands hôtels tout en restant chez soi ! Voici la mission que nous ont confié nos clients. Leur souhait : un espace inédit, sur-mesure et fonctionnel.
L’architecte en charge de la création de l’extension et les clients nous ont donné carte blanche pour aménager son intérieur !
Nous avons donc pensé et créé ce nouvel espace comme une suite à l’hôtel, comprenant chambre, salle de bain, dressing, salon, sans oublier un coin bureau et un minibar ! Pas de cloison pour délimiter les espaces mais un meuble séparatif qui vient naturellement réunir et répartir les différentes fonctions de la suite. Placé au centre de la pièce, on circule autour de ce meuble qui comprend le dressing côté salle de bain, la tête de lit et l’espace bureau côté chambre et salon, sur les côtés le minibar et 2 portes coulissantes se dissimulent dans le meuble pour pouvoir isoler si on le souhaite l’espace dressing – salle de bain de l’espace chambre – salon. Dans la chambre un joli papier peint vient accentuer l’effet cocooning afin de bien délimiter le coin nuit du coin salon.
L’alliance du noir & du blanc, le choix des matériaux de qualité crée un style élégant, contemporain et intemporel à cette suite ; au sol le parquet réchauffe l’ambiance quant à la vue exceptionnelle sur le jardin elle fait rentrer la nature et les couleurs dans la suite et sublime l’ensemble.
 iCork Floor
 https://www.icorkfloor.com/store/floating-cork-floors-12mm-leather/
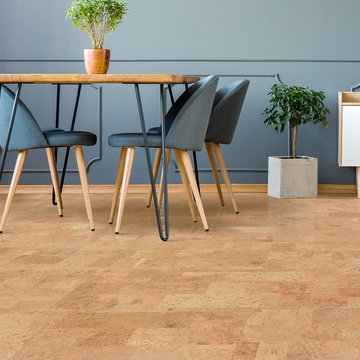
Better than other hardwoods because it’s water resistant – cork flooring for the dining room.
Want a dining room that is warm and cozy without the plastic feel of vinyl, then look to cork. This material is derived from the bark of the cork oak tree and it is highly water resistant, making it an ideal choice in the dining room. Unlike hardwood, spills wont ruin the beauty of the floor or cause the worry of rot and mildew, simply wipe up and relax. Check out cork flooring today and learn how well cork works in the dining room.
 Michael Nash Design, Build & Homes
2010 NARI CAPITAL COTY FINALIST AWARD WINNER
Project Scope:
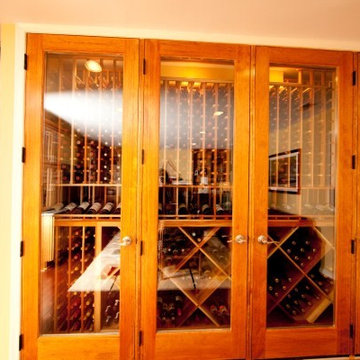
Transform a little-used room in the client’s lower level into an entertainment center, featuring a 1,500-bottle refrigerated wine cabinet, a wet bar, a custom-made bookshelves surround for existing hearth, and television hanging built-ins.
Challenges:
Primary technical challenge was to find a way to unobtrusively install a large “split system” chilling unit to service the wine cooler.
Solutions
The contractor started with a rectangular space that was appreciably stripped down, except for the fireplace at the far end. An adjacent room housed a professional pool table.
The client’s primary concern was how to situate the custom-built wine rack were to specify and fabricate. Although there was plenty of space in niche to the left of the stairway, there was no obvious way to locate the wine rack’s chilling unit for ducting and chiller unit.
Both client and contractor agreed that the logical setting for the rack would be along the short wall adjacent to the room’s entrance. But the short wall afforded no room for the chiller, a “split system” unit that needed adequate “breathing room” to avoid overheating
After many design sketches, the contractor had a tentative solution: house the chilling unit in a utility room behind the stairs leading to the basement. This would keep the unit out of sight and muffle the sound of the compressor.
Then question was how to “circumnavigate” the stairwell and run plumbing lines from the utility room – which was about 20 feet away — to the rack. A floor-level path would be exposed to possible damage and aesthetically unpleasing. Installing the line in the concrete slab flooring would be difficult and expensive – and any repairs to the line would mean tearing up the floor.The only alternative, the contractor suggested, would be to route the lines overhead – run them straight up from the chilling unit, over the joists above, and around the back of the stair case. Once past the staircase, it was straight shot above the joists to the short wall; the lines would then run behind the wall to the wine cooler resting on the floor.
This highly creative solution pleased the client greatly: it not only isolated the chilling unit, but allowed it to be easily serviced; the lines were protected and out of sight; and the wine rack – situated as it was in the room – seemed like it was part of the original house design.
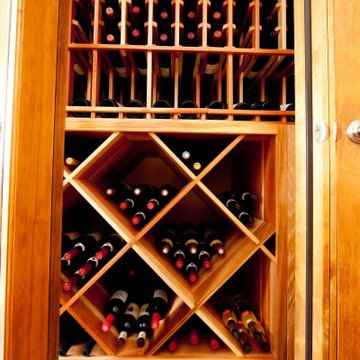
At that point, the contractor needed a wine rack design that seemed equally “original” to the home – and here, too, the challenge was met. Custom-built cabinetry span the length of the wall, with two floor-level cabinets flanking the wine cooler. Above, twin glass-facing walnut displays – lighted and rising nearly to the ceiling – rest on a black marble countertop, showcasing the client’s impressive wine collection.
On the long wall perpendicular to the rack, a widescreen television hangs between two built-in bookcases designed by the contractor. The firm also fabricated the two bookcases now flanking the original fireplace in the far end wall – as well as the glass-faced hanging cabinets which are lighted above the newly installed wet bar.
 Michael Nash Design, Build & Homes
2010 NARI CAPITAL COTY FINALIST AWARD WINNER
Project Scope:
Transform a little-used room in the client’s lower level into an entertainment center, featuring a 1,500-bottle refrigerated wine cabinet, a wet bar, a custom-made bookshelves surround for existing hearth, and television hanging built-ins.
Challenges:
Primary technical challenge was to find a way to unobtrusively install a large “split system” chilling unit to service the wine cooler.
Solutions
The contractor started with a rectangular space that was appreciably stripped down, except for the fireplace at the far end. An adjacent room housed a professional pool table.
The client’s primary concern was how to situate the custom-built wine rack were to specify and fabricate. Although there was plenty of space in niche to the left of the stairway, there was no obvious way to locate the wine rack’s chilling unit for ducting and chiller unit.
Both client and contractor agreed that the logical setting for the rack would be along the short wall adjacent to the room’s entrance. But the short wall afforded no room for the chiller, a “split system” unit that needed adequate “breathing room” to avoid overheating
After many design sketches, the contractor had a tentative solution: house the chilling unit in a utility room behind the stairs leading to the basement. This would keep the unit out of sight and muffle the sound of the compressor.
Then question was how to “circumnavigate” the stairwell and run plumbing lines from the utility room – which was about 20 feet away — to the rack. A floor-level path would be exposed to possible damage and aesthetically unpleasing. Installing the line in the concrete slab flooring would be difficult and expensive – and any repairs to the line would mean tearing up the floor.The only alternative, the contractor suggested, would be to route the lines overhead – run them straight up from the chilling unit, over the joists above, and around the back of the stair case. Once past the staircase, it was straight shot above the joists to the short wall; the lines would then run behind the wall to the wine cooler resting on the floor.
This highly creative solution pleased the client greatly: it not only isolated the chilling unit, but allowed it to be easily serviced; the lines were protected and out of sight; and the wine rack – situated as it was in the room – seemed like it was part of the original house design.
At that point, the contractor needed a wine rack design that seemed equally “original” to the home – and here, too, the challenge was met. Custom-built cabinetry span the length of the wall, with two floor-level cabinets flanking the wine cooler. Above, twin glass-facing walnut displays – lighted and rising nearly to the ceiling – rest on a black marble countertop, showcasing the client’s impressive wine collection.
On the long wall perpendicular to the rack, a widescreen television hangs between two built-in bookcases designed by the contractor. The firm also fabricated the two bookcases now flanking the original fireplace in the far end wall – as well as the glass-faced hanging cabinets which are lighted above the newly installed wet bar.
 John Cannon Homes
Visit The Korina 14803 Como Circle or call 941 907.8131 for additional information.
3 bedrooms | 4.5 baths | 3 car garage | 4,536 SF
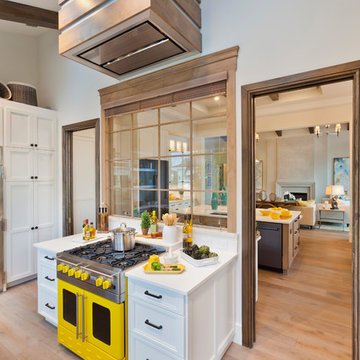
The Korina is John Cannon’s new model home that is inspired by a transitional West Indies style with a contemporary influence. From the cathedral ceilings with custom stained scissor beams in the great room with neighboring pristine white on white main kitchen and chef-grade prep kitchen beyond, to the luxurious spa-like dual master bathrooms, the aesthetics of this home are the epitome of timeless elegance. Every detail is geared toward creating an upscale retreat from the hectic pace of day-to-day life. A neutral backdrop and an abundance of natural light, paired with vibrant accents of yellow, blues, greens and mixed metals shine throughout the home.
 Boyenga Team / Compass
Eichler X-100 Bathroom: A Study in Efficiency, Light, and Modern Living
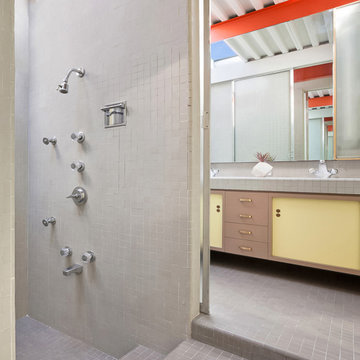
The bathrooms in the Eichler X-100 are a fascinating blend of innovation and restraint—spaces where efficiency, light, and thoughtful design come together in a way that feels both practical and ahead of its time. Designed by A. Quincy Jones and Frederick Emmons for Joseph Eichler, these rooms reflect a highly intentional approach to everyday living.
A Unique Shared-Core Concept
At the heart of the design is the X-100’s central utility core, where the bathrooms are arranged in a paired configuration. This innovative layout allows for:
Efficient use of space
Shared plumbing systems
Simultaneous use by multiple occupants
The result is a plan that minimizes wasted space while maximizing functionality—a hallmark of mid-century modern thinking.
Light from Above
Rather than relying on traditional windows, the bathrooms are illuminated by overhead skylights, bringing in soft, diffused natural light while maintaining complete privacy.
This creates an atmosphere that feels:
Bright, yet secluded
Open, yet intimate
Calm, yet visually engaging
Light becomes the defining feature—transforming a functional space into something experiential.
Clean Lines, Minimal Distraction
The material palette is simple and intentional, emphasizing:
Smooth, easy-to-maintain surfaces
Clean geometric forms
A lack of unnecessary ornamentation
This minimalism allows the architecture—and the experience of the space—to take center stage.
Thoughtful, Human-Centered Design
Even the details reflect a deeper level of consideration. Features such as varied control placements and efficient layouts demonstrate a focus on usability and comfort, anticipating the needs of daily routines.
Everything is designed to make life easier.
Private, Yet Connected
Though located within the central core, the bathrooms remain visually and experientially connected to the rest of the home through light and spatial flow. They feel integrated, not isolated.
This continuity reinforces the X-100’s overarching philosophy:
every space is part of a larger system.
A Modern Approach—Decades Ahead
What makes the X-100 bathrooms so compelling is how forward-thinking they remain. Concepts like efficient layouts, shared functionality, and natural-light-driven design are widely embraced today—but were radical in 1956.
The bathrooms of the Eichler X-100 prove that even the most utilitarian spaces can be elevated through thoughtful design—where simplicity, innovation, and light create an experience that is both functional and refined.
 Michael Nash Design, Build & Homes
2010 NARI CAPITAL COTY FINALIST AWARD WINNER
Project Scope:
Transform a little-used room in the client’s lower level into an entertainment center, featuring a 1,500-bottle refrigerated wine cabinet, a wet bar, a custom-made bookshelves surround for existing hearth, and television hanging built-ins.
Challenges:
Primary technical challenge was to find a way to unobtrusively install a large “split system” chilling unit to service the wine cooler.
Solutions
The contractor started with a rectangular space that was appreciably stripped down, except for the fireplace at the far end. An adjacent room housed a professional pool table.
The client’s primary concern was how to situate the custom-built wine rack were to specify and fabricate. Although there was plenty of space in niche to the left of the stairway, there was no obvious way to locate the wine rack’s chilling unit for ducting and chiller unit.
Both client and contractor agreed that the logical setting for the rack would be along the short wall adjacent to the room’s entrance. But the short wall afforded no room for the chiller, a “split system” unit that needed adequate “breathing room” to avoid overheating
After many design sketches, the contractor had a tentative solution: house the chilling unit in a utility room behind the stairs leading to the basement. This would keep the unit out of sight and muffle the sound of the compressor.
Then question was how to “circumnavigate” the stairwell and run plumbing lines from the utility room – which was about 20 feet away — to the rack. A floor-level path would be exposed to possible damage and aesthetically unpleasing. Installing the line in the concrete slab flooring would be difficult and expensive – and any repairs to the line would mean tearing up the floor.The only alternative, the contractor suggested, would be to route the lines overhead – run them straight up from the chilling unit, over the joists above, and around the back of the stair case. Once past the staircase, it was straight shot above the joists to the short wall; the lines would then run behind the wall to the wine cooler resting on the floor.
This highly creative solution pleased the client greatly: it not only isolated the chilling unit, but allowed it to be easily serviced; the lines were protected and out of sight; and the wine rack – situated as it was in the room – seemed like it was part of the original house design.
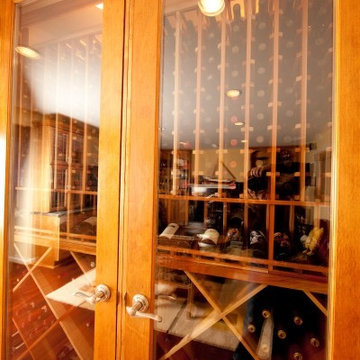
At that point, the contractor needed a wine rack design that seemed equally “original” to the home – and here, too, the challenge was met. Custom-built cabinetry span the length of the wall, with two floor-level cabinets flanking the wine cooler. Above, twin glass-facing walnut displays – lighted and rising nearly to the ceiling – rest on a black marble countertop, showcasing the client’s impressive wine collection.
On the long wall perpendicular to the rack, a widescreen television hangs between two built-in bookcases designed by the contractor. The firm also fabricated the two bookcases now flanking the original fireplace in the far end wall – as well as the glass-faced hanging cabinets which are lighted above the newly installed wet bar.
 Michael Nash Design, Build & Homes
2010 NARI CAPITAL COTY FINALIST AWARD WINNER
Project Scope:
Transform a little-used room in the client’s lower level into an entertainment center, featuring a 1,500-bottle refrigerated wine cabinet, a wet bar, a custom-made bookshelves surround for existing hearth, and television hanging built-ins.
Challenges:
Primary technical challenge was to find a way to unobtrusively install a large “split system” chilling unit to service the wine cooler.
Solutions
The contractor started with a rectangular space that was appreciably stripped down, except for the fireplace at the far end. An adjacent room housed a professional pool table.
The client’s primary concern was how to situate the custom-built wine rack were to specify and fabricate. Although there was plenty of space in niche to the left of the stairway, there was no obvious way to locate the wine rack’s chilling unit for ducting and chiller unit.
Both client and contractor agreed that the logical setting for the rack would be along the short wall adjacent to the room’s entrance. But the short wall afforded no room for the chiller, a “split system” unit that needed adequate “breathing room” to avoid overheating
After many design sketches, the contractor had a tentative solution: house the chilling unit in a utility room behind the stairs leading to the basement. This would keep the unit out of sight and muffle the sound of the compressor.
Then question was how to “circumnavigate” the stairwell and run plumbing lines from the utility room – which was about 20 feet away — to the rack. A floor-level path would be exposed to possible damage and aesthetically unpleasing. Installing the line in the concrete slab flooring would be difficult and expensive – and any repairs to the line would mean tearing up the floor.The only alternative, the contractor suggested, would be to route the lines overhead – run them straight up from the chilling unit, over the joists above, and around the back of the stair case. Once past the staircase, it was straight shot above the joists to the short wall; the lines would then run behind the wall to the wine cooler resting on the floor.
This highly creative solution pleased the client greatly: it not only isolated the chilling unit, but allowed it to be easily serviced; the lines were protected and out of sight; and the wine rack – situated as it was in the room – seemed like it was part of the original house design.
At that point, the contractor needed a wine rack design that seemed equally “original” to the home – and here, too, the challenge was met. Custom-built cabinetry span the length of the wall, with two floor-level cabinets flanking the wine cooler. Above, twin glass-facing walnut displays – lighted and rising nearly to the ceiling – rest on a black marble countertop, showcasing the client’s impressive wine collection.
On the long wall perpendicular to the rack, a widescreen television hangs between two built-in bookcases designed by the contractor. The firm also fabricated the two bookcases now flanking the original fireplace in the far end wall – as well as the glass-faced hanging cabinets which are lighted above the newly installed wet bar.
102