
Search results for "Leave difficult" in Home Design Ideas


 Tile Doctor Ltd
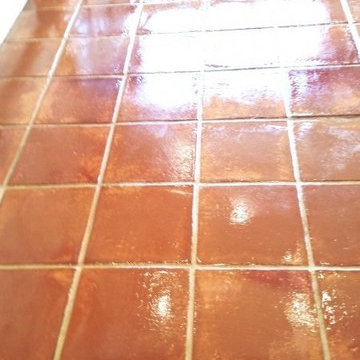
Sealers really do bring out the best in Terracotta tiles, however the catch is they will wear off over time and if you want to maintain that appearance you have to work out a regular maintenance plan. If you don’t maintain the sealer you will find that the sealer near the most heavily used areas such as doors etc. will wear away first and once that happens dirt will become ingrained in the tile and becomes difficult to clean resulting in a patchy appearance.
The remaining sealer on this Terracotta tiled kitchen floor at a house in the town of Wickford, Essex was no longer effective and had worn completely off in places. The solution was to strip off the old sealer, clean the Terracotta tile and gout and then re-seal with a fresh seal.
I started by giving the floor a deep clean with Tile Doctor Pro Clean diluted 2 parts water to 1 part cleaner. This is quite a strong dilution designed to allow the removal of the sealer and was left to dwell on the floor for ten minutes before working it into the floor using a scrubbing machine fitted with a black pad. Surprisingly the sealer was proving difficult to shift in certain areas and I had to repeat the process a few times and made sure to give the grout a good scrubbing as well.
I managed to get rid of most of the sealer using this process and for the remaining stubborn areas I used a stronger product called Tile Doctor Remove and Go which is a very effective coatings remover that is safe to use on tiles. This did the trick and the floor was now free of sealers and the grout was looking much better too, the resultant slurry was removed using a wet vacuum and I then rinsed the floor several times with water before leaving it to dry for weekend.
Tile Doctor Colour Grow which is an impregnating sealer that seeps into the pores of the tile to block them and prevent contaminates becoming ingrained in there and it also enhances the natural colours. Once this was dry I followed up with a number of coats of Tile Doctor Seal and Go which is topical sealer that will protect the surface and adds a nice sheen to the floor and is a popular choice for Terracotta and Quarry tiles.
I’m not sure my photographs do this post any justice however hopefully you can see that floor was quite transformed, the grout is much cleaner and the colours in the Terracotta have really come to life.
Nick Murphy
South Essex Tile Doctor
 Splash Pools & Construction
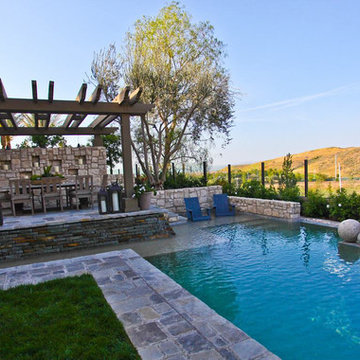
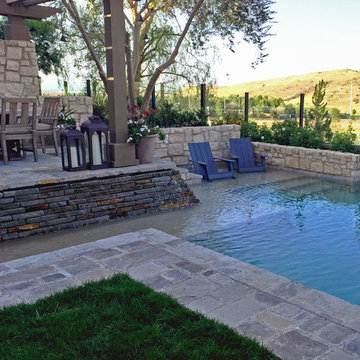
The owner had several requirements when we started the design of this pool, including: negative edge, Tuscan style to match the house, raised outdoor living area adjacent to pool and a large reef step.
The Tuscan style was easy to match, by using the stone similar to the house on the decking, patio and wall; and similar flagstone on the tiered stone spillway. The stone wall on the raised patio also provides great privacy from neighbors.
The negative edge and outdoor living area adjacent to the pool required more creativity and coordination to work. This lot was completely flat, making it difficult to give a negative edge look and the owner did not want a raised pool. We were able to achieve the negative edge look by lowering the soil level down behind the pool and only having a short drop from the negative edge to the water basin. We added the decorative concrete balls to give an artsy look to the pool.
The outdoor living area is a unique raised deck to take advantage of the view and includes a freestanding-latticed patio. The patio footings were integrated into the pool, while leaving enough space for a water trough and plumbing for the tiered spillway that flows down from the raised patio.
We incorporated the large reef step around the raised patio with the pool entrance at the far end.
At just under 600 SF, this Tuscan-style pool provides a great view, lounging area and plenty of space for swimming!
This is a Toll Brothers model home pool in the Marbella Collection, Avalon Model in Irvine. California.
Find the right local pro for your project
 Виктория Якуша
Forest house
Year: 2019
Area: 235 sq. m.
Kyiv region, Ukraine
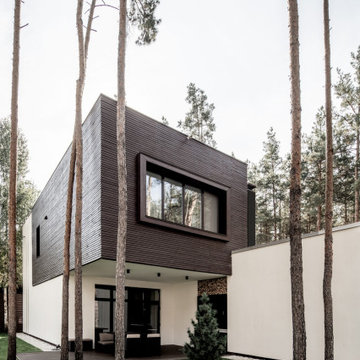
Architecture has a power to transform space. Often it`s too aggressive to the natural landscape. The principles of "live minimalism" in architectural projects is that you do not need to choose “man or nature”. Ukrainian architect and designer Viktoria Yakusha created residential house in the middle of the pine forest with zero harm to the environment.
The location of the house was not chosen by chance.Pine forest, convenient location near Kyiv – an ideal place for a quiet flow of life and a cosy weekend.Preserving wildlife, leaving pine trees on the site,while ensuring comfortable spatial planning of the house, was a fundamental point in the entire project and the most difficult task for the designer.
The first floor of the house is an open space. Thanks To the large window and terrace, the interior and exterior are combined and merged into a single harmonious space.The second-floor hangs over the terrace, creating a cosy place for family evenings. The construction of the outer wall of the building provides barbecue facilities.
The house is formed from several clear volumes, which are additionally highlighted with different materials: decorative plaster,porcelain stoneware, wooden beams. The colour scheme continues and partially reproduces the colours of the surrounding landscape as if the house emerges among the trees.
“Nature was not just an inspiration for design team, but a co-author of this house,” - says the architect Victoria Yakusha. - “During our work, we were guided by the principles of“living minimalism”. This allowed us to create a special space combining man and nature.”
 Tile Doctor Ltd
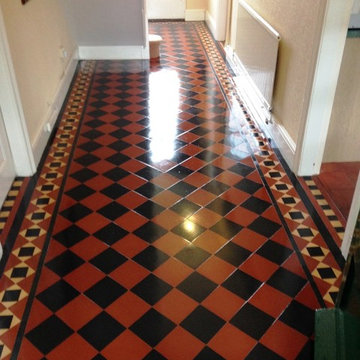
This black and red Victorian tiled hallway at a property in Newport, the third largest city in Wales, had a timeless charm about it, and a classic diamond pattern. Unfortunately, the tiles had lost their colour, leaving them looking dull and lifeless. It was clear to me, upon further inspection, that the existing sealer had failed, allowing dirt to become trapped in the pores of tile.
This can be a very difficult problem to rectify without the right professional assistance; everyday household cleaners are rarely suitable for sealed floors and acidic cleaners can actually male the problem worse. The tiles needed a deep clean with strong products, followed by a fresh, robust surface seal to prevent dirt from becoming trapped again in the future.
I started cleaning the tiles with a strong dilution of Tile Doctor Pro Clean, worked in to the stone as per usual by using a rotary machine fitted with a black scrubbing pad. Pro Clean is a reliable alkaline cleaner that works well on most kinds of natural stone, and while I could see it made a difference here, it was clear something stronger was required to remove what was left of the old sealer.
To remove this, I applied a dilution of Tile Doctor Remove and Go, which is a dedicated stripper that is safe to use on tile and stone for the purposes of breaking down old sealers, waxes, paints, and adhesives, and this proved effective in getting rid of all the old sealer.
Once the cleaning was complete, I rinsed the floor thoroughly to remove any trace of chemicals left over from the cleaning products, before leaving it to dry overnight.
I came back to the property the next day and, after checking the floor was completely dry, I proceeded to seal the floor using eight coats of Tile Doctor Seal and Go. This types of sealer is known as ‘topical’, which means that it builds up a solid layer of protection on the surface of the tile. Topical sealers tend to be more suitable to Victorian and Quarry tiles as they typically require a lot of sealer due to their porosity and these types of sealer are less costly. Seal and Go also adds a nice aesthetically pleasing low sheen finish.
As you can see from the second photo, this did wonders to the tiles and really brought this classic Victorian pattern back to life. Another satisfied client for the Monmouthshire Tile Doctor.
Paul Wales
Monmouthshire Tile Doctor
 Splash Pools & Construction
The owner had several requirements when we started the design of this pool, including: negative edge, Tuscan style to match the house, raised outdoor living area adjacent to pool and a large reef step.
The Tuscan style was easy to match, by using the stone similar to the house on the decking, patio and wall; and similar flagstone on the tiered stone spillway. The stone wall on the raised patio also provides great privacy from neighbors.
The negative edge and outdoor living area adjacent to the pool required more creativity and coordination to work. This lot was completely flat, making it difficult to give a negative edge look and the owner did not want a raised pool. We were able to achieve the negative edge look by lowering the soil level down behind the pool and only having a short drop from the negative edge to the water basin. We added the decorative concrete balls to give an artsy look to the pool.
The outdoor living area is a unique raised deck to take advantage of the view and includes a freestanding-latticed patio. The patio footings were integrated into the pool, while leaving enough space for a water trough and plumbing for the tiered spillway that flows down from the raised patio.
We incorporated the large reef step around the raised patio with the pool entrance at the far end.
At just under 600 SF, this Tuscan-style pool provides a great view, lounging area and plenty of space for swimming!
This is a Toll Brothers model home pool in the Marbella Collection, Avalon Model in Irvine. California.
 Tile Doctor Ltd
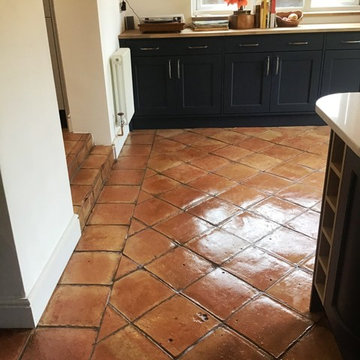
We were contacted by the owner of a property in Moulton with a problematic Terracotta tiled kitchen floor. She was seriously considering ripping up the entire area of tiling and replacing it as she was having a new kitchen installed. Both her and her husband were concerned that unless I could restore this floor to somewhere near to its original condition, they would need to replace it.
I went over to inspect the Terracotta tiles and could see the entire surface was deeply ingrained with soiling and the grout lines were filthy. After carrying out a test it became obvious that the previous sealer had been applied very sparingly and had mostly worn away, leaving the stone prone to staining. Terracotta is a very porous tile and dirt had become ingrained in the pores leaving it looking very dull and difficult to clean.
I completed the test on a small part of the floor and the customer could see the results which could be achieved. Happy with the result they agreed my quote and we set a date for my return to complete the floor.
The tiles turned out to be made of a fairly soft Terracotta which meant that we were able to deep clean them extremely effectively using a strong dilution of Tile Doctor Pro-Clean. We used Tile Doctor Remove and Go in particularly stubborn areas.
The process I use is to spray the Pro-Clean onto the floor and leave it to soak in for about ten minutes before being worked in using a heavy rotary machine fitted with a black scrubbing pad. The resulting slurry is removed using a wet pick up vacuum. All the dirt and virtually all of the old sealer was removed at this stage; the remaining patches around the edges of the area being finished by hand with a 200-grit burnishing block. The grout lines were then cleaned by hand with an angled grout brush.
Finally, the deep-seated oil stains in front of the cooker were brought out using Tile Doctor Oxy-Gel which was left to dwell on the marks for an hour before being agitated with a diamond burnishing pad and rinsed away with a wet pick up machine. The floor was rinsed with water and allowed to dry off overnight.
The following day I inspected the floor and checked it was ready to be sealed. All was well so I applied an initial coat of Tile Doctor Colour Grow which is an impregnating sealer that occupies the pores in the tile enhancing the natural colours of the Terracotta and provide a base layer of protection from staining.
I returned at a convenient time once the kitchen was completely installed to finish the job. This involves carrying out a light maintenance clean with Tile Doctor Neutral Cleaner and once the floor was dry, I applied 5 further coats of Tile Doctor Seal and Go which provides a pleasing satin finish which is really suited to this type of floor.
The customer was very happy with the results and has left the following feedback.
“We were really pleased with the results, thank you!”
Phil Vissian
Northamptonshire Tile Doctor


 Tile Doctor Ltd
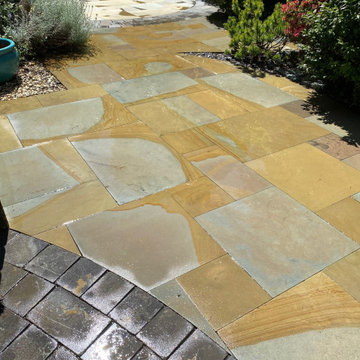
This Indian Sandstone Patio in Bolton-Le-Sands near Lancaster had not been cleaned successfully for several years. Although the owner had power washed it on occasion, that won’t rid you of Black Spot, Mould, Lichen etc and this will build-up over the years. It does clean the stone up to a certain standard but at some point, it will need further treatment.
My client had now reached this point and decided to give Tile Doctor a call to have it renovated. We discussed the Patio which ran around the house and calculated that it measured approximately 60m2. With the measurements and a summary of the issues I was able to work out a quote which they were happy to accept.
To improve the appearance of the stone I started by giving it a power wash to remove the general grime and dirt. I used a top of the range Karcher Pressure Washer for this which can apply up to 20 bars of pressure. The machine also comes with a spinner attachment results in a much more even clean than simply using the spray head.
The patio was left to dry for thirty minutes before applying neat Tile Doctor Patio & Brick Driveway Cleaner. Please note this is a very powerful product meant for professional use so if you’re using it always wear gloves and protective glasses. You leave it on the stone for ten minutes or longer before working it in. The directions on the back of the bottle say recommend leaving it for two to four hours, but its general advice. Personally, I find it is best to test the timing on a small inconspicuous area first, leave it on for say ten minutes then add a bit of water, scrub the surface and if the Black Spot disappears then that is all the time you need. If the stain is stubborn, increase the time. The two to four hour recommendation is really for difficult Black Spots that have become ingrained into the stone and then the product needs longer to digest the stain before it can work.
Once that was done, I used the power washer on low pressure to wash the products off the stone and into the sewerage drain, a wet vacuum comes in handy for this. Don’t dispose of it into the grass or planting areas as the strong chemicals in the product could upset them. Many properties have a soak away to capture rainwater from gutters, so you need to make sure it’s the sewage drain you are using.
As you can see on the pictures, this product really does work and got rid of the Black Spot completely. To maintain the patio a regular jet wash was recommended, the household versions are ideal for keeping it clean and tidy.
Due to the size of the Sandstone patio the whole process took around six hours to complete. Once done though the patio looked transformed and was all ready for a barbeque and some guests. Hopefully, it will stop raining long enough for this to happen.
Russell Taylor
Lancashire Tile Doctor
 American Standard® Heating and Air Conditioning
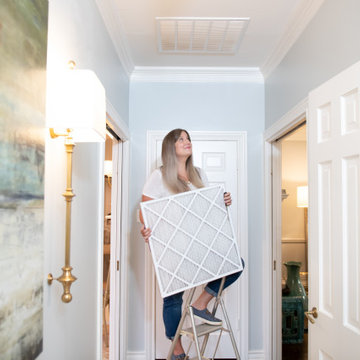
Example of a transitional hallway design in Charlotte
 Splash Pools & Construction
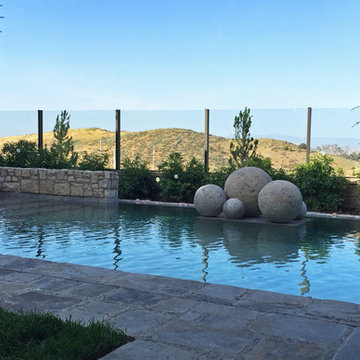
The owner had several requirements when we started the design of this pool, including: negative edge, Tuscan style to match the house, raised outdoor living area adjacent to pool and a large reef step.
The Tuscan style was easy to match, by using the stone similar to the house on the decking, patio and wall; and similar flagstone on the tiered stone spillway. The stone wall on the raised patio also provides great privacy from neighbors.
The negative edge and outdoor living area adjacent to the pool required more creativity and coordination to work. This lot was completely flat, making it difficult to give a negative edge look and the owner did not want a raised pool. We were able to achieve the negative edge look by lowering the soil level down behind the pool and only having a short drop from the negative edge to the water basin. We added the decorative concrete balls to give an artsy look to the pool.
The outdoor living area is a unique raised deck to take advantage of the view and includes a freestanding-latticed patio. The patio footings were integrated into the pool, while leaving enough space for a water trough and plumbing for the tiered spillway that flows down from the raised patio.
We incorporated the large reef step around the raised patio with the pool entrance at the far end.
At just under 600 SF, this Tuscan-style pool provides a great view, lounging area and plenty of space for swimming!
This is a Toll Brothers model home pool in the Marbella Collection, Avalon Model in Irvine. California.
 Splash Pools & Construction
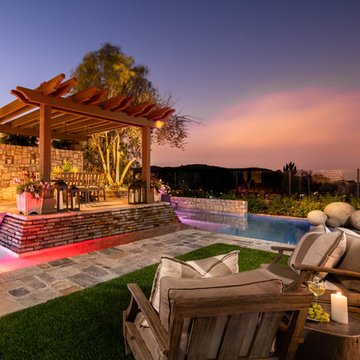
The owner had several requirements when we started the design of this pool, including: negative edge, Tuscan style to match the house, raised outdoor living area adjacent to pool and a large reef step.
The Tuscan style was easy to match, by using the stone similar to the house on the decking, patio and wall; and similar flagstone on the tiered stone spillway. The stone wall on the raised patio also provides great privacy from neighbors.
The negative edge and outdoor living area adjacent to the pool required more creativity and coordination to work. This lot was completely flat, making it difficult to give a negative edge look and the owner did not want a raised pool. We were able to achieve the negative edge look by lowering the soil level down behind the pool and only having a short drop from the negative edge to the water basin. We added the decorative concrete balls to give an artsy look to the pool.
The outdoor living area is a unique raised deck to take advantage of the view and includes a freestanding-latticed patio. The patio footings were integrated into the pool, while leaving enough space for a water trough and plumbing for the tiered spillway that flows down from the raised patio.
We incorporated the large reef step around the raised patio with the pool entrance at the far end.
At just under 600 SF, this Tuscan-style pool provides a great view, lounging area and plenty of space for swimming!
This is a Toll Brothers model home pool in the Marbella Collection, Avalon Model in Irvine. California.
 McCullough's Flooring
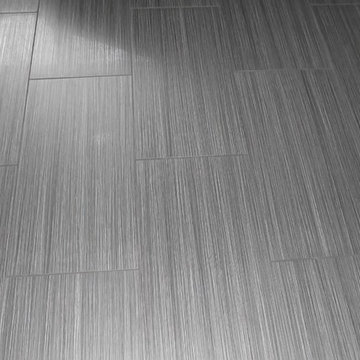
Gorgeous master bath finished with Dal-Tile's Fabrique porcelain tile in the color Noir Linen polished. Tile size is 12"x24" installed in a brick joint pattern. The floor boasts underfloor heating on a timed thermostat.

 Croma Design Inc.
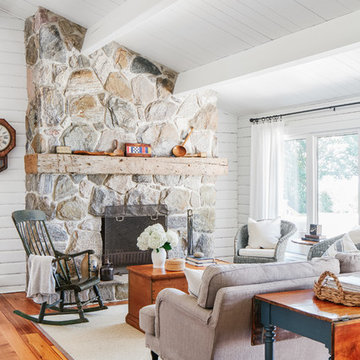
A sunny and bright lakeside Ontario cottage.
Styling: Ann Marie Favot for Style at Home
Photography: Donna Griffith for Style at Home
Inspiration for a mid-sized coastal open concept medium tone wood floor and brown floor living room remodel in Toronto with white walls, a standard fireplace, a stone fireplace and no tv
Inspiration for a mid-sized coastal open concept medium tone wood floor and brown floor living room remodel in Toronto with white walls, a standard fireplace, a stone fireplace and no tv

 Lush Life Landscapes
Indian Pink and Foamflower planted in a border in Haymarket, VA.
Photo and design by Lea Wolf/Lush Life Landscapes, used with permission.
 Tile Doctor Ltd
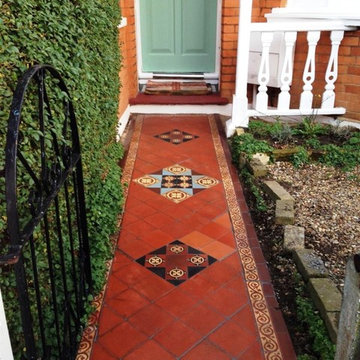
At first sight, this Victorian tiled pathway in Palmers Green, N13 did not appear to need too many repairs, with just a few obvious broken and loose tiles to be fixed. On closer inspection however it became clear it was in need of a deep clean and fresh seal.
To start, we applied Tile Doctor Remove & Go across the entire length of the pathway to break down and strip off the old sealer and provide an initial clean. In the more stubborn and difficult to reach areas where we saw the buildup of efflorescence, we applied Tile Doctor Acid Gel to neutralise the alkaline salts.
Acid Gel, as the name indicates, is a pH1 blend of Phosphoric and Hydrochloric acid in gel form, making it easier to apply to tricky areas, including sloped or vertical surfaces. Users should be aware not to use this type of product on acid-sensitive stone such as Limestone, as this can cause etching if left on too long.
Once the dirt and efflorescence buildups had been dealt with, I focused my attention towards the tile repairs, quickly realising that the extent of damage was greater than initially thought. Firstly, the numerous loose and broken tiles were removed and individually cleaned in a similar way to the rest of the floor. We then repaired the sub base ready for the existing and newly sourced tiles to be re-laid, before leaving the floor to set and dry overnight.
The next day, the pathway was grouted, before being sealed with Tile Doctor’s colour enhancing, impregnating sealer, Colour Grow to bring back the life and character to the Victorian tiles.
I was also asked to renovate the Edwardian hallway tiles in the house so once finished with the pathway they were deep cleaned using a strong dilution of Tile Doctor Pro Clean. This also helped to break down the old sealers and waxes – followed by a careful cleaning of the grout lines using Tile Doctor Grout Clean Up in combination with 3m black pads and detail brushes.
To ensure any pre existing sealer was completely removed, I followed up with a steam clean and left the tiles to dry overnight.
Upon my return to the property the next day, I completed re-grouting in the necessary areas, before sealing the tiles with five coats of Tile Doctor Seal & Go, providing an aesthetically pleasing satin finish. Seal & Go is a topical, solvent-based sealer which forms a layer of durable protection on the surface of the tiles, protecting against dirt and stains.
The hard work invested in restoring these two floors certainly paid off, as the client was exceptionally pleased with the results, going as far as to leave the following feedback:
“I wanted to restore my tired Edwardian tiled hallway and was given Rob Voyce’s
contact details. I was very impressed with Rob and his team; they were very
professional and friendly. Rob explained the stages of the work to be carried out and
we agreed a date and the job was completed much to my satisfaction. Very pleased.”
Nigel Voyce
North London Tile Doctor


 Myron Shenk
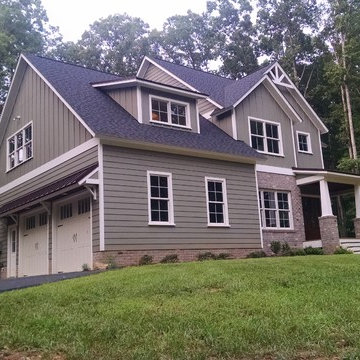
It has been said that the most difficult person to work for is yourself. That anecdote certainly held for this project, designed by Myron, co-owner of Hom, Inc. and constructed by Hom, Inc.
Myron designed this home as a case study for a potential spec house project. The home has only one interior bearing wall and very few beams, which leaves a blank canvas for the entire floor plan upstairs and down. Any of the interior walls can be removed or relocated to suit the lifestyle for any new homeowner.
The home also features LP Smartside products on the exterior, conditioned crawl space, standing seam roof accents, reclaimed pine flooring, granite countertops, lighting by Shades of Light, a coffered living room ceiling, exposed beams in the vaulted master bedroom, custom built in cabinets and shelving in the mudroom and living room, walk in closets in each bedroom and much more.
The structure of the home is also designed according to common lumber lengths and spans. By calculating allowable spans and using common dimensional lumber lengths, the home was designed so none of the floor joists or ceiling joists were required to be cut to fit. This feature of the design provides for a much more efficient and cost effective framing process.
Myron currently lives in this house with his wife and children in the old section of Mill Quarter Plantation in Powhatan County.
 transFORM Home
Why transFORM one closet when you can transFORM them all?
Earlier this year a Scarsdale couple decided to completely renovate their stone tudor, located in the Heart of Fox Meadow.
Naturally, the repeat customers called upon transFORM’s Senior Designer, Ileen Greenberg, to revamp a variety of closets throughout the home, including the front foyer closet, hallway utility closet, basement storage closet, second bedroom closet and of course, the master walk-in closet.
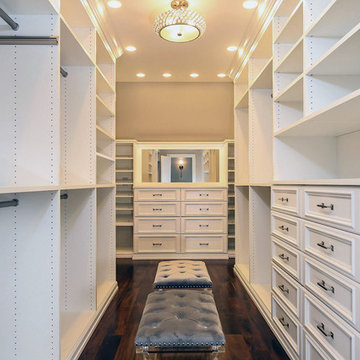
The Master Walk-In Closet was custom crafted, meticulously manufactured and intricately installed to fit the allotted space.
Doubled as a dressing room, this area includes a ton of storage options like tilt-out hampers, front-to-back valet rods, velvet lined jewelry drawers, open and closed adjustable shelving, drawers and more.
Wide slanted and flat shoe shelves were installed, allowing the homeowner to identify and grab their favorite footwear quickly and easily.
As you can see, decorative cabinet doors, a large custom mirror, base trim molding and crown molding create a sophisticated and classic space you won't want to leave.
Ileen also emphasized the importance of good lighting to enhance these newly designed features. Specifically, the closet was equipped with a combination of LED lighting like under-mounted shelf lights and sensor activated drawer lights to make the contents of the dressing room fully visible.
Melamine was the material of choice - it's always an attractive option for closets due to its durability. It’s extremely difficult to scratch, and very easy to clean.
Overall, a truly exceptional job by Ileen and the transFORM team!
9