
Search results for "Mistake">mistake" in Home Design Ideas
 Windy City Painters
Transform Your Home with Expert Wallpaper Installation by Windy City Painters
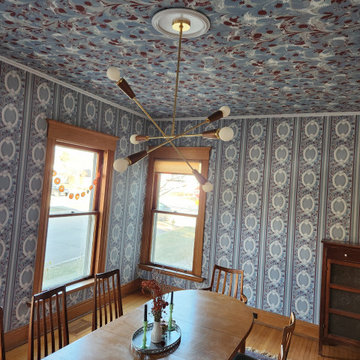
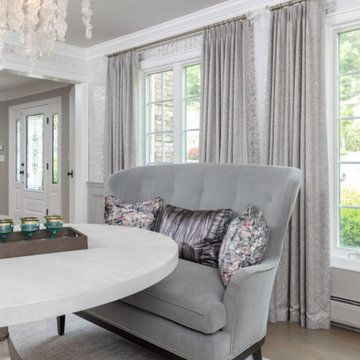
This dining room in Evanston, Illinois, recently underwent a stunning transformation, thanks to the team at Windy City Painters. As a trusted Chicago painter and wallpaper installer, we specialize in elevating spaces with expert craftsmanship and attention to detail. For this project, we installed bold, eclectic wallpaper on both the walls and ceiling—a design style that’s making a huge comeback in modern home décor.
The ceiling wallpaper, in particular, is the highlight of this room. This intricate pattern required careful planning and precise installation to achieve a seamless look. Ceiling wallpaper installation is one of the most challenging aspects of our work. Gravity, delicate materials, and complex patterns make it a task that only skilled professionals should tackle. Every seam, alignment, and adhesive application must be perfect, as even minor mistakes can be glaringly obvious on a ceiling. This is why hiring an experienced wallpaper installer is essential, especially when working with expensive, custom, or delicate wallpaper.
The process of wallpaper installation begins with careful surface preparation. Walls and ceilings need to be cleaned, repaired, and smoothed to ensure the wallpaper adheres properly. Next comes the meticulous measuring and cutting of wallpaper pieces, taking into account pattern repeats to ensure a flawless design flow. For ceilings, additional steps include precise alignment and support systems to keep the wallpaper in place as the adhesive sets. It’s a time-intensive process, but the results speak for themselves—creating a space that feels polished, cohesive, and unique.
Bold, busy patterns, like the one used in this dining room, are becoming increasingly popular. This eclectic style is perfect for homeowners looking to add personality and drama to their spaces. When paired with complementary furniture and décor, it creates a harmonious yet striking aesthetic. In this case, the rich blue tones, paired with natural wood accents and mid-century modern furniture, make the room feel both elegant and inviting.
At Windy City Painters, we pride ourselves on being a top Chicago painting contractor and wallpaper expert. Whether you’re looking to enhance your walls or tackle the challenge of ceiling wallpaper, our experienced team has you covered.
Ready to bring your vision to life? Contact us today to learn more about our wallpaper installation services and start transforming your space!
 Windy City Painters
Transform Your Home with Expert Wallpaper Installation by Windy City Painters
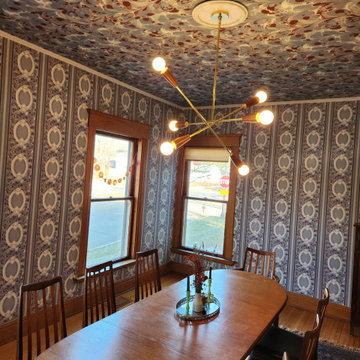
This dining room in Evanston, Illinois, recently underwent a stunning transformation, thanks to the team at Windy City Painters. As a trusted Chicago painter and wallpaper installer, we specialize in elevating spaces with expert craftsmanship and attention to detail. For this project, we installed bold, eclectic wallpaper on both the walls and ceiling—a design style that’s making a huge comeback in modern home décor.
The ceiling wallpaper, in particular, is the highlight of this room. This intricate pattern required careful planning and precise installation to achieve a seamless look. Ceiling wallpaper installation is one of the most challenging aspects of our work. Gravity, delicate materials, and complex patterns make it a task that only skilled professionals should tackle. Every seam, alignment, and adhesive application must be perfect, as even minor mistakes can be glaringly obvious on a ceiling. This is why hiring an experienced wallpaper installer is essential, especially when working with expensive, custom, or delicate wallpaper.
The process of wallpaper installation begins with careful surface preparation. Walls and ceilings need to be cleaned, repaired, and smoothed to ensure the wallpaper adheres properly. Next comes the meticulous measuring and cutting of wallpaper pieces, taking into account pattern repeats to ensure a flawless design flow. For ceilings, additional steps include precise alignment and support systems to keep the wallpaper in place as the adhesive sets. It’s a time-intensive process, but the results speak for themselves—creating a space that feels polished, cohesive, and unique.
Bold, busy patterns, like the one used in this dining room, are becoming increasingly popular. This eclectic style is perfect for homeowners looking to add personality and drama to their spaces. When paired with complementary furniture and décor, it creates a harmonious yet striking aesthetic. In this case, the rich blue tones, paired with natural wood accents and mid-century modern furniture, make the room feel both elegant and inviting.
At Windy City Painters, we pride ourselves on being a top Chicago painting contractor and wallpaper expert. Whether you’re looking to enhance your walls or tackle the challenge of ceiling wallpaper, our experienced team has you covered.
Ready to bring your vision to life? Contact us today to learn more about our wallpaper installation services and start transforming your space!
 Windy City Painters
Transform Your Home with Expert Wallpaper Installation by Windy City Painters
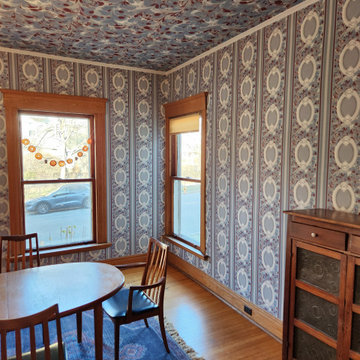
This dining room in Evanston, Illinois, recently underwent a stunning transformation, thanks to the team at Windy City Painters. As a trusted Chicago painter and wallpaper installer, we specialize in elevating spaces with expert craftsmanship and attention to detail. For this project, we installed bold, eclectic wallpaper on both the walls and ceiling—a design style that’s making a huge comeback in modern home décor.
The ceiling wallpaper, in particular, is the highlight of this room. This intricate pattern required careful planning and precise installation to achieve a seamless look. Ceiling wallpaper installation is one of the most challenging aspects of our work. Gravity, delicate materials, and complex patterns make it a task that only skilled professionals should tackle. Every seam, alignment, and adhesive application must be perfect, as even minor mistakes can be glaringly obvious on a ceiling. This is why hiring an experienced wallpaper installer is essential, especially when working with expensive, custom, or delicate wallpaper.
The process of wallpaper installation begins with careful surface preparation. Walls and ceilings need to be cleaned, repaired, and smoothed to ensure the wallpaper adheres properly. Next comes the meticulous measuring and cutting of wallpaper pieces, taking into account pattern repeats to ensure a flawless design flow. For ceilings, additional steps include precise alignment and support systems to keep the wallpaper in place as the adhesive sets. It’s a time-intensive process, but the results speak for themselves—creating a space that feels polished, cohesive, and unique.
Bold, busy patterns, like the one used in this dining room, are becoming increasingly popular. This eclectic style is perfect for homeowners looking to add personality and drama to their spaces. When paired with complementary furniture and décor, it creates a harmonious yet striking aesthetic. In this case, the rich blue tones, paired with natural wood accents and mid-century modern furniture, make the room feel both elegant and inviting.
At Windy City Painters, we pride ourselves on being a top Chicago painting contractor and wallpaper expert. Whether you’re looking to enhance your walls or tackle the challenge of ceiling wallpaper, our experienced team has you covered.
Ready to bring your vision to life? Contact us today to learn more about our wallpaper installation services and start transforming your space!
Find the right local pro for your project
 Lamont Bros. Design & Construction
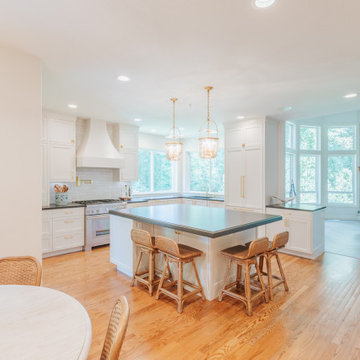
Main portion of the kitchen featuring custom cabinets, a large island, and beautiful lighting. This area leads into the dining room.
Large elegant u-shaped medium tone wood floor and brown floor eat-in kitchen photo in Portland with a drop-in sink, recessed-panel cabinets, white cabinets, granite countertops, white backsplash, ceramic backsplash, black appliances, an island and gray countertops
Large elegant u-shaped medium tone wood floor and brown floor eat-in kitchen photo in Portland with a drop-in sink, recessed-panel cabinets, white cabinets, granite countertops, white backsplash, ceramic backsplash, black appliances, an island and gray countertops

 Kitchen Mart Kitchen & Bath Remodeling
Designer: Kathy Starrett
Example of a farmhouse u-shaped eat-in kitchen design in Sacramento with an integrated sink, raised-panel cabinets, white cabinets, quartzite countertops, beige backsplash, stone slab backsplash, paneled appliances and no island
Example of a farmhouse u-shaped eat-in kitchen design in Sacramento with an integrated sink, raised-panel cabinets, white cabinets, quartzite countertops, beige backsplash, stone slab backsplash, paneled appliances and no island

 StarMark Cabinetry
This kitchen was created with StarMark Cabinetry's Fairhaven inset door style in Cherry finished in a cabinet color called Toffee. The island was created with StarMark Cabinetry's Fairhaven inset door style in Cherry finished in Chestnut. The drawers in this kitchen have optional five-piece drawer headers. Glass front doors were created with glass in the Koko Seedy pattern. Additional accents include faux metal inserts in a color called Ragged Copper, and optional furniture pegs on doors and drawer headers.


 CoCreative Interiors
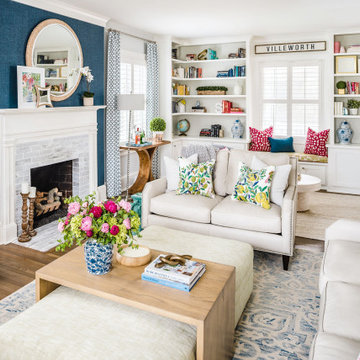
After renovating to give an old home new life, Andrea and Stephen were stumped on how to make sense of their now open and oddly-situated floor plan. “We just keep thinking that taking down so many walls was a huge mistake!” With a fireplace centered in the middle of a long and narrow room and a gaping space at the end of the kitchen island, they knew they needed help.
Aside from not loving the way their home looked, it simply did not function well. They had nowhere to binge their favorite TV shows, no good place to enjoy meals together, and even avoided hosting friends and family.
Built in 1948 and purchased from the original owners, the well-loved furniture from their college years did little to showcase the history of the home’s hand-plastered walls, oversized mouldings and original hardwood floors.
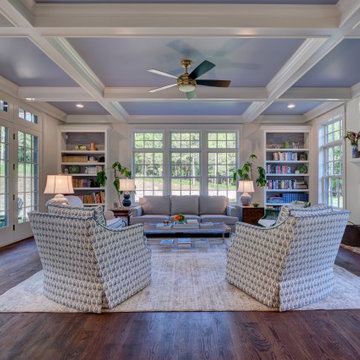
Rather than downplaying the awkwardly-situated fireplace, we made it a focal point. Wrapping it in navy sisal grasscloth gives the fireplace wall warmth and texture, while whitewashing the brick surround enhances what once felt out of place.
We flanked the room with built-ins to create two distinct zones: an entertainment area on one end and a library cocktail lounge on the other. Custom carpentry elevates the space, seamlessly matching the home’s historical features, while wallpaper in the back of the bookcases add a surprising touch of whimsy.
Game night is a regular occurrence, for both the family and their close-knit group of friends. Having plenty of places for people, food, drinks and gaming boards was key. Comfortable yet durable seating, accent tables (especially a sophisticated and space-saving martini table) and a tailor-made island extension that seats seven do the trick.
And every home deserves touches as unique as the people who live within its walls.
Andrea loves the beach, blue and pops of bright color. Stephen loves her so much that he gave us the green light to add hot pink accents and fabrics printed with birdcages and butterflies to the mix without a second thought – so long as we agreed to find him a cushy leather sofa.
Blue and white ginger jars anchor the library lounge bookcases, beautiful reminders of Andrea’s late grandmother. A pink-tinted handprint from their four-year-old little girl echoes the magenta elements throughout the room, as though she made it just for this space.
As a nod to their neighborhood, we surprised Andrea and Stephen by hanging a hand-painted VILLEWORTH sign over their newly built-in bench seating. Stephen named it such because he considers Greenfield Park the “Dilworth of Huntersville.” Locals know this phrase references an area nestled in the heart of Charlotte that has been revived with restoration.
Be like Andrea and Stephen. Be cheeky-chic. Use what you love.


 Mariane Wheatley-Miller
Lots of low growing 'Steppables' were used along the outside edges of the flagstones. Perennials like Monada, Sedums, Epimedium, Stachys, Alchemilla mollis, Rudbeckia, and Echinacea fill the center of the boulder beds. Butterflies, Hummingbirds, Bees and dragonflies are already making this there new home.

 CRC Builders Inc.
The homeowner wanted something different, out of the ordinary, as an entertainment center and bar combination that would add an unusual dimension to watching TV. It had to be in character with the rest of the residence, tastefully designed and executed to deliver the maximum effect.
A two-piece combination bar and seating, coupled with a fireplace and large screen TV was designed. A system was designed and custom built cabinet consisting of a radius front entertainment center houses a large flat screen TV and enclosed stereo speakers on the top level, and a gas log fireplace below.
A custom built see-through bar sports a matching radius front, plenty of storage, and room for three to eat, drink, and enjoy the warmth of the fireplace without missing any of the action on the TV. For even greater functionality, the TV is also viewable through the large opening in the bar while meals or snacks are prepared from the kitchen. Traffic flow is unique: access and egress between the bar front and TV can happen with ease around both sides of the bar, and the opening in the back of the bar provides for service both from and to the kitchen area. Because of the free and easy movement about the space, adequate lighting, and lack of combustibles at or on the fireplace, safety, as well as an ample use of space, are both achieved. Both pieces are custom fabricated from start to finish, and match each other identically in all respects. Both are constructed of clear cherry finish with a clear satin lacquer. Both enjoy chrome accents strips and custom crafted, glass cabinet doors with matching radii, and both are tastefully lit with accenting puck lights. The design and fabrication for both units shared issues in common as well as individually.
The entertainment center was fabricated in the shop in three units and then assembled onsite. The opening for the flat screen TV had to be carefully considered as it too had a radius and therefore had to be designed so that the TV would fit.
The entire bar system, except the countertop, had to be fabricated onsite due to the structural columns on either side between which the curved lower cabinets would rest. Then the countertop template was prepared, fabricated elsewhere, returned and installed. After the countertop was in place, the cabinetmaker had to wrap the two columns on either side as well as the overhead beam while making sure the joints at the columns and header maintained alignment. A complement of matching radii cabinet doors had to be constructed for both units. Radius glass inserts had to be ordered with precise dimensions to assure a perfect fit to openings with tight tolerances. Any mistake would have been expensive to correct. Because of the abundance of natural light into the space, the finishes had to be dead-on, otherwise every flaw would show. The custom walnut inlays were fabricated out of square stock, which protruded above the radius in each door. A jig matching the radius had to be designed and fabricated, then a router used to trim excess material and then sanded and finished.
Solving the multitude of challenges associated with the project was one of the parts that made the project fun and interesting. The homeowners now can entertain every night.
 CRC Builders Inc.
The homeowner wanted something different, out of the ordinary, as an entertainment center and bar combination that would add an unusual dimension to watching TV. It had to be in character with the rest of the residence, tastefully designed and executed to deliver the maximum effect.
A two-piece combination bar and seating, coupled with a fireplace and large screen TV was designed. A system was designed and custom built cabinet consisting of a radius front entertainment center houses a large flat screen TV and enclosed stereo speakers on the top level, and a gas log fireplace below.
A custom built see-through bar sports a matching radius front, plenty of storage, and room for three to eat, drink, and enjoy the warmth of the fireplace without missing any of the action on the TV. For even greater functionality, the TV is also viewable through the large opening in the bar while meals or snacks are prepared from the kitchen. Traffic flow is unique: access and egress between the bar front and TV can happen with ease around both sides of the bar, and the opening in the back of the bar provides for service both from and to the kitchen area. Because of the free and easy movement about the space, adequate lighting, and lack of combustibles at or on the fireplace, safety, as well as an ample use of space, are both achieved. Both pieces are custom fabricated from start to finish, and match each other identically in all respects. Both are constructed of clear cherry finish with a clear satin lacquer. Both enjoy chrome accents strips and custom crafted, glass cabinet doors with matching radii, and both are tastefully lit with accenting puck lights. The design and fabrication for both units shared issues in common as well as individually.
The entertainment center was fabricated in the shop in three units and then assembled onsite. The opening for the flat screen TV had to be carefully considered as it too had a radius and therefore had to be designed so that the TV would fit.
The entire bar system, except the countertop, had to be fabricated onsite due to the structural columns on either side between which the curved lower cabinets would rest. Then the countertop template was prepared, fabricated elsewhere, returned and installed. After the countertop was in place, the cabinetmaker had to wrap the two columns on either side as well as the overhead beam while making sure the joints at the columns and header maintained alignment. A complement of matching radii cabinet doors had to be constructed for both units. Radius glass inserts had to be ordered with precise dimensions to assure a perfect fit to openings with tight tolerances. Any mistake would have been expensive to correct. Because of the abundance of natural light into the space, the finishes had to be dead-on, otherwise every flaw would show. The custom walnut inlays were fabricated out of square stock, which protruded above the radius in each door. A jig matching the radius had to be designed and fabricated, then a router used to trim excess material and then sanded and finished.
Solving the multitude of challenges associated with the project was one of the parts that made the project fun and interesting. The homeowners now can entertain every night.
 Tile Doctor Ltd
Along with internal tiled floors at residential and commercial properties, we also specialise in the cleaning, restoration and sealing of all types of external tiled floors, including patios.
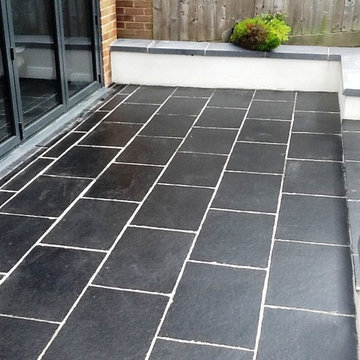
This customer, who lives in the small town of Brackley in Northamptonshire, had made the unfortunate mistake of sealing a brand new Slate tiled patio without removing the layer of grout haze smeared across the surface of the tile first. With the grout trapped between the tile and the new sealant the sealer was unable to fulfil its potential and the entire floor appeared really dull and patchy. The customer contacted me about setting the situation right.
My initial course of action was to remove the new sealer using Tile Doctor Remove & Go, which is specially designed to strip away sealant, as well as adhesives and paints in cases where building and decorating works have left the tiles stained. The product was applied liberally across the surface area of the patio and agitated using a rotary machine fitted with a special stripping pad. Of course, this was necessary because the grout haze could not be treated without removing the sealant first. The soiled cleaning solution was promptly soaked up using a wet-vac machine.
Once the tiles were exposed I applied Tile Doctor Acid Gel, which is a blend of phosphoric and hydrochloric acids in more manageable gel form, all over the patio and allowed it to dwell for ten minutes to begin neutralising the grout haze. I then added a little water and worked the product into the patio with a stiff scrubbing brush and a rotary machine to ensure all grout haze was removed from the surface of the tiles. The remaining slurry was then removed using the wet vacuum, and I rinsed the area twice with plain water to ensure all cleaning products had been removed. It was them left to dry completely.
I returned to the property several days later to give the patio a fresh seal now that it was free from grout haze. First, I gave the patio a vacuum and light mop to remove any dust and debris. The customer wanted the tiles as dark as possible, therefore I suggested we use Tile Doctor Stone Oil before sealing, as this would darken the Slate significantly.
Once this was agreed, I applied one coat of Stone Oil, allowed an hour for the product to dry, and then followed this applying two coats of Tile Doctor Colour Grow sealer. This is our impregnating, colour enhancing sealant which provides maximum protection against ingrained dirt and stains, as well as a durable no-sheen finish.
As you can see from the photographs, the Slate tiles experienced an impressive transformation. The fresh sealant, combined with the Stone Oil, really took the appearance of the tiles to a new level and, what’s more, it will be easier for the happy customer to keep it clean in the future.
Phil Vissian
Northamptonshire Tile Doctor
 Mayflower Construction Group
How Planning Leads to Successful Construction
Construction projects, whether small residential jobs or large commercial builds, require more than just skilled labor and high-quality materials. The foundation of a successful project lies in effective planning. Proper planning ensures efficiency, minimizes risks, and keeps the project within budget and on schedule. Here’s how thorough planning leads to successful construction:
1. Clear Project Scope and Objectives
Defining the project scope early on helps prevent scope creep and miscommunication. Establishing clear goals, deliverables, and timelines ensures that everyone involved understands the expectations. This prevents delays and unnecessary changes during construction.
2. Accurate Budgeting and Cost Control
A well-planned project includes a detailed cost estimation. This accounts for labor, materials, permits, and unexpected contingencies. Without proper budgeting, costs can spiral out of control, leading to financial strain and potential project failure.
3. Efficient Resource Management
Proper planning helps allocate resources effectively, including manpower, equipment, and materials. Scheduling workers and ordering materials at the right time avoids delays caused by shortages or logistical issues.
4. Risk Identification and Mitigation
Every construction project comes with risks—weather delays, supply chain issues, safety hazards, or regulatory compliance concerns. Planning ahead allows for risk assessment and the implementation of strategies to mitigate potential problems before they occur.
5. Compliance with Regulations and Permits
Failing to secure the necessary permits or adhere to building codes can halt a project indefinitely. Planning ensures that all legal requirements are met in advance, avoiding costly fines and legal complications.
6. Seamless Communication and Coordination
A structured plan includes clear communication protocols between contractors, architects, engineers, and clients. When everyone is on the same page, mistakes are reduced, and the workflow remains smooth.
7. Improved Project Scheduling
A construction schedule outlines each phase of the project, from site preparation to finishing touches. A well-planned schedule helps keep tasks on track, prevents unnecessary delays, and ensures timely project completion.
8. Higher Quality Workmanship
Planning allows for a structured approach to quality control. By setting benchmarks, conducting inspections, and using the right materials, projects meet industry standards and client expectations.
9. Better Client Satisfaction
When a project is completed on time, within budget, and meets quality expectations, client satisfaction increases. A satisfied client is more likely to recommend your services and return for future projects.
Conclusion
In construction, planning isn’t just a step—it’s the backbone of success. From budgeting and resource management to compliance and scheduling, thorough planning prevents costly errors, improves efficiency, and ensures a high-quality outcome. Whether you're working on a small driveway installation or a large-scale commercial project, investing time in planning will always pay off in the long run.
Do you need expert concrete construction services that prioritize planning and quality? Contact us today!

 J M G CONSTRUCTION
This beautiful 1930's Rolling Hills Estates ranch house was in dire need of a kitchen remodel with a drop ceiling and navy blue floors. We completely gutted the room adding almost three feet of height to the space. We were also able to save the original tile and cabinets. Giving them a fresh coat of paint and medium stain wash to add color and depth to wood.
 CRC Builders Inc.
The homeowner wanted something different, out of the ordinary, as an entertainment center and bar combination that would add an unusual dimension to watching TV. It had to be in character with the rest of the residence, tastefully designed and executed to deliver the maximum effect.
A two-piece combination bar and seating, coupled with a fireplace and large screen TV was designed. A system was designed and custom built cabinet consisting of a radius front entertainment center houses a large flat screen TV and enclosed stereo speakers on the top level, and a gas log fireplace below.
A custom built see-through bar sports a matching radius front, plenty of storage, and room for three to eat, drink, and enjoy the warmth of the fireplace without missing any of the action on the TV. For even greater functionality, the TV is also viewable through the large opening in the bar while meals or snacks are prepared from the kitchen. Traffic flow is unique: access and egress between the bar front and TV can happen with ease around both sides of the bar, and the opening in the back of the bar provides for service both from and to the kitchen area. Because of the free and easy movement about the space, adequate lighting, and lack of combustibles at or on the fireplace, safety, as well as an ample use of space, are both achieved. Both pieces are custom fabricated from start to finish, and match each other identically in all respects. Both are constructed of clear cherry finish with a clear satin lacquer. Both enjoy chrome accents strips and custom crafted, glass cabinet doors with matching radii, and both are tastefully lit with accenting puck lights. The design and fabrication for both units shared issues in common as well as individually.
The entertainment center was fabricated in the shop in three units and then assembled onsite. The opening for the flat screen TV had to be carefully considered as it too had a radius and therefore had to be designed so that the TV would fit.
The entire bar system, except the countertop, had to be fabricated onsite due to the structural columns on either side between which the curved lower cabinets would rest. Then the countertop template was prepared, fabricated elsewhere, returned and installed. After the countertop was in place, the cabinetmaker had to wrap the two columns on either side as well as the overhead beam while making sure the joints at the columns and header maintained alignment. A complement of matching radii cabinet doors had to be constructed for both units. Radius glass inserts had to be ordered with precise dimensions to assure a perfect fit to openings with tight tolerances. Any mistake would have been expensive to correct. Because of the abundance of natural light into the space, the finishes had to be dead-on, otherwise every flaw would show. The custom walnut inlays were fabricated out of square stock, which protruded above the radius in each door. A jig matching the radius had to be designed and fabricated, then a router used to trim excess material and then sanded and finished.
Solving the multitude of challenges associated with the project was one of the parts that made the project fun and interesting. The homeowners now can entertain every night.
 CRC Builders Inc.
The homeowner wanted something different, out of the ordinary, as an entertainment center and bar combination that would add an unusual dimension to watching TV. It had to be in character with the rest of the residence, tastefully designed and executed to deliver the maximum effect.
A two-piece combination bar and seating, coupled with a fireplace and large screen TV was designed. A system was designed and custom built cabinet consisting of a radius front entertainment center houses a large flat screen TV and enclosed stereo speakers on the top level, and a gas log fireplace below.
A custom built see-through bar sports a matching radius front, plenty of storage, and room for three to eat, drink, and enjoy the warmth of the fireplace without missing any of the action on the TV. For even greater functionality, the TV is also viewable through the large opening in the bar while meals or snacks are prepared from the kitchen. Traffic flow is unique: access and egress between the bar front and TV can happen with ease around both sides of the bar, and the opening in the back of the bar provides for service both from and to the kitchen area. Because of the free and easy movement about the space, adequate lighting, and lack of combustibles at or on the fireplace, safety, as well as an ample use of space, are both achieved. Both pieces are custom fabricated from start to finish, and match each other identically in all respects. Both are constructed of clear cherry finish with a clear satin lacquer. Both enjoy chrome accents strips and custom crafted, glass cabinet doors with matching radii, and both are tastefully lit with accenting puck lights. The design and fabrication for both units shared issues in common as well as individually.
The entertainment center was fabricated in the shop in three units and then assembled onsite. The opening for the flat screen TV had to be carefully considered as it too had a radius and therefore had to be designed so that the TV would fit.
The entire bar system, except the countertop, had to be fabricated onsite due to the structural columns on either side between which the curved lower cabinets would rest. Then the countertop template was prepared, fabricated elsewhere, returned and installed. After the countertop was in place, the cabinetmaker had to wrap the two columns on either side as well as the overhead beam while making sure the joints at the columns and header maintained alignment. A complement of matching radii cabinet doors had to be constructed for both units. Radius glass inserts had to be ordered with precise dimensions to assure a perfect fit to openings with tight tolerances. Any mistake would have been expensive to correct. Because of the abundance of natural light into the space, the finishes had to be dead-on, otherwise every flaw would show. The custom walnut inlays were fabricated out of square stock, which protruded above the radius in each door. A jig matching the radius had to be designed and fabricated, then a router used to trim excess material and then sanded and finished.
Solving the multitude of challenges associated with the project was one of the parts that made the project fun and interesting. The homeowners now can entertain every night.
 CRC Builders Inc.
The homeowner wanted something different, out of the ordinary, as an entertainment center and bar combination that would add an unusual dimension to watching TV. It had to be in character with the rest of the residence, tastefully designed and executed to deliver the maximum effect.
A two-piece combination bar and seating, coupled with a fireplace and large screen TV was designed. A system was designed and custom built cabinet consisting of a radius front entertainment center houses a large flat screen TV and enclosed stereo speakers on the top level, and a gas log fireplace below.
A custom built see-through bar sports a matching radius front, plenty of storage, and room for three to eat, drink, and enjoy the warmth of the fireplace without missing any of the action on the TV. For even greater functionality, the TV is also viewable through the large opening in the bar while meals or snacks are prepared from the kitchen. Traffic flow is unique: access and egress between the bar front and TV can happen with ease around both sides of the bar, and the opening in the back of the bar provides for service both from and to the kitchen area. Because of the free and easy movement about the space, adequate lighting, and lack of combustibles at or on the fireplace, safety, as well as an ample use of space, are both achieved. Both pieces are custom fabricated from start to finish, and match each other identically in all respects. Both are constructed of clear cherry finish with a clear satin lacquer. Both enjoy chrome accents strips and custom crafted, glass cabinet doors with matching radii, and both are tastefully lit with accenting puck lights. The design and fabrication for both units shared issues in common as well as individually.
The entertainment center was fabricated in the shop in three units and then assembled onsite. The opening for the flat screen TV had to be carefully considered as it too had a radius and therefore had to be designed so that the TV would fit.
The entire bar system, except the countertop, had to be fabricated onsite due to the structural columns on either side between which the curved lower cabinets would rest. Then the countertop template was prepared, fabricated elsewhere, returned and installed. After the countertop was in place, the cabinetmaker had to wrap the two columns on either side as well as the overhead beam while making sure the joints at the columns and header maintained alignment. A complement of matching radii cabinet doors had to be constructed for both units. Radius glass inserts had to be ordered with precise dimensions to assure a perfect fit to openings with tight tolerances. Any mistake would have been expensive to correct. Because of the abundance of natural light into the space, the finishes had to be dead-on, otherwise every flaw would show. The custom walnut inlays were fabricated out of square stock, which protruded above the radius in each door. A jig matching the radius had to be designed and fabricated, then a router used to trim excess material and then sanded and finished.
Solving the multitude of challenges associated with the project was one of the parts that made the project fun and interesting. The homeowners now can entertain every night.
 Metropolis Drafting and Construction Inc
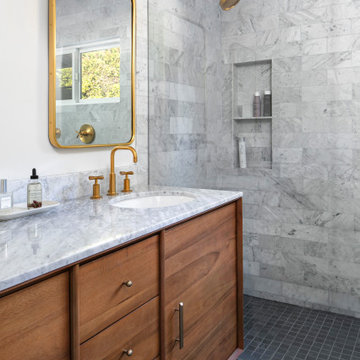
The main bathroom in the house acts as the master bathroom. And like any master bathroom we design the shower is always the centerpiece and must be as big as possible.
The shower you see here is 3' by almost 9' with the control and diverter valve located right in front of the swing glass door to allow the client to turn the water on/off without getting herself wet.
The shower is divided into two areas, the shower head and the bench with the handheld unit, this shower system allows both fixtures to operate at the same time so two people can use the space simultaneously.
The floor is made of dark porcelain tile 48"x24" to minimize the amount of grout lines.
The color scheme in this bathroom is black/wood/gold and gray.

52