
Search results for "Mistakes start" in Home Design Ideas

 Kitchen Village
Kitchen - transitional l-shaped medium tone wood floor and brown floor kitchen idea in Chicago with an undermount sink, recessed-panel cabinets, white cabinets, beige backsplash, subway tile backsplash, stainless steel appliances, an island and beige countertops

 Floor Coverings International of East Lake
Example of a large classic hallway design in Tampa with yellow walls

 Bay Ridge Carpet and Linoleum
Inspiration for a mid-sized transitional wooden u-shaped staircase remodel in New York with painted risers
Find the right local pro for your project


 Wine Cellar Innovations
This Designer Series project was a labor of love. William S has this to say about the project:
"1. The wine racks arrived in relatively undamaged boxes, all wood was in good condition, and the boxes were nicely placed in my garage by the delivery folks. My project was in the basement, so it was easy for me to move them individually from the garage to the project location.
2. As I ordered a number of racks, I also received the compressor and nail gun as a bonus, which I then used for assembly, It made the job very easy and I couldn't imagine anyone doing this with a hammer and nails. As well, I used the nail gun in other areas of my cellar project, so it was a great bonus to have for the entire project.
3. Assembly was easy; but, you needed the right tools. I have a power mitre saw and table saw, so that made the difference for me on some of the trim and detail work. I did manage to make a mistake on one trim corner angle; but, your customer service took care of that and sent me a new piece that I then knew how to do correctly.
4. My project took many steps - from layout, to picking the right look with the wall and ceiling products to support it, the rack assembly and installation, then the final installation with the wine room cooling unit, and then the wine. There are still some things I need to do; but, for now, it is a fully functional wine cellar and I think the racks are wonderful.
The attached pictures take you through my project for a ~250 cu ft cellar - nearly start to finish. Today, the room is holding about 200 bottles (capacity 500) and the room is a solid 55F and 65% RH. The racks are natural and unfinished and I love the smell of the wood and outcome. I may add some additional features down the road."

 Everett Custom Homes
Example of a mid-sized farmhouse l-shaped dark wood floor and brown floor eat-in kitchen design in Charlotte with an undermount sink, shaker cabinets, white cabinets, granite countertops, gray backsplash, stainless steel appliances and an island

 Hierarchy Architecture + Design, PLLC
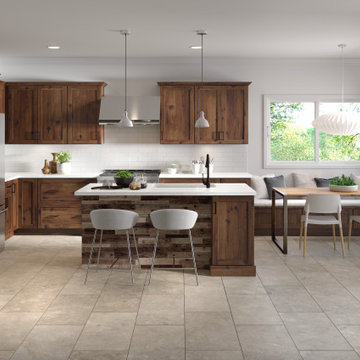
Classic designs have staying power! This striking red brick colonial project struck the perfect balance of old-school and new-school exemplified by the kitchen which combines Traditional elegance and a pinch of Industrial to keep things fresh.

 Custom Surface Solutions
Custom Surface Solutions (www.css-tile.com) - Owner Craig Thompson (512) 430-1215. This project shows the remodel of a small 1950's vintage home master bathroom. 8"" x 18" Calcutta gold marble tile was used on the shower walls and floor wall base and ceramic gray penny tile on the floor. Shower includes curbless pan / floor, dual shower boxes, frameless glass slider, trough duel fixture sink and chrome fixtures.


 Redecorating Vancouver
A classic style arranged with bold prints and vibrant colours
This condo started with a fantastic base. Priceless art collected during trips around the world and an eye for beauty that any designer would envy. My client was purposeful in her approach, but she still thought there was something not quite right about the room. Sitting room conversations felt awkward. You would catch guests unsure of where to sit or place their drink. The client needed a change and Redecorating Vancouver was there to correct common mistakes and look at the problems from a professional angle.
After the consultation and rearrangement the client was thrilled with the changes we made. The space opened up. The flow of energy from the staircase through the living area and into the dining room was no longer blocked. By grouping two pieces of art with matching framing material, we were able to create a focal point in the room, around which we centred the furniture. Conversations were more natural and now we all had a place to set our drinks.
This redecoration took place during the holiday season and my client also chose to add Holiday Decorating to the consultation. I offered suggestions that helped give a fresh new feel to her existing christmas ornaments. Entertaining during the holiday season was important to her as well, so I used my expertise to add some holiday cheer and maintain the great flow we had just created.
This redecoration was a pleasure. A lifetime of collecting fine things from a plethora of fantastic destinations and only one day with Redecorating Vancouver to make them all shine!
 Redecorating Vancouver
A classic style arranged with bold prints and vibrant colours
This condo started with a fantastic base. Priceless art collected during trips around the world and an eye for beauty that any designer would envy. My client was purposeful in her approach, but she still thought there was something not quite right about the room. Sitting room conversations felt awkward. You would catch guests unsure of where to sit or place their drink. The client needed a change and Redecorating Vancouver was there to correct common mistakes and look at the problems from a professional angle.
After the consultation and rearrangement the client was thrilled with the changes we made. The space opened up. The flow of energy from the staircase through the living area and into the dining room was no longer blocked. By grouping two pieces of art with matching framing material, we were able to create a focal point in the room, around which we centred the furniture. Conversations were more natural and now we all had a place to set our drinks.
This redecoration took place during the holiday season and my client also chose to add Holiday Decorating to the consultation. I offered suggestions that helped give a fresh new feel to her existing christmas ornaments. Entertaining during the holiday season was important to her as well, so I used my expertise to add some holiday cheer and maintain the great flow we had just created.
This redecoration was a pleasure. A lifetime of collecting fine things from a plethora of fantastic destinations and only one day with Redecorating Vancouver to make them all shine!
 Redecorating Vancouver
A classic style arranged with bold prints and vibrant colours
This condo started with a fantastic base. Priceless art collected during trips around the world and an eye for beauty that any designer would envy. My client was purposeful in her approach, but she still thought there was something not quite right about the room. Sitting room conversations felt awkward. You would catch guests unsure of where to sit or place their drink. The client needed a change and Redecorating Vancouver was there to correct common mistakes and look at the problems from a professional angle.
After the consultation and rearrangement the client was thrilled with the changes we made. The space opened up. The flow of energy from the staircase through the living area and into the dining room was no longer blocked. By grouping two pieces of art with matching framing material, we were able to create a focal point in the room, around which we centred the furniture. Conversations were more natural and now we all had a place to set our drinks.
This redecoration took place during the holiday season and my client also chose to add Holiday Decorating to the consultation. I offered suggestions that helped give a fresh new feel to her existing christmas ornaments. Entertaining during the holiday season was important to her as well, so I used my expertise to add some holiday cheer and maintain the great flow we had just created.
This redecoration was a pleasure. A lifetime of collecting fine things from a plethora of fantastic destinations and only one day with Redecorating Vancouver to make them all shine!

 Cossentino & Sons Remodeling & Design Inc.
Example of a classic stone tile marble floor freestanding bathtub design in Baltimore with recessed-panel cabinets, white cabinets, a one-piece toilet, pink walls, an undermount sink and quartz countertops

 Lemon Remodeling & Services
Planning a Modern Kitchen Remodel
Every successful kitchen remodeling project begins with careful planning. Before construction starts, it is important to evaluate the existing layout, cabinet storage, lighting conditions, appliance placement, and how the kitchen connects to surrounding living spaces.
For this project, the primary design goals included:
Creating a brighter open concept kitchen
Improving functionality and circulation
Increasing pantry and cabinet storage
Maximizing natural light with skylight integration
Creating a clean and timeless design aesthetic
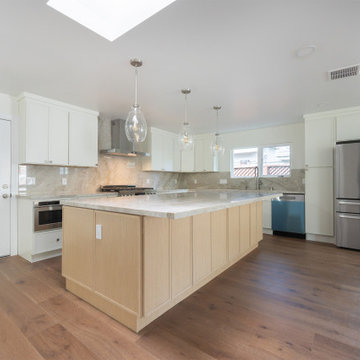
The final layout centered around a large kitchen island that functions as both a workspace and gathering area. Open concept kitchens remain highly desirable because they improve communication between living areas while helping the home feel larger and more connected.
Importance of Natural Light
Natural lighting plays a major role in modern kitchen remodeling. In this renovation, the skylight significantly improved brightness throughout the space and helped create a softer, more inviting atmosphere during the day.
Combined with recessed lighting and pendant fixtures above the island, the layered lighting design provides both functional task lighting and balanced ambient illumination.
Construction and Material Selection
Kitchen remodeling projects require coordination between multiple construction trades including demolition, framing, electrical, plumbing, drywall, flooring, cabinetry, countertops, and finish carpentry.
Bi-Color Kitchen Remodel Design
One of the standout features of this project is the bi-color kitchen remodel design. The warm natural wood island creates contrast against the surrounding white cabinetry while maintaining a clean and balanced appearance.
This approach helps:
Add visual depth to the kitchen
Create separation between functional zones
Prevent the space from feeling overly monochromatic
Introduce warmth into modern kitchen designs
The oversized island also provides additional storage, countertop workspace, and seating opportunities for everyday use and entertaining.
Countertops, Cabinetry, and Finishes
The kitchen includes:
Quartz countertops with waterfall-style edges
Custom shaker-style cabinetry
Stainless steel appliances
Modern pendant lighting
Wide plank engineered hardwood flooring
Full-height backsplash surfaces
The neutral color palette was selected to create a timeless appearance while allowing flexibility for future décor and furniture changes.
Pantry Kitchen Renovation
Storage planning is one of the most important aspects of kitchen remodeling. The pantry kitchen renovation focused on improving organization and accessibility while maximizing usable storage space.
Modern pantry systems help homeowners:
Reduce countertop clutter
Improve kitchen organization
Store small appliances more efficiently
Increase long-term functionality
Thoughtful storage design can significantly improve the daily usability of a kitchen without increasing square footage.
Real Estate Value and Long-Term Benefits
Kitchen remodeling remains one of the highest-value residential renovation projects in the Bay Area real estate market. A professionally designed open concept kitchen can improve buyer perception, increase property appeal, and modernize outdated layouts.
Features such as large islands, skylights, pantry storage, and bi-color cabinetry continue to remain highly desirable among homeowners and future buyers alike.
Common Kitchen Remodeling Mistakes
Some common mistakes homeowners should avoid include:
Insufficient lighting design
Poor circulation planning
Limited storage solutions
Choosing low-durability materials
Overcrowded layouts
Inadequate electrical preparation
Working with experienced remodeling professionals can help avoid costly design and construction issues later in the process.
Common Questions
How long does a kitchen remodel usually take?
Most kitchen remodeling projects take approximately 6–12 weeks depending on the project scope, inspections, material lead times, and structural modifications.
Do kitchen remodels require permits?
Permits are often required when plumbing, electrical, structural, or layout changes are involved. Requirements vary depending on the city and scope of work.
What is a bi-color kitchen remodel?
A bi-color kitchen remodel uses two cabinet finishes or tones to create visual contrast and a more customized design appearance.
Does an open concept kitchen increase home value?
Open concept kitchens are highly desirable because they improve functionality, natural lighting, and overall flow throughout the home.
Conclusion
A well-planned kitchen remodeling project combines thoughtful design, quality craftsmanship, and durable materials to create a space that is both functional and visually appealing. Features such as skylight integration, open concept layouts, pantry kitchen renovations, and bi-color cabinetry continue to remain popular among Bay Area homeowners seeking timeless and practical kitchen designs.
Careful planning, professional coordination, and attention to detail are essential for creating a kitchen that performs well aesthetically and functionally for many years.
------->
If you’re planning a kitchen remodeling project, consulting with an experienced contractor can help simplify the design and construction process while avoiding costly mistakes.
Book a consultation:
calendly.com/lemonremodeling

 StarMark Cabinetry
This kitchen was created with StarMark Cabinetry's Fairhaven inset door style in Cherry finished in a cabinet color called Toffee. The island was created with StarMark Cabinetry's Fairhaven inset door style in Cherry finished in Chestnut. The drawers in this kitchen have optional five-piece drawer headers. Glass front doors were created with glass in the Koko Seedy pattern. Additional accents include faux metal inserts in a color called Ragged Copper, and optional furniture pegs on doors and drawer headers.

 Lisa Tharp Design
Governor's House Entry by Lisa Tharp. 2019 Bulfinch Award - Interior Design. Photo by Michael J. Lee
Transitional painted wood floor foyer photo with white walls and a black front door
Transitional painted wood floor foyer photo with white walls and a black front door

 Five Star Tree Care
Using a chainsaw is a quick way to make work of fallen branches, damaged trees, and more. However, unless you have been plenty of experience, you may not be able to use this tool safely. For those who have never used a chainsaw before, it is a good idea to start with a lighter saw to prevent injury. It is also a good idea to enroll in a training course. If you plan to use a chainsaw in a professional company, it is even mandatory. Five Star Tree Services has created a quick guide that will help you decide if using a chainsaw is the best option for you.
Chainsaw Maintenance
Before you start using a chainsaw, you need to know if the blades are properly sharpened. Dull blades can cause jagged cuts or even cause injury. A sharp blade allows the saw to cut smoothly and produce straight cuts. The next step is to review is the cutting chain. It should be adjusted to the right tension, so the chain doesn’t move when the engine is idle. Make sure there are no loose screws and that the chain brake is in proper working order.
Operating a Chainsaw
Once you ensure that the chainsaw is safe to operate, it is time to get it started. Do you know the right amount of throttle and pressure to use? What about which cut would be best for your current project? Each type of cut will affect the wood differently, so it is important to keep these factors in mind when using a chainsaw. Situational awareness is also an important part of chainsaw use. No one should be within 10 feet while you are cutting. Also, avoid getting distracted by people seeking your attention since it only takes a second for a grave mistake to occur.
Protection During Chainsaw Operation
Proper protection is essential when operating machinery. When using a chainsaw, you should have on personal protection equipment such as; chainsaw pants, steel toe boots, gloves, ear protection, high visibility clothing, a helmet, and eye protection. All of these items should be in good working order and made from high-quality materials. Protecting your face, neck, chest, and abdomen is critical when working with any type of cutting tool.
The best way to keep yourself protected while wearing your personal protective equipment (PPE) is to maintain control over the chainsaw. Gloves may reduce control for many people, but a firm stance and proper balance can work wonders for maintaining control. PPE usage is very important, but it is equally important not to get lulled into a false sense of security by wearing it.
Practice Makes Perfect
It is best to practice using your chainsaw before taking on big projects. This will help you learn to move your body and your head in a safe way and a way that supports a clean cut. Most often, work with chainsaws is completed on ground that is uneven or covered in obstacles. Practicing will ensure that you can adapt to your environment without risking damage to your property or bodily harm.
How We Can Help
Working with chainsaws can make tree care simpler, but without the proper training and protection, it can be hazardous. Instead of taking the risk, hire the professionals here at Five Star Tree Services for all of your Richmond Hill tree removal and tree care needs. Give us a call at (416) 990-3355 to find out more about our rates and services.
 Tile Doctor Ltd
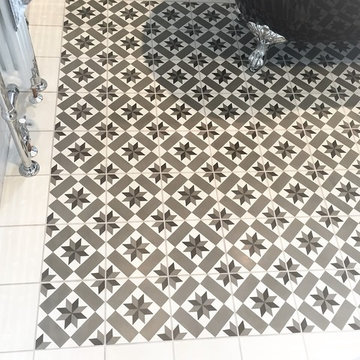
I’m often asked if you should seal a tile before grouting and the answer is a definite yes, and this Encaustic Cement tiled bathroom floor installation in Stockport is a great example as to why. The tiles had not been sealed before grouting and then, once the tiler went to grout the newly installed tiles with a grey grout, the colour ran into the tiles, staining them and leaving them looking grubby and dirty. Had the tiles been sealed it would of made the process of removing the grout from the surface of the tile much easier.
If you haven’t come across them before Encaustic cement tiles are often hand painted and are available in a range of beautifully artistic patterns, so it was a real shame that these tiles were allowed to be spoilt by an avoidable mistake. As you can imagine, the property owner was keen to have the tiles professionally restored, and she contacted me to get the job done. I took some photographs but I’m not sure that they do justice to the problem.
Rather than use a liquid cleaning product, I opted to use diamond encrusted handheld burnishing pads to remove the grout stains. Our burnishing system comprises four pads of varying grits. I started with the Coarse grit burnishing pads applying to the tiles it with a small amount of water as lubricant to grind down the grubby marks. Following this I worked my way through the system, applying Medium, Fine and Very Fine pads to gradually restore the appearance of the floor. Once the burnishing process has been completed I rinsed the tiles and then accelerated the drying process using a heat gun to prepare them to be sealed.
Removing any excess moisture before sealing is essential as even a small amount can cloud the sealer and prevent it from properly protecting the tiles from dirt and stains. Once satisfied that the floor was dry, I proceeded to seal it using Tile Doctor Colour Grow. As an impregnating sealer Colour Grow penetrates deep into the pores of the stone to fill them and thus prevent dirt from becoming ingrained. Colour Grow’s colour intensifying properties also really accentuated the patterns of the Encaustic Cement tiles.
Now that these fantastic tiles have been properly sealed it will be far easier for the customer to keep them clean in future. Needless to say, she was very happy with the result. We recommend topping up your sealer on a regular basis to ensure problems like those which occurred here do not damage the appearance of your tiles.
Steve Keary
Greater Manchester Tile Doctor
5