
Search results for "Moisturizing" in Home Design Ideas
 Paradise Found Construction
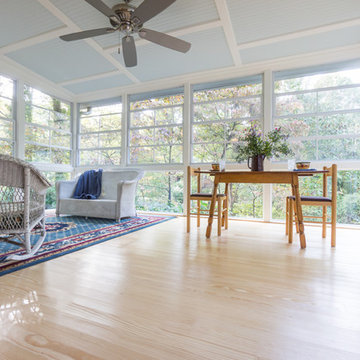
The homes in Heritage Hills in Chapel Hill, NC are representative of the popularity and explosive growth of American Home Ownership that occurred during the economic expansion that followed the end of WW II. They were designed and built to foster the benefits and sense of “community”, where families could come together and share theirs and their children’s lives. They are typically in very desirable locations within their larger communities, and remodeling them with modern amenities, increasing the performance and efficiency of them, and having them Green Certified (independent third-party verified) makes them extremely attractive to buyers, and helps to raise other property values within the neighborhood.
Green Certified Remodeled Homes offer significant value and advantage in the marketplace over similar homes in their area, which is especially important as a new, younger era of home buyers enter the market. Current trends suggest that younger (as well as many “seasoned”) homeowners are interested in smaller, more efficient (and thus affordable) homes situated closer to shopping, their work, entertainment opportunities, and access to the economic and environmental benefits of mass transit.
These older homes also offer an additional value that is continuing to gain visibility and appreciation in the market place. They were built from lumber from slower-growth trees (denser and harder wood), and as such offer superior structural support compared to the same home built using lumber from today’s faster-growing (softer and less-dense wood) trees.
Robin and Kent had lived in their 2-story Gambrel Roof home in Heritage Hills since 1994. The house was structurally sound, due in large part to the old-growth (and denser) yellow pine that was used in its framing. They loved the quiet neighborhood, its sense of community and amenities, and their home. It suited their life-style and needs; and they had decided that they would remain in the home. It was showing its age, and was in need of general repairs and maintenance, and its energy, water, and indoor air quality performance was continuing to increase their ongoing cost of ownership.
Robin loved the screen porch that looked out on their private and nicely landscaped back yard, but she wanted to be able to use it in the colder months of the year. She was unsatisfied with the kitchen and the mud room / laundry room, and the darkness of other living spaces. A previous water leak in the laundry room had resulted in a large patch of mold that had compromised flooring, wall board, and insulation and contributed to the homes reduced indoor air quality.
The home lacked insulation in the crawl, and inadequate insulation in the attic. The single HVAC unit had been replaced a few years earlier with a more efficient unit, but with a single programmable thermostat control on the first floor and aging and un-insulated ducting, the second floor was often over-heated in the summer months.
The original wood windows had begun to deteriorate and were drafty and inefficient, and the original wood-burning fireplace was an open conduit for escaping conditioned air as well as an inlet for wood-smoke smelling air being pulled into the home. The siding had been replaced a few years earlier with a cement-fiber product, but the exterior wood trim was compromised and beginning to look unsightly. Its original architecture had been altered over the years in ways that presented ongoing maintenance and durability issues, as well as disrupting the elegance of the original design.
Kent has worked for over 30 years in the Environmental Sciences field, and is considered to be a national expert in understanding the sources of, and human exposure to pollutants in indoor environments. He had always been very conscious and cautious about the effects on indoor air quality that the construction, furnishings, and products used in home had on him and his family.
Project Goals
Increase the performance of their home by improving energy efficiency by at least 40% and lowering their natural gas and electric utility costs.
Increase the performance of their home by reducing water usage by at least 40% and lowering the water utility costs.
Increase the comfort of their home that was being compromised by an inadequate HVAC design, inadequate insulation, inefficient and compromised wood windows, and copious air intrusions and drafts.
Improve the healthiness of the homes indoor air quality that was being compromised by an open wood-burning fireplace, and prior water intrusion that had allowed colonies of mold to thrive.
Create a new Kitchen, Family Room, Home Office, Mudroom, and Laundry Room that featured some of the latest designs and trends and harmonized with the rest of the homes charm.
Increase the usefulness and aesthetics of the screened porch by creating a warm and inviting semi-conditioned 3-Season Room that extended the times during the year that it was comfortable.
Introduce day-lighting into areas of the home that were dark and uninviting.
Brighten and harmonize all of the interior finishes.
Protect and restore the exterior of the home with superior-performing products and finishes.
Achieve Gold Level Green Home Certification in conformance with the ICC 700-2012 National Green Building Standards (NGBS).
 Armor Exteriors
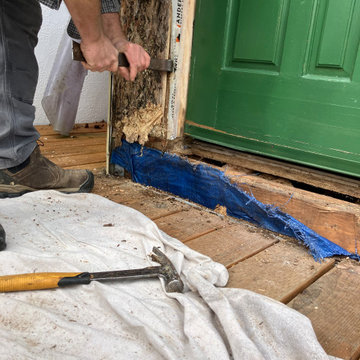
After removing the exterior finishes, we uncovered moisture-related deterioration in the wall sheathing and in a section of subfloor beneath the entry door. The damaged materials were removed and replaced, and new blocking was installed below the subfloor to provide solid support for the door sill and help create a stronger, longer-lasting entry assembly.
 TOC design & construction inc.
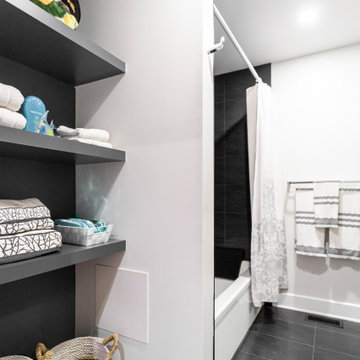
When designing your dream home, there’s one room that is incredibly important. The master bathroom shouldn’t just be where you go to shower it should be a retreat. Having key items and a functional layout is crucial to love your new custom home.
Consider the following elements to design your Master Ensuite
1. Think about toilet placement
2. Double sinks are key
3. Storage
4. Ventilation prevents mold and moisture
5. To tub or not to tub
6. Showers should be functional
7. Spacing should be considered
8. Closet Placement
Bonus Tips:
Lighting is important so think it through
Make sure you have enough electrical outlets but also that they are within code
The vanity height should be comfortable
A timeless style means you won’t have to renovate
Flooring should be non-slip
Think about smells, noises, and moisture.
BEST PRO TIP: this is a large investment, get a pro designer, In the end you will save time and money.
Find the right local pro for your project
 RGR Construction and Roofing, LLC
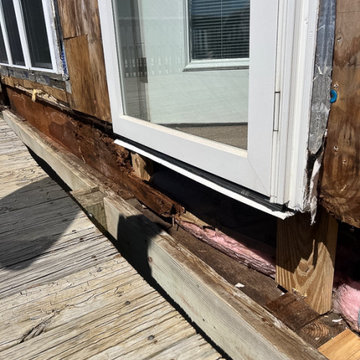
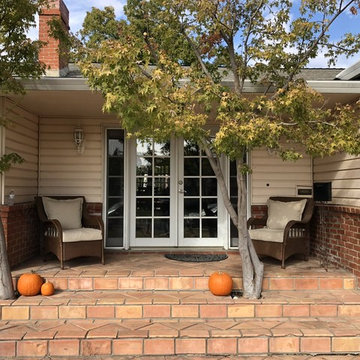
This project in Oak Island, NC revealed extensive wood rot and structural deterioration beneath an exterior door and deck connection. The rim joist and framing members had failed due to prolonged moisture intrusion, compromising structural integrity. RGR Construction and Roofing, LLC is performing full structural repairs, including framing replacement, moisture protection, and rebuilding to meet code and coastal durability standards.
 Elite Construction and Remodel Corp
Damage noted to the exterior trim, is visible at the garage and pedestrian door jambs, and to the soffit caused by uncontrollable exterior moisture sources.
https://www.eliteconstructioncorp.com/projects/melrose-avenue
 Provost Companies, Inc.
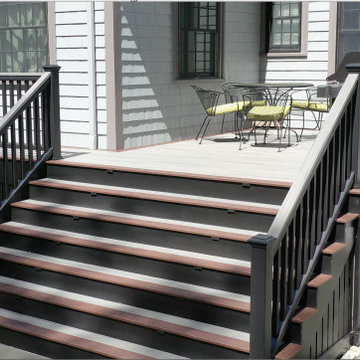
This project is a great example of how the different divisions under Provost Companies can come together to create exceptional results for this construction project in Wellesley, MA.
This project consists of the initial site work including, excavating and re-grading the property to improve drainage and access.
Our construction division was tasked with replacing some of the exterior siding and installing a new deck on the home. To provide more value to the client we installed waterproof taping on the top of all our joists to help prevent moisture from entering. We leave the bottom and side open so it can breathe. This prevents moisture from falling directly into the inevitable splits (specifically at the top of the joist where it will take direct rain and water infiltration) that occur in PT lumber. This wasn’t our idea, and we aren’t taking credit for it, it’s just a best practice we follow to provide more value to the client. Yes, using steel joists is a superior solution but steel is often outside of the budget.
Our landscape construction team was tasked with re-grading the yard, installing a bluestone patio and fieldstone retention wall.
 Allman Remodeling Contractors
Basement Refresh & Moisture-Resistant Upgrade
This basement was showing signs of failing paint and moisture wear, so we tackled it the right way — no shortcuts.
✔️ Scraped and removed failing paint
✔️ Thorough TSP wash for proper surface prep
✔️ Repainted masonry walls with Sherwin-Williams Loxon (designed for basement and masonry conditions)
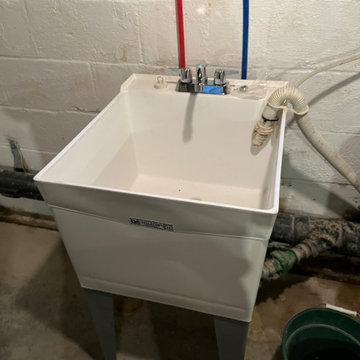
✔️ Removed old utility sink and installed a new, clean utility sink
The result is a brighter, cleaner, and more durable basement space built to hold up long term.
 Mace Energy Supply
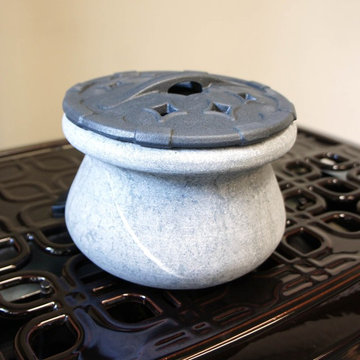
Hearthstone Soapstone Steamer with a blue/black enamel lid. Beautiful way to add much needed moisture in a scratch-free option for preserving your delicate enamel finishes.
 Budget Blinds of Wilmington - Wilmington
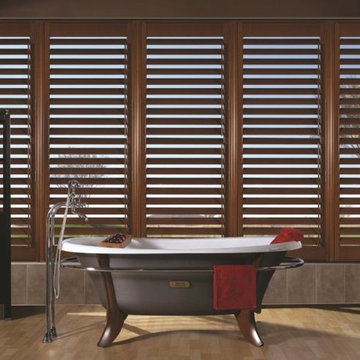
These moisture resistant plantation shutters are perfect for the bathroom, since they won't crack or warp under wet conditions.
Claw-foot bathtub - master light wood floor claw-foot bathtub idea in Wilmington with dark wood cabinets, brown walls and a drop-in sink
Claw-foot bathtub - master light wood floor claw-foot bathtub idea in Wilmington with dark wood cabinets, brown walls and a drop-in sink
 Tile Doctor Ltd
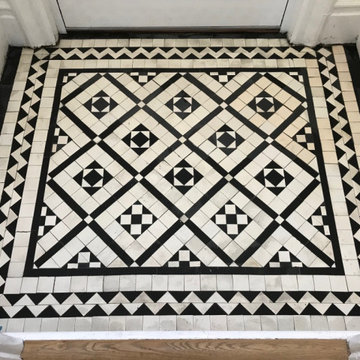
I visited this property in Lytham St Annes to survey a small Victorian tiled lobby which was in a sorry state. The client was keen to have it restored and wanted to know if it was possible. I discussed with them what we could do, and I gave them a quote for the work. Although it was only a small lobby, I could see the job could be quite involved and would be subject to the replacement tiles which I was confident we could source.
This is one of those jobs you wish you hadn’t started as there were a lot more tiles to remove than anticipated and it mushroomed into replacing half the floor. Once the area was cleaned up, I applied a self-levelling compound to bring up the height of the base.
Once the levelling compound had set, I was able relay the Victorian tiles using a combination of original tiles and replacements which had to be cut to shape. Cutting tiles to fit is quite intricate and time-consuming work especially when you consider new tiles are all metric in size and a 2mm difference becomes very telling after a foot or so! My solution was to use 150 mm tiles which are the biggest the stockist offers and then cut them down on my Rubi cutter using a template made from the original tiles. This the only way I could get it to look tight, it takes longer but it makes for a thorough job and a better finish.
I always use flexible floor adhesive when laying tiles, my preference is Keraquick Grey from Mapei. There are other brands off course but this one is quite easy to get hold of and as the term grouting is a relatively modern invention (in the past it was called pointing ) I find it looks right with this type of tile and similar to the screed cement the Victorians used in the past.
After the tiling had been completed, I left the floor to cure and fully dry and returned at a later date to give the floor an overall clean. For this I ran a coarse 200-grit diamond floor pad across the floor lubricated with water and used handheld diamond blocks for the edges where the pad can’t reach. The slurry was rinsed off with water and extracted with a wet vacuum.
With old floors like this, which don’t have a damp-proof membrane installed under the floor, efflorescence is always a concern and can lead to white salts appearing on the surface of the tile as moisture rises through the floor. To counter this, I finished cleaning the floor by scrubbing it with Tile Doctor Acid Gel. This was then rinsed off with water and the soil extracted using a wet vacuum.
The client was happy to seal the floor themselves (they wanted to save some money and it wasn’t a big area) so I supplied them with a bottle of Tile Doctor Colour Grow. I recommended this sealer as it will enhance the dark colours and being fully breathable it will cope with any moisture rising through the base. I recommended they apply two coats to start leaving time to allow the first coast to dry they could also then decide to leave it at that if they were happy with the finish.
Russell Taylor
Lancashire Tile Doctor
 Floors Floors Floors NJ
Call Floors Floors Floors NJ - 844 435 6679 to learn more about Shaw Floorte schedule an appointment today.
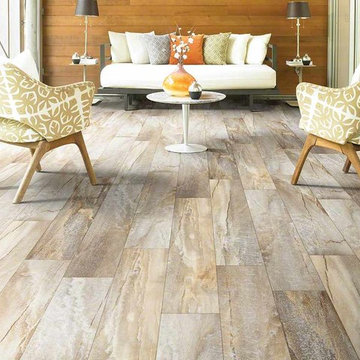
Floors Floors Floors NJ Shaw Floorté™floors are strong, durable, flexible—concealing imperfections of the floor beneath—and waterproof, making Floorté™ a great flooring option on and below ground level.Shaw Floorte’s waterproof qualities make it ideal for high-moisture areas like basements, bathrooms, kitchens and mudrooms. It’s designed to emulate the top species and colors of hardwood.
 Flores Artscape, Inc.
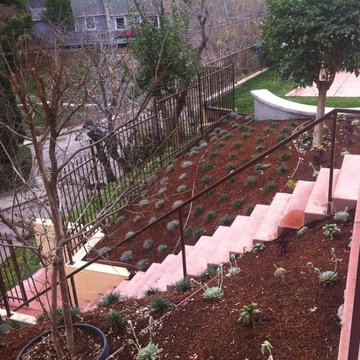
A drought-tolerant hillside design with low-moisture plants and mulch. Bender boards act as dividers and small retaining walls.
Inspiration for a contemporary landscaping in Los Angeles.
Inspiration for a contemporary landscaping in Los Angeles.
 Tali Hardonag Architect
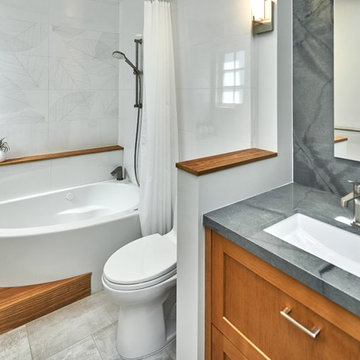
A curved tub tucks into a corner. The shower curtain attached to a flexible curtain track attached to the ceiling. Accoya moisture resistant wood soap ledge and floor step warm up the color scheme. A grab bear stretches to the the bath step, also serves as a towel bar
 Cachet Wine Cellars
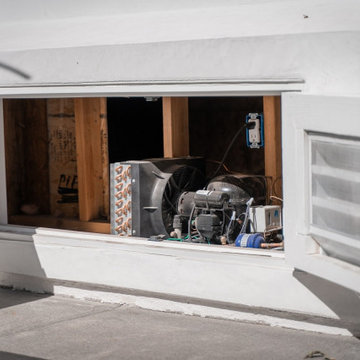
The compressor equipment of the wine modern wine cellar cooling unit was located behind the client's home. This allows better dissipation of noise and heat away from the wine cellar itself.
The team also added a 3 1/2 inch spray foam application that helps in preventing moisture to form on the wine cellar walls. Protection from moisture is necessary to keep the wine bottle away from molds that break down the wine corks.
Additional seals were also installed for the wine cellar glass door. The seals help the pivot hinge, ensuring that the wine room is protected from changing external humidity and temperature.
Learn more about the importance of proper wine cooling system installation here:
https://www.winecellarsbycoastal.com/custom-wine-cellar-cooling-about.aspx
Coastal Custom Wine Cellars
8 Waltham Rd.
Ladera Ranch, CA 92694
+1 949-200-8134
Request a FREE 3D design: https://www.winecellarsbycoastal.com/free-3d-drawing.aspx
 K&D Wallcovering
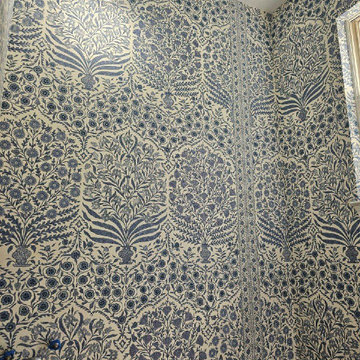
Wallpaper Installation – Basement in Arlington Heights
Transform your underutilized basement into a stunning living space with professional wallpaper installation designed for Arlington Heights homes. As your local wallpaper specialist, I specialize in creating beautiful, functional below-grade spaces with:
✔ Basement-Specific Expertise
Moisture-resistant vinyl wallpaper and fabric-backed options
Specialized adhesives for concrete or paneled walls
Pattern matching that accommodates uneven surfaces
✔ Arlington Heights Solutions
Materials tested for Chicagoland's seasonal humidity changes
Light-enhancing finishes to brighten windowless areas
Sound-absorbing textures for entertainment spaces
✔ Complete Basement Services
Feature walls for home theaters or game rooms
Ceiling treatments to elevate low ceilings
Wallpaper repair for existing installations
Why Arlington Heights Homeowners Choose Us:
✔ Free Moisture Evaluation – Critical for basement installations
✔ HOA Compliance Knowledge – Familiar with local community standards
✔ 1-2 Day Transformations – Efficient project completion
✔ Flexible Scheduling – Work around your family's routine
Popular Arlington Heights Basement Styles:
• Modern Entertainer – Sleek metallics or geometric patterns
• Cozy Library – Rich textures and warm tones
• Sports Den – Team colors and memorabilia displays
• Rustic Retreat – Faux wood or stone appearances
Serving All of Arlington Heights – From downtown condos to suburban family homes.
 Elite Construction and Remodel Corp
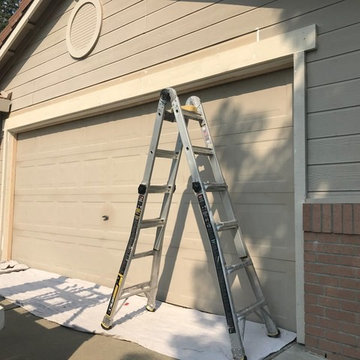
Damage noted at the lap siding and trim, at the roof sheathing, to the rafter tail caused by uncontrollable exterior moisture sources.
RECOMMENDATION:
Remove trim as necessary. Remove and replace the damaged portions of siding (to match as close as practical) and install new trim at repaired areas only. Remove the roof covering and gutters if necessary to expose damaged areas. Remove all structurally damaged wood members and replace with new material. If removed, reinstall gutters and roof covering to the exposed areas only. Cut out damaged sections and splice in with new material. Re-support rafter tails by attaching a sister wood member of a like size to the repaired area.
https://www.eliteconstructioncorp.com/projects/roseville-ca
 Tile Doctor Ltd
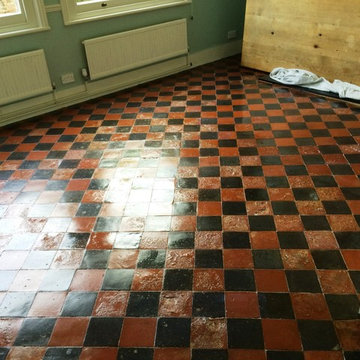
I was contacted recently by a client in East Grinstead, who asked me to restore a large area of damaged Quarry tiles in his house. East Grinstead actually dates back to the 14th century and is a town known for its many interesting houses and historic buildings. Hard-wearing Quarry tiles are most often used in high traffic areas, such as reception areas and hallways, although they are also commonly used for patio areas and porches. In these busy areas, the tiles can get dirty quickly, and this can lead to damage over time if they are not regularly tended to.
In this case, the damage to the tiles had actually been caused by regular flooding over a period of several years. The damage was so extreme that I advised my client that the only means of total restoration was re-tiling. However, my client informed me that the property was currently on the market for sale and this wasn’t an option. Instead, he settled on a deep clean and seal which, while not a complete restoration, would still significantly improve the condition of the tiled floor.
My first day of work was spent moving a significant amount of large furniture out of the room and into the garden. Once the area was completely clear, I was able to apply a layer of Tile Doctor Pro-Clean, using a stiff deck brush to really work it into the damaged stone. Pro-Clean helped to lift out a huge amount of the muck and ingrained dirt revealing, unfortunately, yet more damage beneath.
Once I had finished for the day, my client opened the windows to allow the warm sunshine to dry up any remaining moisture. This was important, as any excess moisture left on the floor may have affected the performance of the sealer when I returned to complete the sealing.
I allowed the floor a two-day drying period, during which time my client decided to colour some of the tiles with red doorstep paint. He counted up to two thousand tiles before giving up!
When I returned after 48 hours, I set about sealing the floor using Tile Doctor Seal & Go, which provided the eye-catching gloss finish and durable protection the client wanted whilst the house was still on the market. As it was another warm day, the homeowners went out cycling around the Ashdown forest, leaving me to complete the sealing carefully and without distraction.
When they returned a few hours later, they were amazed by the results! Although a complete re-tiling was not possible under the circumstances, both myself and my clients were extremely pleased with how great the Quarry tiles were now looking, especially after such significant water damage.
 Universal Appliance and Kitchen Center
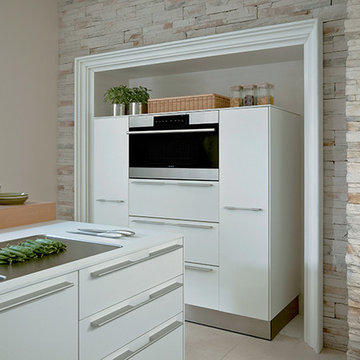
Wolf 30" E Series Transitional Convection Steam Oven Stainless Steel | CSO30TE
Available at Universal Appliance and Kitchen Center | uakc.com
Easy-access water tank:
The oven’s large water tank provides 90 minutes of continuous steam cooking. Thoughtfully designed, it can be refilled when needed without opening the oven door and interrupting the cooking process.
Largest interior capacity:
More than 25 percent larger than similar units, large enough to roast a 15-pound turkey, Wolf’s steam oven lets you prepare larger items and even multiple dishes at once.
Design flexibility:
Install the unit flush with cabinetry to seamlessly integrate it into your kitchen design. And since the unit isn’t plumbed, it can be installed anywhere without requiring special water lines.
10 cooking modes:
Precisely control heat, steam and airflow for the best results with any dish with 10 cooking modes: Steam, Reheat, Auto Steam Bake, Convection, Convection Humid, Convection Steam, Gourmet, Slow Roast, Recipes, and Keep Warm.
Steam mode:
Steam mode heats with steam and hot air, achieving a temperature range from 85°F-210°F. From vegetables, poultry and fish to grains, beans, pasta and egg dishes, gentle steam heat is ideal for capturing nutrition, color and flavor.
Reheat mode:
Reheat mode uses steam and hot air to rehydrate food gently. Using convection and the right amount of moisture, Reheat mode warms one to four pans of food evenly and without drying with a temperature range from 210°F to 300°F.
Auto Steam Bake mode:
By heating with steam first, then using convection heat to finish, bagels, breads, buns, rolls and pastries acquire a tender interior and a natural shine without the need for brushing with an egg wash. Auto Steam Bake mode temperatures range from 210°F to 445°F.
Convection mode:
A fan circulates hot air from a heating element at the back of the oven to distribute heat evenly around food for consistent results and browning. Convection mode temperatures range from 85°F to 445°F.
Convection Humid mode:
In Convection Humid mode, a heating element at the back of the oven produces heat and oven ventilation is sealed so that moisture produced during cooking remains in the oven. Convection Humid temperatures range from 85°F to 445°F.
Convection Steam mode:
Use Convection Steam for any foods you want to be tender inside and roasted or crisped outside. Convection steam mode temperatures range from 85°F to 445°F.
Gourmet mode:
Gourmet mode uses a climate sensor to adjust time, temperature and humidity for ideal results with no guesswork.
Slow Roast mode:
Slow Roast mode is an ultimate convenience. Insert the probe into your prepared meat, select a slow roast setting for the dish you're preparing, tell the oven what time you want it done, and come home to a perfectly cooked meal.
Recipes mode:
Use Recipes mode and the collection of built-in recipes to harness the power of the oven's many different cooking modes to easily cook entire meals from appetizers and entrees to desserts.
Keep Warm mode:
The combination of convection and steam heat preserves food’s taste, texture, looks and quality so every bite is as delicious as if it were fresh from the oven. Keep multiple dinner plates warm at once, making staggered meal times more convenient.
Temperature probe:
The temperature probe alerts you when your dish has reached the desired temperature, eliminating guesswork when preparing roasts and other meats.
Multiple pans and rack positions:
Two included pans can be placed in any of four rack positions. Both pans are stainles steel – one solid, and the other with a perforated bottom that is particularly well-suited for dishes prepared in Steam mode.
Delayed start:
What time would you like your dish to be ready? Simply program in a time. The oven turns on at the right moment and adjusts the cooking process so the food is ready to serve precisely when you want it.
Technical Features:
Shipping Weight (lbs): 80
Electrical Requirements: 220/240V, 60Hz, 20 amp dedicated circuit
Dimensions: 29 7/8"W x 17 7/8"H x 21 1/2"D
Star-K Kosher certified as Sabbath and holiday-compliant
 SHEEX
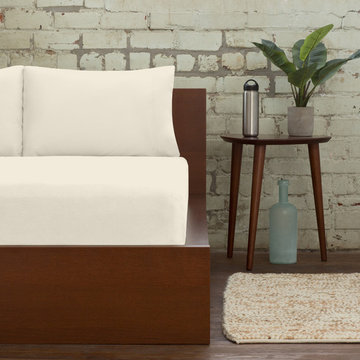
SHEEXSHEEX® PRO • COTTON Performance Sheets amp up the performance of traditional bedding through innovative, technical SLEEP•TECHTM fabric advancements in temperature regulation, breathability, and moisture wicking. Traditional sheets trap excess heat against your body, which makes you hot and sweaty and, consequently, causes you to wake up in soaking wet sheets. SHEEX® PRO•COTTON offers the familiar comfort of cotton that you love with the added benefit of patented TransDRY® technology to release excess heat and wick moisture away from your body. You stay cooler, drier and more comfortable throughout the night, and you will sleep better and stay asleep longer.
 Grennan Construction
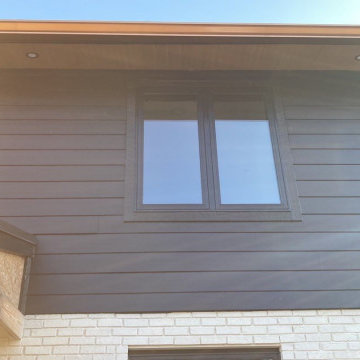
Grennan Construction brought modern elegance and durability to this Highland Charter Township home with a complete exterior makeover. The standout feature is a sleek, durable metal roof that enhances the home's aesthetic while ensuring long-lasting protection. The exterior walls are clad in vibrant hues from the James Hardie Dream Collection, blending bold color with the trusted durability of fiber cement siding. Complementing the design, aluminum soffits were seamlessly integrated to provide essential ventilation and moisture protection, while expertly installed energy-efficient windows elevate both comfort and curb appeal. This project reflects Grennan Construction’s dedication to quality craftsmanship, transforming a simple home into a modern masterpiece.
Keywords: Highland Charter Township exterior renovation, modern metal roofing, James Hardie Dream Collection siding, fiber cement siding, aluminum soffit installation, energy-efficient window installation, modern home makeover, durable roofing solutions, moisture protection, exterior home transformation, Grennan Construction projects, curb appeal enhancement.
49