
Search results for "Oils existing" in Home Design Ideas

 TVL Creative Ltd.
Our clients, two NYC transplants, were excited to have a large yard and ample square footage, but their 1959 ranch featured an en-suite bathroom that was more big-apple-tiny and certainly not fit for two. The original goal was to build a master suite addition on to the south side of the house, but the combination of contractor availability and Denver building costs made the project cost prohibitive. So we turned our attention to how we could maximize the existing square footage to create a true master with walk-in closet, soaking tub, commode room, and large vanity with lots of storage. The south side of the house was converted from two bedrooms, one with the small en-suite bathroom, to a master suite fit for our client’s lifestyle. We used the existing bathroom footprint to place a large shower which hidden niches, a window, and a built-in bench. The commode room took the place of the old shower. The original ‘master’ bedroom was divided in half to provide space for the walk-in closet and their new master bathroom. The clients have, what we dubbed, a classy eclectic aesthetic and we wanted to embrace that with the materials. The 3 x 12 ceramic tile is Fireclay’s Tidewater glaze. The soft variation of a handmade tile plus the herringbone pattern installation makes for a real show stopper. We chose a 3 x 6 marble subway with blue and green veining to compliment the feature tile. The chrome and oil-rubbed bronze metal mix was carefully planned based on where we wanted to add brightness and where we wanted contrast. Chrome was a no-brainer for the shower because we wanted to let the Fireclay tile shine. Over at the vanity, we wanted the fixtures to pop so we opted for oil-rubbed bronze. Final details include a series of robe hook- which is a real option with our dry climate in Colorado. No smelly, damp towels!- a magazine rack ladder and a few pops of wood for warmth and texture.
 True North Kitchen & Bath
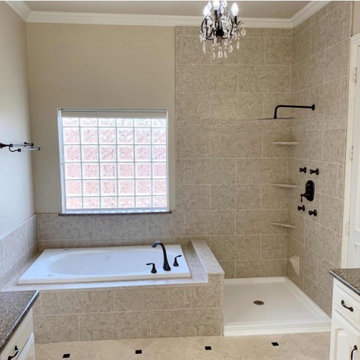
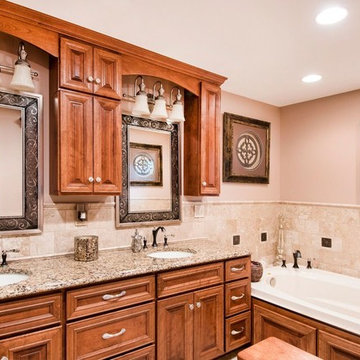
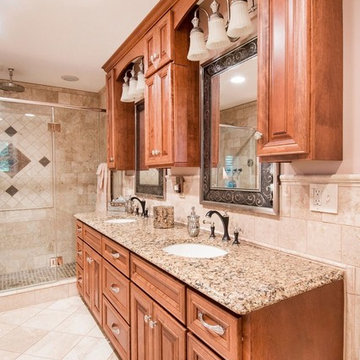
This bathroom remodel blends timeless elegance with modern comfort, featuring a neutral tile palette, oil-rubbed bronze fixtures, and upgraded granite countertops. A new walk-in shower with built-in shelving and a sleek pan complements the existing soaking tub, now updated with coordinating hardware. Classic details like crown molding and a crystal chandelier add sophistication, while the overall layout enhances functionality and flow. The result is a serene, polished space designed for everyday relaxation.
 Progressive Design Build
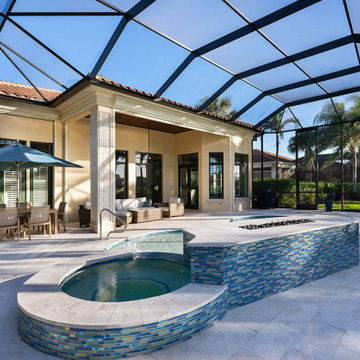
We started by removing the existing heavy stone structure around the spa to bring their vision to life. Working with our design team, we helped them completely reimagine the pool area with fresh, contemporary materials. We replaced the lanai floor with Queen Anne Beige leathered marble pavers, creating a sleek, cool surface underfoot. A new Pebble Tec floor in Silver Pearl gives the pool a soft, inviting shimmer, perfectly complemented by a sparkling iridescent waterline tile from AlttoGlass in the color Atlantic.
We also introduced a custom fire feature, clad in a multi-toned glass mosaic, which serves as an elegant centerpiece for evening gatherings. Complementing the tile features is a new Kichler outdoor sconce in an Olde Bronze finish, along with a matching oil-rubbed bronze ceiling fan. For enhanced entertainment and convenience, we added two weather-resistant speakers, completing the transformation and making the space both functional and beautiful.
Find the right local pro for your project
 TVL Creative Ltd.
Our clients, two NYC transplants, were excited to have a large yard and ample square footage, but their 1959 ranch featured an en-suite bathroom that was more big-apple-tiny and certainly not fit for two. The original goal was to build a master suite addition on to the south side of the house, but the combination of contractor availability and Denver building costs made the project cost prohibitive. So we turned our attention to how we could maximize the existing square footage to create a true master with walk-in closet, soaking tub, commode room, and large vanity with lots of storage. The south side of the house was converted from two bedrooms, one with the small en-suite bathroom, to a master suite fit for our client’s lifestyle. We used the existing bathroom footprint to place a large shower which hidden niches, a window, and a built-in bench. The commode room took the place of the old shower. The original ‘master’ bedroom was divided in half to provide space for the walk-in closet and their new master bathroom. The clients have, what we dubbed, a classy eclectic aesthetic and we wanted to embrace that with the materials. The 3 x 12 ceramic tile is Fireclay’s Tidewater glaze. The soft variation of a handmade tile plus the herringbone pattern installation makes for a real show stopper. We chose a 3 x 6 marble subway with blue and green veining to compliment the feature tile. The chrome and oil-rubbed bronze metal mix was carefully planned based on where we wanted to add brightness and where we wanted contrast. Chrome was a no-brainer for the shower because we wanted to let the Fireclay tile shine. Over at the vanity, we wanted the fixtures to pop so we opted for oil-rubbed bronze. Final details include a series of robe hook- which is a real option with our dry climate in Colorado. No smelly, damp towels!- a magazine rack ladder and a few pops of wood for warmth and texture.
 TVL Creative Ltd.
Our clients, two NYC transplants, were excited to have a large yard and ample square footage, but their 1959 ranch featured an en-suite bathroom that was more big-apple-tiny and certainly not fit for two. The original goal was to build a master suite addition on to the south side of the house, but the combination of contractor availability and Denver building costs made the project cost prohibitive. So we turned our attention to how we could maximize the existing square footage to create a true master with walk-in closet, soaking tub, commode room, and large vanity with lots of storage. The south side of the house was converted from two bedrooms, one with the small en-suite bathroom, to a master suite fit for our client’s lifestyle. We used the existing bathroom footprint to place a large shower which hidden niches, a window, and a built-in bench. The commode room took the place of the old shower. The original ‘master’ bedroom was divided in half to provide space for the walk-in closet and their new master bathroom. The clients have, what we dubbed, a classy eclectic aesthetic and we wanted to embrace that with the materials. The 3 x 12 ceramic tile is Fireclay’s Tidewater glaze. The soft variation of a handmade tile plus the herringbone pattern installation makes for a real show stopper. We chose a 3 x 6 marble subway with blue and green veining to compliment the feature tile. The chrome and oil-rubbed bronze metal mix was carefully planned based on where we wanted to add brightness and where we wanted contrast. Chrome was a no-brainer for the shower because we wanted to let the Fireclay tile shine. Over at the vanity, we wanted the fixtures to pop so we opted for oil-rubbed bronze. Final details include a series of robe hook- which is a real option with our dry climate in Colorado. No smelly, damp towels!- a magazine rack ladder and a few pops of wood for warmth and texture.

 Castle Building & Remodeling
This growing family needed more living space in their 1926 St. Paul, MN Bungalow, and had great potential in their unfinished attic for a new master suite.
Castle began working with the city to grandfather some existing conditions in, like the steeper stairs and lower ceiling height to comply with building codes. New insulation, interior walls, electrical, heating, and a full interior finish was planned. The finished space incorporates traditional millwork matching the lower level of the home, a custom built-in bookshelf, new white doors, and pre-finished white oak hardwood floors in a rich Licorice stain. The dark floors and oil-bronze accents throughout the space really anchors the room and completes an overall bright color pallet with high contrast.
In the new bathroom, a cement tile floor was selected to tie in the homeowner’s classy flair. Switching the finishes to polished brass inside the bathroom really brings a lux and regal feel to the space. Paired with traditional subway tile, white vanity, refurbished vintage medicine cabinet, and neutral walls, the new bathroom is elegant, yet understated. One of our favorite features is the use of the two existing dormers. One dormer was converted into a new walk-in closet with custom glass closet doors, so the light can still shine into the bedroom. The 2nd dormer, we left open for a quaint sitting and reading nook.
See full details (including before photos) at http://www.castlebri.com/attics/project-3299-1/
Designed by: Emily Blonigen
 TVL Creative Ltd.
Our clients, two NYC transplants, were excited to have a large yard and ample square footage, but their 1959 ranch featured an en-suite bathroom that was more big-apple-tiny and certainly not fit for two. The original goal was to build a master suite addition on to the south side of the house, but the combination of contractor availability and Denver building costs made the project cost prohibitive. So we turned our attention to how we could maximize the existing square footage to create a true master with walk-in closet, soaking tub, commode room, and large vanity with lots of storage. The south side of the house was converted from two bedrooms, one with the small en-suite bathroom, to a master suite fit for our client’s lifestyle. We used the existing bathroom footprint to place a large shower which hidden niches, a window, and a built-in bench. The commode room took the place of the old shower. The original ‘master’ bedroom was divided in half to provide space for the walk-in closet and their new master bathroom. The clients have, what we dubbed, a classy eclectic aesthetic and we wanted to embrace that with the materials. The 3 x 12 ceramic tile is Fireclay’s Tidewater glaze. The soft variation of a handmade tile plus the herringbone pattern installation makes for a real show stopper. We chose a 3 x 6 marble subway with blue and green veining to compliment the feature tile. The chrome and oil-rubbed bronze metal mix was carefully planned based on where we wanted to add brightness and where we wanted contrast. Chrome was a no-brainer for the shower because we wanted to let the Fireclay tile shine. Over at the vanity, we wanted the fixtures to pop so we opted for oil-rubbed bronze. Final details include a series of robe hook- which is a real option with our dry climate in Colorado. No smelly, damp towels!- a magazine rack ladder and a few pops of wood for warmth and texture.

 TVL Creative Ltd.
Our clients, two NYC transplants, were excited to have a large yard and ample square footage, but their 1959 ranch featured an en-suite bathroom that was more big-apple-tiny and certainly not fit for two. The original goal was to build a master suite addition on to the south side of the house, but the combination of contractor availability and Denver building costs made the project cost prohibitive. So we turned our attention to how we could maximize the existing square footage to create a true master with walk-in closet, soaking tub, commode room, and large vanity with lots of storage. The south side of the house was converted from two bedrooms, one with the small en-suite bathroom, to a master suite fit for our client’s lifestyle. We used the existing bathroom footprint to place a large shower which hidden niches, a window, and a built-in bench. The commode room took the place of the old shower. The original ‘master’ bedroom was divided in half to provide space for the walk-in closet and their new master bathroom. The clients have, what we dubbed, a classy eclectic aesthetic and we wanted to embrace that with the materials. The 3 x 12 ceramic tile is Fireclay’s Tidewater glaze. The soft variation of a handmade tile plus the herringbone pattern installation makes for a real show stopper. We chose a 3 x 6 marble subway with blue and green veining to compliment the feature tile. The chrome and oil-rubbed bronze metal mix was carefully planned based on where we wanted to add brightness and where we wanted contrast. Chrome was a no-brainer for the shower because we wanted to let the Fireclay tile shine. Over at the vanity, we wanted the fixtures to pop so we opted for oil-rubbed bronze. Final details include a series of robe hook- which is a real option with our dry climate in Colorado. No smelly, damp towels!- a magazine rack ladder and a few pops of wood for warmth and texture.
 TVL Creative Ltd.
Our clients, two NYC transplants, were excited to have a large yard and ample square footage, but their 1959 ranch featured an en-suite bathroom that was more big-apple-tiny and certainly not fit for two. The original goal was to build a master suite addition on to the south side of the house, but the combination of contractor availability and Denver building costs made the project cost prohibitive. So we turned our attention to how we could maximize the existing square footage to create a true master with walk-in closet, soaking tub, commode room, and large vanity with lots of storage. The south side of the house was converted from two bedrooms, one with the small en-suite bathroom, to a master suite fit for our client’s lifestyle. We used the existing bathroom footprint to place a large shower which hidden niches, a window, and a built-in bench. The commode room took the place of the old shower. The original ‘master’ bedroom was divided in half to provide space for the walk-in closet and their new master bathroom. The clients have, what we dubbed, a classy eclectic aesthetic and we wanted to embrace that with the materials. The 3 x 12 ceramic tile is Fireclay’s Tidewater glaze. The soft variation of a handmade tile plus the herringbone pattern installation makes for a real show stopper. We chose a 3 x 6 marble subway with blue and green veining to compliment the feature tile. The chrome and oil-rubbed bronze metal mix was carefully planned based on where we wanted to add brightness and where we wanted contrast. Chrome was a no-brainer for the shower because we wanted to let the Fireclay tile shine. Over at the vanity, we wanted the fixtures to pop so we opted for oil-rubbed bronze. Final details include a series of robe hook- which is a real option with our dry climate in Colorado. No smelly, damp towels!- a magazine rack ladder and a few pops of wood for warmth and texture.

 Sheridan Interiors, Kitchens + Baths
Client wanted to upgrade their 'country' style, yet not go too modern. Combining the shaker door style and raised panel door style on the island is the perfect blend towards a transitional style. Warm oil rubbed bronze lighting and hardware as well as turned legs on the island speaks to that country style while the stainless steel appliances upgrade it to today's styling. Combining two countertop colours defines both spaces.
We were able to retain the existing hardwood floors. A matchstick glazed porcelain backsplash in country colours finishes off this kitchen.
 Castle Building & Remodeling
This growing family needed more living space in their 1926 St. Paul, MN Bungalow, and had great potential in their unfinished attic for a new master suite.
Castle began working with the city to grandfather some existing conditions in, like the steeper stairs and lower ceiling height to comply with building codes. New insulation, interior walls, electrical, heating, and a full interior finish was planned. The finished space incorporates traditional millwork matching the lower level of the home, a custom built-in bookshelf, new white doors, and pre-finished white oak hardwood floors in a rich Licorice stain. The dark floors and oil-bronze accents throughout the space really anchors the room and completes an overall bright color pallet with high contrast.
In the new bathroom, a cement tile floor was selected to tie in the homeowner’s classy flair. Switching the finishes to polished brass inside the bathroom really brings a lux and regal feel to the space. Paired with traditional subway tile, white vanity, refurbished vintage medicine cabinet, and neutral walls, the new bathroom is elegant, yet understated. One of our favorite features is the use of the two existing dormers. One dormer was converted into a new walk-in closet with custom glass closet doors, so the light can still shine into the bedroom. The 2nd dormer, we left open for a quaint sitting and reading nook.
See full details (including before photos) at http://www.castlebri.com/attics/project-3299-1/
Designed by: Emily Blonigen
 TVL Creative Ltd.
Our clients, two NYC transplants, were excited to have a large yard and ample square footage, but their 1959 ranch featured an en-suite bathroom that was more big-apple-tiny and certainly not fit for two. The original goal was to build a master suite addition on to the south side of the house, but the combination of contractor availability and Denver building costs made the project cost prohibitive. So we turned our attention to how we could maximize the existing square footage to create a true master with walk-in closet, soaking tub, commode room, and large vanity with lots of storage. The south side of the house was converted from two bedrooms, one with the small en-suite bathroom, to a master suite fit for our client’s lifestyle. We used the existing bathroom footprint to place a large shower which hidden niches, a window, and a built-in bench. The commode room took the place of the old shower. The original ‘master’ bedroom was divided in half to provide space for the walk-in closet and their new master bathroom. The clients have, what we dubbed, a classy eclectic aesthetic and we wanted to embrace that with the materials. The 3 x 12 ceramic tile is Fireclay’s Tidewater glaze. The soft variation of a handmade tile plus the herringbone pattern installation makes for a real show stopper. We chose a 3 x 6 marble subway with blue and green veining to compliment the feature tile. The chrome and oil-rubbed bronze metal mix was carefully planned based on where we wanted to add brightness and where we wanted contrast. Chrome was a no-brainer for the shower because we wanted to let the Fireclay tile shine. Over at the vanity, we wanted the fixtures to pop so we opted for oil-rubbed bronze. Final details include a series of robe hook- which is a real option with our dry climate in Colorado. No smelly, damp towels!- a magazine rack ladder and a few pops of wood for warmth and texture.
 Progressive Design Build
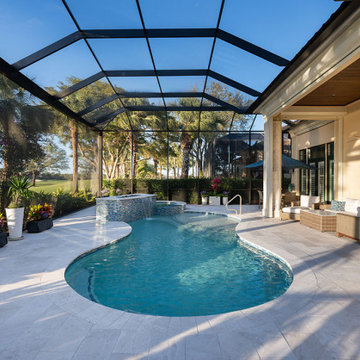
We removed the existing heavy stone structure around the spa to bring our client's vision to life. Working with our design team, we helped them completely reimagine the pool area with fresh, contemporary materials. We replaced the lanai floor with Queen Anne Beige leathered marble pavers, creating a sleek, cool surface underfoot. A new Pebble Tec floor in Silver Pearl gives the pool a soft, inviting shimmer, perfectly complemented by a sparkling iridescent waterline tile from AlttoGlass in the color Atlantic.
We also introduced a custom fire feature, clad in a multi-toned glass mosaic, which serves as an elegant centerpiece for evening gatherings. Complementing the tile features is a new Kichler outdoor sconce in an Olde Bronze finish, along with a matching oil-rubbed bronze ceiling fan. For enhanced entertainment and convenience, we added two weather-resistant speakers, completing the transformation and making the space both functional and beautiful.
 Castle Building & Remodeling
This growing family needed more living space in their 1926 St. Paul, MN Bungalow, and had great potential in their unfinished attic for a new master suite.
Castle began working with the city to grandfather some existing conditions in, like the steeper stairs and lower ceiling height to comply with building codes. New insulation, interior walls, electrical, heating, and a full interior finish was planned. The finished space incorporates traditional millwork matching the lower level of the home, a custom built-in bookshelf, new white doors, and pre-finished white oak hardwood floors in a rich Licorice stain. The dark floors and oil-bronze accents throughout the space really anchors the room and completes an overall bright color pallet with high contrast.
In the new bathroom, a cement tile floor was selected to tie in the homeowner’s classy flair. Switching the finishes to polished brass inside the bathroom really brings a lux and regal feel to the space. Paired with traditional subway tile, white vanity, refurbished vintage medicine cabinet, and neutral walls, the new bathroom is elegant, yet understated. One of our favorite features is the use of the two existing dormers. One dormer was converted into a new walk-in closet with custom glass closet doors, so the light can still shine into the bedroom. The 2nd dormer, we left open for a quaint sitting and reading nook.
See full details (including before photos) at http://www.castlebri.com/attics/project-3299-1/
Designed by: Emily Blonigen
 Twelve Stones Designs, LLC
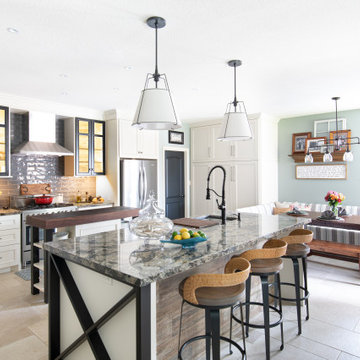
The owners of this kitchen had spent the money to upgrade the finishes in their kitchen upon building the home 12 years ago, but after living in the space for several years they realized how nonfunctional the layout really was. The (then) two preschool aged children had grown into busy, hungry teenagers with many friends who also liked to hang out at the house. So the family needed a more functional kitchen with better traffic flow, space for daily activities revolving around the kitchen at different times of day, and a kitchen that could accommodate cooking for and serving large groups. Furthermore, the dark, traditional finishes no longer reflected the homeowners’ style. They requested a brighter, more relaxed, coastal style that reflected their love of the seaside cities they like to visit.
Originally, the kitchen was U-shaped with a narrow island in the middle. The island created narrow aisles that bottle-necked at the dishwasher, refrigerator, and cooktop areas. There was a pass-through from the foyer into the kitchen, but the owners never liked that the pass-through was also located so close to the powder room. The awkward proximity was unappealing and made guests feel uncomfortable.
The kitchen’s storage was made up of lots of narrow cabinets, apothecary drawers, clipped corner units, and very few drawers. It lacked useful storage for the larger items the family used on a daily basis. And the kitchen’s only pantry was small closet that had only builder-grade, narrow shelving with no illumination to be able to see the contents inside.
Overall, the kitchen’s lighting plan was poorly executed. Only six recessed cans illuminated the entire kitchen and nook areas. The under cabinet lighting was not evenly distributed either. In fact, the builder had mis-placed the under cabinet lighting around the decorative pilasters which made for choppy, dark cubbies. Further, the builder didn’t include any lighting over the sink or the bar area, which meant whoever was doing the dishes was always in their own shadow. That, coupled with the steep overhang of the game room above made the bar area feel like a dim, cavernous space that wasn’t inviting or task oriented. The kitchen looked out into the main living space, but the raised bar and a narrow wall (which held the only large cabinet in the kitchen) created more of a barrier than a relationship to the living room or breakfast nook. In fact, one couldn’t even see the breakfast nook from the cooktop or sink areas due to its orientation. The raised bar top was too narrow to comfortably sit to either dine at or chat from due to the lack of knee space. The the homeowners confided that the kitchen felt more like a dark, dirty prison than place where the family, or their guests, wanted to gather and commune.
The clients' needs and desires were:
➢ to create a kitchen that would be a space the family loved to be in; to relate to the adjacent spaces all around, and to have better flow for entertaining large groups
➢ to remove the walls between the breakfast nook and living area and to be able to utilize the natural light from the windows in both those areas
➢ to incorporate a functional chopping block for prepping fresh food for home cooked meals, an island with a large sink and drain board, 2 pull out trash cans, and seating for at least the 2 teens to eat or do homework
➢ to design a kitchen and breakfast nook with an airy, coastal, relaxed vibe that blended with the rest of the house's coastal theme
➢ to integrate a layered lighting plan which would include ample general illumination, specific task lighting, decorative lighting, and lots of illuminated storage
➢ to design a kitchen with not only more storage for all the husband’s kitchen gadgets and collection of oils and spices, but smart storage, including a coffee/breakfast bar and a place to store and conceal the toaster oven and microwave
➢ to find a way to utilize the large open space between the kitchen, pantry area, and breakfast nook
Twelve Stones Designs achieved the owner's goals by:
➢ removing the walls between the kitchen and living room to allow the natural light to filter in from the adjacent rooms and to create a connection between the kitchen, nook, and living spaces for a sense of unity and communion
➢ removing the existing pantry and designing 3 large pantry style cabinets with LED tape lights and rollout drawers to house lots of kitchen appliances, gadgets, and tons of groceries. We also took the cabinets all the way up to the 9’ ceiling for additional storage for seasonal items and bulk storage.
➢ designing 2 islands - 1 with a gorgeous black walnut chopping block that houses a drawer for chopping and carving knives and a custom double pull out trash unit for point of use utilization - and 1 that houses the dishwasher, a large Blanco Gourmet sink with integrated drain board, woven baskets for fresh root vegetables and kitchen towels, plenty of drawer storage for kitchen items, and bar seating for up to 4 diners.
➢ closing off the space between the kitchen and the powder room to create a beautiful new private alcove for the powder room as well as adding some decorative storage. This also gave us space to include more tall storage near the new range for precision placement of the husband’s extensive oil and spice collection as well as a location for a combo-steam oven the wife wanted for baking and cooking healthy meals.
The project is enhanced functionally by:
➢ incorporated USB and standard receptacles for the kids’ laptops and phone charging in the large island
➢ designing the small island to include additional open shelving for items used on a daily basis such as a variety of bowls, plates, and colanders. This set up also works well for the husband who prefers to “plate” his dinners in restaurant-style fashion before presenting them to the table.
➢ the integration of specific storage units, such as double stacked cutlery drawers, a custom spice pull-out, a Kuerig coffee and tea pod drawer, and custom double stacked utensil drawers
➢ moving the refrigerator to the old oven location - this eliminated the bottle neck as well as created a better relationship to the eating table. It also utilizes the floor space between the pantry, nook, and kitchen
➢ creating a banquet style breakfast nook - this banquette seating not only doubles the amount of seating for large gatherings but it better utilizes the odd space between the kitchen and the previous nook area. It also helps to create a distinct pathway from the mudroom room through the pantry area, kitchen, nook, and living room.
➢ the coffee/breakfast bar area which includes the perfect location for the concealed microwave and toaster oven, convenient storage for the coffee pods and tea accoutrements. Roll-out drawers below also house the smoothie maker, hot water kettle, and a plethora of smoothie-making ingredients such as protein powders, smoothie additives, etc. Furthermore, the drawers below the Keurig house measuring utensil, cutlery, baking supplies and tupperware storage.
➢ incorporating lots of wide drawers and pullouts to accommodate large cookware.
➢ utilizing as much vertical space as possible by building storage to the ceiling which accommodates the family’s abundant amount of serving platters, baking sheets, bakeware, casserole dishes, and additional cutting boards.
The project is enhanced aesthetically by:
➢ new 5-piece Versailles pattern porcelain tile that now seamlessly joins the entire down stairs area together creating a bright, cohesiveness feeling instead of choppy separated spaces - it also adds a coastal feeling
➢ designing a cabinet to conceal the microwave and toaster oven
➢ the coastal influenced light fixtures over the nook table and island
➢ the sandy colors of the Langdon Cambria countertops. The swirling pattern and sparkling quartz pieces remind the homeowner of black-and-tan sandy beaches
➢ the striped banquet seating whose creamy white background and blue-green stripes were the inspiration for the cabinet and wall colors.
➢ All the interior doors were painted black to coordinate with the blacks and grays in the backsplash tile and countertop. This also adds a hint of tailored formality to an otherwise casual space.
➢ the use of WAC's Oculux small aperture LED units for the overhead lighting complimented with Diode LED strips for task lighting under the cabinets and inside the pantry and glass wall cabinets. All of the lighting applications are on separate dimmer switches.
Innovative uses of materials or construction methods by Realty Restoration LLC:
➢ Each 1-1/2” x 3” block of reclaimed end-grain black walnut that makes up the center island chopping block was hand milled and built in the shop. It was designed to look substantial and proportional to the surrounding elements, executed by creating the 4 inch tall top with a solid wood chamfered edge band.
➢ The metal doors on either side of the vent hood were also custom designed for this project and built in the Realty Restoration LLC shop. They are made 1x2, 11-gauge mild steel with ribbed glass. Weighing 60 lbs a piece, heavy duty cabinet hinges were added to support the weight of the door and keep them from sagging.
➢ Under-cabinet receptacles were added along the range wall in order to have a clean, uninterrupted backsplash.
Design obstacles to overcome:
➢ Because we were removing the demising walls between the kitchen and living room, we had to find a way to plumb and vent the new island. We did this by tunneling through the slab (the slab had post tension cables which prevented us from just trenching) to run a new wet vent through a nearby structural wall. We pulled the existing hot and cold lines between upper floor joists and ran them down the structural wall as well and up through a conduit in the tunnel.
➢ Since we were converting from wall overs to a gas range it allowed us to utilize the 220 feed for the wall ovens to provide a new sub panel for all the new kitchen circuits
➢ Due to framing deficiencies inherited from the original build there was a 1-1/2” differential in the floor-to-ceiling height over a 20 foot span; by utilizing the process of cutting and furring coupled with the crown moulding details on the cabinet elevations we were able to mask the problem and provide seamless transitions between the cabinet components.
Evidence of superior craftsmanship:
➢ uniquely designed, one-of-a-kind metal “X” end panels on the large island. The end panels were custom made in the Realty Restoration LLC shop and fitted to the exact dimensions of the island. The welding seams are completely indistinguishable - the posts look like they are cut from a single sheet of metal
➢ square metal posts on the small island were also custom made and designed to compliment and carry through the metal element s throughout the kitchen
➢ the beautiful, oversized end panels on the pantry cabinets which give the breakfast nook a tailored look
➢ integrating a large format 5 piece Versailles tile pattern to seamlessly flow from the existing spaces into the new kitchen space
➢ By constructing a custom cabinet that jogged around a corner we could not remodel (housing the entry way coat closet) we were able to camouflage the adjacent wall offset within the upper and lower cabinets. By designing around the existing jog in the structural walls we accomplished a few things: we were able to find the space to house, and hide, the microwave and toaster oven yet still have a clean cohesive appearance from the kitchen side. Additionally, the owners were able to keep their much needed coat closet and we didn’t have to increase the budget with unnecessary structural work.
 TVL Creative Ltd.
Our clients, two NYC transplants, were excited to have a large yard and ample square footage, but their 1959 ranch featured an en-suite bathroom that was more big-apple-tiny and certainly not fit for two. The original goal was to build a master suite addition on to the south side of the house, but the combination of contractor availability and Denver building costs made the project cost prohibitive. So we turned our attention to how we could maximize the existing square footage to create a true master with walk-in closet, soaking tub, commode room, and large vanity with lots of storage. The south side of the house was converted from two bedrooms, one with the small en-suite bathroom, to a master suite fit for our client’s lifestyle. We used the existing bathroom footprint to place a large shower which hidden niches, a window, and a built-in bench. The commode room took the place of the old shower. The original ‘master’ bedroom was divided in half to provide space for the walk-in closet and their new master bathroom. The clients have, what we dubbed, a classy eclectic aesthetic and we wanted to embrace that with the materials. The 3 x 12 ceramic tile is Fireclay’s Tidewater glaze. The soft variation of a handmade tile plus the herringbone pattern installation makes for a real show stopper. We chose a 3 x 6 marble subway with blue and green veining to compliment the feature tile. The chrome and oil-rubbed bronze metal mix was carefully planned based on where we wanted to add brightness and where we wanted contrast. Chrome was a no-brainer for the shower because we wanted to let the Fireclay tile shine. Over at the vanity, we wanted the fixtures to pop so we opted for oil-rubbed bronze. Final details include a series of robe hook- which is a real option with our dry climate in Colorado. No smelly, damp towels!- a magazine rack ladder and a few pops of wood for warmth and texture.

 Adelene Keeler Smith Interior Design
The living room combines existing pieces along with the introduction of oval ostrich leather ottoman/coffee table; curved modern sofa; hand-painted floor screen framed by wall sconces. Floor lamps provide practical reading lamps without contrived end tables or predictable floor plan.
 Signature Innovations LLC
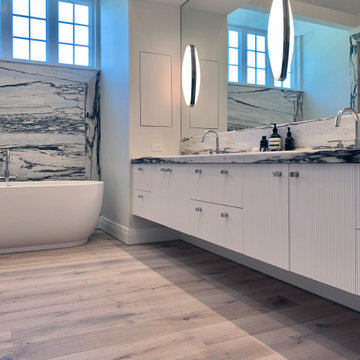
This sleek California style contemporary bathroom is accented by wrap around full size marble slabs to help create a natural open and airy atmosphere. The DutchHaus floor in Silk color finishes off the space by adding warmth and texture to the existing hard surfaces. Floor: 7” wide-plank Vintage French Oak | Rustic Character | Dutch-Haus Collection wire brushed | nano bevel edge | color Silk Oxi | Matte Hardwax Oil. For more information please email us at: sales@signaturehardwoods.com

 Breathing Room Design
Kitchen - transitional galley multicolored floor kitchen idea in Los Angeles with a farmhouse sink, shaker cabinets, blue cabinets, white backsplash, stainless steel appliances, a peninsula and white countertops

 InnovationLand
Patio kitchen plans these days require the ability to incorporate high-tech, modern appliances into rustic, timeless – even ancient-looking – outdoor design styles.
You can see this juxtaposition pulled off perfectly in this outdoor kitchen by Outdoor Homescapes of Houston.
“A smart patio kitchen plan requires not only a balance of the new and old,” says Outdoor Homescapes owner Wayne Franks, “but a blending of new elements – like an outdoor kitchen – with the existing home and outdoor living features like a pool, hardscaping or landscaping.”
In this case, explains Franks, the existing 25-by-15-foot pool had a craggy edge of moss rock boulders, plus a spa and firepit faced with a rough Scabos splitface travertine.
“The overall look was rustic and naturalistic,” says Franks, “so we of course wanted the new outdoor kitchen island to match.”
Hence the 14-foot-long outdoor kitchen island with a raised bar, also faced in the Scabos splitface travertine and topped with a Normandy granite countertop. The hardscaping around it is Kool Deck® textured concrete.
“People used to shy away from busy textures in outside patio kitchen plans, but now they’re embracing them,” notes Franks. “They’re increasingly attracted to the beautiful imperfections and irregularities of nature – there’s more of an authenticity and character to it.”
Now, for the high-tech part: A Memphis wood grill. Memphis Wood Fire pellet grills are becoming increasingly popular for their ability to infuse amazing, rich flavor and for their versatility (they can grill, bake, smoke, slow cook, braise and barbecue).
This premier model, the Memphis Pro 304, features 562 square inches of cooking space and a three-in-one cooking system (high-temperature grill, low-and-low smoker and true-convection-oven roasting and baking). It also has an intuitive Intelligent Temperature Control (see the display panel to the left of the grill) that can be set for cooking and internal temperature.
A programmable food probe tells you when the internal temperature is reached and drops the grill down to a programmed lower temperature to keep the food warm till serving.
The dual-fan convection system, with reliable metal blades, circulates heat evenly for tender, juicy results. Double-walled and sealed construction of 304 stainless steel allows for optimum heat retention and consistent temperatures in all weather conditions. A direct-flame “flavorizer” insert delivers the added flavor of a seared finish.
Outdoor Homescapes also added a mount sink with a custom oil-rubbed bronze faucet by Moen and the following RCS stainless steel accessories: a pull-out trash door, a countertop trash chute, dual horizontal grill utensil drawers and a swing-out storage door.
“At first, you’d think all this technology and the smooth, modern stainless steel would fight with the rustic look of the rough-faced stone in outdoor patio kitchen plans,” says Franks. “But it actually provides some visual rest from all the rugged textures and busyness.”
Serving a similar function is the smooth, polished Scabos travertine tile used for the pool coping and firepit ledge.
“It’s a perfect environment for the client to entertain business associates,” says Franks. “He’s very happy with the old-meets-new approach, and so are we.”
More patio kitchen plans can be found at Outdoor Homescapes of Houston’s website, at www.outdoorhomescapes.com
51