
Search results for "Patches" in Home Design Ideas
 George Ocampo
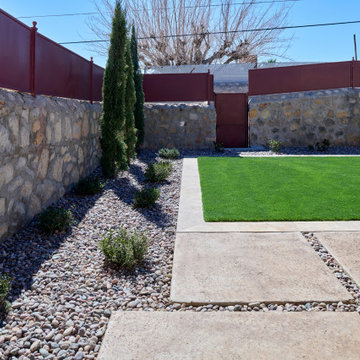
Central El Paso Backyard Renovation:
Fifteen years is a long time for a backyard to quietly wait.
At first, it was full of intention—a pool that promised summers, laughter, and long evenings. But time has a way of settling in. The water turned still, then green. Edges cracked. The space became less of a destination and more of something you looked past. Life moved forward, but the backyard stayed behind.
Then came the decision: it was time.
Not a patch job. Not a quick fix. A complete reset.
The transformation didn’t begin beautifully—it began with demolition. The old pool was drained, exposing years of neglect etched into its surface. Crews stepped in, breaking, clearing, reshaping. What once held stagnant water became an open cavity of possibility. Steel rebar formed a new skeleton, precise and intentional. Every line measured. Every elevation reconsidered.
This wasn’t just construction—it was rethinking how the space should live.
The shell was rebuilt. Surfaces were refined. Plumbing, structure, and flow were corrected at their core. What had once been outdated and failing was now engineered to last.
Then the shift happened.
Hardscape came in—clean, warm-toned concrete replacing worn decking. Stone walls, once just boundaries, were elevated into features. Subtle textures, intentional lines. A visual language that matched the architecture of the home instead of competing with it.
The pool returned—but not as it was.
Now it was sharp, modern, and inviting. A long, clean body of water with a shallow tanning ledge that catches the sun just right. Stainless steel scuppers arc water into the pool—movement, sound, life. Steps are crisp, geometry is balanced, and the water reflects clarity instead of neglect.
Around it, the yard found purpose.
Artificial turf introduced contrast—green, controlled, low-maintenance. A pergola structure rose in the corner, creating a destination within the destination. Beneath it, a built-in outdoor kitchen turned the backyard into a place to gather, not just pass through. Lighting stitched everything together, making the space just as alive at dusk as it is under the midday sun.
By the end, nothing felt accidental.
What was once forgotten is now deliberate. What was once avoided is now the center of attention.
Fifteen years later, the backyard didn’t just come back—it finally became what it was always supposed to be.
 Castle Building & Remodeling
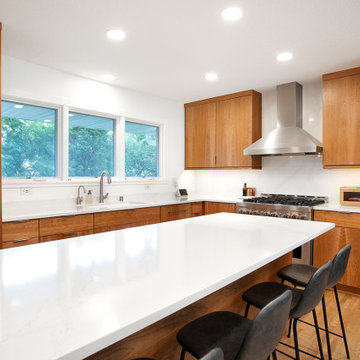
Minneapolis homeowners came to Castle ready to transform their whole house including: renovating their kitchen, living, main floor hall bath, and lower level mudroom + laundry. They also added a new 3/4 bath, completed a basement full finish, selected new exterior siding and new Marvin windows. To round things out, new exterior Thermatru doors and garage door were installed, our team updated millwork to birch and installed new siding and exterior trim.
The kitchen renovation started with opening up the walls to both the living room and dining room to create a much desired new open floor plan. Our skillful team was able to patch the new hardwoods in the kitchen and refinishing of the main level. The new gourmet kitchen also features a large island topped with gorgeous new Silestone Quartz countertops. The modern Crystal frameless cabinets, set in a Natural Cherry finish, accent nicely with a quartz backsplash. The living room was completed with a new modern gas stove.
Main floor hall bath: The homeowners decided to do a full remodel to create better layout of the room. This included adding a new white Crystal Frameless linen cabinet, a larger Crystal Frameless vanity in blue, a brand new window, and new tub. The room was complete with brand new ceramic tile floor and the tub/ shower walls. A custom accent tile was installed in the shower niche.
On the lower level of the home, a new garage door and new door to the backyard were installed. A second laundry in home with mudroom storage was also added. A new 3/4 bath with new cultured marble shower walls + pan were also added to the lower level. The entire lower level space was finished with Adura LVT flooring throughout.
Basement level: The homeowners chose to do a complete full finish of the basement with framing for a new family room, utility room, bedroom and future second laundry. The space also features a second modern gas stove. The entire basement was finished with new Adura LVP wood plank flooring. The most unique feature in the space is the use of double custom barn doors from the new bedroom to the family room for transitional use of space.

 Green Building Supply
Mid-sized urban linoleum floor kitchen/dining room combo photo in Chicago with gray walls and no fireplace
Find the right local pro for your project

 Jordan Iverson Signature Homes
KuDa Photography
Large minimalist wooden u-shaped staircase photo with metal risers
Large minimalist wooden u-shaped staircase photo with metal risers

 Modern Mosaic Arts LLC
Mosaic floor inlay in restaurant bathroom.
Photo Cathleen Newsham
Small eclectic 3/4 multicolored tile and glass tile travertine floor bathroom photo in New York with a vessel sink, raised-panel cabinets, white cabinets, wood countertops, a wall-mount toilet and white walls
Small eclectic 3/4 multicolored tile and glass tile travertine floor bathroom photo in New York with a vessel sink, raised-panel cabinets, white cabinets, wood countertops, a wall-mount toilet and white walls

 BC FLOORS Flooring Company
BC FLOORS
Mid-sized minimalist dark wood floor and brown floor hallway photo in Vancouver with white walls
Mid-sized minimalist dark wood floor and brown floor hallway photo in Vancouver with white walls

 Van Zelst Inc
A variety of green foliage and trees, punctuated by orange daylilies and purple salvia, bring interest to a shade garden.
In addition to familiar hostas and ferns, many colorful and interestingly textured plants are well suited to shade garden areas. Here, shade-loving varieties are planted in generous drifts, providing a changing view as visitors walk along the winding path. The result is proof that shaded garden areas don't have to be predictable or sparse.
A casual, inviting decomposed granite pathway sets the tone for the garden, and is complemented by unrestrained, abundant plantings on either side. The effect feels spontaneous and natural, perfect for a shade garden walk. Photo by Linda Oyama Bryan

 CaliScape Landscape Services
Succulents are an easy, low maintenance way to spruce up your outdoor, or indoor, spaces. These plants require very low water usage making them a perfect plant for the southwestern United States, or for the plant lover who is constantly forgetting their watering can.
 Crisp Architects
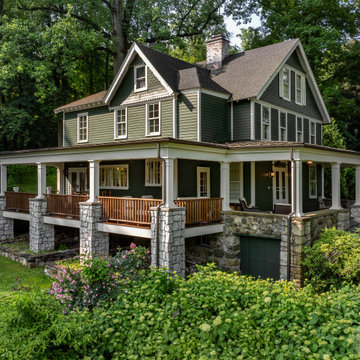
Our clients loved their old home but were ready for some updates. Based on the foundation and other historical clues, they believe it was built around 1890. The house was well-built and full of character. While it had a charming front porch, it was far from the kitchen and faced the driveway. We added a spacious side porch just off the kitchen, creating the perfect spot for outdoor dining. By connecting it to the original porch, we created a natural flow from the front door through the rest of the home. Inside, we redesigned the kitchen and dining area to open up the space and views. The homeowners chose retro appliances that complement the home’s vintage charm.

 Borden Interiors & Associates
Riad Tile
Bathroom - contemporary cement tile floor and pink floor bathroom idea in Santa Barbara
Bathroom - contemporary cement tile floor and pink floor bathroom idea in Santa Barbara


 User
Our approach to the dining room wall was a key decision for the entire project. The wall was load bearing and the homeowners considered only removing half of it. In the end, keeping the overall open concept design was important to the homeowners, therefore we installed a load bearing beam in the ceiling. The beam was finished with drywall to be cohesive so it looked like it was a part of the original design. Now that the kitchen and dining room were open, paint colors were used to designate the spaces and create visual boundaries. This made each area feel like it’s its own space without using any structures.
The original L-shaped kitchen was cut short because of bay windows that overlooked the backyard patio. These windows were lost in the space and not functional; they were replaced with double French doors leading onto the patio. A brick layer was brought in to patch up the window swap and now it looks like the French doors always existed. New crown molding was installed throughout and painted to match the kitchen cabinets.
This window/door replacement allowed for a large pantry cabinet to be installed next to the refrigerator which was not in the old cabinet configuration. The replaced perimeter cabinets host custom storage solutions, like a mixer stand, spice organization, recycling center and functional corner cabinet with pull out shelving. The perimeter kitchen cabinets are painted with a glaze and the island is a cherry stain with glaze to amplify the raised panel door style.
We tripled the size of the kitchen island to expand countertop space. It seats five people and hosts charging stations for the family’s busy lifestyle. It was important that the cooktop in the island had a built in downdraft system because the homeowners did not want a ventilation hood in the center of the kitchen because it would obscure the open concept design.
The countertops are quartz and feature an under mount granite composite kitchen sink with a low divide center. The kitchen faucet, which features hands free and touch technology, and an instant hot water dispenser were added for convenience because of the homeowners’ busy lifestyle. The backsplash is a favorite, with a teal and red glass mosaic basket weave design. It stands out and holds its own among the expansive kitchen cabinets.
All recessed, under cabinet and decorative lights were installed on dimmer switches to allow the homeowners to adjust the lighting in each space of the project. All exterior and interior door hardware, hinges and knobs were replaced in oil rubbed bronze to match the dark stain throughout the space. The entire first floor remodel project uses 12x24 ceramic tile laid in a herringbone pattern. Since tile is typically cold, the flooring was also heated from below. This will also help with the homeowners’ original heating issues.
When accessorizing the kitchen, we used functional, everyday items the homeowners use like cutting boards, canisters for dry goods and place settings on the island. Ultimately, this project transformed their small, outdated kitchen into an expansive and functional workspace.


 Tile Doctor Ltd
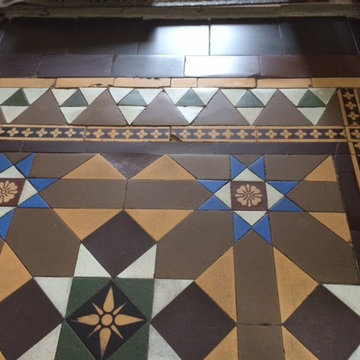
Recently Heidi and I worked on a Victorian tiled hallway floor at a house in Turton, Lancashire, an area which lies on the southern slopes of the West Pennine Moors. Victorian tile floors are commonly found in the reception area and hallways of older houses and public buildings, many of which date back to the reign of Queen Victoria (hence ‘Victorian’ tiles). It was during this time that the tile industry really started to boom.
Upon inspection it was evident that the floor in question had suffered from some settlement in the past resulting in a crack in the base under the tiles which had lifted one side and dropped the other; this is quite common in old houses resulting in some of the tiles becoming loose and would need to be fixed back in place before the floor could be given a good clean and re-seal.
Removing Lippage from Victorian Tiles
The concrete floor under the tile was patched as best as could be without pulling up more of the floor and the tiles were fixed in place, unfortunately however many of the triangular tiles in the adjacent border would not lay flat resulting in a lippage issue between them which naturally the customer was not very happy about.
Not wishing to cause the customer the extra expense of pulling up more tiles and relaying the concrete subfloor I left the tiles to fully set and then came back a few days later with a handheld Flex Machine fitted with a small 220 Grit Diamond pad to grind the tiles flat. As the pictures show, this made the difference and the diamond did not scratch the tiles despite the surface being dry.
Diamond pads are usually used on stone floors but after some investigation back at the Tile Doctor training centre we also realised they can be used on other types of tile including Victorian.
Once this was resolved the entire floor was given a thorough clean using a strong dilution of Tile Doctor Pro-Clean worked in with a scrubbing pad. As well as cleaning the tile and grout it also removed any remaining sealer which is important if you don’t know the history of the floor as the previous coating maybe incompatible with the new sealer. Once done the floor was given a thorough rinse with water which was then extracted from the floor with a wet vacuum.
Sealing Victorian Tiles
The floor was left to dry and I returned later to seal the tiles with a couple of coats of Tile Doctor Colour Grow which is an impregnating sealer that soaks into the pores of the tile and intensifies colour whilst also providing durable protection from within. Normally I use Seal and Go on Victorian Tiles however in this case the customer had specified a matt finish.
The results were fantastic and the client was very pleased with the now flat Victorian tiled floor which, thanks to the cleaning and sealing, was back to looking its best. Another happy customer for the Lancashire Tile Doctor!


 Little Miracles Designs
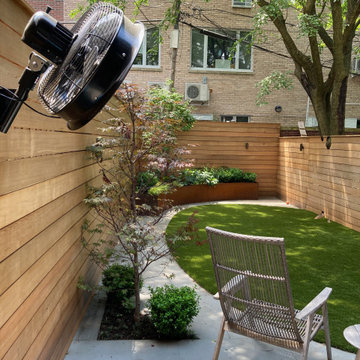
Modern update to a typical South Park Slope row house with Synthtic lawn, Cedar horizontal fence, Bluestone patio, curved Corten planter with perennials and new metal deck with stairs in Ipe wood.

 LCM PLUS
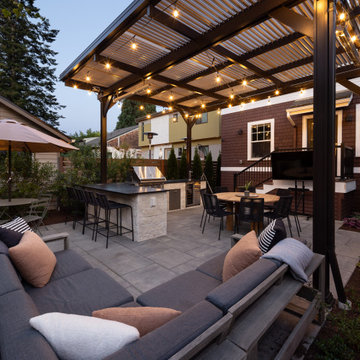
 designed & installed this versatile creative outdoor space for our client. The space was designed for everyone in the family to enjoy: Pool Patio, Outdoor Kitchen, Basketball Court, Trampoline & Synthetic Turf, and to complete the outdoor living area landscape lighting & audio were installed. LCM PLUS, a Techo-Pro firm, installed the stunning hardscape using Techo-Bloc products: Borealis, Travertina, Hera, Bali, Avignon
 Tile Doctor Ltd
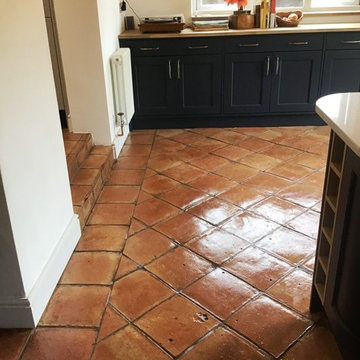
We were contacted by the owner of a property in Moulton with a problematic Terracotta tiled kitchen floor. She was seriously considering ripping up the entire area of tiling and replacing it as she was having a new kitchen installed. Both her and her husband were concerned that unless I could restore this floor to somewhere near to its original condition, they would need to replace it.
I went over to inspect the Terracotta tiles and could see the entire surface was deeply ingrained with soiling and the grout lines were filthy. After carrying out a test it became obvious that the previous sealer had been applied very sparingly and had mostly worn away, leaving the stone prone to staining. Terracotta is a very porous tile and dirt had become ingrained in the pores leaving it looking very dull and difficult to clean.
I completed the test on a small part of the floor and the customer could see the results which could be achieved. Happy with the result they agreed my quote and we set a date for my return to complete the floor.
The tiles turned out to be made of a fairly soft Terracotta which meant that we were able to deep clean them extremely effectively using a strong dilution of Tile Doctor Pro-Clean. We used Tile Doctor Remove and Go in particularly stubborn areas.
The process I use is to spray the Pro-Clean onto the floor and leave it to soak in for about ten minutes before being worked in using a heavy rotary machine fitted with a black scrubbing pad. The resulting slurry is removed using a wet pick up vacuum. All the dirt and virtually all of the old sealer was removed at this stage; the remaining patches around the edges of the area being finished by hand with a 200-grit burnishing block. The grout lines were then cleaned by hand with an angled grout brush.
Finally, the deep-seated oil stains in front of the cooker were brought out using Tile Doctor Oxy-Gel which was left to dwell on the marks for an hour before being agitated with a diamond burnishing pad and rinsed away with a wet pick up machine. The floor was rinsed with water and allowed to dry off overnight.
The following day I inspected the floor and checked it was ready to be sealed. All was well so I applied an initial coat of Tile Doctor Colour Grow which is an impregnating sealer that occupies the pores in the tile enhancing the natural colours of the Terracotta and provide a base layer of protection from staining.
I returned at a convenient time once the kitchen was completely installed to finish the job. This involves carrying out a light maintenance clean with Tile Doctor Neutral Cleaner and once the floor was dry, I applied 5 further coats of Tile Doctor Seal and Go which provides a pleasing satin finish which is really suited to this type of floor.
The customer was very happy with the results and has left the following feedback.
“We were really pleased with the results, thank you!”
Phil Vissian
Northamptonshire Tile Doctor


 Northwest Native Landscapes LLC
This compact, urban backyard was in desperate need of privacy. We created a series of outdoor rooms, privacy screens, and lush plantings all with an Asian-inspired design sense. Elements include a covered outdoor lounge room, sun decks, rock gardens, shade garden, evergreen plant screens, and raised boardwalk to connect the various outdoor spaces. The finished space feels like a true backyard oasis.
187