
Search results for "Ph neutral cleaners" in Home Design Ideas

 Doyle McCullar
Photo by Eric Rorer
Mid-sized trendy freestanding desk dark wood floor study room photo in San Francisco with gray walls
Mid-sized trendy freestanding desk dark wood floor study room photo in San Francisco with gray walls

 Greenauer Design Group
David Patterson
Example of a mountain style dark wood floor bedroom design in Denver
Example of a mountain style dark wood floor bedroom design in Denver
Find the right local pro for your project

 Linc Thelen Design
Example of a country white two-story exterior home design in Chicago with a mixed material roof

 Lauren DeBello Interiors
Earthy, Modern Organic living room by Nashville Interior Designer Lauren DeBello Interiors
Living room - transitional living room idea in Nashville
Living room - transitional living room idea in Nashville

 Wheeler Kearns Architects
Kids Bedroom
Interiors: Britt Taner Design
Photography: Tony Soluri Photography
Example of a bedroom transitional girl carpeted kids' bedroom design in Chicago with beige walls
Example of a bedroom transitional girl carpeted kids' bedroom design in Chicago with beige walls

 Carolyn Thayer interiors
Example of a large beach style open concept family room design in Boston with gray walls, a standard fireplace and a wall-mounted tv

Sponsored
Sunbury, OH

J.Holderby - Renovations
Franklin County's Leading General Contractors - 2X Best of Houzz!

 Tile Doctor Ltd
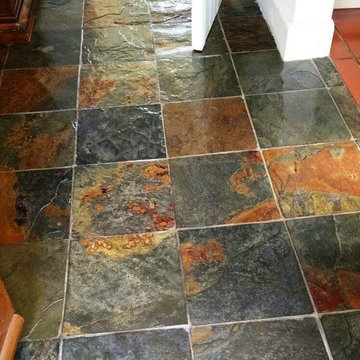
The photographs below are of rough Chinese Slate floor tiles installed at a house in Dorchester; they had not been deep cleaned in a long time and the combination of pets and grandchildren had taken its toll on the floor. Rough Slate from China is a relatively inexpensive product and although long lasting and value for money the texture of the Slate is difficult to maintain and thus difficult to keep clean even if fully sealed
To clean the tiles I used a strong dilution of Tile Doctor Pro-Clean which was left to soak into the Slate for a good ten minutes before working it in with a buffing machine fitted with a black scrubbing pad. This action removed the ground in dirt and any old sealer and a stiff brush was then run along the grout lines with more Pro-Clean to get them as clean as possible. The floor was then rinsed thoroughly and any stubborn areas retreated; a wet vacuum was used to extract the soiled water from the surface of the stone in order to get it as dry as possible.
The floor was left to dry overnight and I returned the next day to seal using three coats of Tile Doctor Seal and Go sealer which is a water based sealer (so no smell) that leaves a nice subtle shine to floor.
The slate and the grout looked really dull and dirty before we started and now the floor looks like it was recently laid.
For aftercare we don’t recommend the use of a Floor Steamer as they work on a 100 degrees and this damages the sealer; for regular cleaning use Tile Doctor Ph Neutral Cleaner using a two bucket system, whereby you apply the cleaning solution with a jug, wipe the floor and then squeeze off the excess into the second bucket, this stops you reapplying dirty water onto a clean floor.
Stuart Tibu
Dorset Tile Doctor
 Peterbilt Construction Inc
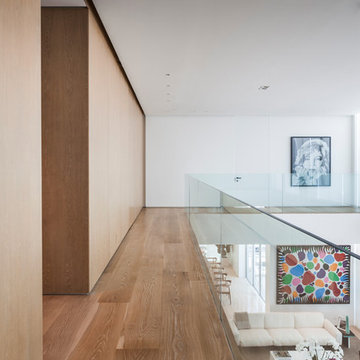
Inspiration for a contemporary medium tone wood floor and brown floor hallway remodel in Miami with white walls

 Gregory Carmichael
Example of a mountain style formal and enclosed living room design in Seattle with a standard fireplace, a stone fireplace and no tv
 Tile Doctor Ltd
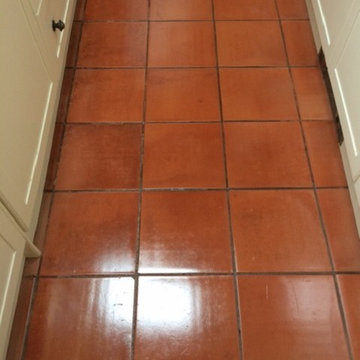
Terracotta is an interesting type of stone manufactured using a variety of techniques dependant on the country of origin which leads to a number of differences such as Spanish Terracotta being less porous than its Mexican counterpart: the former is semi-hand made and finished in a factory kiln, while the latter is completely handmade. Spanish Terracotta is therefore a lot less than porous and ultimately, of a higher quality.
But despite the Spanish Terracotta being less porous, and therefore being less prone to ingrained dirt, it still, like any other stone, needs regular maintenance to keep it looking smart. In the tiling trade, we quite often refer to this as a good old fashioned ‘Clean and Seal’ and this is exactly what was requested by this property owner in Halifax, for their Spanish Terracotta tiled floors in the kitchen and adjacent hallway.
I cleaned both sets of Terracotta tiles using the same process, which involved the application of our reliable alkaline cleaner known as Tile a Doctor Pro Clean, diluted with five parts of warm water. Once the solution had been left to dwell for a short period, it was scrubbed into the tiles to remove all dust, dirt, and general muck. This created a slurry of cleaning residue, which I promptly soaked up using a wet vac. A wet vac machine is an essential tool when it comes to cleaning porous tiles since, unlike a traditional mop and bucket, it sucks the excess trapped dirt out of the clay and thus provides a superior clean.
Following this, I applied a small amount of our heavy duty remover, known as Tile Doctor Remove & Go, to deal with some of the more stubborn stains and paint splashes, before rinsing with clean water and wet vaxing in a similar fashion to before.
Once the clean had been completed I left the tiles to dry completely. This can take 12 to 24 hours depending on numerous factors including whether a Damp proof Membrane and underfloor heating has been installed which can really help reduce drying times. Letting the tiles dry completely before sealing is paramount as moisture can cloud the sealer and affect its performance.
Upon my return to the property I ran some quick damp tests, which revealed the tiles were ready to be sealed. I then applied several coats of Tile Doctor Seal and Go, our topical sealer which provides a satin finish and accentuates colour. A new coat of this product is recommended every six months on Terracotta to ensure the continuous protection of the tiles’ soft clay particles.
My customer was extremely pleased with her refreshed Terracotta tiles. It goes to show what a big difference a bit of regular maintenance can make. I advised the customer that an everyday cleaner called Tile Doctor pH Neutral cleaner can also be used regularly to keep the tiles looking great without damaging the sealer.
Nigel Stoker
North West Yorkshire Tile Doctor

Example of a classic open concept medium tone wood floor living room design in Los Angeles with beige walls, a standard fireplace, a stone fireplace and no tv


 Tile Doctor Ltd
This is a large 17.2 m2 Sandstone Floor installed throughout the living and kitchen areas of a property in the beautiful village of Disley close to Lyme Park which is run by the National Trust. The floor had been installed four years ago and my client was unhappy with the original sealer which hadn’t lasted very long. Without the protection of a sealer dirt had become ingrained in the pores of the stone which was now difficult to clean. Another issue was the rough nature of the Sandstone meant it was impossible to mop as it shreds the mop! As a result, the floor was mainly cleaned with a hoover which was not ideal, especially in a kitchen.
I went over to survey the floor and before quoting I ran a small test clean in the kitchen which took the floor back to its natural pale colour and really showed how dirty the floor had become. Test cleans are great as it helps me to formulate an effective cleaning plan and provide an accurate quote. My client was impressed with the result and so I was booked to come back and deep clean and then reseal the whole floor. Due to its size I estimated the floor would take two days to deep clean and a further day to apply a new sealer, so three days in total.
Working in large sections I started by cleaning the floor and stripping off the old sealer with a strong dilution of Tile Doctor Remove and Go which is a coatings remover that is safe to use on stone. The solution was left to soak into the pores of the Sandstone for ten minutes before being worked in with a 200-grit diamond pad fitted to a rotary floor machine. This action not only removed the old sealer and cleaned the floor but the 200-grit pad being vey coarse removed a lot of the roughness from the surface of the Sandstone so it shouldn’t shred any more mops.
After rinsing the floor with water and removing the slurry with a wet vacuum I set about cleaning the grout with Tile Doctor Pro-Clean worked into the grout line with a stiff brush and assisted with steam from a professional steam cleaner with a grout attachment. Once done the floor was rinsed and extracted again to remove the soil from the grouting. There was also an area near one of the doors where the grout had become loose and needed replacing so I made up a batch of matching grout and filled this in. The floor was then left overnight to dry with assistance from a couple of air movers.
I returned the next day to finish the floor by applying a sealer. First, I double checked the floor was dry with the damp meter. The readings confirmed the air movers had done a good job and that the floor was within the accepted parameters, so I was ready to seal. The sealer I chose was Tile Doctor Seal and Go which being water based doesn’t leave a smell as it dries, it really works well on Sandstone and adds a nice subtle sheen to the stone.
Once finished the floor looked much cleaner, lighter in colour overall more inviting, you could even see the fossils in some of the tiles.
The surface was also smoother so the customer should find cleaning with a mop much easier in future. On that subject its worth pointing out that owners of sealed floors should always use a neutral pH tile cleaner on their floors as most supermarket products are simply too strong and will prematurely strip the sealer off a tile if used repeatedly. Tile Doctor sell a product called Tile Doctor Neutral Cleaner which is ideal for cleaning sealed Sandstone floors like this one.
My client was really happy with the results and sent me a message later saying: “the floor looks amazing!”
Kamila Logonzy
East Cheshire Tile Doctor
 Black Oak Construction, LLC
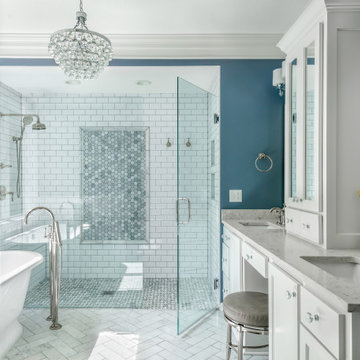
Freestanding bathtub - mid-sized transitional master white tile and subway tile porcelain tile, double-sink and white floor freestanding bathtub idea in Kansas City with white cabinets, blue walls, an undermount sink, quartz countertops, a hinged shower door, gray countertops, a built-in vanity, recessed-panel cabinets and a niche
 Tile Doctor Ltd
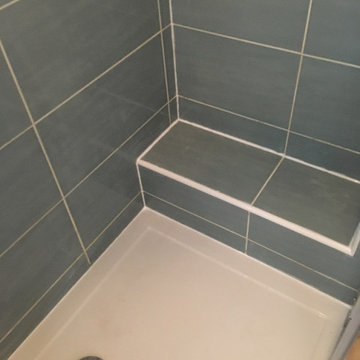
Pictured below is a very mouldy Ceramic Tiled Shower Cubicle at a property in the picturesque market town of Woodstock, which is very close to the famous Blenheim Palace and has a long history that dates to the Domesday Book and have many 17th century buildings.
As you can see mould had really got a grip on the white grout around the bottom of the shower and in most other places the grout had become discoloured. Mould and discolouration are a very common problem and is caused by a lack of ventilation in the bathroom as well as the dyes in soap and shampoos.
Most ceramic tiles have a glazed surface and so are fairly impervious to these problems, grout however is a problem due to its cementitious rough nature. I discussed with the client what could be done to restore the appearance of the shower cubicle for them, and they were pleased to hear we could do something about it. Happy with my quotation it wasn’t long before I got instructed to go ahead with the work.
To resolve the problem, I first sprayed the whole shower with Tile Doctor Duo Clean and left it to soak in. The bottle comes with a spray attachment that combines the product with air making it lighter and easier to stick to vertical surfaces. It is a fast effective cleaner which doubles up as a grout cleaner and mould remover.
Whilst the Tile Doctor Duo Clean was doing its magic I fetched the other tools I would need to complete this job. After about 30 minutes I sprayed the cubicle again and started to hand scrub the grout and tiles to remove the mould and dirt. I then rinsed with water and went over the stubborn stains again until I was happy. The walls where then dried with a clean towelling cloth. It is amazing the difference you can achieve with the right grout cleaning product and a lot of elbow grease.
The last step and “prise de la resistance” was to cut out all the original silicone sealant with a sharp knife and then replace with new white sealant which had an anti-mould formula. I am not convinced these anti-mould products work any better to be honest but with mould being such a problem it is definitely worth giving them a go.
The last step was to spray the grout with Tile Doctor Wall Tile and Grout Sealer to help protect the grout, it forms a protective barrier over the tile and the grout, so water just runs straight off the wall and into the shower tray.
For after care I recommended the use of Tile Doctor Aqua-Pro which is pH neutral cleaner designed for showers and will help the sealer last longer. Stronger supermarket products can actually strip a sealer off the tile over time so we don’t recommend their use.
I think you will agree the shower cubicle looked transformed by the time I had finished, certainly my client was very happy with the work we had carried out.
Barry Woodward
Oxfordshire Tile Doctor
 Interiors by Popov
Our clients owned a secondary home in Bellevue and decided to do a major renovation as the family wanted to make this their main residence. A decision was made to add 3 bedrooms and an expanded large kitchen to the property. The homeowners were in love with whites and grays, and their idea was to create a soft modern look with transitional elements.
We designed the kitchen layout to capitalize on the view and to meet all of the homeowners requirements. Large open plan kitchen lets in plenty of natural light and lots of space for their 3 boys to run around. We redesigned all the bathrooms, helped the clients with selection of all the finishes, materials, and fixtures for their new home.


 Jennifer Pacca Interiors
peter rymwid
Bedroom - traditional master dark wood floor bedroom idea in New York with gray walls
Bedroom - traditional master dark wood floor bedroom idea in New York with gray walls

 Tile Doctor Ltd
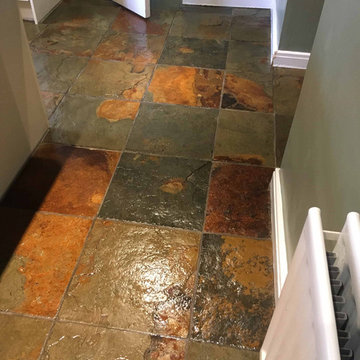
Except for general cleaning this multi-coloured slate floor had not been professionally cleaned since installation eleven years prior. Any sealer that had once been applied to the slate had long since worn off and dirt was now ingrained in the pores of the stone causing it to look dull and un-attractive. The property was in the lovely town of Staines Upon Thames, obviously situated on the banks of the River Thames and a popular place to live for London commuters.
I visited site to take a closer look at the floor and provide the client with an accurate price for renovating the stone. It turns out that the client had used all sorts of different household cleaners in an attempt to get the floor clean. Unfortunately, they were probably making the situation worse as these strong cleaning products would have actually stripped the sealant off the stone leaving it open to dirt. I carried out a test clean for them and they were very pleased to see how the floor could look. We agreed a price for the work and arranged a suitable date to carry out the work.
Cleaning a Multi-Coloured Slate Tiled Kitchen Floor
My first task was to strip off what was left of the old sealer and deep clean the stone using a dilution of Tile Doctor Remove and Go mixed 50:50 with Tile Doctor Pro-Clean. This powerful cocktail was applied to the floor and left to soak in for ten minutes before being scrubbed in using a rotary machine fitted with a black scrubbing pad.
The grout was hand scrubbed using more of the cleaning solution along the grout lines until I was happy the floor was as clean as it possibly could be. The floor was rinsed with water and the soil extracted by using the wet vacuum.
Once the floor was clear the Slate was inspected, and any stubborn areas were spot treated using the same process as before. After a final rinse and extraction, the floor was dried as much as possible using the wet vacuum and left to dry off overnight.
Sealing a Multi-Coloured Slate Tiled Kitchen Floor
I came back the next day and checked the moisture levels of the tiles using a damp meter. The floor had dried well so I had a green light for applying a new sealer. For this I used four Coats of Tile Doctor Seal and Go, allowing each coat to dry before applying the next. This product works really well on Slate and gave the tiles a nice sheen finish, the fresh sealer will also make maintenance cleaning far easier in the future.
The client was very happy with the result, the floor now looks great and the natural colours of the stone is so much more evident. For aftercare I recommended they throw away all those supermarket products and use Tile Doctor Neutral Tile Cleaner which is a pH neutral product that won’t prematurely erode the new sealer with use.
Jonathan Oldham
South Middlesex Tile Doctor
6