
Search results for "Plan ahead" in Home Design Ideas
 Timberline Patio Covers
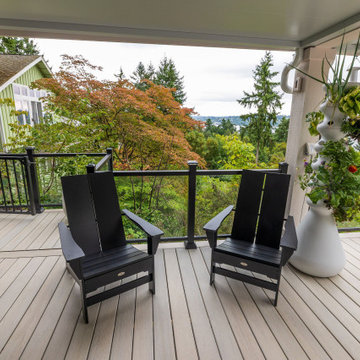
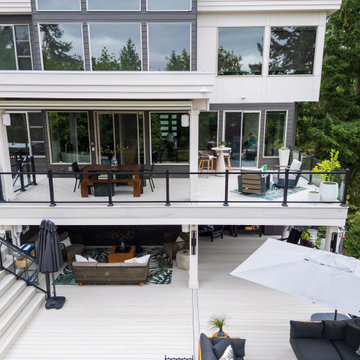
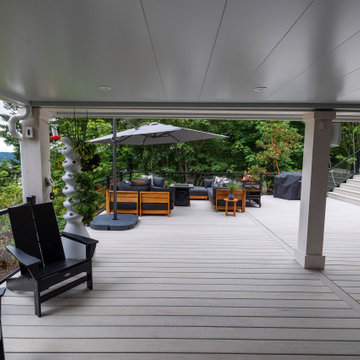
This Kirkland, Washington outdoor living project was thoughtfully designed to create a clean, modern space while also planning ahead for future upgrades. The new deck features TimberTech Legacy decking in Whitewash Cedar, bringing a warm, natural wood look with the durability of composite materials. A custom pattern on the upper deck adds visual interest and elevates the overall design.
The staircase is finished with a picture-framed border and notched fascia, creating a seamless and polished transition between levels. To enhance both safety and aesthetics, we installed TimberTech Impression railing with sleek black framing and glass infill, preserving open views while maintaining a contemporary feel. Two custom gates were also integrated for functionality and accessibility.
Below the deck, a full undercover system was installed using white smooth panels and a vinyl gutter system, transforming the space into a dry, usable area year-round. This not only expands the homeowner’s living space but also protects the structure from moisture.
A key feature of this project is the forward-thinking infrastructure. The deck was framed to accommodate a future outdoor kitchen and fire feature, with gas and electrical rough-ins already in place. This allows the homeowner to easily expand their outdoor space without major reconstruction down the line.
From structural planning to finishing details, this project blends modern design, durability, and long-term functionality, creating an outdoor environment that’s ready to enjoy today and built for tomorrow.
 MAKING THE WORLD BEAUTIFUL
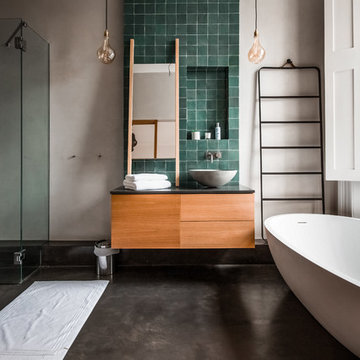
For this beautiful bathroom, we have used water-proof tadelakt plaster to cover walls and floor and combined a few square meters of exclusive handmade lava tiles that we brought all the way from Morocco. All colours blend in to create a warm and cosy atmosphere for the relaxing shower time.
 LiB contents
Photo by Junichi Harano
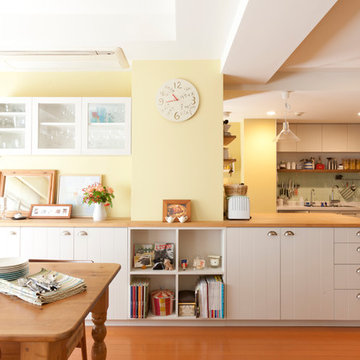
Inspiration for a contemporary u-shaped brown floor eat-in kitchen remodel in Tokyo with a double-bowl sink, white cabinets, green backsplash, stainless steel appliances and a peninsula
Inspiration for a contemporary u-shaped brown floor eat-in kitchen remodel in Tokyo with a double-bowl sink, white cabinets, green backsplash, stainless steel appliances and a peninsula
Find the right local pro for your project


 Chervin Kitchen & Bath Inc.
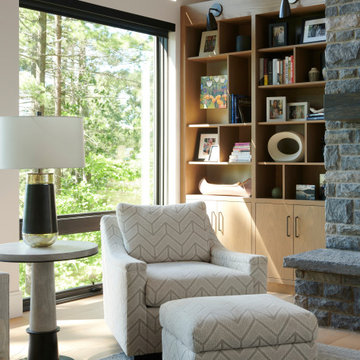
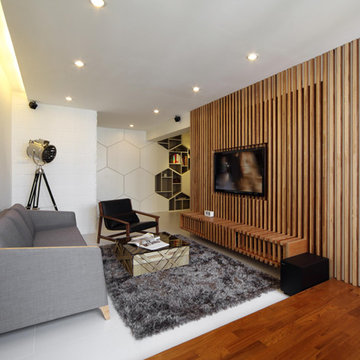
An elevated modern cottage living room with a custom-built wall unit featuring a sleek bookshelf. Crafted with a keen eye for contemporary design, this project seamlessly blends functionality and style. The unit boasts clean lines and a minimalist aesthetic, perfectly complementing the cozy charm of the cottage space. With ample shelving for favourite reads and display items, this bespoke addition transforms the living room into a curated haven of sophistication and comfort.


Sponsored
Sunbury, OH

J.Holderby - Renovations
Franklin County's Leading General Contractors - 2X Best of Houzz!
 mango design co
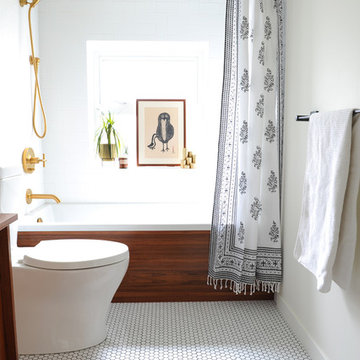
Bathroom - small 1960s master white tile and ceramic tile porcelain tile and white floor bathroom idea in Vancouver with flat-panel cabinets, medium tone wood cabinets, a two-piece toilet, white walls and wood countertops

 Steffanie Gareau Design
Stephani Buchman Photography
Inspiration for a small transitional guest carpeted and beige floor bedroom remodel in Toronto with white walls and no fireplace
Inspiration for a small transitional guest carpeted and beige floor bedroom remodel in Toronto with white walls and no fireplace

 Free Lancing
Effective residential construction project management is crucial in today’s fast-moving building industry. It means overseeing every step of building a home, from planning to finishing, to ensure projects are completed time, within budget, and with high quality. Unlike commercial projects, residential projects require special attention to meet homeowners' unique needs and wishes, requiring a customized approach from the beginning to the end.
In 2025, the construction sector will use advanced technologies like AI and integrated project delivery (IPD) to streamline processes and improve stakeholder collaboration. However, project managers face significant challenges, including managing risks, maintaining quality control, and ensuring effective communication among team members.
A WIP Report (Work-in-Progress Report) is a key tool that helps track a project's budget, progress, and resource use. It provides clear insights, making managing costs easier, avoiding delays, and making informed decisions.
By adopting best practices and using modern construction management tools, project managers can overcome these challenges and deliver successful residential construction projects that meet client expectations and contribute to a sustainable future.
This article provides a brief overview of residential construction project management, highlights its importance, and touches on the challenges faced by project managers while incorporating the latest trends and technologies in the field.
Types of Residential Construction Management
Here are the different types of Residential Construction Management:
Single-Family Homes: These are standalone houses built for individual families. Managing these projects involves overseeing construction from planning to completion, ensuring that the home meets the owner's preferences and budget.
Multi-Family Housing: This includes apartments, condominiums, and townhouses. Projects of this type require managing multiple units, often with shared facilities, and ensuring compliance with local building codes.
Custom Home Building: This involves constructing homes tailored to specific client needs. Close collaboration with architects and designers is required to ensure the house reflects the owner's personality and preferences.
Home Renovation and Remodeling: These projects focus on updating or expanding existing homes. They often involve working with subcontractors for specialized tasks like electrical or plumbing work.
Components of Residential Construction Project Management
Managing a residential construction project requires carefully coordinating people, materials, and timelines. A well-structured approach ensures efficiency, cost control, and high-quality results.
Roles and Responsibilities
A project manager plays a vital role in residential construction. They oversee every step from planning to completion and ensure the project stays on schedule, within budget, and meets quality standards.
Project Manager’s Role in Home Construction
The project manager is responsible for organizing tasks, managing resources, and solving problems that arise during construction. They coordinate between different teams, track progress, and ensure safety regulations are followed.
Collaboration with Contractors, Architects, and Stakeholders
Successful residential construction requires teamwork. Project managers work closely with architects to bring designs to new heights, coordinate with contractors to manage labor and materials, and keep stakeholders (such as homeowners and investors) informed about project updates.
Client Communication and Expectations Management
Clear communication with clients is essential. The project manager keeps homeowners updated on timelines, changes, and challenges. Setting realistic expectations and providing regular updates, they help avoid misunderstandings and keep the project running smoothly.
Project Scope & Planning
Practical project planning sets the foundation for a successful residential construction project. It ensures clear goals, minimizes risks, and keeps the project on track.
Defining Project Objectives and Deliverables:
Clearly outlining what needs to be done and what the final result should look like is essential. This involves setting specific, measurable goals that align with the homeowner's vision and budget.
Managing Homeowner Expectations and Scope Creep:
Homeowners often have changing needs or ideas. Effective project managers must manage these expectations to prevent "scope creep," which can delay projects and increase costs. This involves open communication and setting clear boundaries.
Ensuring Compliance with Zoning Laws and Permits:
Before construction begins, it's crucial to ensure that all necessary permits are obtained and that the project complies with local zoning laws. This step avoids costly fines and delays, ensuring the project moves forward smoothly.
Budgeting & Cost Control
Proper budgeting is essential for keeping residential construction projects financially viable. Effective cost management prevents overspending and ensures profitability.
Accurate Cost Estimation for Residential Projects
A precise cost estimate considers labor, materials, permits, and unexpected expenses. Using historical data and Sage 300 CRE for financial management improves accuracy and helps set realistic budgets.
Budget Allocation and Tracking
Allocating funds efficiently ensures that each phase of the project receives the necessary resources. Tracking expenses through Construction & Financial Dashboards allows for real-time monitoring and early detection of budget deviations.
Preventing Budget Overruns
Uncontrolled costs can derail a project. Regular financial reviews, automated alerts for overspending, and contingency planning help keep expenses in check and prevent financial strain.
Scheduling & Timeline Management
Timely project completion is crucial in residential construction. Effective scheduling minimizes delays and ensures a smooth workflow.
Creating Detailed Project Schedules
A structured schedule outlines all tasks, deadlines, and dependencies. Breaking down the project into phases, planning, execution, and finishing, helps maintain order and clarity.
Preventing Delays & Meeting Deadlines
Delays can result from labor shortages, weather conditions, or supply chain issues. To avoid problems, it’s good to check for risks ahead of time, add extra time to schedules, and keep everyone on the same page.
Using Gantt Charts and Critical Path Methods
CPM for Construction helps identify critical activities that directly impact project completion, while Gantt charts provide a visual timeline of tasks. Both tools optimize scheduling and improve efficiency.
Residential Construction Project Management Phases
Managing a residential construction project effectively requires a structured approach through various phases. Each phase plays a critical role in ensuring the project's success, from initial planning to completion.
Pre-Construction Phase
The pre-construction phase sets the foundation for a smooth and efficient building process. Proper planning at this stage helps prevent costly changes and delays later.
Site Analysis & Approvals: A thorough site analysis assesses soil conditions, topography, and environmental factors. Feasibility studies evaluate project viability, including costs and regulatory compliance. Obtaining zoning approvals, permits, and other legal clearances is crucial before breaking ground.
Selecting Materials and Procurement Strategies: Choosing the right materials impacts durability, sustainability, and cost efficiency. A well-planned procurement strategy, including bulk purchasing and reliable supplier partnerships, ensures timely delivery and cost savings. Using Sage 300 CRE for procurement management helps streamline material sourcing and financial planning.
Construction Phase
The construction phase transforms plans into reality. Effective coordination and strict quality control ensure a successful build.
Resource Allocation and Workflow Coordination: Efficiently managing labor, equipment, and materials is key to maintaining progress. Using CPM for Construction, project managers can allocate resources strategically, prevent bottlenecks, and optimize workflows for timely completion.
Project Closeout & Handover
The final phase of residential construction project management is crucial for ensuring a smooth transition from construction to occupancy. Proper closeout procedures guarantee quality, client satisfaction, and long-term project success.
Final Inspections and Quality Assurance: Before finishing the project, a final inspection checks that everything meets safety rules and quality standards. Any problems need to be fixed quickly. Using Procore helps make inspections and tracking issues easier, ensuring a high-quality final product.
Client Walkthrough and Support: A final check helps homeowners see the finished work, ask questions, and make sure it meets their expectations. This is also a chance to explain important home features and maintenance tips. Good communication here builds trust and strengthens relationships.
Warranty Management and Feedback: Efficient warranty management ensures clients get quick help for any issues after construction. A clear process for tracking requests and keeping in touch with homeowners boosts satisfaction. Collecting feedback helps improve future projects. Using S-Curve Forecasting tracks performance trends and refines management strategies.
Software for Residential Construction Project Management
The integration of technology in residential construction project management has revolutionized the way projects are planned, executed, and monitored. Digital tools streamline operations, reduce costs, and improve communication, making them essential for modern construction firms.
Importance of Digital Tools
Investing in digital tools is crucial for construction firms as it transforms the industry by enhancing efficiency, accuracy, and collaboration across the entire project lifecycle. They also improve project management by streamlining processes, automating tasks, and facilitating real-time stakeholder communication.
Top Construction Management Software for Residential Projects
Several software solutions are available for managing residential construction projects:
Procore: Known for its comprehensive project management features, including document management and collaboration tools.
Sage 300 CRE: Offers robust accounting and financial management capabilities, ideal for large-scale construction projects.
Buildertrend: Specializes in residential construction, providing tools for project scheduling, budgeting, and client communication.
CoConstruct: Focuses on custom home building and remodeling, offering features for estimating, scheduling, and project management.
WIP Reports: Useful for tracking work-in-progress and managing project finances effectively.
Features Comparison and Best Use Cases:
Procore: Best for large projects requiring extensive collaboration and document management.
Sage 300 CRE: Ideal for firms needing robust financial management.
Buildertrend: Suitable for residential builders focusing on client communication and project scheduling.
CoConstruct: Perfect for custom home builders who need detailed estimating and scheduling tools.
WIP Reports: Useful for firms needing to track project finances closely.
How Software Improves Project Efficiency
Construction management software significantly enhances project efficiency in several ways:
Automating Accounting and Job Costing: Software like Sage 300 CRE automates financial tasks, reducing manual errors and improving budget tracking.
Streamlining Document Management and Communication: Tools like Procore centralize documents and facilitate real-time communication among team members, reducing misunderstandings and delays.
Mobile-Friendly Solutions for Real-Time Tracking: Mobile apps from platforms like Buildertrend allow for on-site access to project data, enabling real-time tracking and decision-making.
These digital tools and software solutions are essential for modern residential construction project management, offering benefits such as improved efficiency, enhanced collaboration, and better financial control.
Challenges in Residential Construction Project Management
Residential construction projects face a variety of challenges that can impact their success. Here are some of the key issues project managers encounter:
Managing Subcontractors and Labor Shortages
One of the biggest challenges in residential construction is managing subcontractors and dealing with labor shortages. Subcontractors often have their own schedules and priorities, which can lead to delays if not coordinated properly. Additionally, labor shortages can slow down projects and increase costs due to the need for overtime or hiring temporary workers.
Budget Overruns and Unexpected Costs
Budget overruns are common in residential construction due to factors like material price fluctuations, unexpected site conditions, or changes in project scope. Effective budget management involves regularly monitoring expenses and having contingency plans for unexpected costs.
Changing Construction and Eco Rules
Construction and Eco Rules are always changing, so project managers need to keep up with the latest regulations. This involves following guidelines for saving energy, protecting the environment, and ensuring safety. Ignoring these rules can lead to fines, delays, or even stopping the project.
Best Practices
To ensure your residential construction projects run smoothly and successfully, follow these essential best practices:
Setting Clear Project Goals and Milestones
Clearly defining what you want to achieve is the first step to success. Set specific, measurable, achievable, relevant, and time-bound (SMART) goals. This helps everyone involved understand what needs to be done and by when. For example, instead of saying "build a house," say "build a house with three bedrooms and two bathrooms within the next nine months."
Stakeholder Collaboration
Good communication is key to keeping everyone on the same page. Regular meetings with contractors, suppliers, and homeowners help prevent misunderstandings and ensure that everyone knows what's happening and what's next. This open dialogue also helps resolve issues quickly, preventing small problems from becoming big delays.
Using Data-Driven Insights for Decision-Making
Making decisions based on facts rather than guesses is crucial. Use data and analytics to understand project progress, identify potential issues early, and make informed decisions. For instance, if data shows that a particular material is consistently causing delays, you can plan ahead to avoid those delays in the future.
Proactive Risk Management Strategies
Things don't always go as planned, so being prepared is essential. Identify potential risks early and have a plan to manage them. This might include having backup suppliers, planning for weather conditions, or setting aside extra funds for unexpected expenses. Being proactive can prevent small issues from turning into major problems.
Conclusion
Effective residential construction project management requires careful planning, clear communication, and the right digital tools. From single-family homes to multi-family housing and custom projects, managing timelines, budgets, and quality is essential for success.
By following best practices, using project management software, and staying ahead of industry trends, project managers can ensure smooth execution and client satisfaction despite challenges like labor shortages, budget overruns, and regulatory compliance; modern technology and strategic planning help mitigate risks.
Construction firms can improve efficiency, enhance collaboration, and maintain financial control by adopting advanced tools like Procore, Sage 300 CRE, and Buildertrend. A well-managed project delivers a quality home and builds trust and long-term success in the industry.
FAQs
What is residential construction project management?
It involves overseeing all aspects of building residential properties, from initial planning and design to construction and completion, ensuring projects are completed on time, within budget, and to the desired quality standards.
How can I prevent budget overruns in my construction project?
Accurate cost estimation, continuous budget tracking, and having contingency plans for unexpected expenses are key strategies to prevent budget overruns.
What are the main stages of a residential construction project?
The primary stages include design, pre-construction, procurement, and construction.
How does construction management software improve project efficiency?
It streamlines processes like scheduling, budgeting, and communication, providing real-time data access and collaboration among stakeholders, which enhances overall project efficiency.
How can I ensure my project complies with local building codes and regulations?
Engage professionals familiar with local laws, obtain all necessary permits before starting, and conduct regular inspections to ensure adherence to building codes and regulations.
 Timberline Patio Covers
This Kirkland, Washington outdoor living project was thoughtfully designed to create a clean, modern space while also planning ahead for future upgrades. The new deck features TimberTech Legacy decking in Whitewash Cedar, bringing a warm, natural wood look with the durability of composite materials. A custom pattern on the upper deck adds visual interest and elevates the overall design.
The staircase is finished with a picture-framed border and notched fascia, creating a seamless and polished transition between levels. To enhance both safety and aesthetics, we installed TimberTech Impression railing with sleek black framing and glass infill, preserving open views while maintaining a contemporary feel. Two custom gates were also integrated for functionality and accessibility.
Below the deck, a full undercover system was installed using white smooth panels and a vinyl gutter system, transforming the space into a dry, usable area year-round. This not only expands the homeowner’s living space but also protects the structure from moisture.
A key feature of this project is the forward-thinking infrastructure. The deck was framed to accommodate a future outdoor kitchen and fire feature, with gas and electrical rough-ins already in place. This allows the homeowner to easily expand their outdoor space without major reconstruction down the line.
From structural planning to finishing details, this project blends modern design, durability, and long-term functionality, creating an outdoor environment that’s ready to enjoy today and built for tomorrow.

 Allreno
How Can I Reduce the Cost of Remodeling a Bathroom? Allreno Design AI
Renovating a bathroom is an exciting but often expensive project. Homeowners frequently worry about how to balance quality with affordability. Fortunately, there are smart strategies to cut costs without sacrificing style. Whether you're updating a bathroom vanity, retiling the floor, or overhauling the entire space, making informed decisions can help you save thousands.
At Allreno, we understand that affordability and quality go hand in hand. That’s why we developed the Allreno Design App, a cutting-edge tool that simplifies the bath renovation process and helps homeowners make cost-effective choices. Here’s how you can reduce expenses on your next bathroom remodel:
1. Plan Ahead with a Budget
One of the biggest mistakes homeowners make is starting a renovation without a clear budget. Before you begin, list all the necessary expenses, including labor, materials, and unexpected costs. Using tools like the Allreno Design App, you can visualize your remodel and get instant cost estimates based on your selections.
2. Choose a Cost-Effective Bathroom Vanity
A bathroom vanity is often the focal point of a bathroom remodel. Instead of opting for a custom-built unit, consider ready-to-assemble or pre-designed vanities. Allreno partners with top manufacturers to offer stylish, high-quality vanities at competitive prices, helping you save money without compromising on design.
3. Keep the Plumbing Where It Is
Relocating plumbing fixtures—such as sinks, toilets, and showers—can significantly increase labor costs. Keeping your layout intact can save you thousands in contractor fees. The Allreno Design App allows you to experiment with different configurations while ensuring you stay within your budget.
4. Refinish Instead of Replacing
Instead of replacing your bathtub, tiles, or countertops, consider refinishing them. Reglazing a tub, repainting cabinets, or updating hardware can make a huge difference at a fraction of the cost. Small changes can have a big impact without the need for a full replacement.
5. Shop Smart for Materials
Purchasing materials strategically can lead to big savings. Look for clearance items, buy in bulk, and compare prices across different suppliers. Allreno simplifies this by connecting you with trusted vendors and providing access to exclusive discounts on bath renovation materials.
6. Do Some of the Work Yourself
While some tasks require professionals, there are many things you can do on your own, such as painting, installing new hardware, or even assembling a pre-made bathroom vanity. If you're comfortable with DIY projects, this can significantly reduce labor costs.
7. Use Technology to Your Advantage
The Allreno Design App is a game-changer in the renovation industry. It helps homeowners design their ideal bathroom, estimate costs, and even connect with local professionals. By using AI-driven recommendations, the app ensures you get the best value without unnecessary expenses.
Conclusion
Bathroom remodeling doesn’t have to break the bank. By planning ahead, making smart material choices, and leveraging technology like the Allreno Design App, you can achieve a beautiful, budget-friendly bathroom. Whether you're upgrading a bathroom vanity or tackling a full bath renovation, these strategies will help you save money while creating a space you love.
www.allreno.co
 Jacobson Construction
A few years ago, the owners added two stories with finished basement to their Edina home. It was a big project that greatly expanded and enhanced the first-floor kitchen, dining room and living room. The project also added a second-floor bedroom/home office.
Their home has another two bedrooms and ¾ bath on the first floor, plus a beautiful master bedroom and ¾ bath on the second floor which they’ve been using for years.
Looking into the future they began to consider aging in place: What living on one floor might look like. They determined that the only thing that needed attention was the first-floor bath – it was pretty dated. So, they built their dream bath. They began with tearing everything out, right down to the studs.
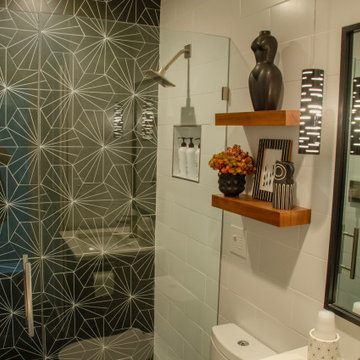
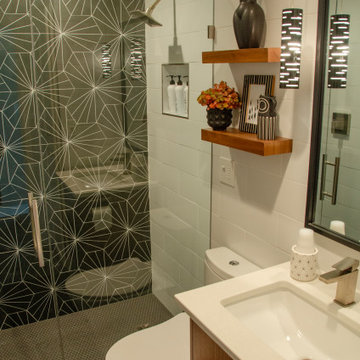
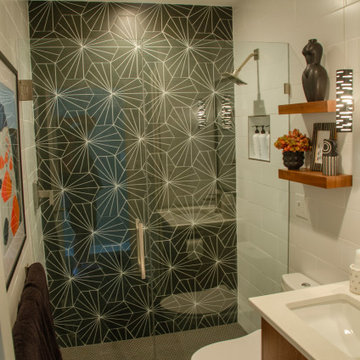
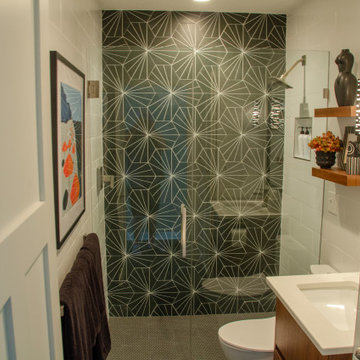
The new 5’ X 9’ ¾ bath includes a 5’ X 3’ walk-in glass enclosed shower, with a twist. The shower control has been moved from the typical location (just below the shower head) to the opposite wall, just inside the shower door. This allows one to turn on the shower and wait for it to get hot without having to step into the shower and then just stand there and get wet with cold water. A small detail that has proven to be a good idea.
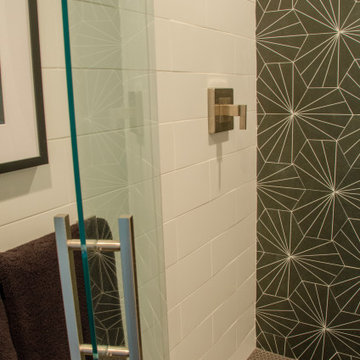
The shower floor is made using 3/4" x 3/4" Penny round matte Porcelain mosaic tile set in charcoal grout. The back shower wall and the remaining bathroom floor is constructed with Aster 9" x 10" hexagon glazed Porcelain patterned wall & floor tile. Hexagonal tile adds an unusual feature that establishes a unique, interesting, repeated design.
The main bath’s walls feature white matt finish 6" x 18" ceramic Subway Wall tile in white grout.
A TOTO center flushing toilet looks great on the dark hexagonal floor tile.
The custom vanity features a walnut base with white Silestone top and undermounted Kohler sink with brushed nickel fixtures.
Another interesting feature are two 3” X 6” X 18” floating Walnut shelves – just the right touch to add character to the bath without taking up too much space.
Finally, the dimmable can lighting is enhanced with two black cylinder slotted pendant lights on either side of the vanity.
This project fulfills the promise of down-the-road one floor living with an efficient, comfortable ¾ bath.

Sponsored
Columbus, OH

Hope Restoration & General Contracting
Columbus Design-Build, Kitchen & Bath Remodeling, Historic Renovations
 Mayflower Construction Group
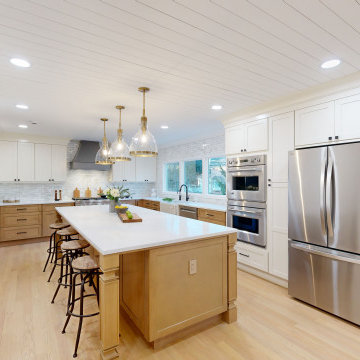
How Planning Leads to Successful Construction
Construction projects, whether small residential jobs or large commercial builds, require more than just skilled labor and high-quality materials. The foundation of a successful project lies in effective planning. Proper planning ensures efficiency, minimizes risks, and keeps the project within budget and on schedule. Here’s how thorough planning leads to successful construction:
1. Clear Project Scope and Objectives
Defining the project scope early on helps prevent scope creep and miscommunication. Establishing clear goals, deliverables, and timelines ensures that everyone involved understands the expectations. This prevents delays and unnecessary changes during construction.
2. Accurate Budgeting and Cost Control
A well-planned project includes a detailed cost estimation. This accounts for labor, materials, permits, and unexpected contingencies. Without proper budgeting, costs can spiral out of control, leading to financial strain and potential project failure.
3. Efficient Resource Management
Proper planning helps allocate resources effectively, including manpower, equipment, and materials. Scheduling workers and ordering materials at the right time avoids delays caused by shortages or logistical issues.
4. Risk Identification and Mitigation
Every construction project comes with risks—weather delays, supply chain issues, safety hazards, or regulatory compliance concerns. Planning ahead allows for risk assessment and the implementation of strategies to mitigate potential problems before they occur.
5. Compliance with Regulations and Permits
Failing to secure the necessary permits or adhere to building codes can halt a project indefinitely. Planning ensures that all legal requirements are met in advance, avoiding costly fines and legal complications.
6. Seamless Communication and Coordination
A structured plan includes clear communication protocols between contractors, architects, engineers, and clients. When everyone is on the same page, mistakes are reduced, and the workflow remains smooth.
7. Improved Project Scheduling
A construction schedule outlines each phase of the project, from site preparation to finishing touches. A well-planned schedule helps keep tasks on track, prevents unnecessary delays, and ensures timely project completion.
8. Higher Quality Workmanship
Planning allows for a structured approach to quality control. By setting benchmarks, conducting inspections, and using the right materials, projects meet industry standards and client expectations.
9. Better Client Satisfaction
When a project is completed on time, within budget, and meets quality expectations, client satisfaction increases. A satisfied client is more likely to recommend your services and return for future projects.
Conclusion
In construction, planning isn’t just a step—it’s the backbone of success. From budgeting and resource management to compliance and scheduling, thorough planning prevents costly errors, improves efficiency, and ensures a high-quality outcome. Whether you're working on a small driveway installation or a large-scale commercial project, investing time in planning will always pay off in the long run.
Do you need expert concrete construction services that prioritize planning and quality? Contact us today!

 Jacobson Construction
A few years ago, the owners added two stories with finished basement to their Edina home. It was a big project that greatly expanded and enhanced the first-floor kitchen, dining room and living room. The project also added a second-floor bedroom/home office.
Their home has another two bedrooms and ¾ bath on the first floor, plus a beautiful master bedroom and ¾ bath on the second floor which they’ve been using for years.
Looking into the future they began to consider aging in place: What living on one floor might look like. They determined that the only thing that needed attention was the first-floor bath – it was pretty dated. So, they built their dream bath. They began with tearing everything out, right down to the studs.
The new 5’ X 9’ ¾ bath includes a 5’ X 3’ walk-in glass enclosed shower, with a twist. The shower control has been moved from the typical location (just below the shower head) to the opposite wall, just inside the shower door. This allows one to turn on the shower and wait for it to get hot without having to step into the shower and then just stand there and get wet with cold water. A small detail that has proven to be a good idea.
The shower floor is made using 3/4" x 3/4" Penny round matte Porcelain mosaic tile set in charcoal grout. The back shower wall and the remaining bathroom floor is constructed with Aster 9" x 10" hexagon glazed Porcelain patterned wall & floor tile. Hexagonal tile adds an unusual feature that establishes a unique, interesting, repeated design.
The main bath’s walls feature white matt finish 6" x 18" ceramic Subway Wall tile in white grout.
A TOTO center flushing toilet looks great on the dark hexagonal floor tile.
The custom vanity features a walnut base with white Silestone top and undermounted Kohler sink with brushed nickel fixtures.
Another interesting feature are two 3” X 6” X 18” floating Walnut shelves – just the right touch to add character to the bath without taking up too much space.
Finally, the dimmable can lighting is enhanced with two black cylinder slotted pendant lights on either side of the vanity.
This project fulfills the promise of down-the-road one floor living with an efficient, comfortable ¾ bath.
 Timberline Patio Covers
This Kirkland, Washington outdoor living project was thoughtfully designed to create a clean, modern space while also planning ahead for future upgrades. The new deck features TimberTech Legacy decking in Whitewash Cedar, bringing a warm, natural wood look with the durability of composite materials. A custom pattern on the upper deck adds visual interest and elevates the overall design.
The staircase is finished with a picture-framed border and notched fascia, creating a seamless and polished transition between levels. To enhance both safety and aesthetics, we installed TimberTech Impression railing with sleek black framing and glass infill, preserving open views while maintaining a contemporary feel. Two custom gates were also integrated for functionality and accessibility.
Below the deck, a full undercover system was installed using white smooth panels and a vinyl gutter system, transforming the space into a dry, usable area year-round. This not only expands the homeowner’s living space but also protects the structure from moisture.
A key feature of this project is the forward-thinking infrastructure. The deck was framed to accommodate a future outdoor kitchen and fire feature, with gas and electrical rough-ins already in place. This allows the homeowner to easily expand their outdoor space without major reconstruction down the line.
From structural planning to finishing details, this project blends modern design, durability, and long-term functionality, creating an outdoor environment that’s ready to enjoy today and built for tomorrow.

 Jacobson Construction
A few years ago, the owners added two stories with finished basement to their Edina home. It was a big project that greatly expanded and enhanced the first-floor kitchen, dining room and living room. The project also added a second-floor bedroom/home office.
Their home has another two bedrooms and ¾ bath on the first floor, plus a beautiful master bedroom and ¾ bath on the second floor which they’ve been using for years.
Looking into the future they began to consider aging in place: What living on one floor might look like. They determined that the only thing that needed attention was the first-floor bath – it was pretty dated. So, they built their dream bath. They began with tearing everything out, right down to the studs.
The new 5’ X 9’ ¾ bath includes a 5’ X 3’ walk-in glass enclosed shower, with a twist. The shower control has been moved from the typical location (just below the shower head) to the opposite wall, just inside the shower door. This allows one to turn on the shower and wait for it to get hot without having to step into the shower and then just stand there and get wet with cold water. A small detail that has proven to be a good idea.
The shower floor is made using 3/4" x 3/4" Penny round matte Porcelain mosaic tile set in charcoal grout. The back shower wall and the remaining bathroom floor is constructed with Aster 9" x 10" hexagon glazed Porcelain patterned wall & floor tile. Hexagonal tile adds an unusual feature that establishes a unique, interesting, repeated design.
The main bath’s walls feature white matt finish 6" x 18" ceramic Subway Wall tile in white grout.
A TOTO center flushing toilet looks great on the dark hexagonal floor tile.
The custom vanity features a walnut base with white Silestone top and undermounted Kohler sink with brushed nickel fixtures.
Another interesting feature are two 3” X 6” X 18” floating Walnut shelves – just the right touch to add character to the bath without taking up too much space.
Finally, the dimmable can lighting is enhanced with two black cylinder slotted pendant lights on either side of the vanity.
This project fulfills the promise of down-the-road one floor living with an efficient, comfortable ¾ bath.
 Jacobson Construction
A few years ago, the owners added two stories with finished basement to their Edina home. It was a big project that greatly expanded and enhanced the first-floor kitchen, dining room and living room. The project also added a second-floor bedroom/home office.
Their home has another two bedrooms and ¾ bath on the first floor, plus a beautiful master bedroom and ¾ bath on the second floor which they’ve been using for years.
Looking into the future they began to consider aging in place: What living on one floor might look like. They determined that the only thing that needed attention was the first-floor bath – it was pretty dated. So, they built their dream bath. They began with tearing everything out, right down to the studs.
The new 5’ X 9’ ¾ bath includes a 5’ X 3’ walk-in glass enclosed shower, with a twist. The shower control has been moved from the typical location (just below the shower head) to the opposite wall, just inside the shower door. This allows one to turn on the shower and wait for it to get hot without having to step into the shower and then just stand there and get wet with cold water. A small detail that has proven to be a good idea.
The shower floor is made using 3/4" x 3/4" Penny round matte Porcelain mosaic tile set in charcoal grout. The back shower wall and the remaining bathroom floor is constructed with Aster 9" x 10" hexagon glazed Porcelain patterned wall & floor tile. Hexagonal tile adds an unusual feature that establishes a unique, interesting, repeated design.
The main bath’s walls feature white matt finish 6" x 18" ceramic Subway Wall tile in white grout.
A TOTO center flushing toilet looks great on the dark hexagonal floor tile.
The custom vanity features a walnut base with white Silestone top and undermounted Kohler sink with brushed nickel fixtures.
Another interesting feature are two 3” X 6” X 18” floating Walnut shelves – just the right touch to add character to the bath without taking up too much space.
Finally, the dimmable can lighting is enhanced with two black cylinder slotted pendant lights on either side of the vanity.
This project fulfills the promise of down-the-road one floor living with an efficient, comfortable ¾ bath.
 Jacobson Construction
A few years ago, the owners added two stories with finished basement to their Edina home. It was a big project that greatly expanded and enhanced the first-floor kitchen, dining room and living room. The project also added a second-floor bedroom/home office.
Their home has another two bedrooms and ¾ bath on the first floor, plus a beautiful master bedroom and ¾ bath on the second floor which they’ve been using for years.
Looking into the future they began to consider aging in place: What living on one floor might look like. They determined that the only thing that needed attention was the first-floor bath – it was pretty dated. So, they built their dream bath. They began with tearing everything out, right down to the studs.
The new 5’ X 9’ ¾ bath includes a 5’ X 3’ walk-in glass enclosed shower, with a twist. The shower control has been moved from the typical location (just below the shower head) to the opposite wall, just inside the shower door. This allows one to turn on the shower and wait for it to get hot without having to step into the shower and then just stand there and get wet with cold water. A small detail that has proven to be a good idea.
The shower floor is made using 3/4" x 3/4" Penny round matte Porcelain mosaic tile set in charcoal grout. The back shower wall and the remaining bathroom floor is constructed with Aster 9" x 10" hexagon glazed Porcelain patterned wall & floor tile. Hexagonal tile adds an unusual feature that establishes a unique, interesting, repeated design.
The main bath’s walls feature white matt finish 6" x 18" ceramic Subway Wall tile in white grout.
A TOTO center flushing toilet looks great on the dark hexagonal floor tile.
The custom vanity features a walnut base with white Silestone top and undermounted Kohler sink with brushed nickel fixtures.
Another interesting feature are two 3” X 6” X 18” floating Walnut shelves – just the right touch to add character to the bath without taking up too much space.
Finally, the dimmable can lighting is enhanced with two black cylinder slotted pendant lights on either side of the vanity.
This project fulfills the promise of down-the-road one floor living with an efficient, comfortable ¾ bath.
9