
Search results for "Prepare process" in Home Design Ideas
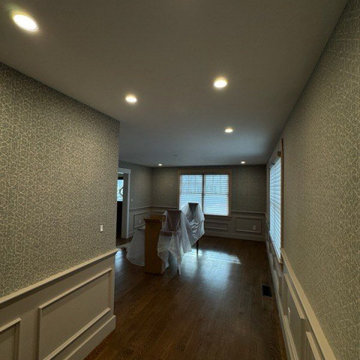
 Wallpaper Installation by Alex
This project illustrates a living room in Lancaster where professional wallpaper installation brought a fresh and stylish look to the space. As a dedicated wallpaper installer, my focus was on achieving a smooth and precise application of the chosen wallcovering, enhancing the room's overall appeal. The process involved thorough wall preparation and expert wallpapering techniques, resulting in a beautifully finished living room for the residents of Lancaster
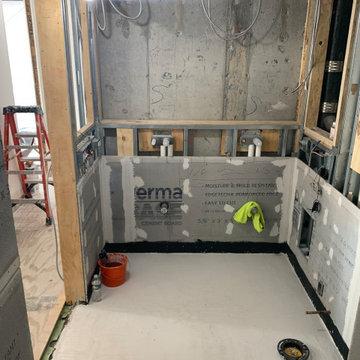
 Top10renovation
This bathroom remodeling project in Queens demonstrates our professional renovation process and construction expertise. Our team completed structural preparation, waterproofing, plumbing installation, and tile layout work to transform the space into a modern and functional bathroom. We focused on precision and high-quality craftsmanship throughout every phase of the renovation. The project was designed to support a sleek contemporary finish while ensuring durability, comfort, and efficient use of the available space.

 Advance Design Studio, Ltd.
Jennifer and Dan have lived in their Deer Park Illinois home for 15 years, slowly making minor fixes like painting and decorating; but they had a new plan for their kitchen the entire time. An awkwardly placed garage door, and an island cooktop with a terrible downdraft made a full-scale kitchen remodel an absolute must. Jennifer had many ideas in mind and wanted to work with a company that could provide high-end work, while partnering with a designer that would tailor the kitchen to her ideas.
She was intrigued by the phrase “Common Sense Remodeling” in Advance Design’s feature she discovered while perusing an issue of the community’s Quintessential Barrington Magazine. Doing further research on the company’s website, as she looked through project profiles and read about Advance Design’s “Common Sense Remodeling” philosophy, she promptly scheduled an appointment to see if the people and ideas she read about were truly who they said they were. The more she read, the more she knew that the “Common Sense” approach to remodeling they described was exactly the type of company she was looking for.
The partnership was sealed after an initial consultation with Owner Todd Jurs and Project Designer Michelle Lecinski. They displayed a combination of friendliness, professionalism and respect that was unmatched by any of the other companies Jennifer talked to. She knew that with Advance Design, she would be able to retain the vision that she had in mind with high-quality craftsmanship.
“I reached out to Advance Design because of the ‘Common Sense Remodeling’ tagline,” Jennifer said. “That’s what lingered for me”. “Advance Design was the most respectful- of the house and of my design ideas, and the most professional of the handful of companies that looked at my project”.
Soon after the meeting Jennifer began working with Michelle on the project design. They quickly developed chemistry. Jennifer loved how Michelle researched and located every detail that Jennifer wanted for the kitchen. Between the two of them, every concept and idea was worked through and perfected. “Jennifer had definite ideas about what she wanted the new kitchen to look like, she just didn’t know how to bring it all together. We worked together really well to make her ideas into the practical reality necessary for a well-functioning kitchen, with the look and feel that she had envisioned”, says Michelle.
“Michelle was wonderful in using the CAD system she would show me new drawings every time we changed the layout while working through the design,” Jennifer said. “She was a really wonderful partner in execution, she made sure everything happened quickly and easily.”
The finished design drew out elements of Jennifer’s style and personality. The pair call the look “sophisticated farmhouse” to describe the kitchen renovation to family and friends. The result was a beautifully crafted, authentic-feeling space that satisfied Jennifer’s dreams 15 years in the making. The whole project consisted of a kitchen remodel, mudroom upgrade with powder room, and garage entry relocation. “The projects I personally like the best, are the ones that put the client’s dreams on display,” Project Designer Michelle said. “And this is one of those projects.”
The main focal point of the kitchen is custom zinc and brass ventilation hood with a vintage sheen, which was hand made to order by a small company in Indiana named Vogler Metalworking. “It’s like sculpture, a true work of art”, says Jennifer. Your eye is immediately drawn towards this elegant yet practical hood that eliminated the home’s downdraft problem and added a striking conversation piece at the same time. The carpenters had to use special gloves when transporting and installing it, so they didn’t smudge it with fingerprints. The beautiful hood centers proudly over the stunning black enamel and brass LaCornue Range. “I had a friend who had a LaCornue range and after learning how easy it was to cook perfect meals, I was convinced I wanted to have one”, says Jennifer. This unique, breathtaking combination anchors the entire kitchen and is apparent immediately as you walk into the great room the surrounds the space.
DuraSupreme Crestwood cabinets with a Kendall Panel add function and sophistication. A custom gray paint color paired with a storm blue was developed so that the new kitchen looked like it belonged to the existing space. Unlacquered brass faucets and hardware were important to Jennifer because she wanted the living finishes to age over time. Remarkable brass diamond mesh cabinet door inserts imported from the UK continue to add this one-of-a-kind kitchen renovation; giving it a “you won’t see this everywhere” quality. The use of old railcar flooring for the coffee bar countertop and reclaimed oak for the open shelving gives an authenticity to the space uncommon in kitchens today.
Jennifer and Michelle fell in love with the Limestone Grey Stone while they were investigating unique island countertop ideas. They liked the fact that the limestone as a living finish will age and change over time. Calcutta Miel Quartz countertops made for an excellent pairing around the perimeter, as it’s durable and perfect for cooking preparations. A textured white subway tile backsplash that runs to the ceiling keeps your eye moving towards the open shelving, and to the main focal point of the stunning range hood combination.
“The kitchen functions beautifully, and it’s gorgeous,” beams Jennifer as she gestures with both hands while smiling ear to ear. “The most important thing was I wanted a kitchen that had a wonderful flow, cooked beautiful meals and was a great gathering place for family and friends, and this space does that perfectly! Beauty wise, it turned out exactly how I had envisioned. I felt the function part was the hardest part, and that was nailed”!
Relocating the garage entry to the new mudroom was a huge priority and has finally separated the family’s arriving home functions from their kitchen. Now coats and shoes and bags have their own area for dropping once members arrive home. Matching gray DuraSupreme cabinetry helped create gorgeous, purposeful lockers for the family. A reclaimed vintage sink and custom wall paper were added to the tiny powder room to beautify the once previously only functional space. Advance Design was even able to create a custom space for their dog to sleep while the family is away.
“It was unbelievable that a project of this size was completed in such a short time, and I think that’s because of the large amount of planning and preparation that went into it,” Jennifer marveled, “When we started, we were ready, and everything was prepared”.
When it came to execution, Project Manager Justin Davis and his crew were quick, accessible, and organized. Projects like this kitchen are typically completed in as little as 8-10 weeks. Jennifer’s kitchen however despite the relocation of some challenging HVAC in a soffit and moving of an exterior door was completed remarkably fast in part because the team was working with an existing tile floor that ran throughout the first floor that the client really loved.
“You get to know these people really well because they’re living in your house while you’re living in your house. They were so fast and really good, it didn’t take as long as even planned” reported Jennifer. “I would text Justin and he always responded almost immediately. I got to know all the guys who were working in our house and they were all wonderful people”.
Details in a customized kitchen like this one require skill and care from the people who install it. “All the guys on the job were skilled at what the did. I wanted small details like little feet to look like furniture, that is where their carpentry skill came in to make these all perfect”, said Jennifer. “The tile guys were wonderful. They even let me determine how I wanted the texture with the grout to appear for a salt and pepper look; now that is a very skilled trade person making it custom”.
In Jennifer’s interview, she continued to reference Advance Design’s “Common Sense Remodeling”, so I took a minute to ask her exactly what that phrase meant to her and how it played out in her experience with her project and the Advance Design team. Here is what she said: “I was intrigued about Common Sense Remodeling and in my head that there would be clear costs and prices, great communication between the design team, the execution team and me”, said Jennifer. They did deliver on that, it was so clear about the cost breakdown, what I could expect from everyone who came to my house, and everything that we had ordered. That to me is the Common Sense”!
It’s great to see a client take literally our assertion that a well-planned remodeling project is simply “Common Sense”! She anticipated each step of the way would be clear, concise, and predictable, all the while protecting the outcome due to the careful upfront planning. “Advance Design delivered on their ‘Common Sense Remodeling’ promise,” Jennifer said. “From the design team, to the execution team - everything was straight forward like I imagined. The project turned out exactly how I envisioned, I enjoyed this process and absolutely would recommend Advance Design Studio to anyone.”
Find the right local pro for your project
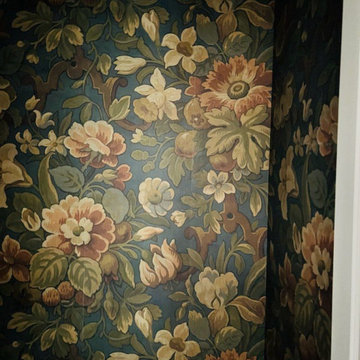
 Titan Hangers Wallpaper
This project showcases a living room in Littleton where professional wallpaper installation enhanced the interior design. As a skilled wallpaper installer, I focused on a meticulous application of the wallcovering to create a seamless and attractive finish. The process involved careful wall preparation and expert wallpapering, resulting in a beautifully transformed living space for the Littleton homeowners.
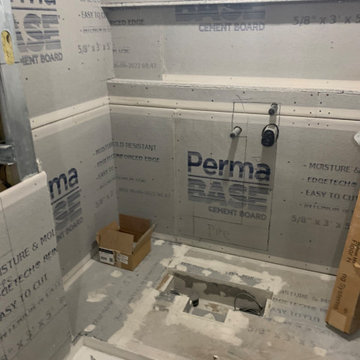 Top10renovation
This custom bathroom construction project in Queens showcases our attention to detail during every stage of the renovation process. We completed framing, waterproofing, tile preparation, plumbing coordination, and flooring installation to create a durable and modern bathroom structure. The project was carefully managed to ensure quality workmanship and efficient space planning. Our team focused on building a strong foundation for a luxury bathroom design that combines functionality, comfort, and contemporary aesthetics.

 Envision Web
Stuart Wade, Envision Virtual Tours
Bobcat Lodge- Lake Rabun
Be welcomed to this perfect mountain/lake lodge through stone pillars down a driveway of stamped concrete and brick paver patterns to the porte cochere. The design philosophy seen in the home's exterior extends to the interior with 10 fireplaces, the finest materials, and extraordinary craftsmanship.
Great Room
Enter the striking foyer with the antique heart pine, walnut and bird's-eye maple inlaid pattern that harmonizes with the natural unity of the spacious great room. The visually anchored stone fireplace accented by hand hewn circa 1800 oak beams silhouettes the soft lake views making a dynamic design statement. The great room was designed with togetherness in mind and features high vaulted ceilings, wormy oak flooring with walnut borders, a spacious dining area, a gourmet kitchen and for softer and more intimate moments a keeping room.
Kitchen:
Wormy chestnut cabinets,
Complimenting South American granite countertops
Wolf cooktop, double oven
Preparation bar
Serving Buffet
Separate wet bar
Walk-in Pantry
Laundry Room: entrance off the foyer, wormy chestnut cabinets and South American granite
Keeping Room: Nestled off the kitchen area intimately scaled for quieter moments, wormy chestnut ceilings with hand hewn oak beams from Ohio and Pennsylvania, wormy oak flooring accented with walnut and sycamore, and private fireplace
Powder Room off foyer
Three Master Bedroom Suites: each with its own unique full bathroom and private alcove with masonry wood burning fireplace
Master suite on the main floor with full bath enlivened by a fish theme with earthtones and blue accents, a copper soaking tub, large shower and copper sinks
Upstairs master suite with wormy oak flooring sits snug above the lake looking through a tree canopy as from a tree house facilitating a peaceful, tranquil atmosphere- full bath features jetted tub, separate shower, large closet, and friendly lizards sitting on copper sinks
Terrace Level Master Suite offers trey ceilings, entrance to stone terrace supported by cyprus tree trunks giving the feel of a rainforest floor: Full bath includes double mosaic-raised copper sinks, antler lighting, jetted tub accented with aquatic life tiles and separate water closet
This warm and inviting rustic interior perfectly balances the outdoor lake vistas with the comfort of indoor living.moving directly to the outdoor living spaces. A full length deck supported by cyprus trees offers the opportunity for serious entertaining. The stone terrace off the downstairs family room leads directly to the two stall boathouse for lakeside entertaining with its own private fireplace.
Terrace Level:
14 foot ceilings, transom windows
A master suite
A guest room with trey ceilings, wool carpet, and full bath with copper sinks,double vanity and riverock shower
Family room with focal stone fireplace, wet bar with wine cooler, separate kitchen with sink, mini refrigerator and built in microwave
Wine closet with hand painted plaster finish
A full bath for drippy swimmers with oversized river rock shower accented with crayfish and salamander tiles
Extras
All windows are Loewen windows
A ridge vent system
Custom design closets
Poured foundation for house and boathouse
European spruce framing
Exterior siding: 1 x 12 pressure treated pine with 1 x 4 batten strips
Siding has three coat process of Sikkens stain finish
Ten masonry fireplaces
Stacked rock from Rocky Gap Virginia
Eight foot custom Honduran Pine
True plaster walls with three coat process faux finish
Locust hand rails for the deck
Support cyprus tree trunks from Charleston
Outside light fixtures custom made in NY
Five hot water heaters, circulating pump
Duel fuel heat pump/propane, 1000 gallon buried propane tank, four zone heating system
Two laundry rooms
All Fireplaces set up for flat screen TV's
Adjacent lot available for purchase

 Royal Renovations
Family room - mid-sized traditional open concept dark wood floor and brown floor family room idea in Dallas with yellow walls, a standard fireplace, a stone fireplace and no tv

 Manomin Resawn Timbers
Reclaimed wood box beams bring warmth and antique character to the ceiling of this contemporary wine cellar, their naturally weathered tones softening the sleek lines of a modern wine room lined floor to ceiling with bottle storage. It is an unexpected application that works beautifully, the aged patina and honest grain of these antique timbers adding a sense of depth and history to a space designed around some of the finest things in life. Sourced from 19th and early 20th century structures, these box beams carry more than a century of natural character that no manufactured material can replicate. Through our process of denailing, kiln drying, and precision milling, Manomin Resawn Timbers prepares these antique timbers for any application, expected or not.
Whether you are a homebuilder, a home remodeling contractor, or a homeowner looking to add reclaimed wood box beams to a wine cellar or specialty room, Manomin Resawn Timbers has been helping people discover the antique charm of reclaimed wood since 2002. We ship nationwide and are happy to help you find the right pieces from anywhere in the country. Visit our showroom in Hugo, MN or reach out to us with a call or a message to get started.

 Carey's Custom Woodworking, Inc
Custom laundry room cabinetry.
Mid-sized transitional galley beige floor and ceramic tile dedicated laundry room photo in Portland with a farmhouse sink, shaker cabinets, dark wood cabinets, beige walls, a side-by-side washer/dryer and white countertops
Mid-sized transitional galley beige floor and ceramic tile dedicated laundry room photo in Portland with a farmhouse sink, shaker cabinets, dark wood cabinets, beige walls, a side-by-side washer/dryer and white countertops

 Baine Contracting, Inc.
This unique style kitchen remodel called for all new cabinets, floors, tile, appliances and fixtures. The home owner wanted a great space to do both entertain and prepare meals. After a smooth design process, we were able to provide just that and they could not be happier!
 Manomin Resawn Timbers
This striking modern bathroom features a dark freestanding soaking tub, a mosaic tile accent wall, and a wall of windows overlooking the trees outside. A Reclaimed Wood Sliding Barn Door with a metal hardware kit and ring pull frames the entrance, adding rustic texture and character against the sleek, contemporary finishes within.
Every piece of reclaimed wood at Manomin Resawn Timbers is salvaged from 19th and early 20th century barns, factories, and warehouses, structures built during the Industrial Revolution from old growth hardwoods that grew slower and denser than the trees available today. Through our detailed process of denailing, kiln drying, and precision milling, that history is preserved and prepared for a new life in modern homes.
Whether you are a homebuilder, a home remodeling contractor, a homeowner, or a designer planning a space like this one, Manomin Resawn Timbers has reclaimed wood sliding barn doors to fit your vision. Visit our showroom in Hugo, MN or reach out to us with a call or a message to discover the antique charm of reclaimed wood.
 Advance Design Studio, Ltd.
Jennifer and Dan have lived in their Deer Park Illinois home for 15 years, slowly making minor fixes like painting and decorating; but they had a new plan for their kitchen the entire time. An awkwardly placed garage door, and an island cooktop with a terrible downdraft made a full-scale kitchen remodel an absolute must. Jennifer had many ideas in mind and wanted to work with a company that could provide high-end work, while partnering with a designer that would tailor the kitchen to her ideas.
She was intrigued by the phrase “Common Sense Remodeling” in Advance Design’s feature she discovered while perusing an issue of the community’s Quintessential Barrington Magazine. Doing further research on the company’s website, as she looked through project profiles and read about Advance Design’s “Common Sense Remodeling” philosophy, she promptly scheduled an appointment to see if the people and ideas she read about were truly who they said they were. The more she read, the more she knew that the “Common Sense” approach to remodeling they described was exactly the type of company she was looking for.
The partnership was sealed after an initial consultation with Owner Todd Jurs and Project Designer Michelle Lecinski. They displayed a combination of friendliness, professionalism and respect that was unmatched by any of the other companies Jennifer talked to. She knew that with Advance Design, she would be able to retain the vision that she had in mind with high-quality craftsmanship.
“I reached out to Advance Design because of the ‘Common Sense Remodeling’ tagline,” Jennifer said. “That’s what lingered for me”. “Advance Design was the most respectful- of the house and of my design ideas, and the most professional of the handful of companies that looked at my project”.
Soon after the meeting Jennifer began working with Michelle on the project design. They quickly developed chemistry. Jennifer loved how Michelle researched and located every detail that Jennifer wanted for the kitchen. Between the two of them, every concept and idea was worked through and perfected. “Jennifer had definite ideas about what she wanted the new kitchen to look like, she just didn’t know how to bring it all together. We worked together really well to make her ideas into the practical reality necessary for a well-functioning kitchen, with the look and feel that she had envisioned”, says Michelle.
“Michelle was wonderful in using the CAD system she would show me new drawings every time we changed the layout while working through the design,” Jennifer said. “She was a really wonderful partner in execution, she made sure everything happened quickly and easily.”
The finished design drew out elements of Jennifer’s style and personality. The pair call the look “sophisticated farmhouse” to describe the kitchen renovation to family and friends. The result was a beautifully crafted, authentic-feeling space that satisfied Jennifer’s dreams 15 years in the making. The whole project consisted of a kitchen remodel, mudroom upgrade with powder room, and garage entry relocation. “The projects I personally like the best, are the ones that put the client’s dreams on display,” Project Designer Michelle said. “And this is one of those projects.”
The main focal point of the kitchen is custom zinc and brass ventilation hood with a vintage sheen, which was hand made to order by a small company in Indiana named Vogler Metalworking. “It’s like sculpture, a true work of art”, says Jennifer. Your eye is immediately drawn towards this elegant yet practical hood that eliminated the home’s downdraft problem and added a striking conversation piece at the same time. The carpenters had to use special gloves when transporting and installing it, so they didn’t smudge it with fingerprints. The beautiful hood centers proudly over the stunning black enamel and brass LaCornue Range. “I had a friend who had a LaCornue range and after learning how easy it was to cook perfect meals, I was convinced I wanted to have one”, says Jennifer. This unique, breathtaking combination anchors the entire kitchen and is apparent immediately as you walk into the great room the surrounds the space.
DuraSupreme Crestwood cabinets with a Kendall Panel add function and sophistication. A custom gray paint color paired with a storm blue was developed so that the new kitchen looked like it belonged to the existing space. Unlacquered brass faucets and hardware were important to Jennifer because she wanted the living finishes to age over time. Remarkable brass diamond mesh cabinet door inserts imported from the UK continue to add this one-of-a-kind kitchen renovation; giving it a “you won’t see this everywhere” quality. The use of old railcar flooring for the coffee bar countertop and reclaimed oak for the open shelving gives an authenticity to the space uncommon in kitchens today.
Jennifer and Michelle fell in love with the Limestone Grey Stone while they were investigating unique island countertop ideas. They liked the fact that the limestone as a living finish will age and change over time. Calcutta Miel Quartz countertops made for an excellent pairing around the perimeter, as it’s durable and perfect for cooking preparations. A textured white subway tile backsplash that runs to the ceiling keeps your eye moving towards the open shelving, and to the main focal point of the stunning range hood combination.
“The kitchen functions beautifully, and it’s gorgeous,” beams Jennifer as she gestures with both hands while smiling ear to ear. “The most important thing was I wanted a kitchen that had a wonderful flow, cooked beautiful meals and was a great gathering place for family and friends, and this space does that perfectly! Beauty wise, it turned out exactly how I had envisioned. I felt the function part was the hardest part, and that was nailed”!
Relocating the garage entry to the new mudroom was a huge priority and has finally separated the family’s arriving home functions from their kitchen. Now coats and shoes and bags have their own area for dropping once members arrive home. Matching gray DuraSupreme cabinetry helped create gorgeous, purposeful lockers for the family. A reclaimed vintage sink and custom wall paper were added to the tiny powder room to beautify the once previously only functional space. Advance Design was even able to create a custom space for their dog to sleep while the family is away.
“It was unbelievable that a project of this size was completed in such a short time, and I think that’s because of the large amount of planning and preparation that went into it,” Jennifer marveled, “When we started, we were ready, and everything was prepared”.
When it came to execution, Project Manager Justin Davis and his crew were quick, accessible, and organized. Projects like this kitchen are typically completed in as little as 8-10 weeks. Jennifer’s kitchen however despite the relocation of some challenging HVAC in a soffit and moving of an exterior door was completed remarkably fast in part because the team was working with an existing tile floor that ran throughout the first floor that the client really loved.
“You get to know these people really well because they’re living in your house while you’re living in your house. They were so fast and really good, it didn’t take as long as even planned” reported Jennifer. “I would text Justin and he always responded almost immediately. I got to know all the guys who were working in our house and they were all wonderful people”.
Details in a customized kitchen like this one require skill and care from the people who install it. “All the guys on the job were skilled at what the did. I wanted small details like little feet to look like furniture, that is where their carpentry skill came in to make these all perfect”, said Jennifer. “The tile guys were wonderful. They even let me determine how I wanted the texture with the grout to appear for a salt and pepper look; now that is a very skilled trade person making it custom”.
In Jennifer’s interview, she continued to reference Advance Design’s “Common Sense Remodeling”, so I took a minute to ask her exactly what that phrase meant to her and how it played out in her experience with her project and the Advance Design team. Here is what she said: “I was intrigued about Common Sense Remodeling and in my head that there would be clear costs and prices, great communication between the design team, the execution team and me”, said Jennifer. They did deliver on that, it was so clear about the cost breakdown, what I could expect from everyone who came to my house, and everything that we had ordered. That to me is the Common Sense”!
It’s great to see a client take literally our assertion that a well-planned remodeling project is simply “Common Sense”! She anticipated each step of the way would be clear, concise, and predictable, all the while protecting the outcome due to the careful upfront planning. “Advance Design delivered on their ‘Common Sense Remodeling’ promise,” Jennifer said. “From the design team, to the execution team - everything was straight forward like I imagined. The project turned out exactly how I envisioned, I enjoyed this process and absolutely would recommend Advance Design Studio to anyone.”

 Built Tough Construction of North Georgia
The project includes a 21 feet wide by 20 feet deep two-story addition at the rear of the home. The new first floor family room has a wall of windows that overlooks Lake Lanier in Cumming, GA. The high cathedral ceiling and shed dormers enhance the depth of the new space. The Client was provided Professional 3D Renderings that we prepared to fully convey the design intent. A new wood deck was designed which is accessible from the new family room. The lower level includes a new guest bedroom and renovations to an existing bedroom. The construction process is underway. Completion photographs coming soon.


 Top10renovation
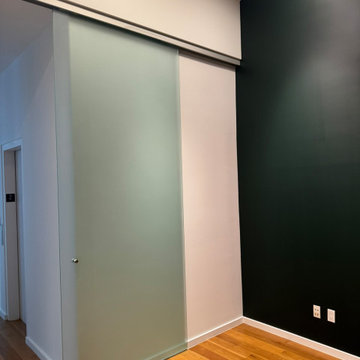
Painting work completed using Benjamin Moore products to achieve a smooth, high-quality finish. The process included proper surface preparation, clean edging, and even application for a flawless result. Attention to detail ensured consistent coverage and a refined look, enhancing the overall appearance of the space while delivering durability and long-lasting performance.
 United Express Construction Inc.
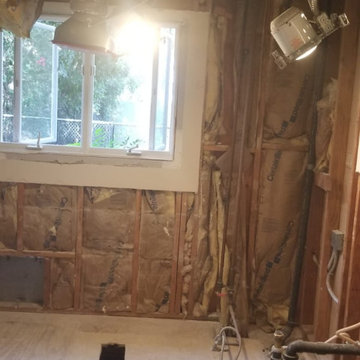
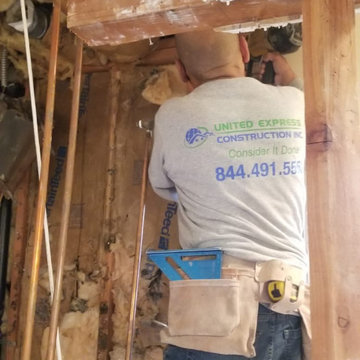
This image captures the bathroom remodel during the full demolition stage, where the space has been stripped down to the wall framing and subfloor in preparation for reconstruction. Existing drywall, insulation, and fixtures have been removed to allow for updated plumbing, electrical, and ventilation systems as part of the renovation process. The exposed structure reveals the extensive groundwork required to redesign the layout and create a more modern, functional bathroom. Natural light from the window highlights the open construction area, emphasizing the transformation from an outdated space into a custom luxury bathroom remodel.
 Lemon Remodeling & Services
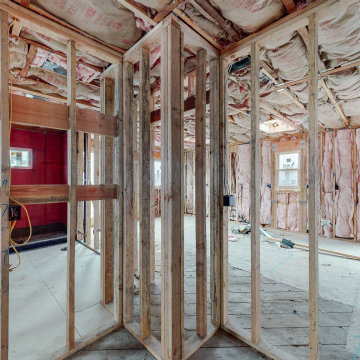
Explore Lemon Remodeling's comprehensive home construction project progress. Our team is currently handling site preparation and foundation pouring, finishing rough framing, and completing rough plumbing, electrical, and HVAC installations. We're presently in the insulation installation phase! Stay tuned for upcoming updates on this remarkable full home building and remodeling journey.
At Lemon Remodeling, we provide end-to-end support for your projects, including navigating the permit process, selecting finishing materials, designing your dream kitchen, or any other remodeling projects you have in mind. For a complimentary estimate or to schedule a convenient call, please don't hesitate to contact us via Calendly.com/lemonremodeling or simply give us a call now! ??✨
 American Classic Painters
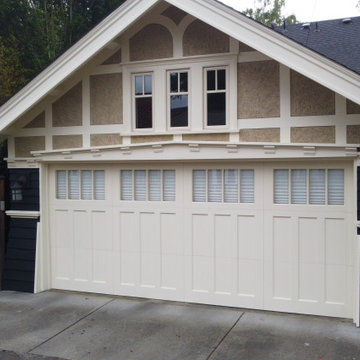
We updated this Seattle house with a deep gray exterior and white rails and window frames. This color scheme is a favorite for its sleek and sophisticated appearance. Our team expertly managed the entire painting process, from surface prep to the final touch. The result is a beautiful home that stands out and is well-protected against Seattle’s rainy climate.
 United Express Construction Inc.
This image highlights the structural and rough construction phase of the bathroom remodel, where the space has been opened to the framing for major system upgrades and layout improvements. A contractor is performing detailed framing and utility work, preparing the bathroom for new plumbing, electrical, and finish installations. Exposed beams, wall studs, and rough-in components demonstrate the extensive behind-the-scenes craftsmanship required to create a durable and modern bathroom renovation. This stage is a critical part of the remodeling process, ensuring the foundation is properly built before the installation of custom finishes and luxury features.
 Windy City Painters
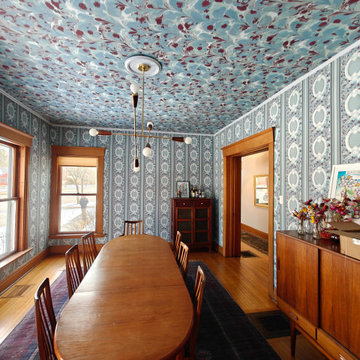
Professional wallpaper installation Chicago dining room showcases expert craftsmanship in this stunning transformation that perfectly complements the home's architectural character.
## Project Overview
This comprehensive wallpaper installation project involved both walls and ceiling application in a formal dining room within a vintage Chicago greystone. The intricate pattern required precise alignment and professional techniques to achieve seamless results that honor the home's historic charm while adding contemporary elegance.
## Materials and Products
We utilized premium wallpaper adhesive specifically formulated for Chicago's climate variations, along with professional-grade smoothing tools and precision cutting equipment. High-quality primer ensured optimal surface preparation for lasting adhesion across both vertical and horizontal applications.
## Installation Process
First, comprehensive surface preparation included removing existing materials and repairing any imperfections. Second, application of specialized primer designed for wallpaper adhesion. Third, precise measurement and cutting with careful attention to pattern alignment. Finally, professional installation with meticulous corner work and ceiling transitions.
## Chicago-Specific Challenges
Chicago homes present unique wallpaper installation challenges including settling foundations that affect wall surfaces, humidity fluctuations impacting adhesive performance, and older plaster surfaces requiring specialized preparation techniques. Additionally, vintage buildings often have irregular walls demanding expert adjustment skills.
## Results and Quality
The completed wallpaper installation creates a sophisticated dining environment that seamlessly integrates with the home's architectural character. Perfect pattern matching across walls and ceiling demonstrates the precision possible with professional installation techniques.
## Professional Tips
Before starting wallpaper installation, always test adhesion in inconspicuous areas first. Maintain consistent room temperature throughout the process. Choose quality materials designed for Chicago's climate. Plan pattern layout carefully to minimize waste and ensure optimal visual flow.
See more work and request free estimate at windypainters.com - Windy City Painters delivers exceptional results.
Q: How long does wallpaper installation take?
A: Professional wallpaper installation typically requires 1-2 days depending on room size, pattern complexity, and surface preparation needs.
Q: Can you install wallpaper on textured walls?
A: Yes, textured wall wallpaper installation requires proper surface preparation and specialized techniques for optimal adhesion results.
Q: Do you remove old wallpaper first?
A: Complete old wallpaper removal is essential before new wallpaper installation to ensure proper adhesion and smooth finish.
Q: What about ceiling wallpaper installation?
A: Ceiling wallpaper installation requires specialized equipment and techniques - Windy City Painters handles this expertly and safely.
Q: How do you ensure pattern matching?
A: Professional wallpaper installation includes precise measuring, cutting, and alignment techniques for seamless pattern matching throughout the space.
Q: Can wallpaper installation work in humid areas?
A: Proper wallpaper installation with quality adhesives designed for humidity variations ensures lasting results in Chicago's climate.
Q: What surfaces accept wallpaper installation?
A: Most properly prepared surfaces including drywall, plaster, and previously painted walls can accept professional wallpaper installation successfully.
Q: Do you handle corner installations?
A: Corner wallpaper installation requires specialized techniques for inside and outside corners - we ensure perfect alignment.
Q: What's included in the service?
A: Complete wallpaper installation service includes surface preparation, removal if needed, professional application, cleanup, and quality guarantee.
Q: How do you prepare surfaces?
A: Surface preparation for wallpaper installation includes cleaning, repairing imperfections, priming, and ensuring optimal conditions for adhesion.
9