
Search results for "Preventative care" in Home Design Ideas
 Willow Gates Landscaping
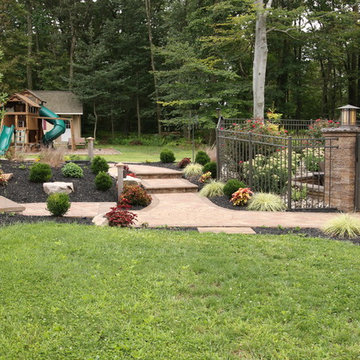
This backyard paradise began with a muddy site, with all the grading sloping directly to the proposed poolside patio. The design for this outdoor living area would need to incorporate many challenges:
* The grading issues would be corrected with retaining walls, which would create a warm yet expansive area and provide additional seating.
* The pillars would require careful notching to insert the hardware for the pool gate.
* The patio would need to incorporate stormwater storage underneath.
* The edge of the poolside patio would require stabilization to prevent future settlement adjacent to the concrete pool deck.
 ESI Builders & Remodelers
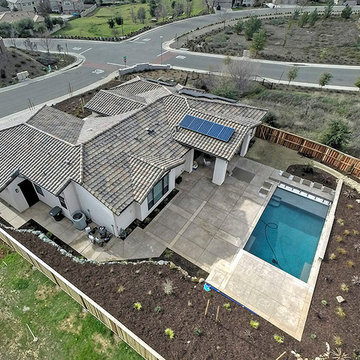
2,700sf, 4 bdrm, 3 bath with 260sf Loggia. Solar, High Efficiency HVAC and Insulation was used which provided huge rebates from the utility company, enhancing the ROI.
ESI Builders is a subsidiary of EnergyWise Solutions, Inc. and was formed by Allan, Bob and Dave to fulfill an important need for quality home builders and remodeling services in the Sacramento region. With a strong and growing referral base, we decided to provide a convenient one-stop option for our clients and focus on combining our key services: quality custom homes and remodels, turnkey client partnering and communication, and energy efficient and environmentally sustainable measures in all we do. Through energy efficient appliances and fixtures, solar power, high efficiency heating and cooling systems, enhanced insulation and sealing, and other construction elements – we go beyond simple code compliance and give you immediate savings and greater sustainability for your new or remodeled home.
All of the design work and construction tasks for our clients are done by or supervised by our highly trained, professional staff. This not only saves you money, it provides a peace of mind that all of the details are taken care of and the job is being done right – to Perfection. Our service does not stop after we clean up and drive off. We continue to provide support for any warranty issues that arise and give you administrative support as needed in order to assure you obtain any energy-related tax incentives or rebates. This ‘One call does it all’ philosophy assures that your experience in remodeling or upgrading your home is an enjoyable one.
ESI Builders was formed by professionals with varying backgrounds and a common interest to provide you, our clients, with options to live more comfortably, save money, and enjoy quality homes for many years to come. As our company continues to grow and evolve, the expertise has been quickly growing to include several job foreman, tradesmen, and support staff. In response to our growth, we will continue to hire well-qualified staff and we will remain committed to maintaining a level of quality, attention to detail, and pursuit of perfection.
 Designs by BSB
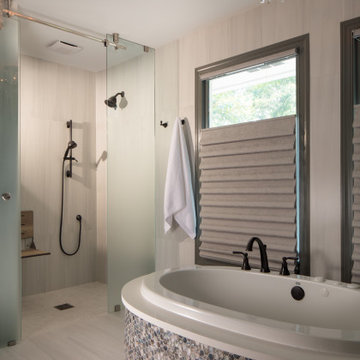
As the designer behind this master bathroom transformation, my mission was clear: to breathe new life into an outdated and dimly lit space while catering to my client's distinct desires. The project was marked by the client's unwavering commitment to enhancing functionality privacy and preserving the owner’s cherished MTI tub, all while adhering to the unalterable presence of existing windows.
FEATURES:
1. A glass pass-through between rooms allows natural light to flow freely, promoting a sense of openness.
2. The ceiling-mounted sliding glass door hardware elevates the shower experience with taller glass panels and effortless operation.
3. Accessibility and safety were paramount, resulting in a zero-entry shower, strategically placed grab bars, and an 'assist' TP holder.
4. To cater to varying preferences, a main showerhead and hand shower were accessible for standing and bench use.
5. A shared glass door between rooms eliminated the inconvenience of cumbersome door swings.
6. Privacy was enhanced through gradient glass etching, ensuring comfort and tranquility.
7. The digital shower system allowed for personalized controls, accommodating the unique preferences of the couple.
Creating a private bath around the existing MTI tub initially seemed insurmountable. However, innovative thinking led to a transformative solution. The drop-in tub was ingeniously converted into a free-standing tub with a narrow quartz deck adorned with a captivating mother-of-pearl mosaic tile surround. A floating walnut shelf at the tub's end introduced practicality and organic beauty.
Black plumbing fixtures were chosen to accentuate the mesmerizing depth of the mother-of-pearl mosaic tile. Horizontal book-matched walnut vanities introduced warmth and character, seamlessly connecting the interior to the outdoor view. The white quartz countertop is a refreshing contrast to the intricate finishes, lending a touch of sophistication. The ceiling light over the tub, akin to the icing on a cake, added a final note of elegance.
To meet the client's need for increased storage, the vanities have pullouts & roll-outs. These thoughtful additions ensured effortless access to personal care products. LED-lit medicine cabinets not only provided excellent lighting but also served as storage for everyday essentials. Vanity toe kick lighting is thoughtfully designed with a motion sensor at the entry, providing a guiding path to the water closet. Particularly valued during nighttime, this feature prevents unnecessary lights from illuminating, preserving the tranquility of those in bed.
Find the right local pro for your project

 User
UserWant a flexible coffee table for your living room? Then this unique-design one may be your choice. With a smoothly swivel tabletop and an upper drawer, you can rotate it in any direction to make it reachable when needed. The combo of white top and walnut drawers, provides your room a natural and accent sense. In addition, rounded corners contribute considerate preventive protection against any unexpected bump while rotating the top.
- Material: Wood, Plywood, Hardware
- Finish/Color: White & Walnut
- Overall Dimensions: 37.4" - 53.1”L x 23.6"H x 15.2”H (950mm - 1350mmL x 600mmH x 385mmH)
- Assembly Required: No
- Care & Clean: Wipe Clean With Damp Cloth, Wipe Dry With Clean Cloth.

 Tile Doctor Ltd
I was contacted about a Georgian property in the Kent village of Leeds , to see if I could do anything to improve a Travertine tiled floor. The use of Travertine was extensive and had been installed throughout the ground floor including the kitchen, dining room, utility and bathroom WC. Travertine is probably my favourite stone, but it is acid sensitive and attracts dirt easily, due to its ‘holey’ composition.
Initially we discussed the floor over the phone where I got to know about the issues they were experiencing, and I detailed the renovation process I normally use to restore it including the products and timelines. Naturally they wanted to me to provide a quote for the work however its tricky to do that accurately without seeing the floor, so I arranged a date to pop over.
Upon arriving I could see the tiles and the wide grout joints had extensive, ingrained dirt indicating the previous sealer had long since worn away. This is a common issue with stone floors, and to re-assure myself and the client it could be resolved I cleaned a small area in the utility room with pleasing results!
This test clean helped me to understand which products and methods would work best on the floor and later that day I emailed over a detailed quote for the renovation. Happy with the quote I received a reply the same day asking when I could start.
My colleague and I arrived on the agreed date and work started with adding protection to all areas that required it. We use a lot of water during the cleaning process and some materials such as MDF can become damaged with water ingress, so it makes sense to do this.
To get the floor clean, a coarse Carbide Brush fitted to a rotary machine was run over the Travertine tiles to scrub in a strong solution of Tile Doctor Pro-Clean. This process generates a lot of slurry as the dirt was washed out of the stone and grout which is extracted with a wet vacuum as we progressed.
Next it was on hands and knees with more Tile Doctor Pro-Clean and handheld brushes run over stubborn areas and along the grout lines to take them from 80% up to 100%.
Happy with the results, the next step was to renovate the stone using a series of diamond encrusted burnishing pads. Using only water for lubrication this process starts with the application of a coarse 400-grit burnishing pad attached to the floor buffer. This produces a lot of slurry which again was removed with a wet vacuum.
This left the Travertine clean, but the pores of the stone had been opened giving the floor a matt finish and more absorbent than it was originally. To further refine the appearance of the stone the next two burnishing pads were applied which are 800 and 1500-grit. These pads polish the stone and close the pores, restoring the natural sheen in the process. After each pad was applied the slurry was rinsed off the floor with water and extracted with the wet vacuum. Once complete the floor was left to dry off fully overnight.
I arrived the next day and took several moisture readings from the floor to check that it had dried off sufficiently overnight. The results were good, so work moved onto sealing the Travertine with two coats of Tile Doctor Ultra Seal which is a natural look impregnating sealer. It works by soaking into the stone, occupying the pores and thereby preventing dirt from becoming ingrained there. This ensures dirt remains on the surface where it is easily cleaned away.
The final step in the floor’s renovation was to apply the last of the diamond polishing pads which is a very fine 3000-grit. This pad further improves the polished appearance of the stone resulting in a satisfying sheen.
The work made a massive difference to the floor, and I received an email the next day from one of the owners who was really pleased with the transformation:
”Floors look brilliant. Very pleased.”
For the care and maintenance of polished sealed floors I recommend the use of Tile Doctor’s Stone Soap which is a gentle but effective cleaning product that won’t impact the sealer and contains a patina enhancer. When it comes to sealed floors my mantra is:
“If you look after the sealer, the sealer will look after the floor!”
Graham Davis
North Kent Tile Doctor

 Windy City Painters
Masterful Wallpaper Installation Wicker Park: A Botanical Retreat
Professional Craftsmanship in the Heart of Chicago
When it comes to high-end interior design, Wallpaper Installation Wicker Park requires more than just a DIY spirit. It demands an eye for symmetry and a hand for precision. This recent project involved a complex, large-scale botanical pattern. Our goal was to create a seamless focal point behind a classic French-style headboard.
Overcoming the Challenge
Chicago’s historic homes often have walls that aren't perfectly square. This makes pattern matching extremely difficult. However, our team used laser levels to ensure a perfectly vertical start. Additionally, we handled the delicate paper with care to avoid over-stretching. We chose a high-tack, low-moisture adhesive. This prevents the paper from shrinking as it dries in our variable Chicago climate.
Pro Tip for Chicago Homeowners:
Always invest in a "wall liner" or high-quality primer before your Wallpaper Installation Wicker Park. This protects your drywall. Furthermore, it makes future removal much easier if you ever decide to change your style!
See our full gallery of transformations: https://windypainters.com/wallpaper/
 C&G FAMILY PRODUCTS, INC.
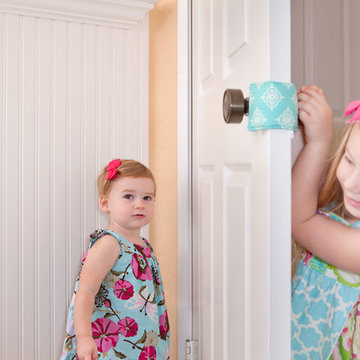
No More Noisy Doors! The Original Mom-Invented Cushy Closer; since 2007.
As two moms, with nine children between us, we've figured out a few things along the way; one of them being: We don't care how much noise a child can sleep through, there's something about the click of a doorknob or the rattling of a door that can break through even the deepest sleep.
The Cushy Closer Door Cushion:
-Allows quiet entry and exit while checking on sleeping children (without turning the knob/handle)
-Helps prevent children/adults from being accidentally locked in or out (bathrooms, bedrooms, house, etc.)
-Snug fit helps muffle door sounds (slamming, rattling, closing) while allowing the door to close completely and quietly
-Makes a unique yet practical baby shower gift
Our Cushy Closer Door Cushions are handmade with quality materials, inside and out, and are designed to be long-lasting and hold their shape for a truly quiet door!
 Cabinet Technologies LLC
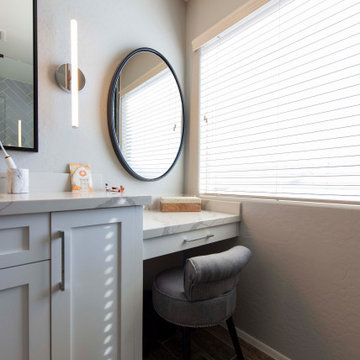
This gorgeous contemporary style bathroom has frameless birch ply cabinets painted a frosty white. We added soft close hinges to prevent slamming, it has a very convenient hair care pull out cabinet, power bars and even a side make up station! The shower received new glass doors with a flat pebble cool blend floor and a chevron pattern tile wall in Paloma Denim. We made sure it had a nook for products, a small corner leg bench and a Wellfor matte black rain shower head. The countertop is quartz Calacatta Jubilee with white porcelain square sinks.
 Tile Doctor Ltd
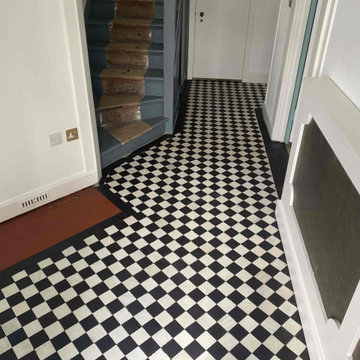
This client from North London had recently bought a property in Highgate N6 and during renovation had discovered an original Victorian tiled floor in the hallway. The floor was laid in a classic black and white diamond pattern but unfortunately a large section was missing and had been filled with concrete. Furthermore, most of the remaining floor had been covered in cement and glue.
I carried out a survey of the floor to determine the main issues and was then able to email over a quote later that day that included rebuilding the missing section of flooring. I suspect the floor had been excavated at some point in the past to install central heating and then rather than have the excavated section restored it was simply back filled and then levelled with a cement screed before finally gluing down a carpet on top.
Once the quote was accepted, I sourced replacement tiles from the Vintage Floor Tile company. Situated in Kent they are a reclamation yard that specialises in supplying original geometric and encaustic tiles including the major historical makers such as Minton and Craven Dunnill.
Armed with replacement tiles I started by removing the concrete that had been used to backfill the missing section and prepare a new surface for tiling with quick drying cement. When ready I was able to carefully build back the original pattern using the replacements. The tiles were secured with tile adhesive and once that had gone off, they were grouted.
The floor was left to set fully overnight and then the next day I was able to return and clean the whole floor using a strong dilution of Tile Doctor Remove and Go. As usual this was left to soak into the tiles for a good ten minutes before being scrubbed into the tiles using a black scrubbing pad. The Tile Doctor Remove and Go did a good job of cleaning the floor and the cleaning solution soon turned black with dirt during the scrubbing. The floor was rinsed with water and the soil extracted with a wet vacuum. After inspecting the floor any areas that needed further work were hand scrubbed and rinsed again until I was happy the floor was clean.
The last part of the cleaning process was to give the tiles an acid wash using Tile Doctor Acid Gel which further cleans the floor by removing old cement residue and grout haze. It also neutralises efflorescent salts in the tiles which are a common issue with floors of this age with no damp proof membrane. After another rinse and extraction, the floor was given a final rinse and then dried as much as possible using the wet vacuum.
I left the floor to dry out for a couple of days before returning to apply a protective sealer. Tile and Stone should be dry before sealing so I use a damp meter first to double check. All was well so to seal the tiles I proceeded to apply the first of what would be three coats of sealer. I used Tile Doctor Colour Grow for this, it works by impregnating the tile occupying the pores and thereby preventing dirt from becoming ingrained there. This product also enhances the black and white colour of the tiles and makes the floor much easier to clean.
Once done the floor was transformed and needless to say my customer was very pleased with the result. For the aftercare of Victorian Tiled floors, I recommend the use of a ph neural tile cleaner such as Tile Doctor Neutral Cleaner; most supermarket tile cleaners are simply too strong for use on sealed floors and can strip off the sealer prematurely.
Andrew Newstead
North London Tile Doctor

 Segerson Builders
Modern custom home with corrugated metal and yellow cedar siding, large planters and concrete patios and stainless steel railings. Photography by Tim Lenz.
 Nova Remodeling Inc
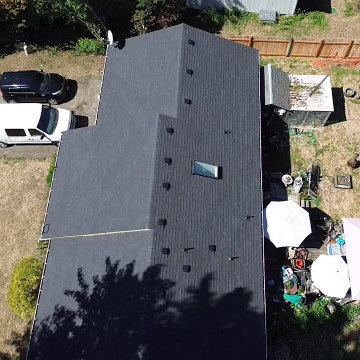
This Tacoma home underwent a complete roof transformation, ensuring long-term durability and improved curb appeal. The project began with a thorough inspection, revealing aging shingles, water damage, and areas of structural weakness. The roof was in dire need of a full replacement.
We started with a meticulous removal of the old shingles and underlying materials, exposing damaged decking that required reinforcement. After replacing compromised plywood sections, we installed a high-performance underlayment to provide superior weather protection and prevent moisture infiltration.
Next, we carefully placed new, impact-resistant shingles designed to withstand the Pacific Northwest’s unpredictable weather. The skylight was resealed to ensure no future leaks, and improved ventilation was added to enhance airflow and extend the roof’s lifespan. The finishing touches included ridge vents and flashing details to ensure maximum efficiency and water resistance.
The final result is a sleek, high-quality roof built for longevity. This project not only enhanced the home’s structural integrity but also boosted its visual appeal. With expert craftsmanship and top-tier materials, this roof replacement in Tacoma guarantees lasting protection and value.
 SINKOLOGY
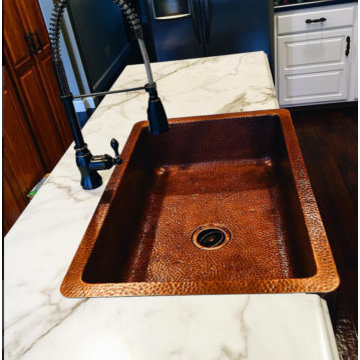
The Adams copper apron kitchen sink is handcrafted from the finest 16 gauge pure copper by Sinkology's team of skilled artisans. The flexible and functional design of each sink offers a wide range for any look. With clear-cut installation and easy to maintain care, all sinks from Sinkology are designed for everyday living, while adding a point of pride to your home. The large single bowl designs offers plenty of space for any kitchen and is guaranteed to be the highlight of your kitchen.
 C&G FAMILY PRODUCTS, INC.
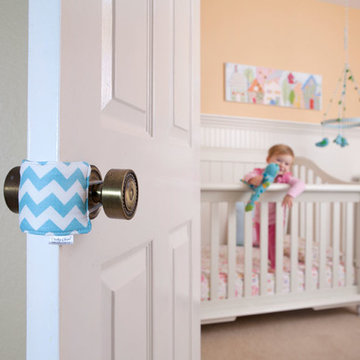
No More Noisy Doors! The Original Mom-Invented Cushy Closer; since 2007.
As two moms, with nine children between us, we've figured out a few things along the way; one of them being: We don't care how much noise a child can sleep through, there's something about the click of a doorknob or the rattling of a door that can break through even the deepest sleep.
The Cushy Closer Door Cushion:
-Allows quiet entry and exit while checking on sleeping children (without turning the knob/handle)
-Helps prevent children/adults from being accidentally locked in or out (bathrooms, bedrooms, house, etc.)
-Snug fit helps muffle door sounds (slamming, rattling, closing) while allowing the door to close completely and quietly
-Makes a unique yet practical baby shower gift
Our Cushy Closer Door Cushions are handmade with quality materials, inside and out, and are designed to be long-lasting and hold their shape for a truly quiet door!
 AnyoneCanLayAFloor
How to Lay Chevron Flooring (Step-by-Step Guide)
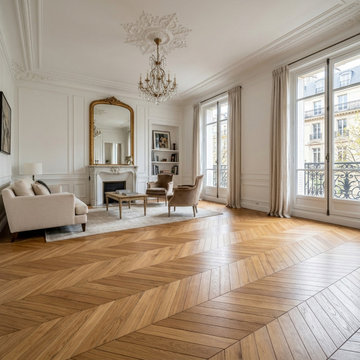
Chevron flooring is a premium parquet style known for its clean, V-shaped pattern. While it delivers a high-end finish, it requires precision and planning to install correctly.
1. Prepare the Subfloor
Ensure the subfloor is clean, dry, and perfectly level. Even small imperfections can cause misalignment in the chevron pattern.
2. Plan Your Layout
Mark a centre line (central axis) across the room. This acts as your guide to keep the pattern symmetrical and balanced.
For a smarter, easier way to plan your layout, calculate materials, and visualise your room before installation, use this free tool: anyonecanlayafloor.com
3. Create a Starter Block
Assemble several left and right planks into a starter block and allow it to set. This creates a solid reference point for the rest of the floor.
4. Dry Lay First Rows
Lay a few rows without adhesive to check alignment and ensure the V-shape pattern flows correctly before fixing.
5. Glue and Install Planks
Apply adhesive and begin laying from the centre line outward. Carefully position each plank at the correct angle (typically 45°) to maintain the chevron design.
6. Maintain Expansion Gaps
Leave a 5–8mm gap around the room edges to allow for natural wood movement and prevent warping.
7. Cut Edges and Finish
Trim planks to fit edges using a mitre saw, then install skirting or beading for a clean, professional finish.
 C&G FAMILY PRODUCTS, INC.
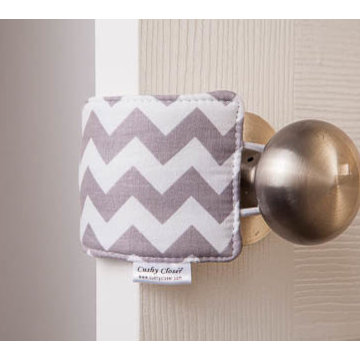
No More Noisy Doors! The Original Mom-Invented Cushy Closer; since 2007.
As two moms, with nine children between us, we've figured out a few things along the way; one of them being: We don't care how much noise a child can sleep through, there's something about the click of a doorknob or the rattling of a door that can break through even the deepest sleep.
The Cushy Closer Door Cushion:
-Allows quiet entry and exit while checking on sleeping children (without turning the knob/handle)
-Helps prevent children/adults from being accidentally locked in or out (bathrooms, bedrooms, house, etc.)
-Snug fit helps muffle door sounds (slamming, rattling, closing) while allowing the door to close completely and quietly
-Makes a unique yet practical baby shower gift
Our Cushy Closer Door Cushions are handmade with quality materials, inside and out, and are designed to be long-lasting and hold their shape for a truly quiet door!
 Xpand Inc. | Homes of Xcellence
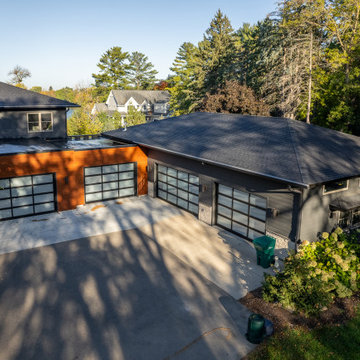
At the outset, this project began with the transformation of a 2-car attached garage. The goal was to create a mudroom, an exercise room, and a breezeway to seamlessly connect the spacious detached garage with the main part of the house. Additionally, the project involved partial roof removal and the addition of a new front entry.
But then came an unexpected twist – scope creep.
We found ourselves veering away from the initial client-supplied architectural plans. After numerous consultations with the clients and several iterations of the design, we arrived at a significantly improved plan for the remodel and addition.
Our journey commenced with the demolition of almost the entire former 2-car garage, making space for a new, oversized 3-car garage measuring 40′ x 28′. This garage was strategically placed between the existing house and the large detached garage. We introduced a custom low-sloped flat roof, designed to address historical drainage issues.
To mitigate water pooling, we created a custom concrete step at the back corner of the garage, equipped with a sturdy metal grate that sits flush with the step. We also installed a PVC drainage system, commencing at the step and running beneath a newly designed patio, ultimately draining into the yard. These measures have significantly reduced water accumulation around the house.
The new garage boasts several features, including Longboard aluminum siding, custom full glass garage doors, interior drywall finished to a level 4, an abundance of can lights, an epoxy floor coating, vinyl base trim, a new forced air garage heater, and more.
The clients also requested a designated space for their three kids and their friends to enjoy, thus giving birth to the “Kid Zone.” We partitioned a section of the existing oversized garage, resulting in a space measuring approximately 22′ x 32′, brimming with entertainment possibilities. To enhance control over the temperature in the Kid Zone, we collaborated with our licensed HVAC partner to install a cold weather mini-split system.
One of the most significant challenges was the modernization and consolidation of the home’s main electrical systems. We reconfigured and combined 6-7 different electrical panels into just two. One panel serves the main house, while the second is dedicated to backup power from a generator. These panels, along with the boiler for the in-floor heating system, are housed in a newly constructed mechanical room within the Kid Zone.
Inside the main house, we completed various tasks, such as removing the ceiling in the hallway from the new garage to address prior water damage, improve insulation, and rework electrical and HVAC systems. We also replaced the ceiling from the front door to the base of the stairs, adding new can lighting and enhancing insulation. Skilled drywall specialists then installed and finished new drywall to a level 5 standard.
The exterior of the house underwent a complete overhaul. Before installing new roofing on the entire house and garage, we modified an existing flat roof by adding custom lumber and plywood to enhance the pitch, preventing future ice dams. A new rubber roof was expertly installed on the oversized 3-car garage, and the flat roof section we re-framed.
Our meticulous exterior team removed old white aluminum soffit, fascia, and gutters, replacing them with new framing to accommodate Longboard soffit material. This task was particularly challenging due to the age of the house and the non-standard wall and roof framing. Our skilled exterior subcontractors ensured a perfect fit.
Near the pool area, we discovered severe rot and decay from years of water intrusion. After informing the homeowners, we ordered and installed five new commercial-style block framed windows and a custom 8′ high Anderson patio door. This involved careful removal and replacement of window headers from the outside to avoid disturbing the finished part of the house. We reframed the large openings to fit the new windows, and our skilled trim carpenters installed new walnut casing, base, and window sills.
In total, we replaced around 900 lineal feet of soffit and installed approximately 32 squares of aluminum siding. The entire house was meticulously prepped, repaired, and painted according to the client’s chosen color.
Throughout the project, we incorporated numerous custom touches and unique design elements, some of which you can see in the pictures. Our team also addressed various unforeseen challenges, from soil issues to rot and decay repair, roof leaks, drainage problems, electrical and HVAC complexities, and much more.
At Xpand Inc., we take pride in making it all happen, turning your remodeling and renovation dreams into reality.
 Handyman Matters of Clear Lake & Greater Houston
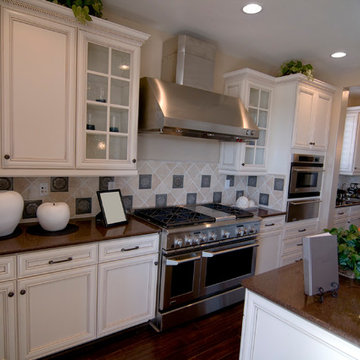
Whether you consider yourself a "Foodie," appreciate the art of cooking, have a passion for baking, love wining and dining at home, or simply grabbing a bite for the road–the kitchen is at the heart of our day-to-day life. It's where your four-legged furry friends beg for their dinner, where your baby took his/her first bite of food, and where friends share their deepest thoughts. No matter how you choose to use your kitchen, it is the hub of your home. And you should love spending time in it.
But there's always something. Something that just irks you every time you're in the kitchen. It's the broken cabinet drawers, lack of shelving in the pantry, water damage under the sink, the faucets that won't stop dripping, dishwasher that quit working, or your countertops that have seen better days.
Handyman Matters brings quality Craftsmanship and exceptional customer service to the home improvement industry. And we have background-checked, licensed, and insured Craftsmen that you'll feel comfortable inviting into your home. Don't let your to-do list prevent you from enjoying your kitchen. Let us take care of it today!
Services include but not limited to:
KITCHEN BACKSPLASH INSTALLATION
CABINET INSTALLATION & REPAIR
COUNTERTOP INSTALLATION & REPAIR
SINK INSTALLATION & REPAIR
 Tile Doctor Ltd
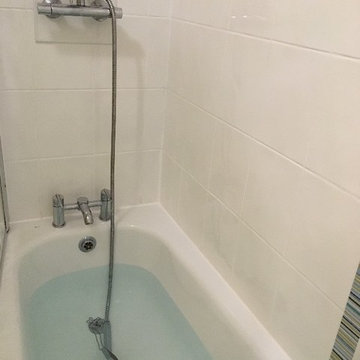
A client with a high-rise apartment in Manchester city centre contacted us in relation to the look of their bathroom tiles. The grout had become grubby and black with mould and it was clear from their message that they were considering have the grout replaced in order to freshen up the bathroom.
We discussed the problem over the telephone, and they emailed a picture of the bathroom across so I could get a better idea of what needed doing. It turns out that the apartment had been rented out previously and they needed the bathroom renovating so they could start letting it again. Clearly, they were keen to have the work completed as soon as possible. Fortunately, we are sometimes able to come out on short notice, especially for small jobs like this and so were able to do the work the following week
Re-grouting is a lot of work and very time consuming so I explained the benefits of Grout Colouring which is much quicker and results in a more practical finish as I will explain. There was a small issue with parking as one would expect from the city centre, but we were able to use one of the parking spaces of a neighbour in the basement of the building.
My first task was to get the grout as clean as possible before applying the colourant and given the amount of mould I decided to apply Tile Doctor Duo-Clean which is a Tile Cleaner/Mould Remover and ideal for use on ceramic tile and grout. The product was sprayed onto the tiles and grout and then scrubbed in by hand to get the grout as clean as possible. I also used a powerful steam cleaner to get the grout as clean as possible before rinsing the soil off with water. This process went well, and the grout looked much cleaner afterwards but was now a little patchy in places due to deep staining.
It’s worth noting that mould thrives in damp warm conditions and can easily be controlled by ensuring the bathroom has adequate ventilation. Some modern showers have a function that cool the bathroom down after use by running the shower on a cold setting. Improving cross-ventilation by leaving the bathroom door and a window open can also improve the situation and of course you can always apply Tile Doctor Duo-Clean on a regular basis.
Once the grout was dry and as clean as it could be, I applied a White Tile Doctor Grout Colourant along the grout lines with a small brush taking care to wipe off any excess from the tiles as I went. Only one bottle of colourant was needed, and I have found baby wipes work well when wiping off the excess.
The last step in the bathroom renovation was to strip out all the old mouldy silicone between the bath and the tiles and replace with new mould resistant silicone.
The cleaning and grout colour completely transformed the look of the bathroom leaving it looking fresh. The grout which was previously dark and patchy was now a consistent white colour giving the impression it had only been recently tiled. The colourant also forms an epoxy barrier over the grout that will prevent dirt from becoming ingrained in the grouts surface going forward, it’s also much easier to clean.
The customer was most impressed with the result and has informed us since that they will back in touch about renovating the grout in their own home! They left the following comment on the Tile Doctor website.
“Kamila made a wonderful job cleaning my grout and silicone. The bathroom looks like new. She was also easy to deal, very friendly and professional. Thank you!”
Alex Logozny
Greater Manchester Tile Doctor
 CoverMyPatio.com
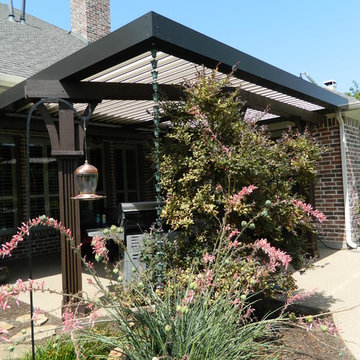
The Arcadia Louvered Roof enhances the beauty of any style home and provides the flexibility of having an open roof when the weather is good or a solid roof to keep the rain off your patio when the weather turns bad.
Eco-friendly Construction
The Arcadia system is made up of recycled aluminum making it an extremely Green product. It is also eco-friendly, helping consumers save on passive solar heating and cooling.
We Think Green
Arcadia is proud to continue the company's tradition with its approach to Environmental Innovation. From the choice of lightweight materials and lean production methods to the efficiency of its drive system and designs, Arcadia is committed to operating as a more sustainable business and reducing its overall environmental impact.
High-quality Building Materials
Each Arcadia system is a work of art, constructed with care and attention to every little detail.
Our system is powered coated, extruded aluminum with stainless steel components giving us the most durable louvered roof on the market today. From our superior drive system, which is UL & CE certified, down to the stainless steel tex screws that secures the system together. Nothing but the best!
Our low-maintenance components eliminate painting, staining, and waterproofing of traditional shading structures. Using powder-coated aluminum construction prevents warping, cracking, and corrosion.
Photographed by: Roger Chafin
 Designs by Debra Cruz
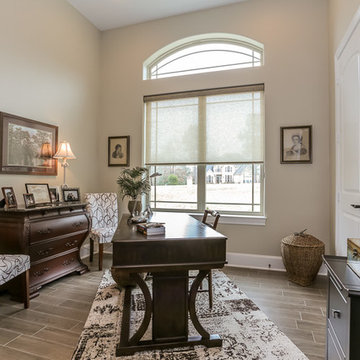
This sun-washed office harmoniously combines contemporary accents with antique southern charm. Careful consideration to the color palette prevents discord; allowing for bold graphic patterns on the parson's chairs and rug to play harmoniously with genteel antiques. The sea grass baskets offer concealment for cords and data cables.
Photo credit: www.home-pix.com
23