
Search results for "Progression plan" in Home Design Ideas
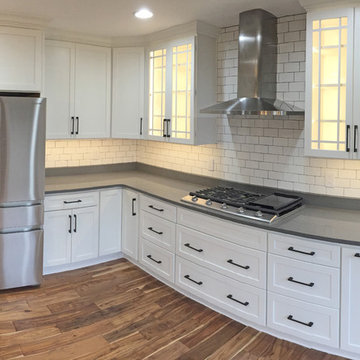
 Solstice Kitchen and Bath
This kitchen design in Crofton is a testament to the impact a fresh design and new layout can make to your quality of life. The remodel started by creating an open floor plan. By removing walls between the old kitchen and dining room, as well as a bulkhead, plumbing, and electric, we were able to re-imagine the space and create an open kitchen/dining room that is perfect for this growing family. The L-shaped layout includes a well-planned cooking zone with wall ovens and a gas cooktop (converted from electric). The peninsula incorporates a white Kohler farmhouse sink and Delta faucet, accented by eye-catching Progress Lighting pendants from the "Swing" collection. The HomeCrest Cabinetry white kitchen cabinets are beautifully accented by dark TopKnobs hardware and a Q Quartz countertop in "Mystic Gray". The cabinets are packed with customized storage accessories, including pull-outs, large drawers, a utensil storage insert, and built-in bookshelves.
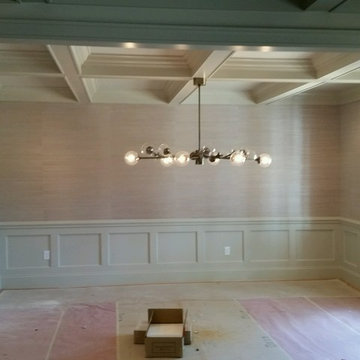
 Whitney McGregor Designs
All millwork, lighting, paint, wallpaper and finishes designed and/or selected by Whitney McGregor designs.
Large minimalist light wood floor enclosed dining room photo in Other with beige walls
Large minimalist light wood floor enclosed dining room photo in Other with beige walls
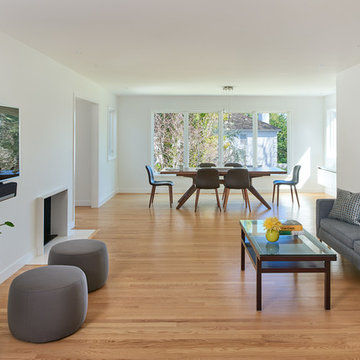
 CARNEMARK design + build
This traditional 1970’s ranch-style house in McLean, Virginia, was in much need of a renovation to suit this couple’s modern tastes. The floor plan was choppy with small rooms and lots of dark corners that failed to flaunt the surrounding landscape. With two small children, and mom working from home part-time, this young family craved practical, open spaces to live their daily lives. Photography by Anice Hoachlander.
Find the right local pro for your project
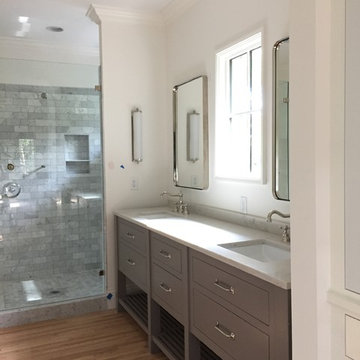 Whitney McGregor Designs
All interior millwork designed by Whitney McGregor. Lighting, mirror, sink, fixtures and tile selected by Whitney McGregor.
Large minimalist master gray tile and marble tile ceramic tile and beige floor freestanding bathtub photo in Other with flat-panel cabinets, gray cabinets, white walls, a console sink and quartz countertops
Large minimalist master gray tile and marble tile ceramic tile and beige floor freestanding bathtub photo in Other with flat-panel cabinets, gray cabinets, white walls, a console sink and quartz countertops
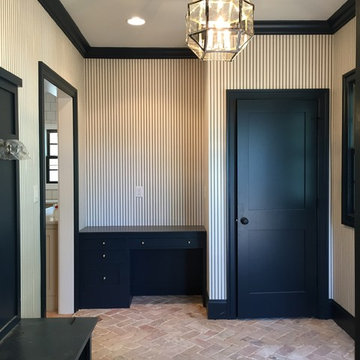 Whitney McGregor Designs
Side entry and mudroom. All finishes, colors, fixtures, cabinetry and hardware designed and selected by Whitney McGregor Designs. We used Chicago reclaimed brick in this side entry mudroom to create a traditional with a twist mudroom.

 CuttingEdge Built LLC
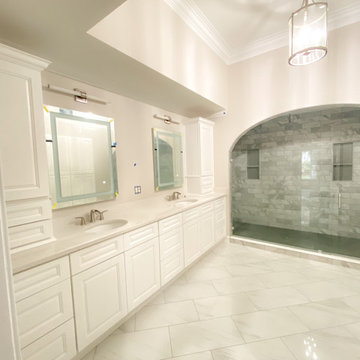
In the original floor plan, there was a jacuzzi tub, window, and skylight where this new double 10-foot shower now exists. The shower walls were lined with Carrara marble-style 4x16 subway tiles and the shower floor was adorned with gray round penny glass tile. To create that extra glam and sparkle, we used a translucent grout with an iridescent finish on the shower floor which reflects and refracts light and gives the glass tile the appearance to be different shades of colors. Two shower systems were installed with massaging jets on each end of the shower and a large rain showerhead in the middle of the shower ceiling. We enclosed this massive shower with a frameless hinged shower door with chrome hardware.
Also in the original floor plan, there was a separate shower and vanity where the new large double vanity with extra storage now sits. The white vanity has raised-panel doors and drawers. An LED mirror and LED vanity light fixture were installed above each sink.
The floor tile is a 12x24 Carrara marble-style porcelain tile installed in a diagonal pattern to visually enlarge the space. The quartz countertop is named 'White Sands' and appears as though it has tiny white pebbles with silver gems, and the walls were painted with Sherwin-Williams Drift of Mist.
Sponsored
Sunbury, OH

J.Holderby - Renovations
Franklin County's Leading General Contractors - 2X Best of Houzz!
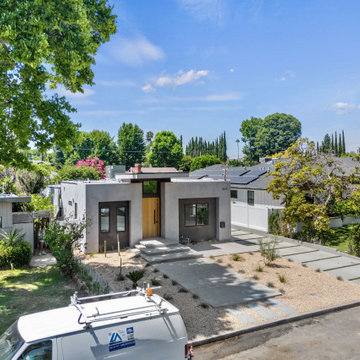
 LA Home Contractor
FULL HOUSE REMODEL – COMPLETE SCOPE OF WORK
1. Pre-Construction Phase
• Initial site inspection and measurements
• Architectural design and layout planning (if required)
• Structural engineering (if load-bearing walls are modified)
• Preparation of plans for city approval
• Permit application and plan check
• Obtain required building permits
• Scheduling of inspections
• Homeowner responsible for permit fees unless otherwise stated.
2. Site Preparation & Protection
• Protect flooring and non-work areas
• Install plastic dust barriers with zipper access
• Cover windows and furniture as needed
• Temporary utility setup if required
• Daily job site cleanup
• Final professional cleaning upon completion
3. Demolition
• Remove existing flooring (tile, wood, carpet, etc.)
• Remove cabinets, countertops, vanities
• Remove interior walls per plans
• Remove drywall where required
• Remove plumbing fixtures
• Remove electrical fixtures
• Haul away all debris
4. Structural & Framing
• Install structural beams if required
• Reframe modified walls
• Install new partitions per approved plans
• Repair or replace damaged framing
• Subfloor repair or replacement as needed
• Install blocking for cabinets and accessories
5. Plumbing (Up to Code)
• Replace old water supply lines (Copper Type L or PEX)
• Replace or modify drain lines (ABS)
• Relocate plumbing fixtures as needed
• Install new shut-off valves and cleanouts
• Water heater replacement if included
• Call for rough and final plumbing inspections
6. Electrical (Up to Code)
• Upgrade electrical panel if required
• Rewire entire house as needed
• Install new outlets and switches
• Install GFCI/AFCI protection per code
• Install recessed lighting and fixtures
• Install smoke and carbon monoxide detectors
• Dedicated circuits for appliances
• Call for rough and final electrical inspections
7. HVAC
• Replace or upgrade HVAC system if included
• Install new ducting and registers
• Install thermostat or mini-split system if applicable
8. Insulation
• Install wall insulation per code requirements
• Install ceiling insulation per code requirements
9. Drywall & Plaster
• Install new drywall
• Tape and mud (Level 4 or 5 finish)
• Texture to match existing or smooth finish
• Patch all affected areas
10. Flooring
• Install tile flooring
• Install engineered wood / hardwood / laminate / vinyl
• Install baseboards
• Floor leveling if required
11. Kitchen Remodel
• Install new cabinets
• Install countertops
• Install backsplash
• Install sink and faucet
• Install appliances (owner supplied unless specified)
12. Bathroom Remodel(s)
• Install new tub or shower system
• Waterproofing system installation
• Install tile on floors and walls
• Install vanity and toilet
• Install shower valve and fixtures
• Install shower glass if included
13. Doors & Windows
• Replace interior and entry doors
• Replace windows if included
• Install hardware
14. Interior & Exterior Paint
• Surface preparation
• Prime and paint walls, ceilings, and trim
• Exterior painting if included
15. Exterior Work (If Included)
• Stucco repair
• Roofing repair or replacement
• Concrete work or pavers
• Drainage improvements
16. Final Phase
• Final inspections
• Punch list completion
• Final cleaning
• Final walk-through with homeowner
Standard California Contract Terms (Summary)
• All work performed in compliance with California Building Code.
• Change orders must be approved in writing.
• Unforeseen conditions may require additional cost.
• One-year labor warranty unless otherwise stated.
• Progress payments per agreed payment schedule.
• Contractor is licensed and insured.
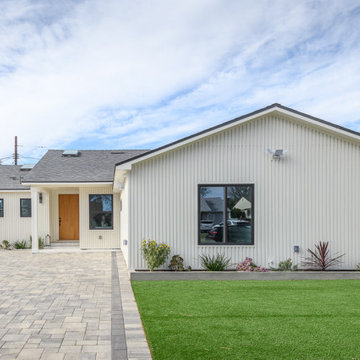 LA Home Contractor
FULL HOUSE REMODEL – COMPLETE SCOPE OF WORK
1. Pre-Construction Phase
• Initial site inspection and measurements
• Architectural design and layout planning (if required)
• Structural engineering (if load-bearing walls are modified)
• Preparation of plans for city approval
• Permit application and plan check
• Obtain required building permits
• Scheduling of inspections
• Homeowner responsible for permit fees unless otherwise stated.
2. Site Preparation & Protection
• Protect flooring and non-work areas
• Install plastic dust barriers with zipper access
• Cover windows and furniture as needed
• Temporary utility setup if required
• Daily job site cleanup
• Final professional cleaning upon completion
3. Demolition
• Remove existing flooring (tile, wood, carpet, etc.)
• Remove cabinets, countertops, vanities
• Remove interior walls per plans
• Remove drywall where required
• Remove plumbing fixtures
• Remove electrical fixtures
• Haul away all debris
4. Structural & Framing
• Install structural beams if required
• Reframe modified walls
• Install new partitions per approved plans
• Repair or replace damaged framing
• Subfloor repair or replacement as needed
• Install blocking for cabinets and accessories
5. Plumbing (Up to Code)
• Replace old water supply lines (Copper Type L or PEX)
• Replace or modify drain lines (ABS)
• Relocate plumbing fixtures as needed
• Install new shut-off valves and cleanouts
• Water heater replacement if included
• Call for rough and final plumbing inspections
6. Electrical (Up to Code)
• Upgrade electrical panel if required
• Rewire entire house as needed
• Install new outlets and switches
• Install GFCI/AFCI protection per code
• Install recessed lighting and fixtures
• Install smoke and carbon monoxide detectors
• Dedicated circuits for appliances
• Call for rough and final electrical inspections
7. HVAC
• Replace or upgrade HVAC system if included
• Install new ducting and registers
• Install thermostat or mini-split system if applicable
8. Insulation
• Install wall insulation per code requirements
• Install ceiling insulation per code requirements
9. Drywall & Plaster
• Install new drywall
• Tape and mud (Level 4 or 5 finish)
• Texture to match existing or smooth finish
• Patch all affected areas
10. Flooring
• Install tile flooring
• Install engineered wood / hardwood / laminate / vinyl
• Install baseboards
• Floor leveling if required
11. Kitchen Remodel
• Install new cabinets
• Install countertops
• Install backsplash
• Install sink and faucet
• Install appliances (owner supplied unless specified)
12. Bathroom Remodel(s)
• Install new tub or shower system
• Waterproofing system installation
• Install tile on floors and walls
• Install vanity and toilet
• Install shower valve and fixtures
• Install shower glass if included
13. Doors & Windows
• Replace interior and entry doors
• Replace windows if included
• Install hardware
14. Interior & Exterior Paint
• Surface preparation
• Prime and paint walls, ceilings, and trim
• Exterior painting if included
15. Exterior Work (If Included)
• Stucco repair
• Roofing repair or replacement
• Concrete work or pavers
• Drainage improvements
16. Final Phase
• Final inspections
• Punch list completion
• Final cleaning
• Final walk-through with homeowner
Standard California Contract Terms (Summary)
• All work performed in compliance with California Building Code.
• Change orders must be approved in writing.
• Unforeseen conditions may require additional cost.
• One-year labor warranty unless otherwise stated.
• Progress payments per agreed payment schedule.
• Contractor is licensed and insured.
 User
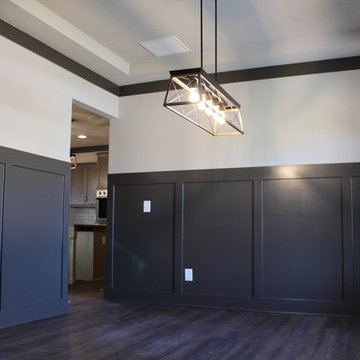
UserCraftsman Style Paneling at Dining and Foyer with Progress Lighting Amanda Groover
Example of a large arts and crafts vinyl floor and brown floor enclosed dining room design in Atlanta with white walls and no fireplace
Example of a large arts and crafts vinyl floor and brown floor enclosed dining room design in Atlanta with white walls and no fireplace
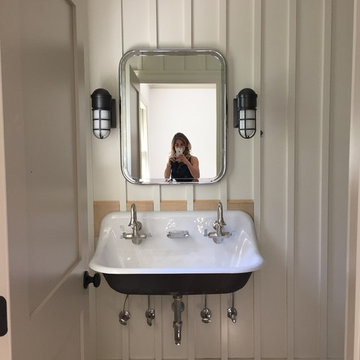 Whitney McGregor Designs
All interior millwork designed by Whitney McGregor. Lighting, mirror, sink, fixtures and tile selected by Whitney McGregor.
Bathroom - mid-sized farmhouse kids' beige tile ceramic tile and multicolored floor bathroom idea in Other with white walls and a wall-mount sink
Bathroom - mid-sized farmhouse kids' beige tile ceramic tile and multicolored floor bathroom idea in Other with white walls and a wall-mount sink
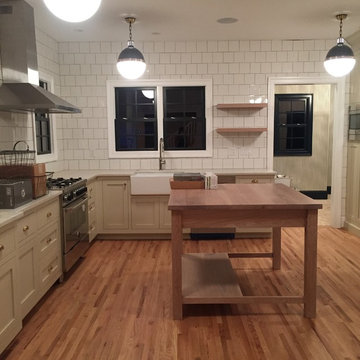 Whitney McGregor Designs
Kitchen was executed based on renderings and designs created by Whitney McGregor. Shaker style cabinets, classic mid century lighting, and a freestanding island keep this kitchen modern but still cozy.
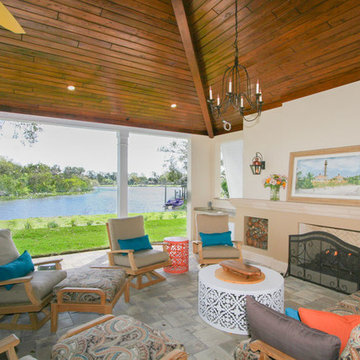
 Progressive Design Build
Challenge
This 2001 riverfront home was purchased by the owners in 2015 and immediately renovated. Progressive Design Build was hired at that time to remodel the interior, with tentative plans to remodel their outdoor living space as a second phase design/build remodel. True to their word, after completing the interior remodel, this young family turned to Progressive Design Build in 2017 to address known zoning regulations and restrictions in their backyard and build an outdoor living space that was fit for entertaining and everyday use.
The homeowners wanted a pool and spa, outdoor living room, kitchen, fireplace and covered patio. They also wanted to stay true to their home’s Old Florida style architecture while also adding a Jamaican influence to the ceiling detail, which held sentimental value to the homeowners who honeymooned in Jamaica.
Solution
To tackle the known zoning regulations and restrictions in the backyard, the homeowners researched and applied for a variance. With the variance in hand, Progressive Design Build sat down with the homeowners to review several design options. These options included:
Option 1) Modifications to the original pool design, changing it to be longer and narrower and comply with an existing drainage easement
Option 2) Two different layouts of the outdoor living area
Option 3) Two different height elevations and options for the fire pit area
Option 4) A proposed breezeway connecting the new area with the existing home
After reviewing the options, the homeowners chose the design that placed the pool on the backside of the house and the outdoor living area on the west side of the home (Option 1).
It was important to build a patio structure that could sustain a hurricane (a Southwest Florida necessity), and provide substantial sun protection. The new covered area was supported by structural columns and designed as an open-air porch (with no screens) to allow for an unimpeded view of the Caloosahatchee River. The open porch design also made the area feel larger, and the roof extension was built with substantial strength to survive severe weather conditions.
The pool and spa were connected to the adjoining patio area, designed to flow seamlessly into the next. The pool deck was designed intentionally in a 3-color blend of concrete brick with freeform edge detail to mimic the natural river setting. Bringing the outdoors inside, the pool and fire pit were slightly elevated to create a small separation of space.
Result
All of the desirable amenities of a screened porch were built into an open porch, including electrical outlets, a ceiling fan/light kit, TV, audio speakers, and a fireplace. The outdoor living area was finished off with additional storage for cushions, ample lighting, an outdoor dining area, a smoker, a grill, a double-side burner, an under cabinet refrigerator, a major ventilation system, and water supply plumbing that delivers hot and cold water to the sinks.
Because the porch is under a roof, we had the option to use classy woods that would give the structure a natural look and feel. We chose a dark cypress ceiling with a gloss finish, replicating the same detail that the homeowners experienced in Jamaica. This created a deep visceral and emotional reaction from the homeowners to their new backyard.
The family now spends more time outdoors enjoying the sights, sounds and smells of nature. Their professional lives allow them to take a trip to paradise right in their backyard—stealing moments that reflect on the past, but are also enjoyed in the present.

 Progressive Design Build
It was in 2012 when Mike Spreckelmeier first met Roy and Patti. They had been despondent after meeting with multiple contractors in an attempt to start their kitchen remodel. The contractors lacked follow through, came tardy to meetings and even failed to show up at others.
Determined to leave nothing to chance in the pursuit of their dream, Roy and Patti followed up on a recommendation after overhearing a conversation that was taking place while they were standing in a gallingly long line waiting to cast a vote on Election Day.
With a solid recommendation to pursue, Roy and Patti contacted Progressive Design Build. The rest is history.
Mike showed up on time. For a small retainer, he provided preliminary sketches, ideas for maximizing space and storage, and solutions for a sunken family room that created a safety hazard and a problem with traffic flow. More importantly, he designed the project to the homeowners’ budget.
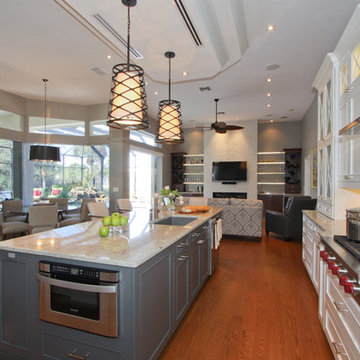
Progressive Design Build shot some different elevations and designed a plan to raise the floor, allowing all finished floors to be on the same level. Upon completion, the kitchen was stunning. Features included LED backlit fire glass shelving, white recessed panel cabinets, a subway tile backsplash, Granite countertop, integrated refrigerator, undermount sink, and more.
The living room was designed with complimentary finishes and included a natural stone fireplace wall with open cabinets flanked on both sides. The 12’ fireplace was made with a floor-to-ceiling white pebble finish.
This Bonita Bay project completed on time and on budget—allowing this fabulous family a wonderful opportunity to create lasting memories for many years to come.
 ZeroEnergy Design
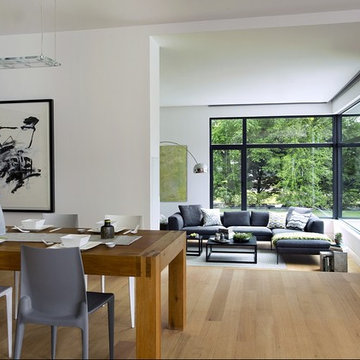
ZeroEnergy Design (ZED) created this modern home for a progressive family in the desirable community of Lexington.
Thoughtful Land Connection. The residence is carefully sited on the infill lot so as to create privacy from the road and neighbors, while cultivating a side yard that captures the southern sun. The terraced grade rises to meet the house, allowing for it to maintain a structured connection with the ground while also sitting above the high water table. The elevated outdoor living space maintains a strong connection with the indoor living space, while the stepped edge ties it back to the true ground plane. Siting and outdoor connections were completed by ZED in collaboration with landscape designer Soren Deniord Design Studio.
Exterior Finishes and Solar. The exterior finish materials include a palette of shiplapped wood siding, through-colored fiber cement panels and stucco. A rooftop parapet hides the solar panels above, while a gutter and site drainage system directs rainwater into an irrigation cistern and dry wells that recharge the groundwater.
Cooking, Dining, Living. Inside, the kitchen, fabricated by Henrybuilt, is located between the indoor and outdoor dining areas. The expansive south-facing sliding door opens to seamlessly connect the spaces, using a retractable awning to provide shade during the summer while still admitting the warming winter sun. The indoor living space continues from the dining areas across to the sunken living area, with a view that returns again to the outside through the corner wall of glass.
Accessible Guest Suite. The design of the first level guest suite provides for both aging in place and guests who regularly visit for extended stays. The patio off the north side of the house affords guests their own private outdoor space, and privacy from the neighbor. Similarly, the second level master suite opens to an outdoor private roof deck.
Light and Access. The wide open interior stair with a glass panel rail leads from the top level down to the well insulated basement. The design of the basement, used as an away/play space, addresses the need for both natural light and easy access. In addition to the open stairwell, light is admitted to the north side of the area with a high performance, Passive House (PHI) certified skylight, covering a six by sixteen foot area. On the south side, a unique roof hatch set flush with the deck opens to reveal a glass door at the base of the stairwell which provides additional light and access from the deck above down to the play space.
Energy. Energy consumption is reduced by the high performance building envelope, high efficiency mechanical systems, and then offset with renewable energy. All windows and doors are made of high performance triple paned glass with thermally broken aluminum frames. The exterior wall assembly employs dense pack cellulose in the stud cavity, a continuous air barrier, and four inches exterior rigid foam insulation. The 10kW rooftop solar electric system provides clean energy production. The final air leakage testing yielded 0.6 ACH 50 - an extremely air tight house, a testament to the well-designed details, progress testing and quality construction. When compared to a new house built to code requirements, this home consumes only 19% of the energy.
Architecture & Energy Consulting: ZeroEnergy Design
Landscape Design: Soren Deniord Design
Paintings: Bernd Haussmann Studio
Photos: Eric Roth Photography
 Meritage Homes
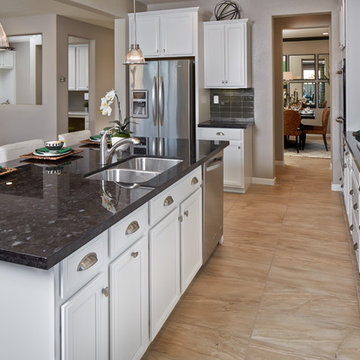
Backsplash Tile Manufacturer: Emser
Color: Lucente, Clive (Color), 3x6”
Liner: Renaissance, Maderna MNOG (color) 2x16”
Granite Countertop Manufacturer: Arizona Tile Granite
Species: Marron Cohiba
Eased Edge
Cabinet Manufacturer: Timberlake
Color: Painted Linen
Drawer Pulls & Door Knobs Manufacturer: Timberlake
Pulls – Cup 3105SN, Satin Nickel
Door Knobs – Toggle 3239SN, Satin Nickel
Wall Paint Manufacturer: Frazee
Color: Glutted CL2853M
Trim Paint Manufacturer: Frazee
Color: Forgetmeknot CLW1033W
Appliance Manufacturer: Whirlpool
Floor Tile Manufacturer: Emser
Boulevard, Color: Andrassy, 12x24” set straight
Pendant Lightings over Island: Progress
P5163-09 mini-pendant
 Progressive Design Build
Challenge
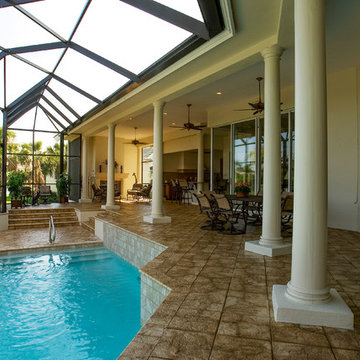
As part-time residents of this Bonita Springs home, our clients were looking to update their outdoor entertainment area. They also planned to be away for the summer during the remodel and needed their renovation project to be finished prior to their return for the winter.
Their needs included:
Changing the color pallet to a monochromatic scheme, removing the yellow brick pavers, adding an outdoor kitchen area, adding an outdoor fireplace, resurfacing the pool and updating the tile, installing a new screen enclosure, and creating privacy from the neighbors, particularly the main sitting areas, pool and outdoor kitchen.
Although there was already a 1,221 sq. ft. lanai under the roof, it lacked functionality needed by the homeowners. Most of its amenities were located at one end of the lanai, and lacked privacy that the homeowners valued.
Solution
The final project design required two additions to the lanai area adding an accumulative 265 sq. ft. to the existing space expanding their sitting area and accommodating a much-needed outdoor kitchen. The new additions also needed to blend with the home’s existing style.
Addition #1—Sitting Area:
The first addition added approximately 145 sq. ft. to the end of the lanai. This allowed Progressive Design Build to tie into the existing gable room for the new space and create privacy from the neighbors.
Addition #2—Outdoor Kitchen:
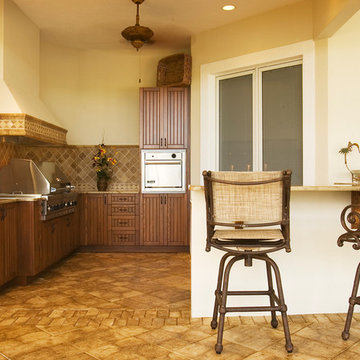
The second addition was a bump out that added approximately 120 sq. ft. to the end of the house close to the interior kitchen. This allowed the client to add an outdoor over and 52” Viking grill (with a side burner) to their outdoor living space. Other amenities included a new sink and under counter fridge, granite countertops, tumbled stone stile and Cypress cabinetry, custom-fabricated with marine grade plywood boxes and marine grade finishes to withstand moisture, common in the Bonita Bay community.
Special attention was given to the preparation area on either side of the stove, the landing area next to the oven and the serving counter behind the bar. Bar seating was added to the outdoor kitchen, allowing guests to visit with the cook comfortably and easily.
Brick Pavers
During the design phase, we discovered that the original brick pavers were set in sand, with no concrete pad below. Consequently, the retaining wall and several pavers were starting to fail, caused by the shifting sands. To remedy the problem, we installed a new concrete deck and laid new nonslip pavers on top of the deck—ideal for wet area applications.
Pool Renovations
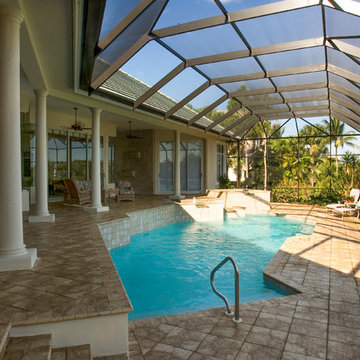
To dramatically improve the enjoyment and ambiance of their pool, Progressive Design Build completely re-plumbed it, putting in additional lighting and new water features. New decorative pool tile, coping, and a paver deck were also installed around the pool. The pool finish chosen by our clients was a nice tropical blue color.
Screen Enclosure
A new screen enclosure was installed in compliance with new local building codes, making it more stable and solid than the existing one. The color change from white to bronze coordinated well with the homeowners’ new color scheme; and the location of the service door and stairs provided convenient access to the new pool equipment.
Results
This project was completed on time and within budget before these homeowners returned for their winter holiday. They were thrilled with the weekly communication, which included two-way phone calls and email photo sharing. They always knew where their project was in the construction process and what was happening at all times—providing security and peace of mind.

Sponsored
Columbus, OH

Hope Restoration & General Contracting
Columbus Design-Build, Kitchen & Bath Remodeling, Historic Renovations
 Progressive Design Build
Challenge
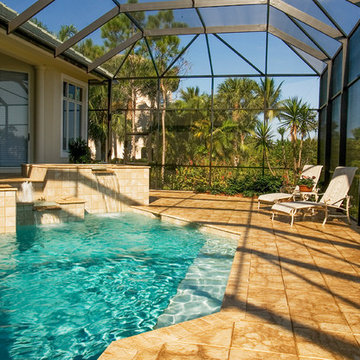
As part-time residents of this Bonita Springs home, our clients were looking to update their outdoor entertainment area. They also planned to be away for the summer during the remodel and needed their renovation project to be finished prior to their return for the winter.
Their needs included:
Changing the color pallet to a monochromatic scheme, removing the yellow brick pavers, adding an outdoor kitchen area, adding an outdoor fireplace, resurfacing the pool and updating the tile, installing a new screen enclosure, and creating privacy from the neighbors, particularly the main sitting areas, pool and outdoor kitchen.
Although there was already a 1,221 sq. ft. lanai under the roof, it lacked functionality needed by the homeowners. Most of its amenities were located at one end of the lanai, and lacked privacy that the homeowners valued.
Solution
The final project design required two additions to the lanai area adding an accumulative 265 sq. ft. to the existing space expanding their sitting area and accommodating a much-needed outdoor kitchen. The new additions also needed to blend with the home’s existing style.
Addition #1—Sitting Area:
The first addition added approximately 145 sq. ft. to the end of the lanai. This allowed Progressive Design Build to tie into the existing gable room for the new space and create privacy from the neighbors.
Addition #2—Outdoor Kitchen:
The second addition was a bump out that added approximately 120 sq. ft. to the end of the house close to the interior kitchen. This allowed the client to add an outdoor over and 52” Viking grill (with a side burner) to their outdoor living space. Other amenities included a new sink and under counter fridge, granite countertops, tumbled stone stile and Cypress cabinetry, custom-fabricated with marine grade plywood boxes and marine grade finishes to withstand moisture, common in the Bonita Bay community.
Special attention was given to the preparation area on either side of the stove, the landing area next to the oven and the serving counter behind the bar. Bar seating was added to the outdoor kitchen, allowing guests to visit with the cook comfortably and easily.
Brick Pavers
During the design phase, we discovered that the original brick pavers were set in sand, with no concrete pad below. Consequently, the retaining wall and several pavers were starting to fail, caused by the shifting sands. To remedy the problem, we installed a new concrete deck and laid new nonslip pavers on top of the deck—ideal for wet area applications.
Pool Renovations
To dramatically improve the enjoyment and ambiance of their pool, Progressive Design Build completely re-plumbed it, putting in additional lighting and new water features. New decorative pool tile, coping, and a paver deck were also installed around the pool. The pool finish chosen by our clients was a nice tropical blue color.
Screen Enclosure
A new screen enclosure was installed in compliance with new local building codes, making it more stable and solid than the existing one. The color change from white to bronze coordinated well with the homeowners’ new color scheme; and the location of the service door and stairs provided convenient access to the new pool equipment.
Results
This project was completed on time and within budget before these homeowners returned for their winter holiday. They were thrilled with the weekly communication, which included two-way phone calls and email photo sharing. They always knew where their project was in the construction process and what was happening at all times—providing security and peace of mind.
 Progressive Design Build
Challenge
As part-time residents of this Bonita Springs home, our clients were looking to update their outdoor entertainment area. They also planned to be away for the summer during the remodel and needed their renovation project to be finished prior to their return for the winter.
Their needs included:
Changing the color pallet to a monochromatic scheme, removing the yellow brick pavers, adding an outdoor kitchen area, adding an outdoor fireplace, resurfacing the pool and updating the tile, installing a new screen enclosure, and creating privacy from the neighbors, particularly the main sitting areas, pool and outdoor kitchen.
Although there was already a 1,221 sq. ft. lanai under the roof, it lacked functionality needed by the homeowners. Most of its amenities were located at one end of the lanai, and lacked privacy that the homeowners valued.
Solution
The final project design required two additions to the lanai area adding an accumulative 265 sq. ft. to the existing space expanding their sitting area and accommodating a much-needed outdoor kitchen. The new additions also needed to blend with the home’s existing style.
Addition #1—Sitting Area:
The first addition added approximately 145 sq. ft. to the end of the lanai. This allowed Progressive Design Build to tie into the existing gable room for the new space and create privacy from the neighbors.
Addition #2—Outdoor Kitchen:
The second addition was a bump out that added approximately 120 sq. ft. to the end of the house close to the interior kitchen. This allowed the client to add an outdoor over and 52” Viking grill (with a side burner) to their outdoor living space. Other amenities included a new sink and under counter fridge, granite countertops, tumbled stone stile and Cypress cabinetry, custom-fabricated with marine grade plywood boxes and marine grade finishes to withstand moisture, common in the Bonita Bay community.
Special attention was given to the preparation area on either side of the stove, the landing area next to the oven and the serving counter behind the bar. Bar seating was added to the outdoor kitchen, allowing guests to visit with the cook comfortably and easily.
Brick Pavers
During the design phase, we discovered that the original brick pavers were set in sand, with no concrete pad below. Consequently, the retaining wall and several pavers were starting to fail, caused by the shifting sands. To remedy the problem, we installed a new concrete deck and laid new nonslip pavers on top of the deck—ideal for wet area applications.
Pool Renovations
To dramatically improve the enjoyment and ambiance of their pool, Progressive Design Build completely re-plumbed it, putting in additional lighting and new water features. New decorative pool tile, coping, and a paver deck were also installed around the pool. The pool finish chosen by our clients was a nice tropical blue color.
Screen Enclosure
A new screen enclosure was installed in compliance with new local building codes, making it more stable and solid than the existing one. The color change from white to bronze coordinated well with the homeowners’ new color scheme; and the location of the service door and stairs provided convenient access to the new pool equipment.
Results
This project was completed on time and within budget before these homeowners returned for their winter holiday. They were thrilled with the weekly communication, which included two-way phone calls and email photo sharing. They always knew where their project was in the construction process and what was happening at all times—providing security and peace of mind.
 Progressive Design Build
Challenge
As part-time residents of this Bonita Springs home, our clients were looking to update their outdoor entertainment area. They also planned to be away for the summer during the remodel and needed their renovation project to be finished prior to their return for the winter.
Their needs included:
Changing the color pallet to a monochromatic scheme, removing the yellow brick pavers, adding an outdoor kitchen area, adding an outdoor fireplace, resurfacing the pool and updating the tile, installing a new screen enclosure, and creating privacy from the neighbors, particularly the main sitting areas, pool and outdoor kitchen.
Although there was already a 1,221 sq. ft. lanai under the roof, it lacked functionality needed by the homeowners. Most of its amenities were located at one end of the lanai, and lacked privacy that the homeowners valued.
Solution
The final project design required two additions to the lanai area adding an accumulative 265 sq. ft. to the existing space expanding their sitting area and accommodating a much-needed outdoor kitchen. The new additions also needed to blend with the home’s existing style.
Addition #1—Sitting Area:
The first addition added approximately 145 sq. ft. to the end of the lanai. This allowed Progressive Design Build to tie into the existing gable room for the new space and create privacy from the neighbors.
Addition #2—Outdoor Kitchen:
The second addition was a bump out that added approximately 120 sq. ft. to the end of the house close to the interior kitchen. This allowed the client to add an outdoor over and 52” Viking grill (with a side burner) to their outdoor living space. Other amenities included a new sink and under counter fridge, granite countertops, tumbled stone stile and Cypress cabinetry, custom-fabricated with marine grade plywood boxes and marine grade finishes to withstand moisture, common in the Bonita Bay community.
Special attention was given to the preparation area on either side of the stove, the landing area next to the oven and the serving counter behind the bar. Bar seating was added to the outdoor kitchen, allowing guests to visit with the cook comfortably and easily.
Brick Pavers
During the design phase, we discovered that the original brick pavers were set in sand, with no concrete pad below. Consequently, the retaining wall and several pavers were starting to fail, caused by the shifting sands. To remedy the problem, we installed a new concrete deck and laid new nonslip pavers on top of the deck—ideal for wet area applications.
Pool Renovations
To dramatically improve the enjoyment and ambiance of their pool, Progressive Design Build completely re-plumbed it, putting in additional lighting and new water features. New decorative pool tile, coping, and a paver deck were also installed around the pool. The pool finish chosen by our clients was a nice tropical blue color.
Screen Enclosure
A new screen enclosure was installed in compliance with new local building codes, making it more stable and solid than the existing one. The color change from white to bronze coordinated well with the homeowners’ new color scheme; and the location of the service door and stairs provided convenient access to the new pool equipment.
Results
This project was completed on time and within budget before these homeowners returned for their winter holiday. They were thrilled with the weekly communication, which included two-way phone calls and email photo sharing. They always knew where their project was in the construction process and what was happening at all times—providing security and peace of mind.
16