
Search results for "Relieved" in Home Design Ideas

 Katie Hutchison Studio
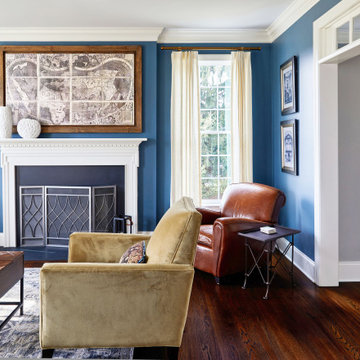
Constructed in two phases, this renovation, with a few small additions, touched nearly every room in this late ‘50’s ranch house. The owners raised their family within the original walls and love the house’s location, which is not far from town and also borders conservation land. But they didn’t love how chopped up the house was and the lack of exposure to natural daylight and views of the lush rear woods. Plus, they were ready to de-clutter for a more stream-lined look. As a result, KHS collaborated with them to create a quiet, clean design to support the lifestyle they aspire to in retirement.
To transform the original ranch house, KHS proposed several significant changes that would make way for a number of related improvements. Proposed changes included the removal of the attached enclosed breezeway (which had included a stair to the basement living space) and the two-car garage it partially wrapped, which had blocked vital eastern daylight from accessing the interior. Together the breezeway and garage had also contributed to a long, flush front façade. In its stead, KHS proposed a new two-car carport, attached storage shed, and exterior basement stair in a new location. The carport is bumped closer to the street to relieve the flush front facade and to allow access behind it to eastern daylight in a relocated rear kitchen. KHS also proposed a new, single, more prominent front entry, closer to the driveway to replace the former secondary entrance into the dark breezeway and a more formal main entrance that had been located much farther down the facade and curiously bordered the bedroom wing.
Inside, low ceilings and soffits in the primary family common areas were removed to create a cathedral ceiling (with rod ties) over a reconfigured semi-open living, dining, and kitchen space. A new gas fireplace serving the relocated dining area -- defined by a new built-in banquette in a new bay window -- was designed to back up on the existing wood-burning fireplace that continues to serve the living area. A shared full bath, serving two guest bedrooms on the main level, was reconfigured, and additional square footage was captured for a reconfigured master bathroom off the existing master bedroom. A new whole-house color palette, including new finishes and new cabinetry, complete the transformation. Today, the owners enjoy a fresh and airy re-imagining of their familiar ranch house.
Photos by Katie Hutchison

 Sruthi Naidu Professional Organizer
I set out to design a master bedroom that was both masculine and feminine. Layering color, textures, patterns and prints helped me to do so. The crisp white walls, delicate chandelier, and intricate gold frames brought the feminine vibe, and the dark rug, black pinstripes on the bedding and the heavy slate drapes added the masculine touch. The pinstripe suiting material on the rounded slipper chairs is a bit of both! The prints and colors may all vary, but since they are still in the same palette they all work well together
Find the right local pro for your project

 Eco Hearth
Size: 4′4″ х 4′2″ х 2′4″ | Price: $5,570
Includes: Chiller, UV Filtration & Wi-Fi Control
Interior: Stainless Steel | Exterior: Red Cedar
FREE SHIPPING
Elevate your wellness routine with the Ice Bath Oval — a beautifully crafted cold plunge designed for personal recovery and rejuvenation. Its space-saving oval form makes it perfect for patios, decks, and smaller outdoor spaces, without compromising full-body immersion.
The interior is made of corrosion-resistant stainless steel for exceptional hygiene, rapid cooling, and easy cleaning. The exterior is finished in natural red cedar, known for its rot resistance, beauty, and durability in all weather conditions.
As experienced manufacturers with over 11 years in production, we deliver each unit fully assembled and ready to use, with doorstep delivery and unloading included. Production and shipping take 2–3 months, and setup requires no tools — just plug in and chill.
Why cold immersion therapy?
• Relieves muscle soreness and post-exercise fatigue
• Boosts circulation and strengthens the immune system
• Improves sleep and enhances mental focus
• Stimulates collagen production and slows aging — so you feel and look revitalized
Professional-grade Chiller System (included):
• 0.8 HP cooling power
• 2500W output
• Temperature range: 37°F – 108°F
• Flow rate: 8–10.5 gal/min
• Built-in UV filtration — keeps water crystal clear
• Quiet operation with automatic temp control
• Timer function for scheduled plunges
• Quick-connect fittings — hassle-free installation
Key Design Features:
• Ergonomic oval shape for comfort and full-body immersion
• Double-wall insulation for maximum cold retention
• Integrated drainage and overflow outlet
• UV filtration system included
• Designed for everyday use with minimal maintenance
We also offer Round and Rectangular models — each one crafted to match your outdoor aesthetic and wellness goals. Custom options available.
➤ Use as a standalone recovery tool or pair with one of our outdoor saunas for the ultimate wellness setup.
➤ Discover more: www.eco-hearth.com/us
Call Us: +1 951 633 7691
WhatsApp: +1 929 420 8945
 Eco Hearth
ce Bath Oval — Includes Chiller | Compact Cold Plunge
Size: 4′4″ х 4′2″ х 2′4″ | Price: $5,570
Includes: Chiller, UV Filtration & Wi-Fi Control
Interior: Stainless Steel | Exterior: Red Cedar | FREE SHIPPING
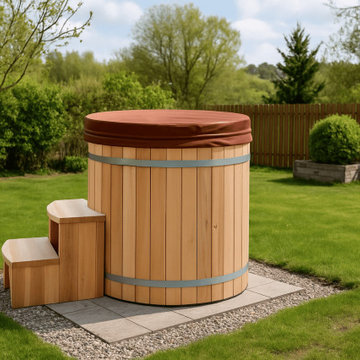
Elevate your wellness routine with the Ice Bath Oval — a beautifully crafted cold plunge designed for personal recovery and rejuvenation. Its space-saving oval form makes it perfect for patios, decks, and smaller outdoor spaces, without compromising full-body immersion.
The interior is made of corrosion-resistant stainless steel for exceptional hygiene, rapid cooling, and easy cleaning. The exterior is finished in natural red cedar, known for its rot resistance, beauty, and durability in all weather conditions.
As experienced manufacturers with over 11 years in production, we deliver each unit fully assembled and ready to use, with doorstep delivery and unloading included. Production and shipping take 2–3 months, and setup requires no tools — just plug in and chill.
Why cold immersion therapy?
• Relieves muscle soreness and post-exercise fatigue
• Boosts circulation and strengthens the immune system
• Improves sleep and enhances mental focus
• Stimulates collagen production and slows aging — so you feel and look revitalized
Professional-grade Chiller System (included):
• 0.8 HP cooling power
• 2500W output
• Temperature range: 37°F – 108°F
• Flow rate: 8–10.5 gal/min
• Built-in UV filtration — keeps water crystal clear
• Quiet operation with automatic temp control
• Timer function for scheduled plunges
• Quick-connect fittings — hassle-free installation
Key Design Features:
• Ergonomic oval shape for comfort and full-body immersion
• Double-wall insulation for maximum cold retention
• Integrated drainage and overflow outlet
• UV filtration system included
• Designed for everyday use with minimal maintenance
We also offer Round and Rectangular models — each one crafted to match your outdoor aesthetic and wellness goals. Custom options available.
➤ Use as a standalone recovery tool or pair with one of our outdoor saunas for the ultimate wellness setup.
➤ Discover more: www.eco-hearth.com/us
Call Us: +1 951 633 7691
WhatsApp: +1 929 420 8945
 Tile Doctor Ltd
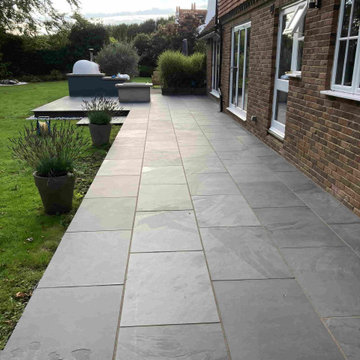
Our client in the villager of Pembury was feeling really deflated after having a Slate Patio laid adjacent to the full length of her house, however the builder had not applied the sealer correctly creating a mess which ruined the appearance of the stone.
Unfortunately, it is not that unusual to be contacted about this sort of situation, applying a sealer is not as easy as manufactures make out. There are lots of factors to consider, choosing the right sealer, is the stone damp, how do you know if you have applied too much, and it often catches tradesmen out. I was able to reassure them that with the right combination of products and equipment the problem could be rectified.
The first job was to strip off the old sealer which was done using a product called Tile Doctor Remove and Go. The name of this product pretty much says it all and once applied to the stone it is left to soak in for ten to twenty minutes before being scrubbed in with a rotary machine fitted with an abrasive burnishing pad.
Tile Doctor Remove and Go is a multi-purpose stripper which will remove most coatings and sealers, including epoxy grout haze which is another common problem we encounter when tradesmen have not cleaned up properly after grouting. It is also good for removing heavy build ups of grease. I used several burnishing pads of different grits going from coarse to smooth on this patio, rinsing and extracting the soil after each pad.
It was a large area, so this process took up most of the day on its own, fortunately I use a van mounted high pressure cleaning and extraction system to remove the soil which is very efficient and leaves the stone bright clean and reasonably dry afterwards. This ensures the process can be carried out with minimal mess.
It was a nice warm summers day and although cloudy we didn’t get any rain overnight, so after checking the forecast I was able to return the next day and apply a fresh sealer to the Slate.
My client wanted a natural look, so I used Tile Doctor Ultra Seal. This product is a no-sheen, natural-look, impregnating sealer which is formulated to provide maximum stain protection. These impregnating sealers work by penetrating the stone, occupying its pores, and thus preventing dirt from residing there.
The client was so happy and relieved to see the results on what a very expensive patio and commented she was eager to get the first barbecue of the season underway.
We recommended that a regular with the jet wash should keep the patio in good condition and in a few years time we could return to reapply the sealer for them.
Michael Conlon
South Kent Tile Doctor
 Gappsi
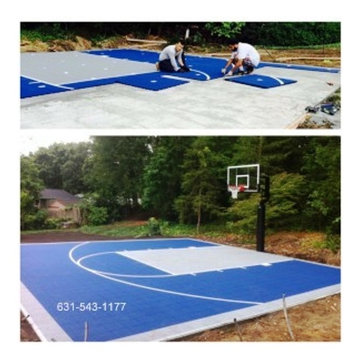
Long Islands Gappsi Team has done it again! No worries about over crowed parks now you can have your very own exclusive recreational center steps away from the comfort of your home. In this photo you see a blue and grey Versa court customized by the homeowner himself. The great thing about the Versa courts is that you have the option to get creative designing your own game lines, layouts, colors and even logos. “Hey, the balls in your court!” What Gappsi Group did specifically was start off with a reinforced concrete base giving a nice even smooth surface to work on as well as rearranging the drainage on the property. Not a one man job! The outdoor court tiles are an interlocking system made from a polyethylene material that is both weather proof and crack resistant with a 25-30 year life expectancy. The Versa tiles have a special shock absorbent attribute that helps relieve stress on the body’s joints and lower back. Gappsi conveniently placed Metal Halide Lights for those long nights whether you’re practicing or finishing off a neighborhood tournament. The Versa tiles are 50% cooler than concrete and asphalt so they are kid friendly if you have interest in doing a children’s playground. Nice and soft for those falls and parents the low maintenance up keep compared to those dirt, sand or wood fiber play areas. Need an indoor court? No problem! The indoor tiles have more of a smooth surface that reflects light giving off a nice shiny appearance. There are a wide variety of other sporting courts and uses for the Versa tiles just call and ask! Stay active Long Island by forfeiting that unused space in your yard or home and let the Gappsi team be in the game! Gappsi provides Gunite, Vinyl, Fiberglass Swimming pools and Hot Tubs for Residential
and commercial application in Suffolk and Nassau County Long Island NY, http://gappsi.com/long-island-swimming-pool-companies-designs-builders-construction-ny.html
Gappsi also provideDesign and installation of Landscape and Masonry for all Suffolk and Nassau County Long Island NY. http://gappsi.com/landscape-design-long-island-ny-landscaping-companies.html
Gappsi also provides Home Remodeling Kitchens and Baths Roofing and siding for residence of Suffolk and Nassau County Long Island NY. http://gappsi.com/long-island-home-improvement-remodeling-general-contractor-ny.html
If in need of Lawn and garden irrigation, in Suffolk and Nassau Gappsi can provide these services http://gappsi.com/irrigation/ along with PVC, wood aluminum and lop-loc fences installation. http://gappsi.com/fences/
To preserve and beautify yournatural Paving stones in Suffolk and Nassau County Long Island NY Gappsi offers cleaning and sealing of patios Driveways and retaining walls. For commercial and residential Applications in Suffolk and Nassau County Long Island NY. http://gappsi.com/patio-cleaning-and-sealing/
Our Showroom displays the most unique Travertine, Porphyry, Granite, Marble, Limestone and Sandstone pavers along with pool copings and veneers. Ready to be picked up at our Yard at 1015 West Jericho Turnpike Smithtown NY or delivered to your Location in Suffolk and Nassau County Long Island NY http://pavingstoneselect.com/
To complete your landscapes outdoor Sports and recreations Gappsi offers Bocce Courts, Putting greens, Sports and Tennis Courts also supply and installation of Synthetic Turf. http://deckandpationaturalstones.com/artificial-grass-synthetic-turf-installation-long-island-ny.html+
 Tile Doctor Ltd
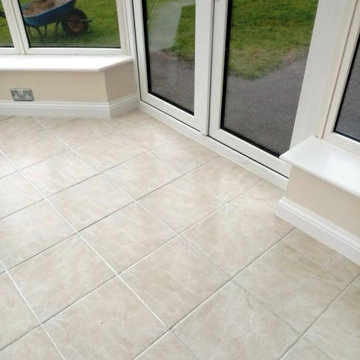
This customer from Stroud was soon to be re-letting her house but the Ceramic tiled floor and especially the grout had been left in a poor and dirty condition by the previous tenant. The ceramic tiled floor was installed throughout the Kitchen and through into the adjacent conservatory. Conscious this would affect future lettings she contacted Tile Doctor to see if we could help.
I paid a visit to the property to survey the floor and discuss how we would restore the Ceramic tiles and get them looking clean again. She was happy to hear we could help and agreed to my quote and we booked the work in for the following week. It would only take a day which suited her perfectly as she was keen to get the property back on the market.
Stroud is a lovely market town and in the centre of Gloucestershire. It is the main town in Stroud District and forms the centre for numerous surrounding market towns.
The Cotswold Area of Outstanding Natural Beauty surrounds the town, and the Cotswold Way path passes by it to the west, so it really is a desirable place to live with lots of lovely walks.
The first job was to protect all the walls and units to ensure they did not get splashed by the products we would be using. I then sprayed Tile Doctor Remove and Go all over the floor and the grout lines, this was left for a short time to dwell and get to work breaking down the dirt. The floor was then scrubbed using a black buffing pad fitted to a buffing machine finishing off by scrubbing the grout lines with a stiff brush. The soil released from the floor was then rinsed off with water and extracted with a wet vacuum. Once I was happy with the result the floors were speed dried with a blow heater. The alternative was to leave the floor overnight, but as time was of the essence speed drying was the best option.
Later that day the floor was dry, and I was able to seal the grout lines with Tile Doctor Ultra Seal. I used a pipette to apply the sealer directly to the grout to ensure maximum coverage. The tiles themselves did not require any sealant as ceramic tiles are sealed at the factory when they are produced. Grout being cementitious however does attract dirt and so sealing it will keep it looking fresh for some time to come and make it easier to clean.
The client was very pleased with the results and relieved she could re-let the house again. Now the floor was clean and much more attractive it would ensure she could achieve the best rental value.
I suggested she left a bottle of Tile Doctor Neutral Tile Cleaner for the new tenants as this would be the best product to keep the floor clean moving forward, you only need a small amount to dilute and it has a pleasant fresh fragrance. At least if the product is on site the tenant is more likely to keep the floor looking good and not resort to everyday household cleaners which eventually break down the grout and its’ seal. She thought this was a great idea.
Malcolm Crowther
Gloucester Tile Doctor
 Room Resolutions
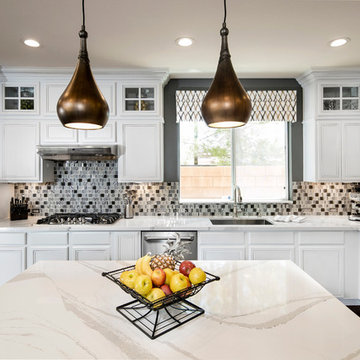
This family friendly kitchen features a contemporary look by refinishing existing cabinets with enamel-based paint in Dunn Edwards Snowflake w/ a touch of Legendary Gray glazing. Playing off the gray, Cambria in Brittanica which grounds the space, was chosen for the countertops and island. This quartz is durable and resistant to surface damage. The window cornice adds an elegant finishing touch to this bright and fresh kitchen.
Photography by Velich Studio
 J Design Group - Interior Designers Miami - Modern
Doors - Contemporary - modern Interior Designers Firm in Miami at your service.
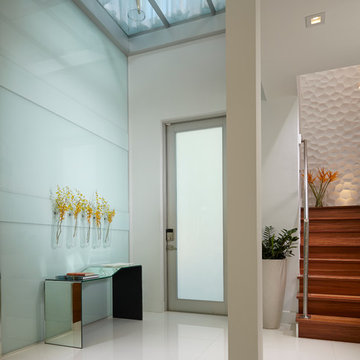
Welcoming guests into your home is always great. What a better way to welcome them, than with impeccable custom wood doors to make a statement for when they walk in – whether it be into a room, a bathroom or your main entrance.
We at J Design Group take great pride in incorporating the most modern materials and finishes for our custom doors.
Whether you want to enhance your entrance, bedrooms or bathrooms, our team of experts will help you choose the right style and finish. One of the best ways to bring an entire design together in your home is through the use of statement doors, and with contrasting elements, you can turn your home into the luxurious place you have always wanted it to be.
We welcome you to take a look at some of our past door jobs. As you can see, doors are a great way to decorate the interior of your home or office space. We invite you to give our office a call today to schedule your appointment with one of our design experts. We will work one-on-one with you to ensure that we create the right look in every room throughout your home.
Give J. Design Group a call today to discuss all different options and to receive a free consultation.
Give J. Design Group a call today to discuss all different options and to receive a free consultation.
Your friendly Interior design firm in Miami at your service.
Contemporary - Modern Interior designs.
Top Interior Design Firm in Miami – Coral Gables.
Door,
Doors,
Double Door,
Glass Door,
Wood Door,
Architectural Door,
Powder Room,
Powder Rooms,
Panel,
Panels,
Paneling,
Wall Panels,
Wall Paneling,
Wood Panels,
Glass Panels,
Bedroom,
Bedrooms,
Bed,
Queen bed,
King Bed,
Single bed,
House Interior Designer,
House Interior Designers,
Home Interior Designer,
Home Interior Designers,
Residential Interior Designer,
Residential Interior Designers,
Modern Interior Designers,
Miami Beach Designers,
Best Miami Interior Designers,
Miami Beach Interiors,
Luxurious Design in Miami,
Top designers,
Deco Miami,
Luxury interiors,
Miami modern,
Interior Designer Miami,
Contemporary Interior Designers,
Coco Plum Interior Designers,
Miami Interior Designer,
Sunny Isles Interior Designers,
Pinecrest Interior Designers,
Interior Designers Miami,
J Design Group interiors,
South Florida designers,
Best Miami Designers,
Miami interiors,
Miami décor,
Miami Beach Luxury Interiors,
Miami Interior Design,
Miami Interior Design Firms,
Beach front,
Top Interior Designers,
top décor,
Top Miami Decorators,
Miami luxury condos,
Top Miami Interior Decorators,
Top Miami Interior Designers,
Modern Designers in Miami,
modern interiors,
Modern,
Pent house design,
white interiors,
Miami, South Miami, Miami Beach, South Beach, Williams Island, Sunny Isles, Surfside, Fisher Island, Aventura, Brickell, Brickell Key, Key Biscayne, Coral Gables, CocoPlum, Coconut Grove, Pinecrest, Miami Design District, Golden Beach, Downtown Miami, Miami Interior Designers, Miami Interior Designer, Interior Designers Miami, Modern Interior Designers, Modern Interior Designer, Modern interior decorators, Contemporary Interior Designers, Interior decorators, Interior decorator, Interior designer, Interior designers, Luxury, modern, best, unique, real estate, decor
J Design Group – Miami Interior Design Firm – Modern – Contemporary
Contact us: (305) 444-4611
www.JDesignGroup.com

 SCJ Studio Landscape Architecture
A Seattle couple needed to take advantage of our amazing summer weather and asked for a way to watch movies outside. We were up to the challenge, designing a custom concrete bench that by day serves as built-in seating and transforms at night into a perfect spot to catch a flick on the fly! Other touches include modern planting and steel planters to match the contemporary feel of the home.
Photos by Miranda Estes Photography

 Backyard Buildings
A yoga shed can be any size you would like. This example shows off one of our 12x10 sheds, but really any size would work well. We would recommend any size greater than 10'x10'. Depends on if you want to use it to store other items as well.

 Anak Ituh
Links ready! Game of Thrones s06e09 Battle of the Bastards On-line. Alright, the long wait has ended, and this is our nice chance anyway to start watching into the rest about Game of Thrones season 6, episode 9 online : Battle of the Bastards. Check this out then, the plot line expected, Ramsay surprises his audience. Jon retaliates.
Dany is true to her word. "Battle of the Bastards" is the ninth episode of the sixth season of HBO's fantasy television series Game of Thrones, and the 59th overall. It was written by series co-creators David Benioff and D. B. Weiss, and directed by Miguel Sapochnik. It is scheduled to air on June 19, 2016.
Additional information looks fantastic, "Battle of the Bastards" was written by the series' creators David Benioff and D. B. Weiss. Some elements in the episode are based on the forthcoming sixth novel in the A Song of Ice and Fire series, The Winds of Winter, which author George R. R. Martin had hoped to have completed before the sixth season began airing. "Battle of the Bastards" was directed by Miguel Sapochnik. Sapochnik previously directed the fifth season episodes "The Gift" and "Hardhome".
Game of Thrones (season 6) looks amazing, The sixth season of the fantasy drama television series Game of Thrones was ordered by HBO on April 8, 2014, together with the fifth season, and premiered on April 24, 2016. In contrast to the previous seasons, it largely consists of original content currently not found in George R. R. Martin's A Song of Ice and Fire series.
Fantastic enough, Jaime Lannister returns to King's Landing with Myrcella Baratheon's corpse. Tensions escalate between Tommen Baratheon, Cersei Lannister, and the Faith Militant and the High Sparrow, as the latter refuses to let Tommen visit Margaery in prison or Cersei attend Myrcella's funeral. Jaime and the Tyrell army attempt to liberate Margaery and Loras, only to find Margaery has become a follower of the High Sparrow and Tommen has forged an alliance with the Faith Militant.
Tommen relieves Jaime from the Kingsguard, sending him to Riverrun to assist House Frey in reclaiming it from the "Blackfish" Brynden Tully. Cersei is unconcerned about their separation, as she has named the reanimated Gregor Clegane to defend her in her trial by combat; however, Tommen decrees that trial by combat is to be abolished and replaced by trial by the Faith.
At Riverrun, Jaime finds that the Blackfish is determined to not surrender the castle and is willing to wait out a siege. Brienne is allowed to enter Riverrun in order to persuade the Blackfish to surrender, but he refuses to abandon his ancestral home. Jaime forces Edmure Tully, held captive by the Freys, to order the Tully forces to surrender. Brienne and Podrick flee, while the Blackfish dies fighting the Lannisters.
In the Riverlands, Sandor "The Hound" Clegane is revealed to have survived his wounds and assists a peaceful community in building a sept. After the villagers are slaughtered by outlaws affiliated with the Brotherhood Without Banners, the Hound pursues the Brotherhood. He kills some of the outlaws and encounters Ser Beric Dondarrion and Thoros of Myr executing the others.
100% working here:
http://tinyurl.com/hzkaudn
http://tinyurl.com/htqfqms
After Doran Martell receives word of Myrcella's death, Ellaria Sand kills him and seizes control of Dorne, with the Sand Snakes also killing his heir Trystane. Are you ready finally? Start watching for it then, Game of Thrones season 6, episode 9 : Battle of the Bastards online.
 Tile Doctor Ltd
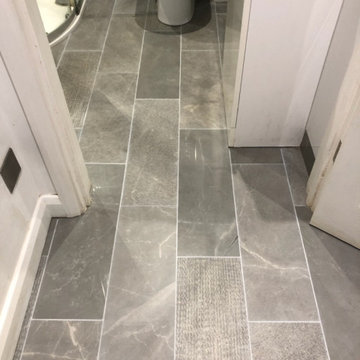
The pictures below detail the renovation of a Porcelain Tiled Floor I completed at a property in Ipswich. Installed throughout the Kitchen and into the adjacent WC the porcelain tile and grout were in a very dirty state and the client was desperate to get them clean. The situation wasn’t helped by their two dogs with grubby paws. She had tried all the usual household cleaners she could find, and nothing seemed to work. Unfortunately, household cleaners can make the problem worse due the strong chemicals they contain.
I visited the property to survey the floor and was able to reassure the client that although the grout was heavily stained it could be renovated by recolouring it with a Tile Doctor Grout Colourant. I was confident we would soon be able to get the floor looking great again and demonstrated the process I would use on a small part of the floor. The demonstration went well and happy with the result we agreed a date for my return the following week to complete the work which should be completed in a single day.
Returning on the agreed date we started by protecting the by applying a clear silicone sealant to the MDF skirting boards and kitchen base units. We left this to dry for an hour before proceeding with the cleaning.
The Porcelain tile and grout was cleaned with a strong dilution of Tile Doctor Pro-Clean using 3 parts cleaner to 5 parts water. The solution was applied to the tile and grout and then left to soak in for ten minutes before being worked in using a rotary machine fitted with a Black Scrubbing Pad. Tile Doctor Pro-Clean is a concentrated, multi-purpose high-alkaline cleaner which is designed for deep cleaning tile, stone and grout of dirt and grease and can also remove sealers.
Pads can struggle to reach into the recesses of the grout line so once I was finished with the tile, I hand scrubbed the grout with a wire brush. The floor was then rinsed with water and the resultant slurry extracted off the floor with wet vacuum.
The floor took about three hours to deep clean which was just the right timing for us to have lunch whilst the floor dried. The grout was much improved by the cleaning process but as suspected there were too many deep-seated stains to be able to guarantee a consistent finish. So as previously agreed with the client we set about colouring the grout using a light grey colourant. This took most of the afternoon as there was a lot of grout.
The Porcelain tiles were the non-porous type that won’t take a sealer and the colourant acts as a barrier over the grout protecting it and making it easy to clean so once I was done colouring there was no need to apply a sealer.
My client was relieved to have the floor looking clean and presentable again. For aftercare I recommended that moving forward it would be best to use Tile Doctor Neutral Tile Cleaner which is a pH neutral cleaner. This will ensure that with regular cleaning the floor will keep clean and the grout won’t be compromised by overly strong products.
Bruce Copping
Suffolk Tile Doctor
 CairnsCraft Design & Remodel
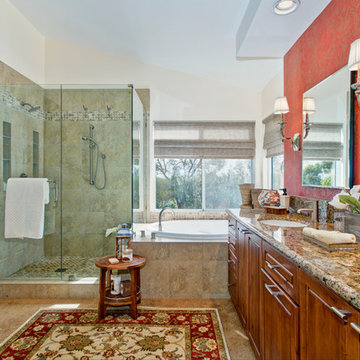
Great spacious bathroom with lot of amenities.
Photographer: Jon Upson
Large elegant master beige tile and porcelain tile drop-in bathtub photo in San Diego with an undermount sink, raised-panel cabinets, medium tone wood cabinets, granite countertops, beige walls and a two-piece toilet
Large elegant master beige tile and porcelain tile drop-in bathtub photo in San Diego with an undermount sink, raised-panel cabinets, medium tone wood cabinets, granite countertops, beige walls and a two-piece toilet
 Omega Builders LLC
Todd Douglas Photography
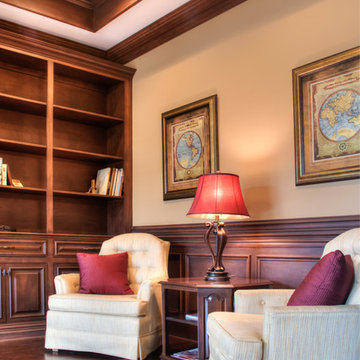
Elegant freestanding desk dark wood floor study room photo with beige walls
Elegant freestanding desk dark wood floor study room photo with beige walls
 Tile Doctor Ltd
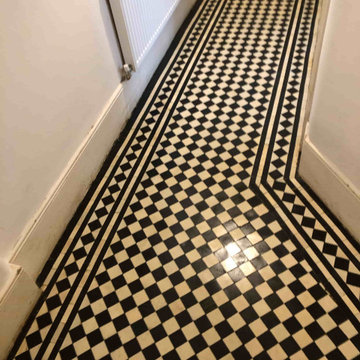
This property was in theLadbroke Grove area of West London near Kensington. The client had found an old and probably original black and white checkered pattern Victorian tiled floor under their cork tiled flooring. They also reported that it was badly damaged so I thought it would be best if I paid them a visit first to see how extensive the damage was and whether it was repairable. The floor was in a quite a state, the tiles were covered in glue from the cork and had several areas had been back filled with cement.
I reassured them that the damage could be rectified, and that it would be possible to completely restore the floor back to a good standard. I would have to remove the glue, remove the cement that had been used to level the floor and replace with reclaimed tiles to match. They were relieved to find out it could be done and happy with my quote I was instructed to go ahead with the work.
We started by taping up the skirting boards to protect the woodwork. With this done attention was turned to the glue which was softened using a strong dilution of Tile Doctor Remove and Go so it could be carefully scraped off. Multiple techniques and tools were needed to remove the glue including hand-held scrappers and a black pad fitted to a buffing machine. For the stubborn areas steam was applied to help lift the adhesive out the tile.
Once all the glue was removed the floor was rinsed and the alkaline cleaner neutralised with Tile Doctor Grout Clean Up which further cleaned the tiles and removed old traces of grout from the floor. Old floors like this generally don’t have a damp proof membrane underneath so the acids in the Grout Clean-up also counter any efflorescent salts trapped in the tile.
Once this was completed the slurry was removed with a wet vacuum and left to fully dry out overnight.
The following day focus turned to repairing the areas of the floor where the tiles were missing or broken. The main issue being the cemented areas, we see this a lot with Victorian Hallways and generally what happens is a heating engineer digs out the floor to install pipework. Not being tilers, your average plumber then repairs the floor with a self-levelling cement that brings the level up to the surface of the tile so it can be covered with lino, carpet of in this case cork.
The sub floor was then rebuilt with rapid setting self-levelling compound but this time to below the level of the tile.
Once the new base was dry it was a just a question of re-tiling with the replacement tiles to match the original checkered pattern. The replacement reproduction tiles were sourced from Original Features in Crouch End North London. After grouting we left the floor to dry out over the weekend.
When we returned to seal the floor our first step was to check the floor was dry using a moisture meter. This is critical as the sealant will not cure correctly if there is too much moisture in the floor. In this case the extra two days we had allowed had done its job and the test had confirmed it was ready to accept a sealer.
The client wanted the floor finish not to be too shiny once sealed so we opted to seal with two coats of Tile Doctor Seal and Go Extra. This is good choice for old Victorian floors such as this example as it’s special acrylic-based formula allows for moisture vapour transmission which as mentioned previously is a concern where no damp proof membrane has been installed.
I’m please to confirm my clients were delighted with the result, as you can see from the pictures the black and white floor restoration makes for a dramatic entrance well in keeping with the style of the property. For aftercare I recommended the use of Tile Doctor Neutral Tile Cleaner which will keep the tiles in good condition going forward without damaging the new sealer.
Jackson Davis
Central London Tile Doctor
 Neumann & Rudy Architecture
**I. Spatial Composition & Architectural Volume**
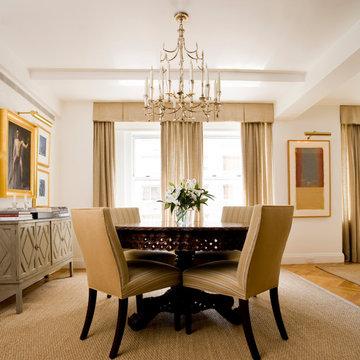
This is a pre-war Manhattan dining room whose proportions have been surgically clarified rather than reinvented. The room reads as a compressed rectilinear volume, its ceiling plane articulated by a shallow dropped soffit and a single exposed transverse beam — a candid acknowledgment of the building's structural grid, left legible rather than concealed behind a coved plaster surround. That beam performs a quiet spatial function: it registers the threshold between the dining zone and the adjoining passage at right, where a sliver of herringbone parquet and a second curtained aperture extend the sightline into a further room, relieving the enclosure and establishing a discreet enfilade. The composition is emphatically axial and symmetrical — chandelier, floral centerpiece, pedestal table and central window mullion align on a single spine — yet the symmetry is deliberately imperfect: the flanking chairs are turned inward on the diagonal, the sideboard weights the left wall, and the artwork on the right hangs off-axis. The result is a Beaux-Arts discipline softened by a decorator's asymmetry. Most consequential is the pelmet, a deep upholstered box valance carried nearly wall-to-wall, which annexes the window into a single monumental glazed field and visually raises the ceiling by drawing the eye above the actual head height of the sash.
**II. Materiality, Color & Texture**
The palette is a study in monochromatic warmth held within a narrow tonal band of buff, oatmeal, flax and champagne, with saturation kept deliberately low so that texture carries the burden of variety. Underfoot, a wall-to-wall seagrass or sisal matting with a coarse basketweave provides the room's tactile bass note — hard-wearing, faintly agricultural, and set in productive tension with the refined silk-and-linen sheen of the curtains and pelmet. The chairs are a masterstroke of dual upholstery: matte sand-toned fabric on the outside back and a subtle self-striped ottoman weave on the seat and inner face, a device that renders the seating both plush and graphic. Against this envelope of pale neutrals, two dark accents supply the necessary chromatic gravity: the deeply carved, pierced-apron rosewood or mahogany center table, almost Anglo-Indian in its fretwork and baluster pedestal, and the ebonized klismos-splayed chair legs that echo it. The left wall introduces a painted, dry-brushed Gustavian-style commode with lozenge-fretwork doors, its chalky grey-green a cool counterpoint, while gilt frames, a burnished picture light and the silvered chandelier thread a metallic warmth through the whole.
**III. Lighting, Atmosphere & Style Profile**
Daylight is the room's primary illuminant and it is handled with restraint: the curtains are dressed open but the roman-like sheer inner treatment diffuses the light into a milky, north-facing wash that flattens shadow and flatters the neutral surfaces. Artificial lighting is layered and entirely decorative in expression — the tall, attenuated candle-arm chandelier, hung low and generously scaled, functions as sculpture and as the room's compositional keystone, while two swing-arm brass picture lights provide directional accents that anchor the art as evening focal points. There is no visible downlighting or recessed apparatus; the mood is candlelit, hushed and faintly nocturnal even in daytime. Stylistically the room resolves into what might be termed **Refined Neutral Traditionalism** — an American-classical, Bilhuber-adjacent idiom that marries eighteenth-century Swedish and Anglo-colonial furniture archetypes with contemporary tailoring, tonal upholstery and humble natural-fiber flooring. Its sophistication lies precisely in that calibration: heirloom silhouettes stripped of pattern and color noise, so that carving, weave and gilding become the sole ornamental language.
 Complete Flooring
Chris Golden
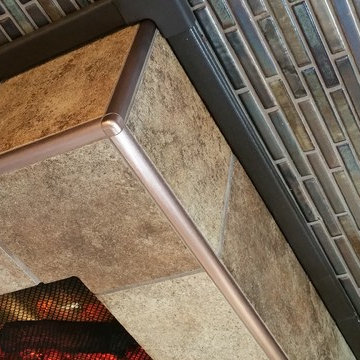
Inspiration for a transitional carpeted living room remodel in Phoenix with beige walls, a standard fireplace and a tile fireplace
Inspiration for a transitional carpeted living room remodel in Phoenix with beige walls, a standard fireplace and a tile fireplace
 Quality Edge
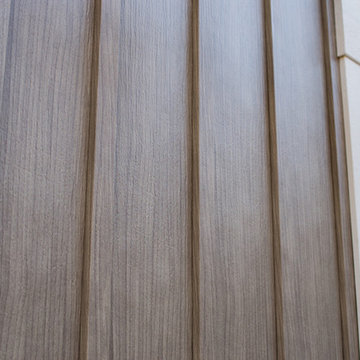
TruCedar Steel Siding shown in 10" Board & Batten in Napa Vine.
Beige two-story metal exterior home idea in Grand Rapids
Beige two-story metal exterior home idea in Grand Rapids
28