Search results for "Removed" in Home Design Ideas
The client's master suite was dark with outdated wallpaper. They wanted the vanity with the floating mirrors to remain the focal point of the bathroom, so for the most part, the layout stayed the same. We went in, removed all finishes and started over; keeping with the style of the house. Grand Mirrors with integrated lighting were installed over the center vanities. The only change in the layout was that the bath tub was removed and replaced shower. The shower was lined with solid white marble tiles and accented with a cool Valentino parquet marble. The old shower became a linen storage closet and cabinets for additional storage. The lower cabinets are a deep espresso finish with contrasting linen finished cabinets up top. The door to the water closet was replaced with a pocket door, creating more space.
The guest bathroom felt claustrophobic with the wall between the vanity and toilet/shower area. We removed the wall and used a pony wall at the end of the vanity instead to hide the toilet. Being a guest bath there was no need double sinks, so one was removed, increasing the cabinet space. The crown molding stayed but the popcorn ceiling texture was removed in both bathrooms. The clients love their new sleek, brighter bathrooms.
Design/Remodel by Hatfield Builders & Remodelers | Photography by Versatile Imaging

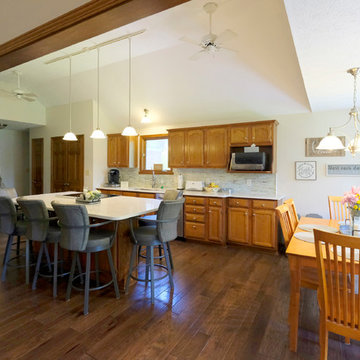
Update a 1980's condo to give it a fresh, new look for the new owner. Removed oak beams and trim in the living room. Painted fireplace to give a clean look. Gutted kitchen and put in new cabinets, countertop, backsplash and flooring. Extended the kitchen countertop to enlarge. Removed window over sink to create a passthrough to the 4 season room. Removed sliding glass door to 4 season room and made the opening smaller. Removed cedar on 4 season room walls and drywalled and painted the walls to give a lighter feel. Removed oak beams and crown molding in the dining room to update. Gutted both bathrooms and installed new tile, flooring, vanities, walk in shower, lighting. Updated front hallway and front door. Painted all bedrooms and replaced flooring. Replaced all windows and doors. Achieved a brighter, newer feel for the entire space.

The owner's dream was for an elegant, prairie style kitchen. A bearing wall required removal to accomplish this plan.
First, we shored up the second floor wall and roof.
Electrical, plumbing, drywall and framing were removed from the existing bearing wall. A hole was then cut in the floor for the new steel post.
The new steel was delivered into the home. The bearing wall was then removed.
We welded a bracket to the side of the existing steel column. The new steel beam was installed on the welded bracket. A new steel column was installed at the opposite of beam, which extended through floor and welded to the steel beam in the crawl space.
We framed and installed paneling around the new beam and two posts.
General Contractor / Remodel: ED Enterprises, Inc.
Find the right local pro for your project
When you uncover a tiled floor after it has been covered by carpet for many years, it’s almost a given that it will be in a bad state. However, my customer, who lives in the town of Lymm, wasn’t expecting the Victorian tiled hallway they had recently uncovered to be in quite so terrible a state. As you can see from the photograph, it has been completely devastated by paint plaster and a big pool of cement floor leveller. Understandably, the formerly colourful appearance of the tiles had completely drained and it would require a through restoration to get them back into a usable condition.
To begin the restoration, I mixed a strong cleaning solution which consisted of Tile Doctor Remove & Go combined 50/50 with Tile Doctor Pro Clean. Remove & Go is a heavy duty remover that breaks down old sealers, along with adhesives, paint stains and other tough soil build up where as Pro-Clean is a versatile alkaline-based cleaner that reliably eradicates dirt on a wide variety of natural stone floors.
The solution was applied liberally across the floor, and left to dwell for a short period, allowing time for it to soften up the paint plaster. Next, I fitted a coarse scrubbing pad to my rotary cleaning machine and began to scrub the solution into the tiles, with a big difference to the appearance of the tiles being made quite quickly. The resulting cleaning slurry was promptly removed using a wet-vac machine.
I repeated the process two times to provide an extra thorough clean and then give the floor a thorough rinse. Some particularly stubborn marks remained on the floor which I was able to remove using Tile a Doctor Acid Gel, a blend of phosphoric and hydrochloric acids in gel form that’s easy to control. The floor was then left to dry fully overnight.
The next morning, I returned to the property and ran some damp tests. This is incredibly important to do before sealing any tiled floor because any excess moisture can cloud the sealer and prevent it from doing its job properly.
Once satisfied that the floor could be sealed, I applied several coats of Tile Doctor Seal and Go, our topical sealer which provides both a robust surface seal and a long-lasting low sheen finish in one and ideal for Victorian tiles.
It would be an understatement to say that this Victorian tiled floor was transformed. The customer was amazed at the results considering how bad a state the tiles had been in just a day earlier. When you have a situation like this, it’s hard to believe the tiles could ever be fully restored. Nonetheless, we could now see them in their full and original glory, and needless to say, the customer was very, very pleased with the result.
Alastair Robb
West Cheshire Tile Doctor

1. Removed Existing Overlay from Lead Walk (Approx 309sqft)
2. Removed Sealer and Color from Driveway. Expand Existing Driveway by 5 feet Remove section of driveway approach Expanded Approach by 5 feet (Approx 1,044 sqft)
3. Apply Stamped Concrete Overlay on Lead walkway, New and Existing Concrete Driveway (Approx 1,269 sqft)
4. Removed Sealer and Color from Pool Deck (Approx 2,878 sqft)
5. Applied Stamped Concrete Overlay on Pool Deck (Approx 2,878 sqft)
6. Removed and Replaced Deck-o-Seal around Pool Deck (Approx 208 sqft)......Salvatici's

Here’s a job I completed just before Christmas last year, at a house in Northampton which has a rich history and mix of architectural styles. The run up to Christmas is always popular as people try to get their household projects finished off in time for celebrating the festive season with family so this is always a busy time for Tile Doctor.
The photos below show a neglected Victorian Quarry tiled floor in need of repair, with cracked tiles along the edges. These were caused by somebody in the past using brute force to remove carpet gripper rods which had been glued to the tiles. These cracks were present around the edges of the entire hallway, however; this particular type of tile is very hard to get hold of. Furthermore, it is a costly process to replace the tiles as the skirting boards would have had to have been removed.
As well as the physical issues the floor had a dull appearance due to the build-up of builder’s dust and the general wearing down of the paintwork over time. I agreed with the client that the best course of action would be to fill the tiles, and paint the damaged tiles using a colour that matched as close as possible. Many of my Tile Doctor colleagues would disagree with this approach opting to source the correct tile and rebuild the damaged section however unfortunately in this case we didn’t have the time or the budget.
My first action was to use a brush and vacuum to remove as much loose debris and dust as possible. I followed this by agitating the tiles with a dilution of Tile Doctor Pro Clean which is a strong alkaline product and safe to use on tile and stone. I use a combination of a coarse burnishing pad fitted to a rotary machine and hand held brushes, in order to get the floor clean. The resulting slurry was then rinsed and removed using a wet vacuum. This process was repeated twice followed by a thorough rinse to ensure any trace of cleaning agent had been removed and the floor neutralised.
As this was such an old property, I then used a steamer to heat up the tiles in order to draw out any contaminants and assist with the drying process. I installed a fan to dry the floor before starting repairs, mixing up some coloured grout and filling all holes and cracks along the edges, including the doormat area.
I allowed the coloured grout to dry overnight, before hand painting the black and Terracotta tiles. These were then given time to dry (about a couple of hours). Following this, I carefully painted in the other colours: brown and cream. The overall effect was quite convincing and you had to look very closely to notice.
Due to the fact that there were other tradesmen working in the house at the time, the floors were sheeted up to protect from additional dust and muck. I then left the house for a week, allowing the floor ample time to dry completely in preparation for sealing.
Upon my return, I took damp meter readings, and once satisfied with the dryness of the tiles, I began the sealing process with the impregnating, colour-enhancing sealer Tile Doctor Colour Grow. The sealer provides both durable surface protection and an aesthetically pleasing matte finish.
The below photos show how the product has enriched the colours with the two coats applied.
The process of restoring this wonderful Victorian Quarry tiled floor was certainly time consuming, but very rewarding. I am exceptionally pleased with the results myself, and my client couldn’t have been happier and I’m sure the newly revitalised hallway will have been a talking point for all their visitors during the Christmas break.
Phil Vissian
Northamptonshire Tile Doctor

The property is a 700 square foot condo. The homeowner's goal was to have his 40+ year old unit transformed into a brand new space. To accomplish this, we gutted the entire unit; we replaced the popcorn ceiling with new drywall, replaced the old flooring with maple engineered wood flooring, removed the mirrored walls and painted the drywall a soothing neutral gray, and removed the kitchen walls and bulkheads to create an open concept. The bathroom and kitchen were totally renovated as well.
The outer kitchen walls and bulkheads were removed to create an open feel. The main challenge in opening up the space was the building restricting the removal of the existing telephone wires that were located in one of the walls. To maintain compliance with the building rules, I designed an "iron pipe" to house the phone wires which also serves as a conduit for the required wiring to the island. This pipe has an industrial influence which ties in perfectly with the custom-made shelving over the kitchen sink.
Additions include: Handsome crown moulding and custom baseboards, Sherwin Williams wall, ceiling and trim paint (the ceiling is NOT white), LED recessed light fixtures, custom island pendants, Quartz countertops, custom dining chandelier, custom shelving over the kitchen sink and custom "iron pipe" designed to house existing telephone wires (the building restricted the removal of existing phone line).
Photography by Michael Anthony Harrison, www.MikeAntPhotography.com

The client's master suite was dark with outdated wallpaper. They wanted the vanity with the floating mirrors to remain the focal point of the bathroom, so for the most part, the layout stayed the same. We went in, removed all finishes and started over; keeping with the style of the house. Grand Mirrors with integrated lighting were installed over the center vanities. The only change in the layout was that the bath tub was removed and replaced shower. The shower was lined with solid white marble tiles and accented with a cool Valentino parquet marble. The old shower became a linen storage closet and cabinets for additional storage. The lower cabinets are a deep espresso finish with contrasting linen finished cabinets up top. The door to the water closet was replaced with a pocket door, creating more space.
The guest bathroom felt claustrophobic with the wall between the vanity and toilet/shower area. We removed the wall and used a pony wall at the end of the vanity instead to hide the toilet. Being a guest bath there was no need double sinks, so one was removed, increasing the cabinet space. The crown molding stayed but the popcorn ceiling texture was removed in both bathrooms. The clients love their new sleek, brighter bathrooms.
Design/Remodel by Hatfield Builders & Remodelers | Photography by Versatile Imaging

We removed existing closet and created a wet bar on the left, we also removed two kitchen walls adding two pendant lights and a white cesar stone counter top creation of an open kitchen by removing two walls, addition of bottom cabinets with adjustable shelves to maximize available space and added a cesar stone counter top.

We removed existing closet and created a wet bar on the left, we also removed two kitchen walls adding two pendant lights and a white cesar stone counter top creation of an open kitchen by removing two walls, addition of bottom cabinets with adjustable shelves to maximize available space and added a cesar stone counter top.

1. Removed Existing Overlay from Lead Walk (Approx 309sqft)
2. Removed Sealer and Color from Driveway. Expand Existing Driveway by 5 feet Remove section of driveway approach Expanded Approach by 5 feet (Approx 1,044 sqft)
3. Apply Stamped Concrete Overlay on Lead walkway, New and Existing Concrete Driveway (Approx 1,269 sqft)
4. Removed Sealer and Color from Pool Deck (Approx 2,878 sqft)
5. Applied Stamped Concrete Overlay on Pool Deck (Approx 2,878 sqft)
6. Removed and Replaced Deck-o-Seal around Pool Deck (Approx 208 sqft)

Damaged caused by a car that hit the side and corner of the garage. Had to remove and salvage brick (to be reused), support the roof before removing framing of the side wall and front corner of garage. Framed the wall and corner back. Removed existing beam over garage door opening and installed new LVL beams. New insulation in all exterior walls and sheetrock installed. New 20 foot garage door with belt-driven door opener with Wi-Fi capabilities. Removed existing deck and frame, built new deck with all new composite decking. Removed vinyl siding above door, installed new vinyl siding.

Designing and engineering this kitchen was a team effort between the owners and E D Enterprises, Inc. A twenty-four foot bearing wall was removed and replaced with a twenty-four foot steel beam to create a more open space. The existing soffits and electrical were removed, as well. The owners were then able to plan the kitchen of their dreams.
First, we shored up the second floor and roof, and rerouted the electrical and gas line.
Walls were then framed for the new kitchen footprint. The bearing wall was then removed. The new steel was delivered to the home. The steel was raised into position and the steel column was installed and bolted to the foundation.
We then framed and dry walled around the steel beam.
General Contractor / Remodel: E D Enterprises, Inc.
Michael Alan Kaskel Photography

Damaged caused by a car that hit the side and corner of the garage. Had to remove and salvage brick (to be reused), support the roof before removing framing of the side wall and front corner of garage. Framed the wall and corner back. Removed existing beam over garage door opening and installed new LVL beams. New insulation in all exterior walls and sheetrock installed. New 20 foot garage door with belt-driven door opener with Wi-Fi capabilities. Removed existing deck and frame, built new deck with all new composite decking. Removed vinyl siding above door, installed new vinyl siding.

Update a 1980's condo to give it a fresh, new look for the new owner. Removed oak beams and trim in the living room. Painted fireplace to give a clean look. Gutted kitchen and put in new cabinets, countertop, backsplash and flooring. Extended the kitchen countertop to enlarge. Removed window over sink to create a passthrough to the 4 season room. Removed sliding glass door to 4 season room and made the opening smaller. Removed cedar on 4 season room walls and drywalled and painted the walls to give a lighter feel. Removed oak beams and crown molding in the dining room to update. Gutted both bathrooms and installed new tile, flooring, vanities, walk in shower, lighting. Updated front hallway and front door. Painted all bedrooms and replaced flooring. Replaced all windows and doors. Achieved a brighter, newer feel for the entire space.

The client's master suite was dark with outdated wallpaper. They wanted the vanity with the floating mirrors to remain the focal point of the bathroom, so for the most part, the layout stayed the same. We went in, removed all finishes and started over; keeping with the style of the house. Grand Mirrors with integrated lighting were installed over the center vanities. The only change in the layout was that the bath tub was removed and replaced shower. The shower was lined with solid white marble tiles and accented with a cool Valentino parquet marble. The old shower became a linen storage closet and cabinets for additional storage. The lower cabinets are a deep espresso finish with contrasting linen finished cabinets up top. The door to the water closet was replaced with a pocket door, creating more space.
The guest bathroom felt claustrophobic with the wall between the vanity and toilet/shower area. We removed the wall and used a pony wall at the end of the vanity instead to hide the toilet. Being a guest bath there was no need double sinks, so one was removed, increasing the cabinet space. The crown molding stayed but the popcorn ceiling texture was removed in both bathrooms. The clients love their new sleek, brighter bathrooms.
Design/Remodel by Hatfield Builders & Remodelers | Photography by Versatile Imaging

Pressure Wash the entire Exterior to remove all Mold and Mildew
Scraped all loose and peeling Stain
Spot Primed all bare wood
Caulked around all Windows, Doors, Siding and Trim where cracked
Filled all Woodpecker holes and knot holes to properly seal
Stained all Siding and Trim in two coats
Garage Access Door-
Carpentry-
Removed and Replace Garage Access Door Brick Mold
Removed and Replaced 4 Siding Boards in Front where warped and cracked
Removed and Replaced three second-story Soffits
Removed and Replaced 3-4’ of Soffit Ceiling Plywood

We removed existing closet and created a wet bar on the left, we also removed two kitchen walls adding two pendant lights and a white cesar stone counter top creation of an open kitchen by removing two walls, addition of bottom cabinets with adjustable shelves to maximize available space and added a cesar stone counter top.

These Victorian hallway tiles were cleaned at a residence in the historic town of Bideford. As you can see from the photograph below the tiles were dull and had lost their vitality due to ingrained dirt, clearly it had been some time since they were given a good deep clean.
Cleaning a Victorian Floor
The first job was to protect the skirting with tape and then vacuum to remove any loose debris and grit. The next step was to cover the entire floor with a strong dilution of Tile Doctor Remove and Go which is a powerful cleaning and coating remover that is safe to use on tile and stone. It was left to dwell on the floor for twenty minutes so it could soak into the tile and make the job of removing any remaining sealer and ingrained dirt easier.
The solution was scrubbed into the tile using a black scrubbing pad fitted to a rotary machine and then the soiled cleaning solution rinsed off using a wet vacuum. This process was repeated a number of times until I was satisfied with the condition of the floor and followed with a final rinse with clean water to remove any trace of cleaning product. The water was extracted with the wet vacuum to get the floor as dry as possible before leaving for the day.
Sealing a Victorian Floor Sealing
The tiles were left to dry for 24 hours and I came back to seal the tiles using eight to nine coats of Tile Doctor Seal and Go which is an ideal sealer for Victorian Tiles as it leaves a nice sheen and provides excellent stain protection.
I think you will agree the hallway floor came up really well and now been given a new lease of life.

Marble is known for its premium quality, toughness and aesthetic, making it a very popular choice for bathroom countertops, such as this one at a house in Northampton. However just because it’s tough doesn’t mean that Marble can be cleaned with the usual household cleaners. Like all natural stone, Marble is acid sensitive and unsuitable products can have a very damaging effect on its appearance.
In this situation, the property owner had used a limescale remover to remove some unsightly marks from the countertop. Unfortunately, the product was acid-based and instead of making an improvement it just made it worse and caused severe etching.
The first photo above shows the limescale marks from where toiletries have been placed on the side whilst wet. Since Northampton is a hard water area, the limescale deposits over time caused these marks to appear.
The only way to effectively remove the Limestone deposits – while at the same time rectifying the damaged caused by the botched cleaning attempt – was to use a system of hand-held diamond encrusted pads and hand help blocks of various grits to cut back the stone and re-polish it, a process we call burnishing.
Before officially beginning the burnishing process, I ran a few tests to determine the type of pad I would need to use to achieve the best results. I found that, in most areas, I would need to use the Tile Doctor 400 Grit (Coarse) pad to resurface the tile and remove the damaged layer of stone, but in some areas where the etching was worse, I would need to use the 200 Grit (Very Coarse) pad.
After burnishing the affected areas with the Coarse and Very Coarse grit pads, I started to incrementally polish the stone to achieve a high-quality shine, working my up through the Medium, Fine and Very grit pads.
No chemicals were used during this process – only water for lubrication, combined with the six-inch diamond encrusted burnishing pads fitted to a hand-held buffing machine.
The final part of the restoration was to seal the stone to maintain a long-lasting, deep polished appearance. To do this, I used Tile Doctor Shine Powder, which is a crystallising sealer in powder form. The powder is applied directly and combined with water, before being worked into the stone to seal it.
The customer was very happy with the results and the level of shine achieved. I gave the customer a complimentary bottle of Tile Doctor Stone Soap, which is our aftercare cleaner for polished natural stone, along with instructions on periodic maintenance to help maintain the finish we had achieved for as long as possible.
Phil Vissian
Northamptonshire Tile Doctor
60