
Search results for "Safety issues" in Home Design Ideas
 AM Dolce Vita
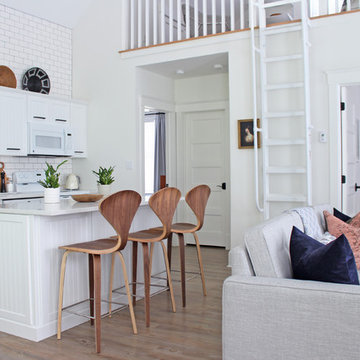
Michelle AM Dolce Vita, Scandinavian cottage style, Nordic cottage style, Scandinavian living room, modern rustic living room, Rove Concepts Norman counter stools, Florence Knoll style tufted sofa, floating TV cabinet, Ikea Stockholm coffee table bench, Tonic living pillow, faux fiddle leaf fig tree in a basket, salt and pepper cowhide rug, modern rustic living room, pink kilim pillow, African mudcloth pillow, Structure chair, hygge home

 SUPERIOR CHIMNEY SERVICES CORPORATION
Let’s be honest. Chimney cleaning probably isn’t the first thing on your spring to-do list. But if you used your fireplace this past winter, scheduling a chimney sweep before warm weather arrives is one of the best home maintenance decisions you can make. Here’s why Spring is the best time to schedule your chimney cleaning.
Your Chimney Just Worked Hard All Winter
It’s tired, simply burnt out! Every time you burned wood this season, creosote, also known as soot, was clinging to the inner walls of your chimney. It’s a natural byproduct of burning wood, but it’s also highly flammable and the leading cause of chimney fires. The longer it sits, the more it builds up. A professional chimney sweep, such as Superior Chimney, takes a look at your chimney flue liner, damper, and firebox — clearing it all out before that creosote becomes a serious issue.
Spring is the Best Time to Take Care of the Chimney
Fall is when everyone panics. The temperature drops, and the fireplace suddenly seems appealing. By scheduling now, in spring, you get to clean your chimney now so your house doesn’t smell from the creosote left in your fireplace and chimney Superior Chimney includes a FREE 14-Point Certified Written Inspection with photo documentation sent straight to your email with every chimney sweep we do. That’s the kind of full-service you want, and you’re more likely to get it when things aren’t hectic.
Catch Problems Before They Get Expensive
Here’s something homeowners don’t regularly remember: a chimney sweep isn’t just about cleaning. It’s about integrity. When a CSIA Certified Chimney Sweep technician pushes rods and brushes through your chimney system, if pieces of fire clay tile, tile joints, or brick start falling, that tells you exactly where a structural issue exists. That’s critical information for fireworthy, continued use of your fireplace.
Avoid Any Obstructions
Obstruction-free chimney systems is another key reason for a spring chimney sweep. Birds, squirrels, and raccoons love a quiet chimney during the warmer (and definitely the cold) months. Nesting, debris, and feces can create blockages, and a simple cleaning alone won’t remove most of them. Knowing what’s going on inside your chimney before critters move in is a whole lot easier than dealing with it in October.
It’s the National Safety Standard — Not Just a Suggestion
The NFPA 211, CSIA, NCSG, and IRC all recommend annual chimney inspections and cleanings for both wood burning and gas fireplaces. It’s not optional; it’s a safety standard. As the CSIA puts it simply: clean chimneys don’t catch fire. Well put CSIA.
Did You Know?
All of Superior Chimney’s technicians are certified by the CSIA, so you know you’re getting expertise you can trust. Then we take the extra step of taking pictures so you can ‘see’ exactly what’s going on with the chimney. Everything looks good from the ground. We’ll email the pictures to you so you can keep your own records of what we all saw during the last visit. Now you know why spring is the best time to schedule your chimney cleaning.
Contact us or give us a call today at 877-244-6349 to get started.
 Sweet Smiling Landscape Design
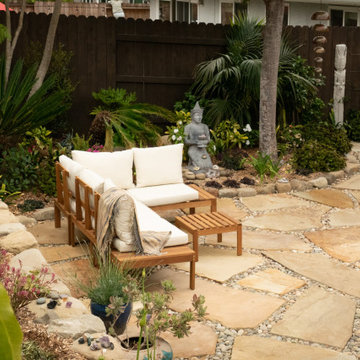
When I came to this property not only was the landscape a scrappy mess the property also had some very real grading and drainage issues that were jeopardizing the safety of this house. As recent transplants from New Jerseys to Southern California these clients were in awe of all the plants they were seeing in their neighborhood. Living on the water at the Ventura harbor they wanted to be able to take full advantage or the outdoor lifestyle and cool ocean breeze. Being environmentally conscious citizens, these clients were very concerned that their garden was designed with sustainability as a leading factor. As they said in our initial consultation, “Would want or garden be part of the solution not part of the problem.”
This property is the last house on the bottom of a gently sloping street. All the water from the neighbor’s houses drain onto this property. When I came into this project the back yard sloped into the house. When it would rain the water would pool up against the house causing water damage. To address the drainage we employed several tactics. Firstly, we had to invert the slope in the back yard so that water would not pool against the house. We created a very minor slope going away from the house so that water drains away but so the patio area feels flat.
The back of the back yard had an existing retaining wall made out of shabby looking slump stone. In front of that retaining wall we created a beautiful natural stone retaining wall. This retain wall severs many purposes. One it works as a place to put some of the soil removed from the grading giving this project a smaller carbon foot print (moving soil of a site burns a lot of fossil fuel). The retaining wall also helps obscure the shabby existing retaining wall and allows for planting space above the footing from the existing retaining wall. The soil behind the ne retaining wall is slightly lower than the top of the wall so that when the run on water on from the neighbor’s property flows it is slowed down and absorbed before it has a chance to get near the house. Finally, the wall is at a height designed to serve as overflow seating as these clients intend to have occasional large parties and gatherings.
Other efforts made to help keep the house safe and dry are that we used permeable paving. With the hardscape being comprised of flag stone with gravel in-between water has a chance to soak into the ground so it does not flow into spots where it will pool up.
The final element to help keep the house dry is the addition of infiltration swales. Infiltration swales are depressions in the landscape that capture rain water. The down spouts on the sides of the houses are connected to pipe that goes under the ground and conveys the water to the swales. In this project it helps move rain water away from the house. In general, these Infiltration swales are a powerful element in creating sustainable landscapes. These swales capture pollutants that accumulate on the roof and in the landscape. Biology in the soil in the swales can break down these pollutants. When run of watered is not captured by soil on a property the dirty water flows into water ways and then the ocean were the biology that breaks down the pollutants is not as prolific. This is particularly important in this project as it drains directly into the harbor. The water that is absorbed in to the swales can replenish aquafers as well as increasing the water available to the plants planted in that area recusing the amount of water that is needed from irrigation.
When it came to the planting we went with a California friendly tropical theme. Using lots of succulents and plants with colorful foliage we created vibrant lush landscape that will have year around color. We planted densely (the images in the picture were taken only a month after installation). Taller drought tolerant plants to help regulate the temperature and loss of water from the plants below them. The dense plantings will help keep the garden, the house and even the neighborhood cooler on hot days, will provide spaces for birds to enjoy and will create an illusion of depth in a somewhat narrow space.
Today this garden is a space these homeowners can fully enjoy while having the peace of mind that their house is protected from flooding and they are helping the environment.
Find the right local pro for your project

 GMI Design Group
This dark, dreary kitchen was large, but not being used well. The family of 7 had outgrown the limited storage and experienced traffic bottlenecks when in the kitchen together. A bright, cheerful and more functional kitchen was desired, as well as a new pantry space.
We gutted the kitchen and closed off the landing through the door to the garage to create a new pantry. A frosted glass pocket door eliminates door swing issues. In the pantry, a small access door opens to the garage so groceries can be loaded easily. Grey wood-look tile was laid everywhere.
We replaced the small window and added a 6’x4’ window, instantly adding tons of natural light. A modern motorized sheer roller shade helps control early morning glare. Three free-floating shelves are to the right of the window for favorite décor and collectables.
White, ceiling-height cabinets surround the room. The full-overlay doors keep the look seamless. Double dishwashers, double ovens and a double refrigerator are essentials for this busy, large family. An induction cooktop was chosen for energy efficiency, child safety, and reliability in cooking. An appliance garage and a mixer lift house the much-used small appliances.
An ice maker and beverage center were added to the side wall cabinet bank. The microwave and TV are hidden but have easy access.
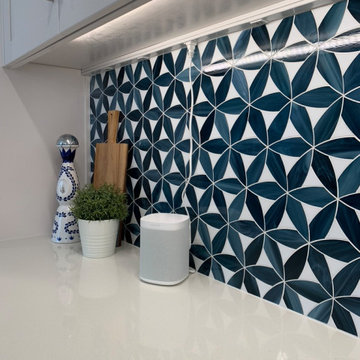
The inspiration for the room was an exclusive glass mosaic tile. The large island is a glossy classic blue. White quartz countertops feature small flecks of silver. Plus, the stainless metal accent was even added to the toe kick!
Upper cabinet, under-cabinet and pendant ambient lighting, all on dimmers, was added and every light (even ceiling lights) is LED for energy efficiency.
White-on-white modern counter stools are easy to clean. Plus, throughout the room, strategically placed USB outlets give tidy charging options.

 Madeen Architecture & Construction
board and batten siding from local forests
Transitional exterior home idea in Albuquerque
Transitional exterior home idea in Albuquerque
 GMI Design Group
This dark, dreary kitchen was large, but not being used well. The family of 7 had outgrown the limited storage and experienced traffic bottlenecks when in the kitchen together. A bright, cheerful and more functional kitchen was desired, as well as a new pantry space.
We gutted the kitchen and closed off the landing through the door to the garage to create a new pantry. A frosted glass pocket door eliminates door swing issues. In the pantry, a small access door opens to the garage so groceries can be loaded easily. Grey wood-look tile was laid everywhere.
We replaced the small window and added a 6’x4’ window, instantly adding tons of natural light. A modern motorized sheer roller shade helps control early morning glare. Three free-floating shelves are to the right of the window for favorite décor and collectables.
White, ceiling-height cabinets surround the room. The full-overlay doors keep the look seamless. Double dishwashers, double ovens and a double refrigerator are essentials for this busy, large family. An induction cooktop was chosen for energy efficiency, child safety, and reliability in cooking. An appliance garage and a mixer lift house the much-used small appliances.
An ice maker and beverage center were added to the side wall cabinet bank. The microwave and TV are hidden but have easy access.
The inspiration for the room was an exclusive glass mosaic tile. The large island is a glossy classic blue. White quartz countertops feature small flecks of silver. Plus, the stainless metal accent was even added to the toe kick!
Upper cabinet, under-cabinet and pendant ambient lighting, all on dimmers, was added and every light (even ceiling lights) is LED for energy efficiency.
White-on-white modern counter stools are easy to clean. Plus, throughout the room, strategically placed USB outlets give tidy charging options.
 Talon Construction Inc.
Finding a reputable contractor to design and build your kitchen remodel in Maryland with quality results involves several steps. Here are some general guidelines to help you find the right professional for your project:
1. Ask for Recommendations: Start by asking friends, family, neighbors, or colleagues who have recently completed kitchen remodels for recommendations. Personal referrals can be a valuable source of trustworthy contractors.
2. Check Online Reviews: Websites like Yelp, Angie's List, and Google Reviews can provide insights into the experiences of previous clients. Look for contractors with consistently positive feedback.
3. Check Credentials: Verify that the contractor has the necessary licenses and insurance to work in Maryland. You can typically check this information on your state's licensing board website.
4. Ask for References: Request references from the contractor and contact previous clients to inquire about their experiences. Visit some of their completed projects if possible.
5. Review Portfolios: Examine the contractor's portfolio of past kitchen remodels. Look for examples of work that match your style and preferences.
6. Check for Permits: Ensure that the contractor will handle any necessary permits and inspections for your remodel. Avoid contractors who suggest bypassing required permits, as this can lead to legal and safety issues.
7. Discuss Communication: Clear communication is crucial throughout the project. Discuss how the contractor will keep you updated on progress and address any concerns or changes during the remodel.
8. Get Everything in Writing: Never rely solely on verbal agreements. Ensure that all project details, warranties, and expectations are documented in a written contract.
9. Check for Red Flags: Be wary of contractors who pressure you into making quick decisions, lack a physical business address, or have a history of disputes or legal issues.
10. Trust Your Instincts: Choose a contractor you feel comfortable working with. Trust your instincts and select someone who listens to your ideas and concerns.
11. Visit Completed Projects: If possible, visit some of the contractors’ completed kitchen remodels to assess the quality of their work in person.
Once you've completed your due diligence and gathered all the necessary information, you'll be better equipped to make an informed decision about which contractor to hire for your kitchen remodel in Maryland. Remember that quality results often come from working with experienced, licensed professionals who prioritize clear communication and transparency throughout the project.
 Talon Construction Inc.
Finding a reputable contractor to design and build your kitchen remodel in Maryland with quality results involves several steps. Here are some general guidelines to help you find the right professional for your project:
1. Ask for Recommendations: Start by asking friends, family, neighbors, or colleagues who have recently completed kitchen remodels for recommendations. Personal referrals can be a valuable source of trustworthy contractors.
2. Check Online Reviews: Websites like Yelp, Angie's List, and Google Reviews can provide insights into the experiences of previous clients. Look for contractors with consistently positive feedback.
3. Check Credentials: Verify that the contractor has the necessary licenses and insurance to work in Maryland. You can typically check this information on your state's licensing board website.
4. Ask for References: Request references from the contractor and contact previous clients to inquire about their experiences. Visit some of their completed projects if possible.
5. Review Portfolios: Examine the contractor's portfolio of past kitchen remodels. Look for examples of work that match your style and preferences.
6. Check for Permits: Ensure that the contractor will handle any necessary permits and inspections for your remodel. Avoid contractors who suggest bypassing required permits, as this can lead to legal and safety issues.
7. Discuss Communication: Clear communication is crucial throughout the project. Discuss how the contractor will keep you updated on progress and address any concerns or changes during the remodel.
8. Get Everything in Writing: Never rely solely on verbal agreements. Ensure that all project details, warranties, and expectations are documented in a written contract.
9. Check for Red Flags: Be wary of contractors who pressure you into making quick decisions, lack a physical business address, or have a history of disputes or legal issues.
10. Trust Your Instincts: Choose a contractor you feel comfortable working with. Trust your instincts and select someone who listens to your ideas and concerns.
11. Visit Completed Projects: If possible, visit some of the contractors’ completed kitchen remodels to assess the quality of their work in person.
Once you've completed your due diligence and gathered all the necessary information, you'll be better equipped to make an informed decision about which contractor to hire for your kitchen remodel in Maryland. Remember that quality results often come from working with experienced, licensed professionals who prioritize clear communication and transparency throughout the project.
 Talon Construction Inc.
Finding a reputable contractor to design and build your kitchen remodel in Maryland with quality results involves several steps. Here are some general guidelines to help you find the right professional for your project:
1. Ask for Recommendations: Start by asking friends, family, neighbors, or colleagues who have recently completed kitchen remodels for recommendations. Personal referrals can be a valuable source of trustworthy contractors.
2. Check Online Reviews: Websites like Yelp, Angie's List, and Google Reviews can provide insights into the experiences of previous clients. Look for contractors with consistently positive feedback.
3. Check Credentials: Verify that the contractor has the necessary licenses and insurance to work in Maryland. You can typically check this information on your state's licensing board website.
4. Ask for References: Request references from the contractor and contact previous clients to inquire about their experiences. Visit some of their completed projects if possible.
5. Review Portfolios: Examine the contractor's portfolio of past kitchen remodels. Look for examples of work that match your style and preferences.
6. Check for Permits: Ensure that the contractor will handle any necessary permits and inspections for your remodel. Avoid contractors who suggest bypassing required permits, as this can lead to legal and safety issues.
7. Discuss Communication: Clear communication is crucial throughout the project. Discuss how the contractor will keep you updated on progress and address any concerns or changes during the remodel.
8. Get Everything in Writing: Never rely solely on verbal agreements. Ensure that all project details, warranties, and expectations are documented in a written contract.
9. Check for Red Flags: Be wary of contractors who pressure you into making quick decisions, lack a physical business address, or have a history of disputes or legal issues.
10. Trust Your Instincts: Choose a contractor you feel comfortable working with. Trust your instincts and select someone who listens to your ideas and concerns.
11. Visit Completed Projects: If possible, visit some of the contractors’ completed kitchen remodels to assess the quality of their work in person.
Once you've completed your due diligence and gathered all the necessary information, you'll be better equipped to make an informed decision about which contractor to hire for your kitchen remodel in Maryland. Remember that quality results often come from working with experienced, licensed professionals who prioritize clear communication and transparency throughout the project.
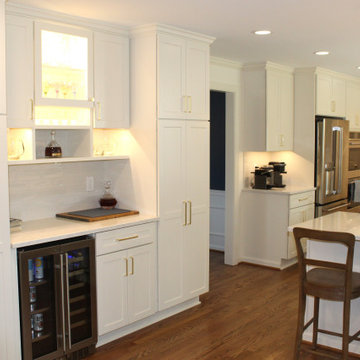 Talon Construction Inc.
Finding a reputable contractor to design and build your kitchen remodel in Maryland with quality results involves several steps. Here are some general guidelines to help you find the right professional for your project:
1. Ask for Recommendations: Start by asking friends, family, neighbors, or colleagues who have recently completed kitchen remodels for recommendations. Personal referrals can be a valuable source of trustworthy contractors.
2. Check Online Reviews: Websites like Yelp, Angie's List, and Google Reviews can provide insights into the experiences of previous clients. Look for contractors with consistently positive feedback.
3. Check Credentials: Verify that the contractor has the necessary licenses and insurance to work in Maryland. You can typically check this information on your state's licensing board website.
4. Ask for References: Request references from the contractor and contact previous clients to inquire about their experiences. Visit some of their completed projects if possible.
5. Review Portfolios: Examine the contractor's portfolio of past kitchen remodels. Look for examples of work that match your style and preferences.
6. Check for Permits: Ensure that the contractor will handle any necessary permits and inspections for your remodel. Avoid contractors who suggest bypassing required permits, as this can lead to legal and safety issues.
7. Discuss Communication: Clear communication is crucial throughout the project. Discuss how the contractor will keep you updated on progress and address any concerns or changes during the remodel.
8. Get Everything in Writing: Never rely solely on verbal agreements. Ensure that all project details, warranties, and expectations are documented in a written contract.
9. Check for Red Flags: Be wary of contractors who pressure you into making quick decisions, lack a physical business address, or have a history of disputes or legal issues.
10. Trust Your Instincts: Choose a contractor you feel comfortable working with. Trust your instincts and select someone who listens to your ideas and concerns.
11. Visit Completed Projects: If possible, visit some of the contractors’ completed kitchen remodels to assess the quality of their work in person.
Once you've completed your due diligence and gathered all the necessary information, you'll be better equipped to make an informed decision about which contractor to hire for your kitchen remodel in Maryland. Remember that quality results often come from working with experienced, licensed professionals who prioritize clear communication and transparency throughout the project.

 Residential Locksmith
Have you found yourself in a situation where you have locked your car with the keys inside? Never fix it by yourself if you don't have enough skills and knowledge to avoid wasting your time and money. We know you are having a hard day today. We offer you immediate emergency action. Your safety and security are our top priority, rest assured that we will do our best to make you satisfied with our services. Our customers continued love and support are amazing and we are truly thankful for that. They are the reason why we always give our 100 percent skills, attention, and commitment.
Our firm operates 24 hours a day, 7 days a week and 365 days a year to attend with all year locksmith issues, emergency or not; you can always rely on us. We'll put all our efforts to end your security problems. We make sure we're consistently delivering quality service. We will never leave until we finish fixing your car problem. We have a proven capability of providing top notch locksmith service at an affordable amount. You matter to us so you'll surely get what you pay for. We pride ourselves on getting the work done right the first time. We take great care to ensure that we will ultimately serve you.
Emergency Locksmith Sierra Madre CA
Key Cutting Sierra Madre CA
Car / Door Unlocking Sierra Madre CA
Car Key Replacement Sierra Madre CA
Lost Car Keys No Spare? Sierra Madre CA
Locked Out of Car / Home? Sierra Madre CA
Car Lock Out Sierra Madre CA
Lock Change Sierra Madre CA
Car Remote Programming Sierra Madre CA
Combination Locks Sierra Madre CA
Call Us: (626) 269-8141
Visit Us: http://626carkeyreplacement.com/car-remote-programming
 Mayflower Construction Group
How Planning Leads to Successful Construction
Construction projects, whether small residential jobs or large commercial builds, require more than just skilled labor and high-quality materials. The foundation of a successful project lies in effective planning. Proper planning ensures efficiency, minimizes risks, and keeps the project within budget and on schedule. Here’s how thorough planning leads to successful construction:
1. Clear Project Scope and Objectives
Defining the project scope early on helps prevent scope creep and miscommunication. Establishing clear goals, deliverables, and timelines ensures that everyone involved understands the expectations. This prevents delays and unnecessary changes during construction.
2. Accurate Budgeting and Cost Control
A well-planned project includes a detailed cost estimation. This accounts for labor, materials, permits, and unexpected contingencies. Without proper budgeting, costs can spiral out of control, leading to financial strain and potential project failure.
3. Efficient Resource Management
Proper planning helps allocate resources effectively, including manpower, equipment, and materials. Scheduling workers and ordering materials at the right time avoids delays caused by shortages or logistical issues.
4. Risk Identification and Mitigation
Every construction project comes with risks—weather delays, supply chain issues, safety hazards, or regulatory compliance concerns. Planning ahead allows for risk assessment and the implementation of strategies to mitigate potential problems before they occur.
5. Compliance with Regulations and Permits
Failing to secure the necessary permits or adhere to building codes can halt a project indefinitely. Planning ensures that all legal requirements are met in advance, avoiding costly fines and legal complications.
6. Seamless Communication and Coordination
A structured plan includes clear communication protocols between contractors, architects, engineers, and clients. When everyone is on the same page, mistakes are reduced, and the workflow remains smooth.
7. Improved Project Scheduling
A construction schedule outlines each phase of the project, from site preparation to finishing touches. A well-planned schedule helps keep tasks on track, prevents unnecessary delays, and ensures timely project completion.
8. Higher Quality Workmanship
Planning allows for a structured approach to quality control. By setting benchmarks, conducting inspections, and using the right materials, projects meet industry standards and client expectations.
9. Better Client Satisfaction
When a project is completed on time, within budget, and meets quality expectations, client satisfaction increases. A satisfied client is more likely to recommend your services and return for future projects.
Conclusion
In construction, planning isn’t just a step—it’s the backbone of success. From budgeting and resource management to compliance and scheduling, thorough planning prevents costly errors, improves efficiency, and ensures a high-quality outcome. Whether you're working on a small driveway installation or a large-scale commercial project, investing time in planning will always pay off in the long run.
Do you need expert concrete construction services that prioritize planning and quality? Contact us today!
 GMI Design Group
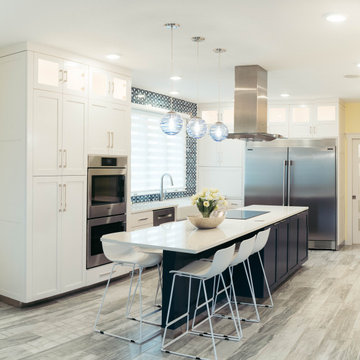
This dark, dreary kitchen was large, but not being used well. The family of 7 had outgrown the limited storage and experienced traffic bottlenecks when in the kitchen together. A bright, cheerful and more functional kitchen was desired, as well as a new pantry space.
We gutted the kitchen and closed off the landing through the door to the garage to create a new pantry. A frosted glass pocket door eliminates door swing issues. In the pantry, a small access door opens to the garage so groceries can be loaded easily. Grey wood-look tile was laid everywhere.
We replaced the small window and added a 6’x4’ window, instantly adding tons of natural light. A modern motorized sheer roller shade helps control early morning glare. Three free-floating shelves are to the right of the window for favorite décor and collectables.
White, ceiling-height cabinets surround the room. The full-overlay doors keep the look seamless. Double dishwashers, double ovens and a double refrigerator are essentials for this busy, large family. An induction cooktop was chosen for energy efficiency, child safety, and reliability in cooking. An appliance garage and a mixer lift house the much-used small appliances.
An ice maker and beverage center were added to the side wall cabinet bank. The microwave and TV are hidden but have easy access.
The inspiration for the room was an exclusive glass mosaic tile. The large island is a glossy classic blue. White quartz countertops feature small flecks of silver. Plus, the stainless metal accent was even added to the toe kick!
Upper cabinet, under-cabinet and pendant ambient lighting, all on dimmers, was added and every light (even ceiling lights) is LED for energy efficiency.
White-on-white modern counter stools are easy to clean. Plus, throughout the room, strategically placed USB outlets give tidy charging options.
 GMI Design Group
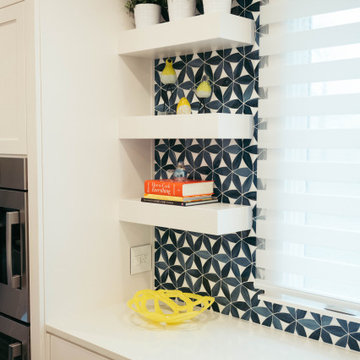
This dark, dreary kitchen was large, but not being used well. The family of 7 had outgrown the limited storage and experienced traffic bottlenecks when in the kitchen together. A bright, cheerful and more functional kitchen was desired, as well as a new pantry space.
We gutted the kitchen and closed off the landing through the door to the garage to create a new pantry. A frosted glass pocket door eliminates door swing issues. In the pantry, a small access door opens to the garage so groceries can be loaded easily. Grey wood-look tile was laid everywhere.
We replaced the small window and added a 6’x4’ window, instantly adding tons of natural light. A modern motorized sheer roller shade helps control early morning glare. Three free-floating shelves are to the right of the window for favorite décor and collectables.
White, ceiling-height cabinets surround the room. The full-overlay doors keep the look seamless. Double dishwashers, double ovens and a double refrigerator are essentials for this busy, large family. An induction cooktop was chosen for energy efficiency, child safety, and reliability in cooking. An appliance garage and a mixer lift house the much-used small appliances.
An ice maker and beverage center were added to the side wall cabinet bank. The microwave and TV are hidden but have easy access.
The inspiration for the room was an exclusive glass mosaic tile. The large island is a glossy classic blue. White quartz countertops feature small flecks of silver. Plus, the stainless metal accent was even added to the toe kick!
Upper cabinet, under-cabinet and pendant ambient lighting, all on dimmers, was added and every light (even ceiling lights) is LED for energy efficiency.
White-on-white modern counter stools are easy to clean. Plus, throughout the room, strategically placed USB outlets give tidy charging options.
 GMI Design Group
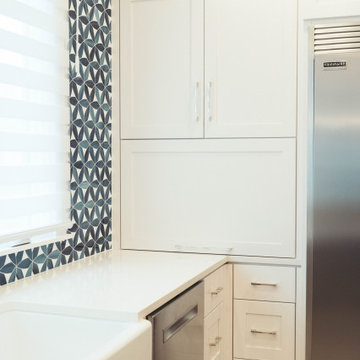
This dark, dreary kitchen was large, but not being used well. The family of 7 had outgrown the limited storage and experienced traffic bottlenecks when in the kitchen together. A bright, cheerful and more functional kitchen was desired, as well as a new pantry space.
We gutted the kitchen and closed off the landing through the door to the garage to create a new pantry. A frosted glass pocket door eliminates door swing issues. In the pantry, a small access door opens to the garage so groceries can be loaded easily. Grey wood-look tile was laid everywhere.
We replaced the small window and added a 6’x4’ window, instantly adding tons of natural light. A modern motorized sheer roller shade helps control early morning glare. Three free-floating shelves are to the right of the window for favorite décor and collectables.
White, ceiling-height cabinets surround the room. The full-overlay doors keep the look seamless. Double dishwashers, double ovens and a double refrigerator are essentials for this busy, large family. An induction cooktop was chosen for energy efficiency, child safety, and reliability in cooking. An appliance garage and a mixer lift house the much-used small appliances.
An ice maker and beverage center were added to the side wall cabinet bank. The microwave and TV are hidden but have easy access.
The inspiration for the room was an exclusive glass mosaic tile. The large island is a glossy classic blue. White quartz countertops feature small flecks of silver. Plus, the stainless metal accent was even added to the toe kick!
Upper cabinet, under-cabinet and pendant ambient lighting, all on dimmers, was added and every light (even ceiling lights) is LED for energy efficiency.
White-on-white modern counter stools are easy to clean. Plus, throughout the room, strategically placed USB outlets give tidy charging options.
 GMI Design Group
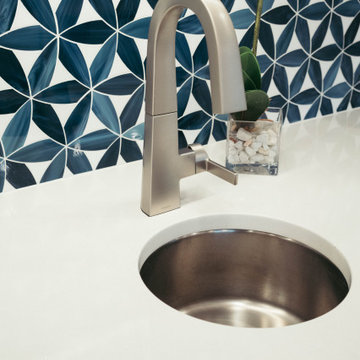
This dark, dreary kitchen was large, but not being used well. The family of 7 had outgrown the limited storage and experienced traffic bottlenecks when in the kitchen together. A bright, cheerful and more functional kitchen was desired, as well as a new pantry space.
We gutted the kitchen and closed off the landing through the door to the garage to create a new pantry. A frosted glass pocket door eliminates door swing issues. In the pantry, a small access door opens to the garage so groceries can be loaded easily. Grey wood-look tile was laid everywhere.
We replaced the small window and added a 6’x4’ window, instantly adding tons of natural light. A modern motorized sheer roller shade helps control early morning glare. Three free-floating shelves are to the right of the window for favorite décor and collectables.
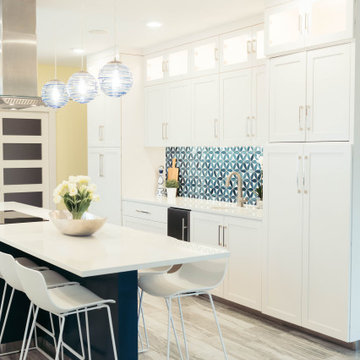
White, ceiling-height cabinets surround the room. The full-overlay doors keep the look seamless. Double dishwashers, double ovens and a double refrigerator are essentials for this busy, large family. An induction cooktop was chosen for energy efficiency, child safety, and reliability in cooking. An appliance garage and a mixer lift house the much-used small appliances.
An ice maker and beverage center were added to the side wall cabinet bank. The microwave and TV are hidden but have easy access.
The inspiration for the room was an exclusive glass mosaic tile. The large island is a glossy classic blue. White quartz countertops feature small flecks of silver. Plus, the stainless metal accent was even added to the toe kick!
Upper cabinet, under-cabinet and pendant ambient lighting, all on dimmers, was added and every light (even ceiling lights) is LED for energy efficiency.
White-on-white modern counter stools are easy to clean. Plus, throughout the room, strategically placed USB outlets give tidy charging options.
 GMI Design Group
This dark, dreary kitchen was large, but not being used well. The family of 7 had outgrown the limited storage and experienced traffic bottlenecks when in the kitchen together. A bright, cheerful and more functional kitchen was desired, as well as a new pantry space.
We gutted the kitchen and closed off the landing through the door to the garage to create a new pantry. A frosted glass pocket door eliminates door swing issues. In the pantry, a small access door opens to the garage so groceries can be loaded easily. Grey wood-look tile was laid everywhere.
We replaced the small window and added a 6’x4’ window, instantly adding tons of natural light. A modern motorized sheer roller shade helps control early morning glare. Three free-floating shelves are to the right of the window for favorite décor and collectables.
White, ceiling-height cabinets surround the room. The full-overlay doors keep the look seamless. Double dishwashers, double ovens and a double refrigerator are essentials for this busy, large family. An induction cooktop was chosen for energy efficiency, child safety, and reliability in cooking. An appliance garage and a mixer lift house the much-used small appliances.
An ice maker and beverage center were added to the side wall cabinet bank. The microwave and TV are hidden but have easy access.
The inspiration for the room was an exclusive glass mosaic tile. The large island is a glossy classic blue. White quartz countertops feature small flecks of silver. Plus, the stainless metal accent was even added to the toe kick!
Upper cabinet, under-cabinet and pendant ambient lighting, all on dimmers, was added and every light (even ceiling lights) is LED for energy efficiency.
White-on-white modern counter stools are easy to clean. Plus, throughout the room, strategically placed USB outlets give tidy charging options.

 C.E. Pontz Sons
This Backyard Waterfall project included installation of a pondless waterfall approximately 15' in length on a sloped bank at the area next to the existing pool. The backyard waterfall cascades down the existing embankment. There is still retaining wall work in progress as of this video and pictures being shot. Future landscaping will be installed once surrounding hardscaping has been complete. Rocks and Boulders for this project were chosen and supplied by home owner. This pondless waterfall project was installed in Mohnton (Berks County), PA.
Pondless Waterfalls are simply a re-circulating waterfall and/or stream without the presence of a pond. You can enjoy the sight and sound of running water without the maintenance of a pond.
The waterfall is undoubtedly the most beautiful and favored feature in a water garden. If space is lacking in your yard or you have safety concerns with a pond, go Pondless! The name basically explains it all. It’s a waterfall and stream, without the pond. So why would you want a waterfall without a pond? The truth is that a Pondless Waterfall isn’t for everyone, but it can be a great alternative for someone who isn’t quite sure if a pond is right for their family.
Because there is no pool of water, a Pondless Waterfall is a great option if you are concerned about safety issues associated with a traditional pond.
Cost can be a big factor when considering the type of pond you want to build. In most cases, the price of a Pondless waterfall will be less than a pond, because there is less labor involved, as well as less rock and materials. Operating costs are also less. Because you’re not dealing with an established ecosystem, it’s not necessary to run the pump 24/7.
The small size of the Pondless Waterfall means you can build and enjoy a beautiful waterfall anywhere in you yard. Taking care of your Pondless Waterfall is easy. Filling the reservoir every few weeks to compensate for water loss because of evaporation is all that’s required.
Perhaps the best part of the Pondless Waterfall is the possibility for the future. If you change your mind later, wishing you’d build a pond, that’s ok! If you leave enough room around the base of the waterfall, it’s easy to add a pond onto a Pondless Waterfall.
A Pondless Waterfall works much like a regular pond. The hole, deeper than a normal pond, is dug then lined with rock and gravel, and filled with water. The water is then circulated from beneath the rocks and gravel by a pump that sits on the bottom, inside a Snorkel™ Vault and Centipede™ Module. A pipe runs from there up to a BioFalls Filter and into an overflowing waterfall, where it falls back into the reservoir. Since the water level never pools above the level of the rock and gravel fill, it give the appearance of a waterfall without a pond, when in fact, the “pond” is there but not visible.
The Pondless Waterfall has made many water-lovers who were previously unable to indulge in the sweet sounds of falling water, very happy. It’s a great alternative for those who are trying to get their feet wet, or looking to fit a little bit of paradise into their own backyard. In other words, when all else fails … go Pondless!
 Fox Interiors
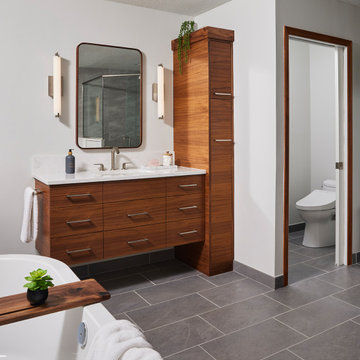
The bathroom was redesigned to improve flow and add functional storage with a modern aesthetic.
Natural walnut cabinetry brings warmth balanced by the subtle movement in the warm gray floor and wall tiles and the white quartz counters and shower surround. We created half walls framing the shower topped with quartz and glass treated for easy maintenance. The angled wall and extra square footage in the water closet were eliminated for a larger vanity.
Floating vanities make the space feel larger and fit the modern aesthetic. The tall pullout storage at her vanity is one-sided to prevent items falling out the back and features shelves with acrylic sides for full product visibility.
We removed the tub deck and bump-out walls with inset shelves for improved flow and wall space for towels.
Now the freestanding tub anchors the middle of the room while allowing easy access to the windows that were blocked by the previous built-in.
14