
Search results for "Sequencing" in Home Design Ideas
 Tile Doctor Ltd
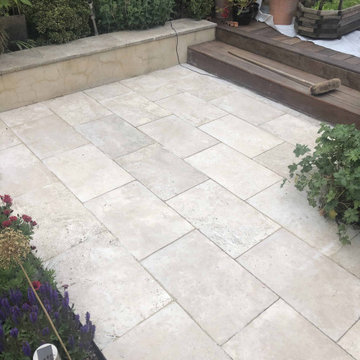
The picture shows an Travertine patio that was installed at a property in Hackney E5 around ten years ago and it had never been sealed. Over the year’s pollution and weather etc had taken its toll on the stone leaving the travertine stained with lichen, dull and grey as opposed to their original white/cream colour. Had the patio been sealed it would have provided some protection from the elements.
I conducted an initial visit where I tested several products to see what would be the most effective and establish what was required. Using that knowledge, I followed up with a written quote which was accepted, and a date arranged to complete the work.
We have adopted new working practices since the COVID-19 epidemic so we can work safely inside or outside but given the excellent weather this year this was an ideal and much easier to maintain social distancing.
During day 1 on site I started by sweeping away loose stones and other debris you typically find on patios. Then Tile Doctor Patio and Brick Driveway cleaner was applied neat to the stone and left for two hours. This is a very strong product designed for use by professionals which cuts through the dirt and was ideal for this situation. There are certain precautions you do need to take when using it such as wearing PPE and you must keep it away from ponds etc.
Using water to lubricate, the solution was then scrubbed into the stone using a coarse 200-grit pad fitted to a rotary machine and followed up with a lot of rinsing and extracting with water and a wet vacuum.
To refine the surface after the coarse Travertine the 200-grit pad I followed with 400, 800 and then 1500-grit burnishing pads in sequence rinsing with water and extracting after each pad was applied. This process is known as burnishing and closes the pores in the stone giving it a polished appearance. By this point the Travertine looked way better and we were starting to get the smooth finish back.
The weather held so the following morning a 3000-grit polishing pad was applied dry to the stone using only a little water. This brings up the appearance of the stone even further and has the added advantage of leaving it dry and ready for sealing.
The client wanted a natural appearance so two coats of Tile Doctor Ultra Seal were applied to seal the stone. Ultra-Seal is an impregnating sealer that soaks into the stone, protecting it from within yet without changing the appearance of the stone leaving a completely natural look.
The client very happy with job and now proud so show off her revamped patio. They hadn’t realised that the patio should have looked like this from the start. For aftercare I recommended they use Tile Doctor Stone Soap, many day to day cleaning products you find in supermarkets can strip off a sealer so if your using something else do check the label first.
Jackson Davis
East London Tile Doctor
 EAG Studio
Refined Continuity: Bridging Classical Architecture and Modern Living
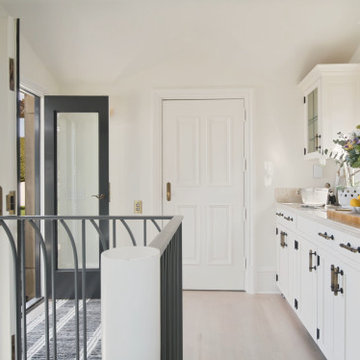
This comprehensive remodel of a grand Cow Hollow residence reimagines a historically expressive envelope through a lens of contemporary livability, precision detailing, and material restraint. The design approach carefully balances the home’s classical proportions and ornamental heritage with a refined, modern sensibility—evident in the disciplined palette of warm neutrals, soft plasters, pale oak flooring, and tailored millwork. Circulation has been clarified and subtly expanded to enhance spatial flow, while openings are leveraged to capture light, garden outlooks, and distant water views. Throughout, architectural interventions are executed with a high level of craft, ensuring that new insertions—whether cabinetry, railings, or apertures—read as seamless continuations of the original structure rather than applied elements.
The kitchen serves as the operational and visual anchor of the home, conceived as a sculptural yet highly functional environment. Custom rift-cut cabinetry, softened through a desaturated finish, is paired with honed stone surfaces and integrated brass hardware to create a quiet, tactile richness. A monolithic island establishes a central gathering point, while perimeter work zones are carefully layered with concealed storage, integrated appliances, and open, backlit shelving that elevates everyday objects into curated displays. The adjacent bar and entertaining areas extend this language, reinforcing a cohesive hospitality-driven program. In parallel, the primary bathroom is designed as a serene, spa-like retreat, where bookmatched stone, frameless glass enclosures, and finely detailed metalwork converge. The composition prioritizes symmetry, clarity, and light—balancing generous volumes with intimate moments through integrated lighting, custom vanities, and a restrained material hierarchy.
The library and ancillary living spaces introduce a more intimate scale, anchored by bespoke built-ins that combine closed storage with illuminated display niches, creating depth and rhythm along the walls. Here, material transitions and furniture integration are handled with particular nuance, allowing the architecture to support both quiet retreat and social gathering. A continuous language of custom railings—executed in refined metal profiles—threads through the interior and extends outward, where the exterior gate and garden elements have been reinterpreted to align with the home’s renewed identity. The entry sequence is now defined by a calibrated interplay of solidity and transparency, with sculptural metalwork and landscape integration establishing a sense of arrival that is both secure and elegant. Collectively, the project reflects a holistic transformation—one that elevates performance, livability, and aesthetic clarity while preserving the inherent dignity of the original architecture.


Find the right local pro for your project
 MARGARITA BRAVO
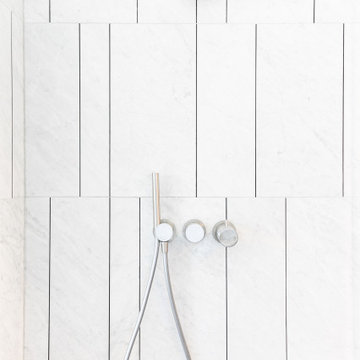
This master bathroom is an oasis of clean, bright design with an abundance of natural light. Our Miami clients wanted a contemporary space, and we gave them hyper modernism with custom materials imported from Italy. A glass walk-in shower with sleek fixtures is a subtle touch to balance the dramatic artwork. Our favorite feature in this master bath is the hand-made mosaic micro tile wall.
---
Project designed by Miami interior designer Margarita Bravo. She serves Miami as well as surrounding areas such as Coconut Grove, Key Biscayne, Miami Beach, North Miami Beach, and Hallandale Beach.
For more about MARGARITA BRAVO, click here: https://www.margaritabravo.com/
To learn more about this project, click here:
https://www.margaritabravo.com/portfolio/englewood-master-bath-renovation/
 MARGARITA BRAVO
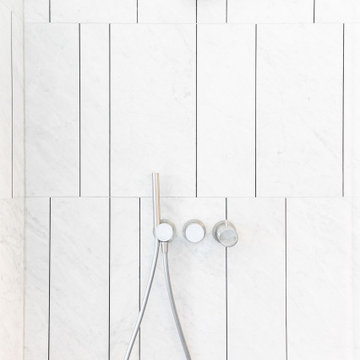
This master bathroom is an oasis of clean, bright design with an abundance of natural light. Our Montecito clients wanted a contemporary space, and we gave them hyper modernism with custom materials imported from Italy. A glass walk-in shower with sleek fixtures is a subtle touch to balance the dramatic artwork. Our favorite feature in this master bath is the hand-made mosaic micro tile wall.
---
Project designed by Montecito interior designer Margarita Bravo. She serves Montecito as well as surrounding areas such as Hope Ranch, Summerland, Santa Barbara, Isla Vista, Mission Canyon, Carpinteria, Goleta, Ojai, Los Olivos, and Solvang.
For more about MARGARITA BRAVO, click here: https://www.margaritabravo.com/
To learn more about this project, click here:
https://www.margaritabravo.com/portfolio/englewood-master-bath-renovation/

 M3LD
Kirsten Hepburn
Living room - small modern formal and enclosed light wood floor living room idea in Salt Lake City with gray walls, no fireplace and no tv
Living room - small modern formal and enclosed light wood floor living room idea in Salt Lake City with gray walls, no fireplace and no tv
 Tile Doctor Ltd
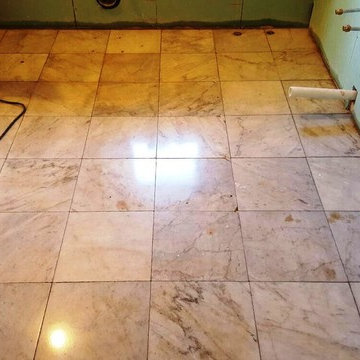
Windlestraw is a picturesque Edwardian manor hotel overlooking the Tweed Valley, near Walkerburn in the Scottish Borders area of Scotland. One of the bathrooms in the manor was in the process of being refurbished when two layers of floor tiles were removed, unveiling an original Marble tiled floor dating back to the 1920s.
After the top layers of tile had been removed the Marble was still covered in old adhesive and cement and although Marble is known for its quality and durability the hotel owner didn’t want the building contractor to proceed any further in case they damaged it. The owner was keen to restore the Marble floor as an original feature so we were called in to set the situation right.
To restore the floor I used two processes known as milling and burnishing. Milling literally involves grinding down uneven or rough surfaces using very coarse, diamond encrusted pads. The pads are usually used to resolve lippage issues on natural stone but in this case we needed to use the very coarse abrasive pads to grind off the adhesive and cement. I used a set of three coarse milling pads rinsing with water between each pad and starting with a 50 grit pad, before moving on to 100 and 200 grit pads. This process was very effective and ground off the cement and adhesive, while also removing any lippage in the tiles to leave a completely flat surface.
Milling leaves the surface of the Marble tiles clean but in a rough condition and this is where the second process Burnishing comes in. Similar to milling, burnishing focuses on achieving a polished finish with the application of ever finer grades of polishing pads and is often used to bring back the polish on Limestone and Travertine as well as Marble. Moving on to the burnishing, I worked my way through the four diamond encrusted pad system lubricating with a little water and again rinsing between each pad to remove the slurry. The grits go from Coarse (400 grit), Medium (800 grit), Fine (1500 grit) and then eventually Very Fine (3000 grit) and come in a 17” pad for use on a rotary floor machine and were applied twice in sequence to achieve a fantastic polished shine.
The floor was given a final rinse and then dried with a wet-vacuum before we proceeded to seal the floor using Tile Doctor Shine Powder which is a crystallizing powder that is applied directly to the floor and worked in using a buffing pad fitted to a rotary machine.
Shine Powder provides a very high shine (as you can see from the photos), along with a tough durable finish. On top of this, it is suitable for sealing all natural stone, including, of course, Marble, along with Limestone, Granite, Slate and Travertine.
The customer was absolutely delighted with the results as were we although it’s now up to them to ensure the bathroom fitters take appropriate care when completing the room which I’m sure will look absolutely fantastic when complete and no doubt add to the allure of this magnificent hotel in the Scottish Borders.
Thomas Wilson
Edinburgh Tile Doctor
 Windy City Painters
PREPARATION AND PLANNING
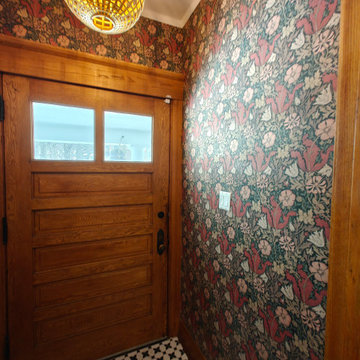
First, we assessed existing wall conditions and repaired minor imperfections. Next, surfaces were thoroughly cleaned and primed for maximum adhesion. Then, precise measurements ensured perfect pattern alignment throughout the space.
INSTALLATION PROCESS
Subsequently, we carefully cut each strip accounting for pattern matching. Moreover, professional installation techniques eliminated bubbles and ensured seamless seams. Finally, detailed finishing work created flawless edges and corners.
CHICAGO-SPECIFIC CHALLENGES
Furthermore, older Chicago buildings present unique challenges including settling walls, vintage plaster surfaces, and lead paint considerations. Therefore, proper preparation becomes crucial for long-lasting results that withstand seasonal temperature fluctuations.
RESULTS AND QUALITY
Consequently, the finished installation showcases perfect pattern alignment and professional craftsmanship. The wallpaper enhances the entry hall's architectural character while providing durability for high-traffic use.
PROFESSION AL TIPS
Homeowners should always hire experienced installers for complex patterns. Additionally, investing in quality primer saves money long-term by ensuring proper adhesion and easier future removal.
See more work and request free estimate at windypainters.com.
Q: How long does wallpaper installation take? / A: Most entry halls require one to two days depending on pattern complexity, surface preparation needs, and room size for professional wallpaper installation.
Q: Can you install over existing wallpaper? / A: We recommend removing old wallpaper first for best adhesion, though some situations allow installation over existing wallpaper after proper preparation and assessment.
Q: What wallpaper works best in Chicago? / A: Vinyl and fabric-backed wallpapers handle Chicago's climate changes best, providing durability against humidity fluctuations and temperature variations throughout seasons.
Q: Do you guarantee installation work? / A: Yes, Windy City Painters provides comprehensive warranties covering wallpaper installation craftsmanship and adhesion for specified warranty periods on all projects.
Q: How do you handle pattern matching? / A: We carefully measure walls, calculate pattern repeats, and plan installation sequence to ensure perfect wallpaper installation pattern alignment throughout the space.
Q: Can wallpaper work in vintage buildings? / A: Absolutely, we specialize in wallpaper installation for older Chicago homes, understanding unique challenges like settling walls and vintage plaster surfaces.
Q: What preparation is required? / A: Proper wallpaper installation requires surface assessment, repairs, thorough cleaning, appropriate priming, and climate control for optimal adhesion and lasting results.
Q: Do you remove old wallpaper? / A: Yes, we provide professional wallpaper removal services using safe techniques that protect underlying wall surfaces during the wallpaper installation preparation process.
Q: How much does installation cost? / A: Wallpaper installation costs vary based on room size, pattern complexity, surface preparation needs, and wallpaper selection - contact for detailed estimates.
Q: What tools do professionals use? / A: Professional wallpaper installation requires specialized smoothing tools, precision cutting equipment, quality brushes, and professional-grade adhesives for optimal results and longevity.
 SM Design
Bridle Path Residence — Luxury Wellness Bathroom & Hydrotherapy Suite
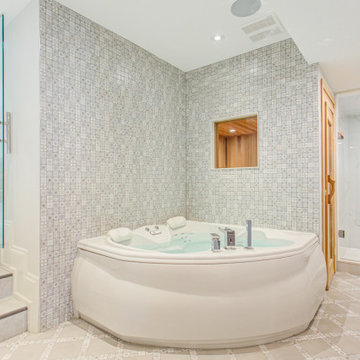
This Bridle Path Residence bathroom is conceived as a private hydrotherapy retreat, bringing a resort-like wellness experience into the home while maintaining the architectural detailing and craftsmanship of the residence. The design is less about creating a conventional bathroom and more about establishing a dedicated space for relaxation, recovery, and ritual.
The hydrotherapy tub becomes the central sculptural element of the room. Its generous curved profile creates a soft, organic focal point against the highly detailed wall treatment, while the integrated jets and ergonomic form emphasize the room's wellness-driven purpose. Positioning the tub within the main architectural composition gives it the presence of a luxury amenity rather than treating it as a standard fixture.
The walls are enveloped in a small-format decorative mosaic with an intricate, almost textile-like pattern. This repeated surface creates remarkable visual depth and gives the room a distinctly crafted quality. The subtle variation within the mosaic prevents the predominantly light palette from feeling flat, while its fine geometry provides a counterpoint to the smooth, sculptural tub.
A particularly thoughtful feature is the integrated sauna viewing window, which creates a visual relationship between the hydrotherapy area and the warm timber sauna beyond. The opening turns the sauna into part of the overall composition and establishes a clear sequence of wellness experiences—hydrotherapy, heat, and showering—within one cohesive suite.
The adjacent shower introduces a contrasting material language. Large-format marble-look surfaces create a cleaner, more serene backdrop, while the vertical patterned accent strip adds a strong decorative moment. This controlled use of pattern prevents the space from becoming visually overwhelming and gives the shower its own identity.
The sauna itself introduces warmth through natural timber, creating an immediate sensory contrast with the cool, pale surfaces surrounding it. The wood adds depth and reinforces the feeling of a private spa retreat, while the glass enclosure maintains openness and allows the different wellness zones to remain visually connected.
The flooring continues the decorative approach with a carefully patterned layout that complements the wall mosaic without simply repeating it. This creates a layered surface treatment in which scale, geometry, and texture work together to give the room a highly customized character.
Even the circulation area is treated as part of the design experience. The glass door and open stair connection allow light to move through the space, while the traditional architectural detailing visible beyond the bathroom establishes continuity with the broader residence.
The overall concept is residential wellness with an emphasis on craftsmanship and sensory experience. Decorative mosaic, natural timber, glass, stone-inspired surfaces, sculptural plumbing, and carefully integrated wellness features create a room that feels more like a private boutique spa than a conventional home bathroom.
 Tile Doctor Ltd
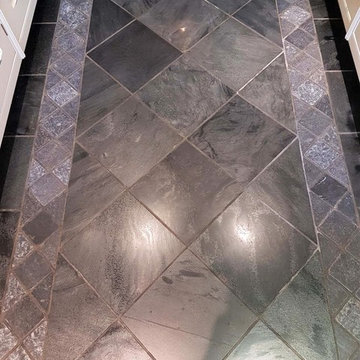
I was recently asked to survey an unusual stone floor at a house in in Harrogate comprising of Slate inlaid with Granite. The client advised that it had not been cleaned properly for 20 years and wanted it renovating! It was now definitely overdue a deep clean and professional attention. Fortunately, having worked on these floors for many years I knew I could make a substantial impact and transform its appearance. Fossilized slate is a beautiful stone when cleaned and sealed correctly.
The owner confessed they had actually been sealing the floor every two years but without a deep clean first, so they were effectively sealing in the dirt each time. I discussed with them the process I would use to clean and re-seal the floor and we agreed a price to carry to out the work.
To remove the layers of old sealer and dirt used a set of Tile Doctor Diamond Burnishing pads. The pads are attached to a rotary floor machine starting with the coarse 400-grit pad which was lubricated with a dilution of Tile Doctor Remove and Go to help strip the floor of dirt and layers of sealer. After rinsing and extracting the soil I worked through the different grades of pads in sequence finishing with the 1500-grit and this time using just water for lubrication.
A set of diamond handheld burnishing blocks were then used to clean up the edges and corners where the large 17” pads struggle to reach. This ensures all areas are treated and free of dirt and old sealer.
The floor was then rinsed and extracted again to remove the remaining soil. I find a wet vacuum is an invaluable tool for this. The floor was then left to dry out overnight ready for sealing the next day.
I returned the next day to seal the floor, first checking with a damp meter that the floor was dry, and the moisture reading was below the acceptable level. These results were fine, so I had a green light to continue and seal the stone.
The customer wanted a shine on the floor so rather than apply a satin sealer which I felt wouldn’t adhere to the stone properly I decided to polish the floor further with a the last of the four burnishing pads which is a very fine 3000-grit pad. You don’t need to use a lot of water with this last pad just a small amount sprayed onto the floor using a technique we refer to as a ‘Spray Burnish’.
To seal the floor, two coats of Tile Doctor Colour Grow were applied. This is an impregnating matt sealer which intensifies the natural colours of this beautiful stone and provides long lasting durable protection.
Even I was impressed with the finished result but more importantly the client was over the moon. To keep the floor looking its best I recommended they use Tile Doctor Stone Soap which is pH neutral. You should always read the label in detail when choosing a floor cleaning product as many are too strong and not recommended for sealed stone surfaces as they will prematurely erode the sealer.
Nigel Stoker
North West Yorkshire Tile Doctor

 Metamorphosis Design
M Residence
(Residential Project)
Constructed 1999
Location :Chandigarh
A House Shaped by Frugal Engineering and Expansive Imagination
I had designed his factory years earlier — and he must have been pleased with the outcome. A 6,000 sq. ft. multi-storied factory conceived for an entirely new product line, marking a decisive shift from decades of manufacturing a declining product.
A careful analysis of the production dynamics led to a vertical organization of spaces, with multiple floor plates interconnected through the sequence of manufacturing operations. The heavy-duty work was concentrated in the basement, where storage for steel and brass raw materials and components was planned. Remarkably, the entire structure stood on just ten columns, each with a mere 30 cm square cross-section — a fact that still gives one nightmares. At the time, it was also the tallest structure in the area.
That same philosophy of frugal engineering later became the guiding principle for an addition to the family residence, more than a decade afterward. A narrow strip only 22 feet wide and less than 50 feet deep had to accommodate an entirely new home for a growing family moving steadily upward in life. The response was straightforward — a similarly efficient column-frame structure designed to extract the maximum usable space from the compact 22' × 50' site.
We began with a semi-basement, using battered retaining walls integrated with the structural columns to counter the thrust from the existing foundations along the length of the original house. A courtyard was introduced to preserve light and ventilation for the older structure, while also providing access to an elevator for a disabled family member. This naturally required ramps and seamless wheelchair mobility throughout. Maintaining connectivity with the old house was equally essential.
The result was a split-level home with interconnected vertical spaces spanning all three floors, linked by shallow, comfortable steps that made movement easy for everyone.
The extension evolved into a house of remarkable generosity — with five bedrooms, study rooms, dens, stores, walk-in closets, box rooms, drawing and dining spaces, lounges, enclosed verandahs, a games room, jacuzzis, decks and balconies, servant quarters, waterfalls, rainwater harvesting systems, SPV installations, solar chimney-assisted ventilation, and nearly every innovation one could imagine at the turn of the millennium.
We were also experimenting with what were then cutting-edge materials and technologies: 2' × 2' vitrified tiles brought all the way from Bombay, CFL lighting long before LEDs arrived, copper and composite aluminium plumbing, and solar water heating. Insulated glazing, integrated Venetian blinds, security systems, and emergency low-voltage lighting were all incorporated with enthusiasm. Wooden flooring in toilets and insulated foam concrete walls were considered radical ideas at the time.
Architecture students frequently visited the house for field studies. The owners’ young son would often dive into the pool before even entering the house, while the little daughter happily inhabited her own magical corner of it.
And for the architect — there was always a wonderful cup of coffee waiting on every visit.
Needless to say, there still is.
 Tile Doctor Ltd
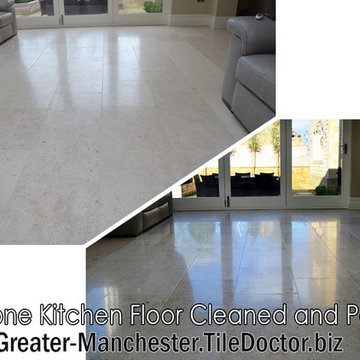
This beautiful Limestone kitchen tiled floor at a property in Peel Green was only a year old and, while it wasn’t in too bad of a state, the customer told me the floor had not been sealed properly due to issues with retaining moisture. The lack of an adequate sealer had allowed the Limestone to become duller over time after exposure to dirt and muck. It also had some more obvious marks and stains in some place and needed some grouting to be done around the corners and edges of the room.
I travelled to the property in Peel Green, which is within the Greater City of Salford in Greater Manchester, to see what could be done to restore the condition of the tiles.
Upon closer inspection of the tiles, I recommended to the customer that we proceed with the process known as burnishing, which we use primarily on Limestone, Marble, and Travertine. Burnishing, which involves the application of diamond encrusted burnishing pads, breaks down old sealers, gets rid of marks, stains and ingrained dirt, and gradually builds and evens out the polish on the tiles.
I started burnishing the Limestone kitchen tiles straight away when I arrived at the property as it was a big area and would require lots of hard work to achieve the desired results within the space of a day.
Our burnishing system consists of four diamond encrusted pads: Coarse, Medium, a Fine and Very Fine. Each pad was applied to the Limestone in sequence in tandem with a small amount of water to act as lubrication, gradually smoothing and polishing the surface of the tiles. After every pad, I also used my wet vac machine to remove any dirty water left on the floor and, after the Fine pad I rinsed the floor thoroughly to remove any dirt left on floor. I then left it to dry.
When I was satisfied that the floor was completely dry, it was time to seal the Limestone tiles. However, I first went over the floor with Very Fine grit pad to provide a final polish before sealing.
My choice of sealer was the impregnating Tile Doctor Colour Grow, a product which enhances the natural colours in the stone whilst also offering robust protection against dirt and stains. Remembering that the tiles had never been properly sealed, I applied plenty of sealer and left it to dry for 10 minutes. Following this, I carefully removed any excess sealer left on the surface with a dry cotton cloth. After sealing I went over the floor once final time with the Very Fine pad, just to smoothen things down and leave an exceptionally neat finish.
When the job was finished, I gave the owner some tips and recommendations on the cleaning of the floor going forward and a complimentary bottle of neutral cleaner to get them started.
The customer was very pleased with the finish, so much so that she opted and take up the Tile Doctor Maintenance Plan to keep the floor looking good for years to come! This involves popping round every 6-12 months to top up the sealer and give the floor a quick polish.
Tony Olmet
Greater Manchester Tile Doctor


 DesignerStone® Panels
18" x 48" holds 4 bottles - $1099.00
24" x 48" holds 8 bottles - $1369.00
48" x 48" holds up to 16 bottles - $2,255.00
Custom wine racks available up to 48" x 96"
Translucent and Non-Translucent stones available.
Stones are thin cut DesignerStone Panels.
 LaFauci Tile and Marble
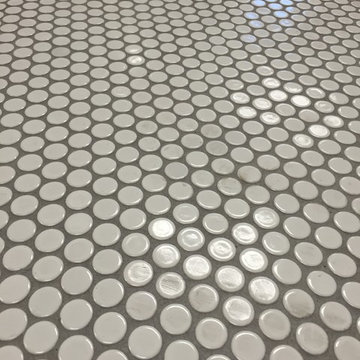
Clean and simple 1" penny round tile with a contrasting grey grout. Looks Great and easy to clean
Example of a mid-sized classic ceramic tile home design design in Boston
Example of a mid-sized classic ceramic tile home design design in Boston

 123 Remodeling Inc.
Chicago isn’t known for spacious bathrooms, especially in older areas like Ravenswood. But we’re experts in using every inch of a condo’s limited footprint. With that determination, this mini master bath now has a full vanity, shower, and soaking tub with room to spare.
You can find more information about 123 Remodeling and schedule a free onsite estimate on our website: https://123remodeling.com/


 TATCOR DESIGN BUILD
Why not include a full bathroom on this level? Steam shower bathroom complete with Steam Spa steam generator, beautiful deep blue square mosaic accents against gray porcelain tiling, built-in shelving, vanity with quartz counter top and wood cabinetry with more of the blue square mosaic accent along the wall above the vanity, and custom wall lighting is impressive, right?

 Talianko Design Group, LLC
The great room incorporates a living and dining and is open to the kitchen as well as a luxurious back patio. It is the perfect place for entertaining. In this space we used rich wood furniture, including a custom exotic wood scroll bench. Cream and white leather upholstery is predominant with hammered silver nail head trim as accents. An antiqued silver leafed custom bar cabinet in an alcove in the back of the space was custom made just for the client. A floor lamp with crystal accents highlights the gorgeous crystal lamp that rests on the sofa table. A large contemporary art piece on the wall brings in some color and interest. We refinished the walnut strip wood flooring in a darker color for more contrast and placed a custom pony hair area rug to the living room floor for added dimension and luxury. Lots of metal and glass furniture accents are seen throughout. A metallic drapery rod and custom horizontally striped drapery panels over motorized roman shades add a glamorous feel to the space. For an upscale look we used grass cloth and mica wall coverings on the dining room wall. An inlaid walnut sunburst table is surrounded by custom upholstered dining chairs and the focal point is the custom chandelier made with quartz crystal clusters in varied lengths over the dining room table. A player piano in the corner of the room adds to the entertainment ambiance of this new condo. Photography by Erika Bierman


113