
Search results for "Starting watering" in Home Design Ideas
 Schulte Design Build
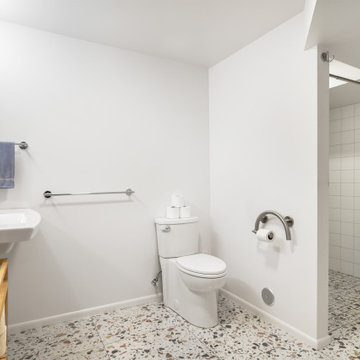
For this full-home remodel, the homeowners were looking for a design-build firm with strong credentials, sustainable practices, and a personal touch. After an extensive search, they chose Schulte Design Build for our expertise, approachability, and commitment to high-quality craftsmanship.
From the beginning, collaboration was essential. The homeowners had a well-defined vision but remained open to professional insights, allowing us to create a design that balanced functionality, sustainability, and budget-conscious decisions. Energy efficiency played a key role in the project, with strategic upgrades such as relocating the water heater and switching to a hybrid model. We also adjusted the backup furnace to side vent, reducing roof penetrations and improving overall efficiency.
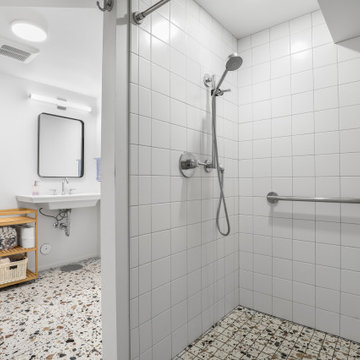
Accessibility was another priority, and our team incorporated thoughtful ADA-friendly solutions throughout the home. The material selection process was equally intentional, ensuring that finishes aligned with the homeowners’ aesthetic goals while staying within budget. Our design team worked closely with them to achieve a refined and cohesive look without compromising quality.
Project management and clear communication were crucial to the success of this remodel. With regular check-ins and project tracking software, we kept the process organized and transparent, providing a seamless experience from start to finish. The construction phase lasted six months, during which the homeowners stayed actively involved while trusting our team to bring their vision to life.
The end result is a beautifully transformed home that integrates modern efficiencies, accessibility, and timeless design. Beyond the renovation itself, the homeowners gained a deeper understanding of their home’s functionality and feel more connected to their space than ever before. At Schulte Design Build, we take pride in guiding homeowners through the remodeling journey with expertise, integrity, and a collaborative spirit.
 Williamsons Kitchens
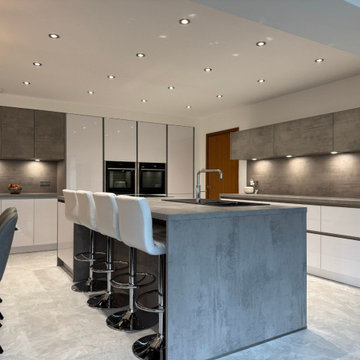
This stunning kitchen project in Fraserburgh perfectly blends modern aesthetics with functionality. The client envisioned a contemporary kitchen that maximised practicality while incorporating a striking island.
To achieve the desired look, we selected the Nolte Lux range with integrated MatrixArt handleless trims for a sleek and seamless appearance. Finished in Gloss White, the cabinetry is paired with Beton Concrete accents, creating a balanced mix of light and texture for a truly sophisticated feel.
The worktops, also by Nolte, feature a robust 40mm Concrete design, adding to the industrial yet refined charm of the space.
High-performance NEFF appliances were chosen to ensure the kitchen meets the demands of modern living. These include two Slide&Hide single ovens, a vented induction hob with an integrated extractor, and essential built-in appliances such as a fridge freezer and dishwasher.
A Blanco Zia sink in Anthracite was paired with a Quooker Fusion Square tap in a Chrome finish, offering instant boiling water for added convenience.
To enhance the flow of the home, a structural wall was removed, opening the kitchen into the conservatory and creating a spacious living area ideal for family gatherings and shared meals.
The multifunctional island serves as a focal point, combining a cooking zone, washing-up area, and informal dining space. Tall units were meticulously designed to extend to the ceiling, incorporating a goal post niche for added storage and visual interest.
Our expert team fully managed this project, ensuring a seamless experience from start to finish. Detailed drawings were provided to all on-site trades, resulting in a beautifully executed kitchen tailored to the client’s needs.
Ready to transform your space? Contact us today to begin your journey towards the kitchen of your dreams!
 Schulte Design Build
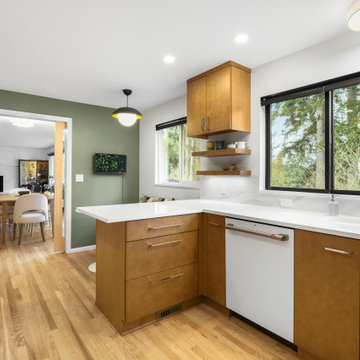
For this full-home remodel, the homeowners were looking for a design-build firm with strong credentials, sustainable practices, and a personal touch. After an extensive search, they chose Schulte Design Build for our expertise, approachability, and commitment to high-quality craftsmanship.
From the beginning, collaboration was essential. The homeowners had a well-defined vision but remained open to professional insights, allowing us to create a design that balanced functionality, sustainability, and budget-conscious decisions. Energy efficiency played a key role in the project, with strategic upgrades such as relocating the water heater and switching to a hybrid model. We also adjusted the backup furnace to side vent, reducing roof penetrations and improving overall efficiency.
Accessibility was another priority, and our team incorporated thoughtful ADA-friendly solutions throughout the home. The material selection process was equally intentional, ensuring that finishes aligned with the homeowners’ aesthetic goals while staying within budget. Our design team worked closely with them to achieve a refined and cohesive look without compromising quality.
Project management and clear communication were crucial to the success of this remodel. With regular check-ins and project tracking software, we kept the process organized and transparent, providing a seamless experience from start to finish. The construction phase lasted six months, during which the homeowners stayed actively involved while trusting our team to bring their vision to life.
The end result is a beautifully transformed home that integrates modern efficiencies, accessibility, and timeless design. Beyond the renovation itself, the homeowners gained a deeper understanding of their home’s functionality and feel more connected to their space than ever before. At Schulte Design Build, we take pride in guiding homeowners through the remodeling journey with expertise, integrity, and a collaborative spirit.
Find the right local pro for your project
 Moore Services LVP LLC
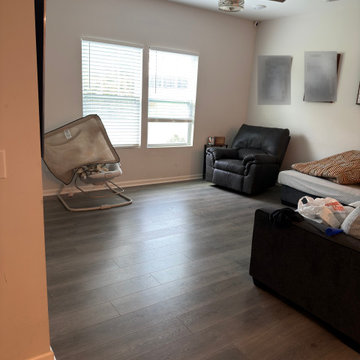
This project involved approximately 200 sq. ft. of Mohawk Boardwalk Collective Graphite flooring after a spill damaged around 10 planks and caused visible bubbling in the affected area.
The repair started with moving furniture and carefully removing the existing quarter-round. I was able to save all of the original trim without breaking it, so it could be reused once the flooring repair was finished.
From there, the existing floating floor was carefully taken apart until I reached the damaged section. The affected boards were identified and marked, the damaged flooring was removed, and matching Mohawk Boardwalk Collective Graphite LVP was installed in its place. Any original planks that were still in good condition were reused rather than unnecessarily replacing more flooring.
Once everything was back together, the original quarter-round was reinstalled and the repair was finished without needing to replace the entire floor.
This is a good example of why an LVP repair can be very different from a normal flooring installation. Sometimes the biggest part of the job is carefully taking the existing floor apart, keeping everything organized, replacing only the damaged material, and then putting the room back together without creating additional damage.
 Schulte Design Build
For this full-home remodel, the homeowners were looking for a design-build firm with strong credentials, sustainable practices, and a personal touch. After an extensive search, they chose Schulte Design Build for our expertise, approachability, and commitment to high-quality craftsmanship.
From the beginning, collaboration was essential. The homeowners had a well-defined vision but remained open to professional insights, allowing us to create a design that balanced functionality, sustainability, and budget-conscious decisions. Energy efficiency played a key role in the project, with strategic upgrades such as relocating the water heater and switching to a hybrid model. We also adjusted the backup furnace to side vent, reducing roof penetrations and improving overall efficiency.
Accessibility was another priority, and our team incorporated thoughtful ADA-friendly solutions throughout the home. The material selection process was equally intentional, ensuring that finishes aligned with the homeowners’ aesthetic goals while staying within budget. Our design team worked closely with them to achieve a refined and cohesive look without compromising quality.
Project management and clear communication were crucial to the success of this remodel. With regular check-ins and project tracking software, we kept the process organized and transparent, providing a seamless experience from start to finish. The construction phase lasted six months, during which the homeowners stayed actively involved while trusting our team to bring their vision to life.
The end result is a beautifully transformed home that integrates modern efficiencies, accessibility, and timeless design. Beyond the renovation itself, the homeowners gained a deeper understanding of their home’s functionality and feel more connected to their space than ever before. At Schulte Design Build, we take pride in guiding homeowners through the remodeling journey with expertise, integrity, and a collaborative spirit.

 Sunset Construction & Design
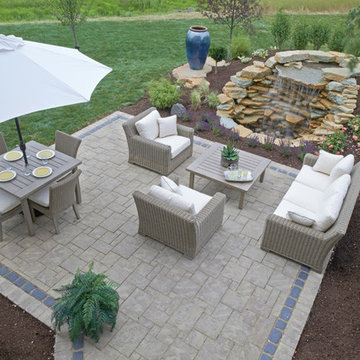
Sunset Construction and Design specializes in creating residential patio retreats, outdoor kitchens with fireplaces and luxurious outdoor living rooms. Our design-build service can turn an ordinary back yard into a natural extension of your home giving you a whole new dimension for entertaining or simply unwinding at the end of the day.
Today, almost any activity you enjoy inside your home you can bring to the outside. Depending on your budget, your outdoor room can be simple, with a stamped concrete patio, a grill and a table for dining, or more elaborate with a fully functional outdoor kitchen complete with concrete countertops for preparing and serving food, a sink and a refrigerator. You can take the concept even further by adding such amenities as a concrete pizza oven, a fireplace or fire-pit, a concrete bar-top for serving cocktails, an architectural concrete fountain, landscape lighting and concrete statuary.
Cooking
Something to cook with, such as a barbecue grill or wood-fired pizza oven, and countertops for food preparation and serving are key elements in a well-designed outdoor kitchen. Concrete countertops offer the advantages of weather resistance and versatility, since they can be formed into any shape you desire to suit the space. A coat of sealer will simplify cleanup by protecting your countertop from stains. Other amenities, such as concrete bar-tops and outdoor sinks with plumbing, can expand your entertainment options.
Hearth
Wood-burning or gas fireplaces, fire pits, chimineas and portable patio heaters extend the enjoyment of outdoor living well into the evening while creating a cozy conversation area for people to gather around.
If you’re interested in converting a boring back yard or starting from scratch in a new home, look us up! A great patio and outdoor living area can easily be yours. Greg, Sunset Construction & Design in Fresno, CA.
 New Generation Wallcovering Inc.
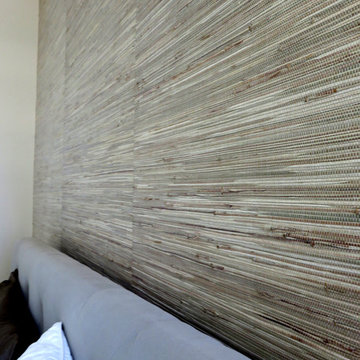
This grass cloth by York Wallcoverings is beautiful to look at. Installed as an accent wall, it adds flair to this bedroom. To create an even look, we trimmed the panels down to 29" wide from the standard 36".


 Envision Web
Stuart Wade, Envision Virtual Tours
Envision Virtual Tours and High Resolution Photography is your best choice to find just what you are looking for in the Lake Burton Area . Knowing the areas and resources of Lake Burton is our specialty
Lake Burton is a 2,775 acre man-made lake with 62 miles of shoreline located in the northeastern corner of Georgia in Rabun County. It is the first lake in a five-lake series called the Tallulah River Watershed that follows the original course of the Tallulah River. The series of lakes starts with Lake Burton as the northernmost lake followed by Lake Seed, Lake Rabun, Lake Tallulah Falls and the eastern arm of Lake Tugalo (the western arm is formed by the Chattooga River. The lakes are owned and operated by the Georgia Power Company to generate hydroelectric energy for Georgia's largest city, Atlanta. At one time these lakes were the largest producers of electricity in the state of Georgia. Now, they only provide peak power supply.
The lake was built in a deep valley located along a 10 mile section of the Tallulah River. The Lake Burton Dam was closed on December 22, 1919 and the lake started to fill. The dam is a gravity concrete dam, with a height of 128 feet and a span of 1,100 feet. The spillway is equipped with eight gates 22 feet wide by 6.6 feet high. The total capacity at an elevation of 1,866.6 feet is 108,000 acre-ft, of which 106,000 acre-ft is usable storage. The generating capacity of the dam is 6,120 kilowatts (two units).Lake Burton is the highest Georgia Power lake in Georgia.
Lake Burton gets its named from the town of Burton, which was the second largest town in Rabun County with a population of approximately 200 but now lies below the lake's surface. The town (and the lake) was named after local prominent citizen Jeremiah Burton and was situated along the road from Clayton, Georgia to the Nacoochee Valley. Andrew Jackson Ritchie served as the postmaster for the area for several years. Gold was first discovered in Rabun County where Dicks Creek and the Tallulah River come together and was the reason for the town's founding in the early 1800s.
The Lake Burton Fish Hatchery and Moccasin Creek State Park are located on the western side of the lake. Lake Burton is home to several species of fish, including Spotted Bass, Largemouth Bass, White Bass, Black Crappie, Bluegill, Redear Sunfish, White Catfish, Walleye, Brown Trout, Rainbow Trout, and Yellow Perch.
The residents of Lake Burton are a mix of permanent residents and seasonal vacationers who together make-up the Lake Burton Civic Association, a local organization who goal is to maintain the lake through volunteer clean-ups and other such events. Let a Lake Burton resident and expert show you the way
The Lake Burton Civic Association is an active homeowners association for residents of the Lake Burton area and sponsors many events throughout the year such as:
burton, custom, envision, georgia, lake, mountain, nc, north, photography, web, western, Lake Burton, Lake Rabun, Seed Lake,Virtual Tours.

 Greenhaven Landscapes Inc.
Inspiration for a large farmhouse partial sun backyard landscaping in Chicago for fall.

 Jarrett Design
These clients win the award for ‘Most Jarrett Design Projects in One Home’! We consider ourselves extremely fortunate to have been able to work with these kind folks so consistently over the years.
The most recent project features their master bath, a room they have been wanting to tackle for many years. We think it was well worth the wait! It started off as an outdated space with an enormous platform tub open to the bedroom featuring a large round column. The open concept was inspired by island homes long ago, but it was time for some privacy. The water closet, shower and linen closet served the clients well, but the tub and vanities had to be updated with storage improvements desired. The clients also wanted to add organized spaces for clothing, shoes and handbags. Swapping the large tub for a dainty freestanding tub centered on the new window, cleared space for gorgeous his and hers vanities and armoires flanking the tub. The area where the old double vanity existed was transformed into personalized storage closets boasting beautiful custom mirrored doors. The bathroom floors and shower surround were replaced with classic white and grey materials. Handmade vessel sinks and faucets add a rich touch. Soft brass wire doors are the highlight of a freestanding custom armoire created to house handbags adding more convenient storage and beauty to the bedroom. Star sconces, bell jar fixture, wallpaper and window treatments selected by the homeowner with the help of the talented Lisa Abdalla Interiors provide the finishing traditional touches for this sanctuary.
Jacqueline Powell Photography

 Coastal Home Design Studio
An adorable but worn down beach bungalow gets a complete remodel and an added roof top deck for ocean views. The design cues for this home started with a love for the beach and a Vetrazzo counter top! Vintage appliances, pops of color, and geometric shapes drive the design and add interest. A comfortable and laid back vibe create a perfect family room. Several built-ins were designed for much needed added storage. A large roof top deck was engineered and added several square feet of living space. A metal spiral staircase and railing system were custom built for the deck. Ocean views and tropical breezes make this home a fabulous beach bungalow.
 SUPERIOR CHIMNEY SERVICES CORPORATION
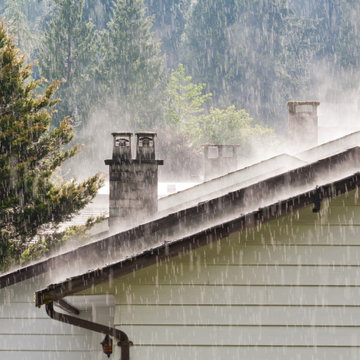
Do you know what ends our time of enjoying the wonderful Fall colors? Rain. The other day when it rained, it took most of those bright yellow leaves and brought them to the ground. It saddened me not only because the colors were gone, but now the leaves have to be cleaned up. And with the trees being larger, those leaves went everywhere. All over the ground, in the tall bushes, stuck on the window sills, lodged in the gutters and up at the chimney. Nature’s going to happen so, what are the effects of Fall rain and the Chimney? Let’s take a further look.
Fall Rain and the Chimney
The Fall leaves are gorgeous and fall is many homeowners favorite time of year. But as with all seasons, it comes to an end. The Fall rain combined with wind takes those colorful leaves and distributes them…everywhere. Especially on the roof where your chimney is located. By having an annual chimney inspection, we’ll take a look to ensure the safety of your chimney stays intact for the upcoming harsher season: Winter.
The Exterior Chimney
With Fall, we have two of the elements to be concerned about and that’s the leaves and rain. Here are a few areas we check and the effects of fall rain and the chimney. Let’s start at the top:
Chimney Cap: The chimney cap is vital for protecting the opening of your chimney which leads to the interior of your home. We inspect the chimney cap ensuring it is tightly secured to the exterior chimney termination. The chimney is typically the tallest part of your home and gets exposed to the harshest winds, rain, snow, animals and blowing debris. All of that hits the chimney cap trying to find that weak spot so it can get inside the chimney. If it does, that debris is easily ignited and can cause harm to your home.
Chimney Crown: This is the slab of concrete that covers the chimney and extends beyond the bricks or materials that make up the chimney. This is to provide protection from the elements. But remember the chimney crown can also develop cracks over time. This is where crown coat can extend the life of the chimney crown ensuring the elements stay where they should… outside.
Brick, Stone and Mortar: The structure of the chimney can be made of brick, stone or other materials. If it is made of brick or stone, then mortar is involved. All of these materials are porous, meaning that it can absorb water and snow melt, which breaks down over time. As a result, this needs to be checked looking for loose bricks, missing mortar, cracks in either one of these materials and more. Tuckpointing is a good solution to ensure the elements stay out. The use of Chimney Saver is a great way to preserve the bricks, stones and mortar as it waterproofs and protects the materials for about 8 – 10 years and slows down the aging process.
Flashing: This is the material that protects the connection of the roof to the chimney. A critical and common area for leaks. The flashing moves the water away from the chimney and down the roof. The flashing adheres to the chimney with a seal, which dries out over time. This area needs to be checked to ensure the seal is strong and doesn’t allow water to get in.
Before the cold sets in and you want to turn on or fire up the fireplace, be sure to take into consideration the effects of fall rain and the chimney. Contact us today at 877-244-6349 to set up an appointment.
Sponsored
Columbus, OH
Free consultation for landscape design!

Peabody Landscape Group
Franklin County's Reliable Landscape Design & Contracting

 Eco Star Painting
Step #1 Apply BM CLEAN
As you can see in the 'Before' picture above, this cedar deck was extremly dirty. This required an extra step in comparison to the typical deck stripping process. My paint rep at Benjamin Moore recommended a product called CLEAN. It comes in one gallon plastic containers and can be applied out of a plastic pail or with a garden sprayer. We used a Garden sprayer and chose a flat tip for application. The three gallon garden sprayer was filled with 2 gallons of water and one gallon of the CLEAN solution. This is a strong mixture and can be reduced to up to 6 parts water and one part of the Benjamin Moore CLEAN.
This approximately 22x20 deck had a board running perpindicular to the rest of the floor boards which divided it into 2 equal parts. Our method was to apply the solution to 3-4 of these 10' boards at a time. Allow it to set up for a few minutes and then scrub away with the deck brush. The agitation loosens up the dirt and grime and is then removed with a pressure washer a board a time. The flat tip on the pressure washer was almost the same width as the floor board. It is important to clean the sides of the board too because any remaining dirt or stain will be visible.
Benjamin Moore Deck Restoration products named Clean,Restore,brighten
Step #2 Apply BM RESTORE
The second step is exactly the same as the first step but with a different solution called Benjamin Moore RESTORE. The deck was dry before we started the 2nd step becuase it was baking hot outside. You use the same 2/1 mixture of water to chemical. This chemical will remove the stain still present in the deck floor. Make sure to rinse the garden sprayer clean before adding the restore solution. Unlike the BM CLEAN, the BM RESTORE has an orange-ish color in appearance. It did a fine job of removing most of the stain, but not 100% of it. There were a few areas that required a 3rd coat of restore but the process was quicker.
Step #3 Apply BM BRIGHTEN
The third step is exactly the same as the first two step but the chemical solution used was Benjamin Moore 'BRIGHTEN'. Again, the garden sprayer was cleaned and filled with 2 parts water and one part Brighten. The brightener not only lightens the wood but it also neutralizes the previous stripper solution. As stated before the Restore adds a bit of color and the Brighten will remove any traces of it. you still have to agitate the brightener with a scrub brush and either pressure wash it off or use a garden hose. We used the pressure washer for faster results. After it dries the wood look a lot brighter but we still found some spots of stain that had not come off.
Apply Sikkens Stain
As stated above the stain we used is called "Sikkens Proluxe" which is basically just a slight re-branding of the classic Sikkens Stain. The formula is exactly the same. In fact, the secondary name is still called 'Cetol' SRD RE. The color chosen was "CEDAR".
The weather was quite hot for a typical Calgary Spring day so we stained a 10' section of floor board at a time. The deck has a metal railing so the supporting feet had to be brushed in with a 2.5" natural bristle paint brush. for the rest of the job a 6" Wooster natural bristle deck brush was used. The handle was remove and a broom handle was inserted. The stain was stirred frequently and poured into a plastic Simms brand roller pan. Semi transparent Oil based stain has the consistency of water so you need to be careful not to spill any of it. When applying to a board you hit the sides first with the brush and then fillin the rest. Ten feet of floor board can be stain in a short period of time. it's important not to leave any streaks so it is adviseable to back-brush the entie length before moving on to the next board. The staining only took about 2.5 hours to complete. One coat is the manufacturers recommendation.
One last thing about Sikkens Stain. To maintain this beautiful look the deck should be re- coated once a year, preferably every spring. It's like applying sunscreen yearly to protect the wood against further damage. Two gallons was enough to cover this 450 sq foot deck.
 Jarrett Design
These clients win the award for ‘Most Jarrett Design Projects in One Home’! We consider ourselves extremely fortunate to have been able to work with these kind folks so consistently over the years.
The most recent project features their master bath, a room they have been wanting to tackle for many years. We think it was well worth the wait! It started off as an outdated space with an enormous platform tub open to the bedroom featuring a large round column. The open concept was inspired by island homes long ago, but it was time for some privacy. The water closet, shower and linen closet served the clients well, but the tub and vanities had to be updated with storage improvements desired. The clients also wanted to add organized spaces for clothing, shoes and handbags. Swapping the large tub for a dainty freestanding tub centered on the new window, cleared space for gorgeous his and hers vanities and armoires flanking the tub. The area where the old double vanity existed was transformed into personalized storage closets boasting beautiful custom mirrored doors. The bathroom floors and shower surround were replaced with classic white and grey materials. Handmade vessel sinks and faucets add a rich touch. Soft brass wire doors are the highlight of a freestanding custom armoire created to house handbags adding more convenient storage and beauty to the bedroom. Star sconces, bell jar fixture, wallpaper and window treatments selected by the homeowner with the help of the talented Lisa Abdalla Interiors provide the finishing traditional touches for this sanctuary.
Jacqueline Powell Photography
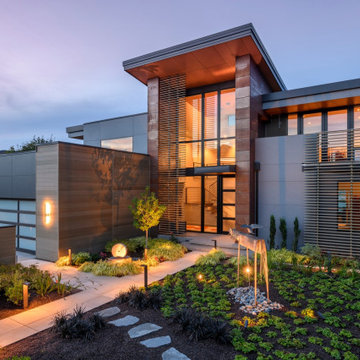
 Rhodes Architecture + Light
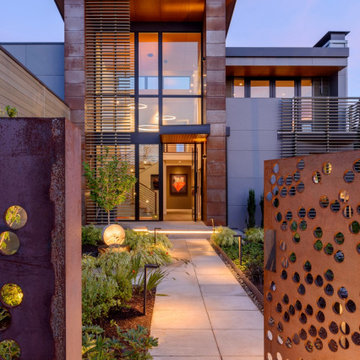
A transformation inspired by the owner’s love of modern architecture, art and color (and the adjacent sand, rock, water, and the northwest landscape), the Indianola House sought to bring the soul of a home to a colorless muted box. The original house was a drab 1990’s-era box with no personality or presence sited on a beautiful secluded bay, facing water and island views, northwest of the City of Seattle. The existing mono-colored stucco-clad exterior and pyramidal glass-block openings had led the neighborhood to dub the structure, unflatteringly, “The Miami Vice House”.
Rhodes Architecture’s Residential Architects careful use of natural light, rich, collaged finishes and ability to open the house to gardens, beach, and outdoor gathering was critical to the design. The house soon became “The Gallery”.
The original home’s grey stucco exterior made the house seem both large and featureless; the introduction of no-maintenance exterior materials that collage and complement each other was a goal of the homeowner and the Seattle Architects who teamed up for this residential design. The bloated scale of the house cried out for the establishment and definition of the parts of the structure, a breaking down of the home’s form and its apparent bland size.
Living, sleeping, and bathing areas that started as staid spaces were in need of opening to the natural environment with additions of large doors, folding glass walls and useable balconies were crucial to each space having a dialogue with the outdoors.
The owner’s extensive art collection was highlighted and became the focus of interior places, well-lit naturally and through a new lighting system. Energy use and sustainable systems were a key component of the design which used high-efficacy lighting, better cladding on a rain-screen system, high-efficiency doors and windows, new insulation and weather barriers, and which added a photovoltaic-generated electrical system. The contemporary design sought to integrate all of these systems, materials, and finishes into a seamless whole that lent interest and drama to a residence which was previously lusterless.
How radically this house was transformed is evident in the exteriors, gardens and the natural spaces the house now opens to, as well as the gallery-like interiors. This home is a stunning testament to what is possible “before-and-after” when remade by Rhodes Architecture + Light.
The clients are an older couple with long professional and political careers, a love of art and a clear desire to connect with the Northwest environment and enliven their daily lives with spaces full of color and natural light.
Rhodes Architecture + Light was hired in 2019 to add new exteriors and interiors, natural light, larger openings to beach and bay, seismic and foundation upgrades to the home, and to infuse life into the house through the re-use of existing space and varied materials, color, textures, and lighting. The only actual change to the exterior “shell” of the house was the introduction of a low “gull-wing” roof with wood soffits above the central atrium space, to add drama and bring natural light into the entry gallery space. Interior spaces, including bedrooms and bathrooms, were re-planned and opened to each other, to greater natural light, to roof decks, and to the incredible views and sea-side environment.
The Builder, Fairbank Construction Company of Bainbridge Island, Washington, met the challenge of the design, first completely deconstructing the finishes inside and out, then precisely interlocking new claddings, windows and doors, cabinetry, finishes and a new gull-wing central roof in a beautiful transformation. The construction was total, thorough, and very detailed, resulting a house that, far from seeming a “remodeling”, is far more present and fitting to the owner’s lives and the natural environment than the house we started with.
 TKS Design Group
Download our free ebook, Creating the Ideal Kitchen. DOWNLOAD NOW
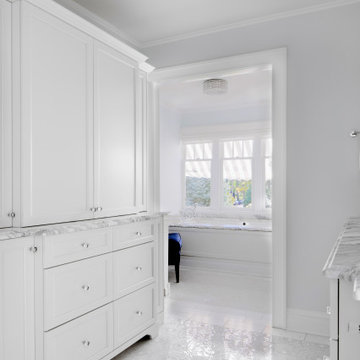
Bathrooms come in all shapes and sizes and each project has its unique challenges. This master bath remodel was no different. The room had been remodeled about 20 years ago as part of a large addition and consists of three separate zones – 1) tub zone, 2) vanity/storage zone and 3) shower and water closet zone. The room layout and zones had to remain the same, but the goal was to make each area more functional. In addition, having comfortable access to the tub and seating in the tub area was also high on the list, as the tub serves as an important part of the daily routine for the homeowners and their special needs son.
We started out in the tub room and determined that an undermount tub and flush deck would be much more functional and comfortable for entering and exiting the tub than the existing drop in tub with its protruding lip. A redundant radiator was eliminated from this room allowing room for a large comfortable chair that can be used as part of the daily bathing routine.
In the vanity and storage zone, the existing vanities size neither optimized the space nor provided much real storage. A few tweaks netted a much better storage solution that now includes cabinets, drawers, pull outs and a large custom built-in hutch that houses towels and other bathroom necessities. A framed custom mirror opens the space and bounces light around the room from the large existing bank of windows.
We transformed the shower and water closet room into a large walk in shower with a trench drain, making for both ease of access and a seamless look. Next, we added a niche for shampoo storage to the back wall, and updated shower fixtures to give the space new life.
The star of the bathroom is the custom marble mosaic floor tile. All the other materials take a simpler approach giving permission to the beautiful circular pattern of the mosaic to shine. White shaker cabinetry is topped with elegant Calacatta marble countertops, which also lines the shower walls. Polished nickel fixtures and sophisticated crystal lighting are simple yet sophisticated, allowing the beauty of the materials shines through.
Designed by: Susan Klimala, CKD, CBD
For more information on kitchen and bath design ideas go to: www.kitchenstudio-ge.com
Sponsored
Columbus, OH
Free consultation for landscape design!
Peabody Landscape Group
Franklin County's Reliable Landscape Design & Contracting

 Kansas City Landscape
 is one of kansas city best Kansas City landscaping companies / Kansas City Landscape Design is a Kansas City Area Landscape Company that continues to develop as a design discipline, and to respond to the various movements in architecture / design throughout Kansas City and the 20th and 21st centuries. Our goal is to create a sense of bliss around your KANSAS CITY metro home, starting at the entrance to your front door and leading to your own special place in your backyard. We are here to complete the vision you have always dreamed of in landscape design with Kansas City landscaping companies. We offer quality and craftsmanship that stand the test of time. We are specializing in all types of brickwork ,Stone Landscape, landscape fountains ,Hardscape, Landscape design, Landscape patio, Landscape Company Installation, Paver Patio Company Kansas City /Brick Paver Patio, Masonry services . From small renovations to multi-million dollar new construction, we handle commercial LANDSCAPE Kansas City, industrial and institutional work for clients seeking a KANSAS CITY landscape partner they can trust. Our final product is always beautifully constructed, fairly priced and delivered on time and on schedule

 Custom Design & Construction
This design / build project in Los Angeles, CA. focused on a couple’s master bathroom. There were multiple reasons that the homeowners decided to start this project. The existing skylight had begun leaking and there were function and style concerns to be addressed. Previously this dated-spacious master bathroom had a large Jacuzzi tub, sauna, bidet (in a water closet) and a shower. Although the space was large and offered many amenities they were not what the homeowners valued and the space was very compartmentalized. The project also included closing off a door which previously allowed guests access to the master bathroom. The homeowners wanted to create a space that was not accessible to guests. Painted tiles featuring lilies and gold finishes were not the style the homeowners were looking for.
Desiring something more elegant, a place where they could pamper themselves, we were tasked with recreating the space. Chief among the homeowners requests were a wet room with free standing tub, floor-mounted waterfall tub filler, and stacked stone. Specifically they wanted the stacked stone to create a central visual feature between the shower and tub. The stacked stone is Limestone in Honed Birch. The open shower contrasts the neighboring stacked stone with sleek smooth large format tiles.
A double walnut vanity featuring crystal knobs and waterfall faucets set below a clearstory window allowed for adding a new makeup vanity with chandelier which the homeowners love. The walnut vanity was selected to contrast the light, white tile.
The bathroom features Brizo and DXV.
 Rhodes Architecture + Light
A transformation inspired by the owner’s love of modern architecture, art and color (and the adjacent sand, rock, water, and the northwest landscape), the Indianola House sought to bring the soul of a home to a colorless muted box. The original house was a drab 1990’s-era box with no personality or presence sited on a beautiful secluded bay, facing water and island views, northwest of the City of Seattle. The existing mono-colored stucco-clad exterior and pyramidal glass-block openings had led the neighborhood to dub the structure, unflatteringly, “The Miami Vice House”.
Rhodes Architecture’s Residential Architects careful use of natural light, rich, collaged finishes and ability to open the house to gardens, beach, and outdoor gathering was critical to the design. The house soon became “The Gallery”.
The original home’s grey stucco exterior made the house seem both large and featureless; the introduction of no-maintenance exterior materials that collage and complement each other was a goal of the homeowner and the Seattle Architects who teamed up for this residential design. The bloated scale of the house cried out for the establishment and definition of the parts of the structure, a breaking down of the home’s form and its apparent bland size.
Living, sleeping, and bathing areas that started as staid spaces were in need of opening to the natural environment with additions of large doors, folding glass walls and useable balconies were crucial to each space having a dialogue with the outdoors.
The owner’s extensive art collection was highlighted and became the focus of interior places, well-lit naturally and through a new lighting system. Energy use and sustainable systems were a key component of the design which used high-efficacy lighting, better cladding on a rain-screen system, high-efficiency doors and windows, new insulation and weather barriers, and which added a photovoltaic-generated electrical system. The contemporary design sought to integrate all of these systems, materials, and finishes into a seamless whole that lent interest and drama to a residence which was previously lusterless.
How radically this house was transformed is evident in the exteriors, gardens and the natural spaces the house now opens to, as well as the gallery-like interiors. This home is a stunning testament to what is possible “before-and-after” when remade by Rhodes Architecture + Light.
The clients are an older couple with long professional and political careers, a love of art and a clear desire to connect with the Northwest environment and enliven their daily lives with spaces full of color and natural light.
Rhodes Architecture + Light was hired in 2019 to add new exteriors and interiors, natural light, larger openings to beach and bay, seismic and foundation upgrades to the home, and to infuse life into the house through the re-use of existing space and varied materials, color, textures, and lighting. The only actual change to the exterior “shell” of the house was the introduction of a low “gull-wing” roof with wood soffits above the central atrium space, to add drama and bring natural light into the entry gallery space. Interior spaces, including bedrooms and bathrooms, were re-planned and opened to each other, to greater natural light, to roof decks, and to the incredible views and sea-side environment.
The Builder, Fairbank Construction Company of Bainbridge Island, Washington, met the challenge of the design, first completely deconstructing the finishes inside and out, then precisely interlocking new claddings, windows and doors, cabinetry, finishes and a new gull-wing central roof in a beautiful transformation. The construction was total, thorough, and very detailed, resulting a house that, far from seeming a “remodeling”, is far more present and fitting to the owner’s lives and the natural environment than the house we started with.
181