
Search results for "Suffered" in Home Design Ideas
 Lamont Bros. Design & Construction
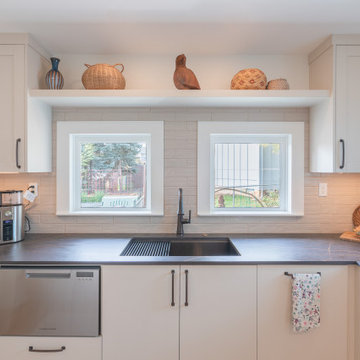
After years of suffering through a poorly designed kitchen that didn’t meet her needs, our client made the difficult decision to re-remodel her kitchen. Now that the kitchen is complete, she's happier than ever in her new kitchen. What used to be a space that was intimidating and difficult to use has become a place designed specifically for her needs, where every appliance and shelf is within comfortable reach and the design is tailored exactly to her personal style.
 Tracy Berman Interiors
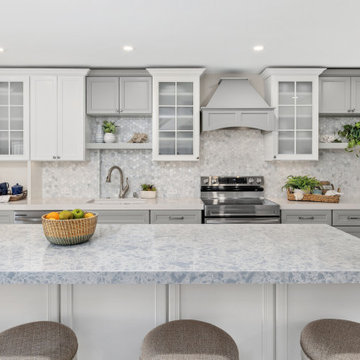
This beach house was not only dated but the kitchen was suffering from a wall that closed it off and a peninsula that cut the space in half. Those were the first things we corrected. The wall was removed which opened the space up. The new layout has a large island instead of the peninsula for better flow and entertaining. This home is across the street from the beach so our design cues came from the ocean and natural surroundings. Our color pallet is white and coastal blue for the cabinets. The new luxury vinyl plank floor is light like the sand. The glass backsplash tile and quartz countertops carry the coastal feel. The main bathroom for the lower level is off the kitchen. We improved the shower size and updated all of the finishes. This beach house is now bright and open with a warm coastal feel.
 Tile Doctor Ltd
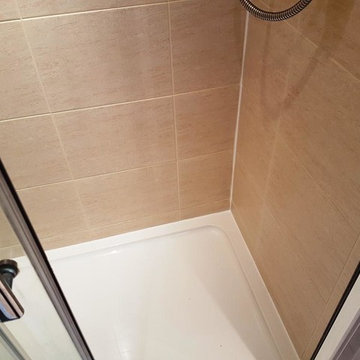
This is a great example of the difference we can make to a Shower Cubicle which suffer from a build up of soap scum, mould and staining from the dyes in shampoos and soaps etc.
This particular cubicle was installed at a property in the city of Edinburgh. The walls were Ceramic tiles which are ideal for shower areas as the glaze makes them completely water proof. However with grout being cementitious it does attract dirt and this shower was no different.
Cleaning Ceramic Tiled Shower Cubicle
The first step was to remove the wire accessory holder and then soak all the tile and grout in a strong solution of Tile Doctor Pro-Clean. I find decanting into a spray bottle works best as it mixes it with air which makes it easier to stick to the wall.
With the Pro-Clean in place it was then hand scrubbed to get the tile and especially the grout clean of all the mould and other stains. The shower walls were rinsed down and the process repeated where necessary.
Grout Colouring Shower Wall Tiles
With the tiles and grout now clean we could see that the grout was still discoloured in some areas where it had been badly stained. One option at this point would be rake out the grout and replace with new however overtime it would only discolour again, so in agreement with the customer we applied a grout colourant in a Limestone colour to better match the tile.
The Grout Colourant would ensure all the grout had a consistent appearance while also adding an impenetrable barrier that will keep its appearance for a long time. It takes a little time to do but is easily applied with a small brush and then you wipe off any excess that gets onto the tile.
The next step was to strip out the mastic silicone sealant strip from around the base of the shower cubicle and replace with new. I used high quality silicone sealant that left nice lines and fresh look, don’t use cheap sealant as it will soon discolour and some have been known to shrink.
Deep cleaning and re-colouring the grout made a huge difference; the shower cubicle has been transformed and now looks like a new installation.
Thomas Wilson
Edinburgh Tile Doctor
Find the right local pro for your project
 Jarrett Design
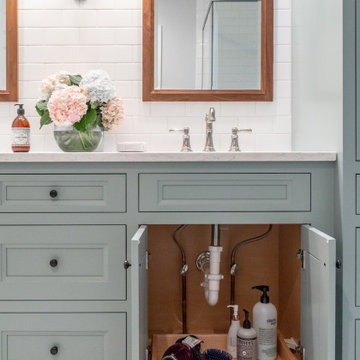
This bathroom needed help as it was tired, dated and cramped! The vanity area was open to the master bedroom and sandwiched between a closet and existing bathroom wall. Behind the bathroom wall, was a second sink, a small walk-in shower and the commode. A poorly placed linen closet ate into the area and there was a soffit over the shower adding to the cramped feeling. The ceiling was cluttered with old-school heating lamps, flush-mount fixtures and ventilation grills. The “movie star” lighting meant to add some glamour only made the bathroom feel dated and sad. Our clients wanted to bring this bathroom to life.
We built a wall and added a door between the bedroom and bathroom to ensure more privacy and define the space. In addition, we removed the wall separating the actual bathroom and vanity area to make the master bathroom larger. The linen closet was also taken out so the shower could be expanded significantly. Our homeowner had recently suffered a knee injury so they were looking for future solutions that would work for them as they continued to age. We made the shower large enough to include a bench and installed a handheld sprayer located near the seat. Shower walls were reinforced so that when the day came that a grab bar was needed, they would be ready.
We added a tall cabinet that featured two, deep rollouts and interior shelving to keep linens and bathroom supplies organized. Beneath the sinks, we included rollout drawers so items would not get lost in those dark areas under the plumbing. Everything that had been cluttering the ceiling was removed including the shower soffit and heat lamp. With those gone, we added evenly-spaced, recessed ceiling lights to help brighten the space making it safer and more practical.
We chose a custom blue-green paint for the cabinets which was understated enough to provide a sense of serenity while still offering a splash of color to help liven up the room. Walnut-framed mirrors added a touch of warmth and the patterned floor tile made the whole room fun! An old bathroom came alive!
 KURV Architecture DPC (Alex Hughes Architects)
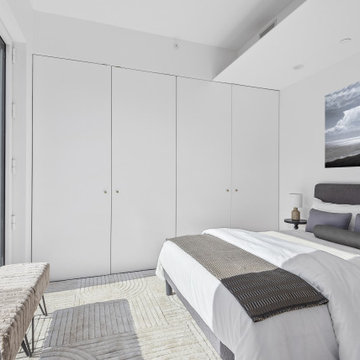
Located in the heart of Manhattan’s Lower East Side, the building was erected on a shallow commercial lot between two 120 year old masonry buildings and a new residential rental building. 330 Grand Street is a mix of 725 SF 1BRs and 1050 SF 2BR apartments. It also contains a 1100 SF two story duplex as well as private and public rooftop space, large private balconies for most units and two large private terraces for the ground floor units.
330 Grand Street was originally designed and approved at the NYC DOB as a prefabricated modular building. During the pandemic, as shipping costs skyrocketed putting the project at risk, we suggested redesigning the building as a reinforced cast-in-place concrete structure. Concrete was readily available and prices had not been affected by the demand increase that many other materials suffered in the pandemic. We took this opportunity to raise floor to ceiling heights, enlarge high performance windows and redistribute the buildings MEPFS and Structural Systems to create very open floor plans.
The challenge was to create a luxurious sensorial living experience with very limited means. In a city with very high construction costs, low cost residential buildings in the area are usually devoid of good quality, design and character. Our approach was to aim high for the end user, prioritizing natural light, open space with long visual perspectives, high ceilings and as always, rejecting the use of predefined building templates.
Our biggest challenge was to ensure that the small spaces feel as clean cut, large and bright as possible. Several unique design decisions were made to ensure low cost and high quality;
Floor plans were laid out so that spaces were wide open and free of clutter from mechanical or structural interruptions. Therefore all infrastructure was placed in lateral demising walls, which in turn act as the unit’s storage and kitchen. The apartments feel wide open, are super quiet and have more storage space than any other comparable apartment in the city.
To solve the problem of the site’s shallow commercial lot which is typically prone to dark interior spaces we focused our attention on the building’s envelope. Instead of the usual small punched window openings, oversized high performance windows were designed to ensure that light penetrated as far as possible into the units. In the smaller 1BR units, the full 50’ depth of the lot is perceived by partitioning spaces with sliding pocket doors that can be retracted to allow deep visual perspectives, making the sight lines in the space feel longer, larger, more ample than normal. In addition to the full height glazing, each unit above the 2nd floor receives a 7 foot covered balcony, adding 120 to 240 sf to each apartment, something unusual in New York City buildings. The space is large enough for a full size dining table, when the weather permits being outside.
We also worked hard to ensure modularity. For example, all kitchen units are all identical throughout the building. The idea of modularity and the economy of the repetitive unit is exercised to the maximum through the building.
Hardware, appliances, flooring, wall coverings and material finishes are all carefully selected to feel bespoke, high quality and unique.
It was important to KURV that the result of this work manifest into something that would deeply connect with the end user and sustain relationships with the consumers of this space.
All images by KURV Architecture ©
 New Roots Landscaping
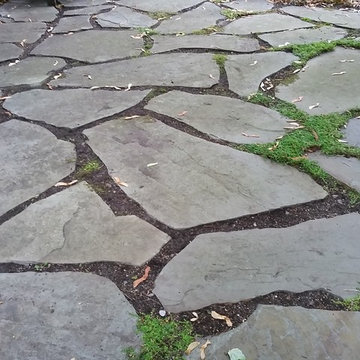
Natural bluestone patio replaces a lawn area that had suffered as the surrounding ornamental trees provided too much shade for the grass. Post intallation, ground cover just starting to fill in.
 All-Craft Decks & Sunrooms
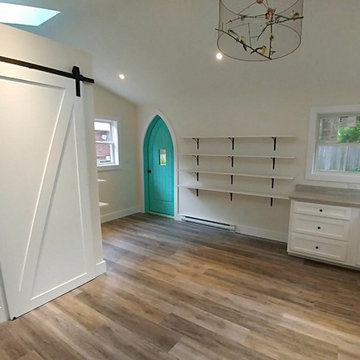
The she shed was intended for a combination art studio and a place to relax for the homeowner who was elderly and suffered with a severe medical condition. We needed to maximize the space to it’s potential, especially since it’s a small space. Included was higher-end pieces such as a stunning chandelier and a stunning Anderson door entrance system. For a more tranquil environment, we incorporated space for comfortable furniture and a propane fireplace. Space was used to the max with built in shelving and cabinetry for the art work and supplies
This 12x18 she-shed was customized with:
Tear-drop custom door by Anderson
Cathedral ceiling with skylights for abundance of natural light
Propane fireplace
Built in cabinets and shelving for art studio supplies
Barn door entrance to small garden tool storage area
 G. Christianson Construction, Inc.
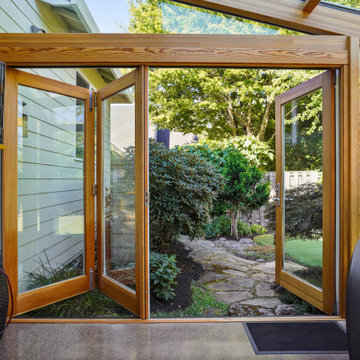
We recently completed a spectacularly beautiful sunroom for Richard and Cynthia. We worked previously with Cynthia on her business and because of our relationship, she felt comfortable asking us to build their Corvallis sunroom. The inspiration for this project came from the desire to have the ambiance of an outdoor hot tub, but without Corvallis’ cold wet weather. The sunroom adds a warm, bright 325 square feet just outside their kitchen and living room. This is the perfect addition if you are suffering from Corvallis’ cloud cover. The vibrant hues of the stained and finished Douglas fir glulam beams complement the beauty of the outdoors. These beams support the glass roof. In addition, the sunroom includes two operable skylights, a nine foot wide bifold door, a full glass roof system and full glass walls. Westview Sunrooms (the manufacturer) has a number of other beautiful ideas on their site: http://www.westviewproducts.com/pictures.html We would love the opportunity to build for you.

 Honey Bee Carpentry Inc.
The updated and restructured load bearing balcony that serves both as a solid support for the wide overhanging roof and as a safe space to enjoy year-round views over the lake. A natural armour stone retaining wall was added to strengthen the shoreline right away as well. Timber-framed braces support the roof where the unstable slope suffers from erosion. Railings are cedar posts with top cedar rails and high tension cable wires (which are difficult to see in the photos).
 Listino Painting Company
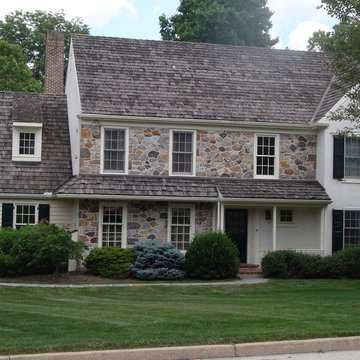
Complete exterior painting project on the stucco, wood trim, windows, and doors.
We replaced much on the right hand porch, and three windows which suffered wood rot.
 Tile Doctor Ltd
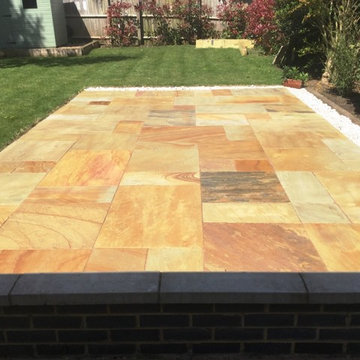
At the start of the year we usually get asked to restore the appearance of patios and other outside areas which have suffered from the staining of autumn leaves and the ravages of winter cold snaps. Most patios are quite straight forward to maintain however when you’re dealing natural stone then it’s best to call in your local Tile Doctor to ensure nothing is applied to the stone that could damage it.
Such was the case with this four-year-old Sandstone Patio at a house in the town of Kettering. Unfortunately, it was not sealed when it was first installed and the combination of weather and UV sunlight had faded the tiles, this together with general soiling had greatly affected the appearance of this beautiful stone and could almost have been mistaken for concrete slabs.
My first course of action was to lightly spray the area with a dilution of Tile Doctor Pro-Clean which is a powerful tile cleaning product that is safe to use on Stone. The solution was allowed to soak in for a while before being agitated with a brush to bring out the dirt. This was followed by pressure washing with a spinning tool at a medium pressure so as to not damage the stone.
Once dry I re-grouted the entire area and then sealed with Tile Doctor Colour Grow Sealant which is a impregnating breathable product (essential for damp environments) that also enhances the natural colours of the stone.
Within hours of finishing the customer came home and called me straight away to say he couldn’t believe the transformation that was achieved and they looked better than when they were first laid.
Phil Vissian
Northamptonshire Tile Doctor
 MD Seamless
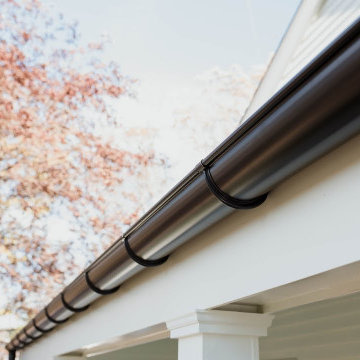
This is half-round gutter. This is a beautiful style available with either internal hangers or external hanger hangers as shown in the photo. This gutter looks great on every home! It is a more expensive product and it usually suffers from over'splash due to the curve of the gutter.
 Tile Doctor Ltd
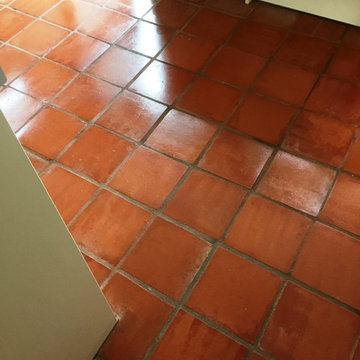
Newly built properties are not without their problems and often take a while to resolve all the snagging which occasionally extends to resolving problems with newly laid tiled floors. At this new property in the village of Malvern, and overlooked by the Malvern hills, the builders had left the Terracotta tiled kitchen floor covered in grout smears (also known as Grout Haze) following installation. They had also neglected to seal the tiles, which was actually quite fortunate in this case as they would have sealed in the grout haze, making it more difficult to remove.
Naturally, the property owner wanted the problem to be resolved as soon as possible, and for me to make the tiles easy to keep clean in future, which can be achieved by sealing the tile.
Before starting work, I made sure to fully protect any exposed woodwork with a plastic sheet covering to protect them from potential damage. I then proceeded to give the floor a thorough clean, using Tile Doctor Remove and Go to clean the floor and eradicate some stains that had been left behind as a result of the building work.
Next, I paid special attention to the grout, where the very visible problem of grout haze had arisen. To neutralise these smears I used Tile Doctor Grout Clean Up, a concentrated phosphoric acid cleaner that can also remove alkaline mineral deposits and efflorescence. Grout Clean Up is only to be used on acid resistant stone, as sensitive stone can suffer from irreparable etching if it comes into contact with the product.
Once completely clean and free of grout smears the floor was thoroughly rinsed with water to remove any trace of product and then dried as much as possible with a wet vacuum, afterwards an air mover was installed to speed up the drying process.
Later that afternoon the floor was dry and I was able to apply a sealer. To do this I opted to use several coats of Tile Doctor Seal and Go Extra, a topical, fully breathable sealer that works really well on Terracotta.
The sealer builds up a layer of protection on the surface of the tiles, protecting against ingrained dirt and stains. Seal and Go Extra also provides a high quality sheen finish which really did well to enhance the look of the Terracotta.
The property owner was exceptionally pleased with the results, and to have this problem dealt with quickly and efficiently, additionally the sealer will ensure the Kitchen floor is easy to keep clean in the future.
 Horn & Co. (Previously JHLA)
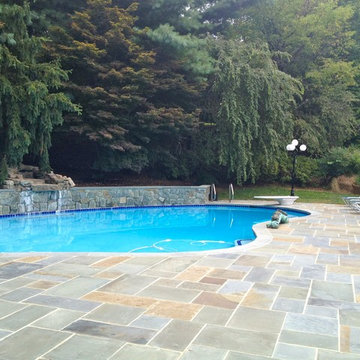
The existing concrete aggregate terrace suffered from disrepair and access was limited from the rear of the Bethesda home. We were tasked with replacing all paving, coping, and stairs. An improved water feature behind the original kidney-shaped pool provided white noise to distract visitors from the nearby highway noise.
 Michael Gorski Architect
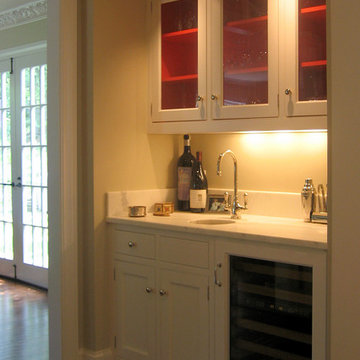
The original 1920’s cottage was charming, but suffered from a series of additions that marred the exterior and created an awkward floor plan. To renovate this home, the exterior of the original cottage was left largely intact, the previous additions were removed, a garage/bedroom wing was added to the rear, and a glazed breakfast room was added where old and new construction meet. Within the original cottage, several partitions were removed and openings between rooms were widened. The resulting home maintains the intimate feel of the original cottage, while creating the light and airy interior desired by the owner.

 iCork Floor
- Installation Type: Floating
- Licensed Uniclic Flooring system
- Square Edge Plank (seamless floor)
- Finish: Three coats water based polyurethane
- Wear Layer: 3mm genuine cork
- Middle Layer: 7mm E1 Class High Density Fiberboard (HDF)
- Integrated Underlayment: 1mm agglomerated cork.
- Plank Width: 12” (315mm)
- Plank Length: 36" (915mm)
- Plank Thickness: 7/16" (11mm)
- Carton coverage: 21.03 sqft
- Pieces per carton: 7
- 25 year warranty (residential installation)
- Underlayment not required
- Hypo-allergenic
- Healthy alternative to carpet
- Excellent thermal and acoustic insulation
- Stain resistant
- Naturally resistant to insects, mould, mildew due to anti-microbial propertiesi
- Low slip surface
- Excellent surface for seniors, children or people suffering from arthritis or joint pain
Order FREE SAMPLES on our website: www.icorkfloor.com

 Care Free Homes, Inc.
This beautiful colonial in Marion, Massachusetts is even more gorgeous with its new GAF Timberline HD roof!
There is more to a roof than shingles – in fact there are several components to a professionally installed GAF Lifetime Roofing System. Here is the anatomy of our Marion homeowner’s roof:
GAF Timberline HD Shingles Marion, MAGAF Timberline HD Roof Shingles: A beautiful architectural shingle at an affordable price! This is our most popular roof shingle here at Care Free Homes! Our Marion customer selected the classic color, Charcoal. This high performance shingle features a 130 mph wind rating and highest possible fire rating.
Underlayment: A felt/paper product that is installed over the entire roof deck, underlayment provides an additional layer of protection between the roof deck and the roof shingles.
Ice Dam and Water Shield: After a brutal winter and unprecedented snow fall, many New England homes suffered damage from ice dams. Ice Dam and Water Shield provides added protection for eves, rakes, valleys as well as flashed areas around vent pipes, chimneys, dormers, and skylights. Whether it’s a winter wonderland or a hurricane, this homeowner will not have to worry about ice dams or driving rain.
GAF Timberline HD, Marion, MA Dormers
Premium Aluminum Drip Edge: Installed along the rakes, drip edge serves several purposes. It improves the efficiency of water shedding, prevents leaking from a wind-driven rain as well as movement between the deck and fascia boards. Drip edge also keeps pesky insects from infiltrating the space between the roof deck and the fascia boards. With a choice of three colors, white, brown and gray, it provides a finished look for a roof.
GAF Pro-Start Eave/Rake Starter Strip: Every story has a beginning and every roof should have a starter strip. Here in New England we’ve got to have our roof be tougher than mother nature. To prevent shingle blow off, an ultra-adhered starter strip properly secures shingles in place during a storm. In contrast, the amateur roofer will often use cut-up shingles as a starter course. This weakened “starter course” lowers the wind resistance of a roof and makes it more susceptible to both wind and water damage. With straighter edges, Dura-Grip adhesive, and outstanding warranties – starter strip will provide beauty, performance and peace of mind.
GAF Cobra Ridge Vent: Ridge vents provide necessary airflow to remove excess heat and moisture in an attic. It inhibits the growth of mold and protects the health of the homeowners as well as their stored possessions. A properly vented attic will also protect homes in harsh winter climates from ice damming.
Why wait? Contact us today and make your house a Care Free home!
 Jarrett Design
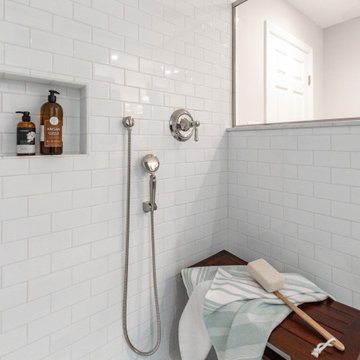
This bathroom needed help as it was tired, dated and cramped! The vanity area was open to the master bedroom and sandwiched between a closet and existing bathroom wall. Behind the bathroom wall, was a second sink, a small walk-in shower and the commode. A poorly placed linen closet ate into the area and there was a soffit over the shower adding to the cramped feeling. The ceiling was cluttered with old-school heating lamps, flush-mount fixtures and ventilation grills. The “movie star” lighting meant to add some glamour only made the bathroom feel dated and sad. Our clients wanted to bring this bathroom to life.
We built a wall and added a door between the bedroom and bathroom to ensure more privacy and define the space. In addition, we removed the wall separating the actual bathroom and vanity area to make the master bathroom larger. The linen closet was also taken out so the shower could be expanded significantly. Our homeowner had recently suffered a knee injury so they were looking for future solutions that would work for them as they continued to age. We made the shower large enough to include a bench and installed a handheld sprayer located near the seat. Shower walls were reinforced so that when the day came that a grab bar was needed, they would be ready.
We added a tall cabinet that featured two, deep rollouts and interior shelving to keep linens and bathroom supplies organized. Beneath the sinks, we included rollout drawers so items would not get lost in those dark areas under the plumbing. Everything that had been cluttering the ceiling was removed including the shower soffit and heat lamp. With those gone, we added evenly-spaced, recessed ceiling lights to help brighten the space making it safer and more practical.
We chose a custom blue-green paint for the cabinets which was understated enough to provide a sense of serenity while still offering a splash of color to help liven up the room. Walnut-framed mirrors added a touch of warmth and the patterned floor tile made the whole room fun! An old bathroom came alive!

 lost love spells 0739143863 lost love spell caster
love spellsINTERNATIONAL TRADITIONAL HEALER SPECIALIZED IN THE FOLLOWING; *Powerful love spell. *Revenge of the raven curse. *Break up spells. *Magic spells. *Protection spell. *Curse removal. *Remove negative energy. *Curse spells. *Spiritual cleansing. *Africa witch craft healers. *Hex removal. *Spiritual healing spell. *Wicca witch craft. *Good luck charm. *Break up spells. *Magic love spells *Sangoma traditional medicine. *Gay love spell. *Real magic spells. *The spell to defeat your rival. *Fertility spells. *Divorce spell. *Marriage spells. *Native healer. *Traditional healer. *Herbalist. *Fortune teller. *Madness coursed by witch craft. Break Up & Come Back To Me Get your ex back, even if they are currently with another lover. They will break up and he or she will come back to you, to be in your loving arms, the way it should have been all along. Break them up and bring back your lost love with The Break Up and Come Back To Me Love Spell . Binding Love Spells Meant for more serious relationships like marriage, or the path to something very special and permanent. Once the binding love spell is cast, it is extremely difficult to reverse. It is highly recommended that you ensure you are choosing the right person for yourself before asking us to cast The Binding Love Spell . Stop Divorce Are you going through a divorce you just don’t want? Still feel strong love towards your husband or wife and they no longer feel the same way? If it’s not about the legal fee’s, division of personal property, the countless arguments, or nights on the couch. Stop a divorce with The Stop a Divorce Love Spell, PLEASE NOTE THAT MY SPELLS ARE BASED ON AFRICAN TRADITIONAL HEALING AND A BELIEF IN THE MYSTICAL. RESULTS VARY FROM INDIVIDUAL TO INDIVIDUAL. Have a serious problem that needs fixing? +27739143863 Rustenburg, Brits, Moruleng, Mafikeng, Zeerust, Vryburg, Ventersdorp, Nelspruit, Secunda, Witbank, Middelburg, Pongola, Piet Retief, Malelane, Evander, Kinrose, WITBANK Kriel, Carolina, Bethal, Ermelo, Naas, , Hazyview, Hendrina, Bushbuckridge, Belfast, Polokwane, Mokopane, Northam, Thohoyandou, Louis Trichardt, Musina, Entabeni, Ladybrand, Ficksburg, Kroonstad, Klerksdorp, Odendaalsrus, Vareeniging, Sasolburg, Carltonville, Westonarea, Parys, Kimberly, Kuruman Grahamstown, Queenstown, East London, Port Elizabeth, King Williams Town, Somerset East, Alice Cape Town, Bellville, Paarl, Beaufort West
 Balestri Architects
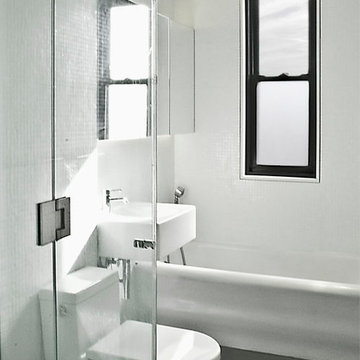
Low cost renovation of a classic pre-war apartment in Brooklyn, New York. The original floor plan of this one bedroom pre-war unit was simple and efficient, but the space suffered from over 90 years of neglect and poor maintenance.
The existing kitchen and bathrooms spaces were gutted and updated with new stone finishes and chrome fixtures. The linear kitchen layout was flipped to allow maximum natural light to the primary work areas. A new glass shower enclosure replaces the original tile shower stall to provide a more opening feeling.
New plaster finishes, minimal window treatments, door hardware, and custom furniture complete the renovation.
13