
Search results for "Updated frequently" in Home Design Ideas
 Ashton Renovations
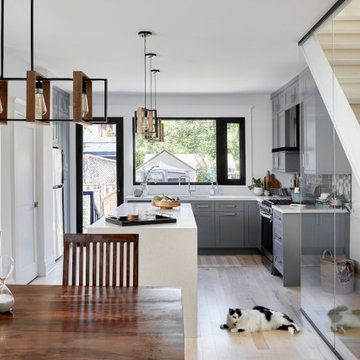
At Muriel Ave. in Toronto, we undertook a comprehensive renovation project that focused primarily on the main floor, with additional updates to the flooring on the second floor. The main floor was transformed by removing walls to create a more open and spacious concept. This allowed for better flow and usability, enhancing the overall aesthetic and functional appeal of the home.
A significant part of the renovation involved enlarging the window opening above the kitchen counter and installing a new side door. Both features were fitted with specialized European black trim windows, adding a sleek, modern touch to the space. In the living area, we installed a beautiful, modern gas fireplace that serves as a focal point, providing both warmth and ambiance.
The staircase received a notable upgrade with new maple treads and a striking black aluminum railing complemented by glass panels, blending safety with contemporary design. One of the most distinctive features of this renovation is the full glass wall by the stairs, which extends to cover the opening to the basement. This not only adds a sense of openness but also allows natural light to permeate through multiple levels of the home.
The kitchen was redesigned into an L-shaped layout with an island, optimizing both functionality and aesthetics. The inclusion of a brick backsplash above the stove offers a rustic yet stylish contrast to the modern kitchen fixtures. The client also chose to retain the existing powder room off to the side of the kitchen, preserving a convenient and practical feature.
On the second floor, we replaced the flooring, ensuring a cohesive and modern look throughout the house. The final product of this renovation is truly stunning, showcasing an eclectic blend of new and old design elements. This project at Muriel Ave., located near the bustling intersection of Pape and Danforth, highlights our expertise and frequent work in this vibrant area. Our team is proud to deliver high-quality, customized renovations that enhance both the functionality and beauty of our clients’ homes.

 Regenesis Ecological Design
Clematis armandii 'Evergreen Clematis' (foreground) arches over a custom-built cedar arbor, modeled to accentuate the home's Craftsman-style architecture. Welded mild-steel panel fills create a scaffold for Akebia quinata 'Five-leaf Akebia Vine' (background), lending seasonal privacy and afternoon shade along this narrow sideyard access walkway.
 Sosna Inc
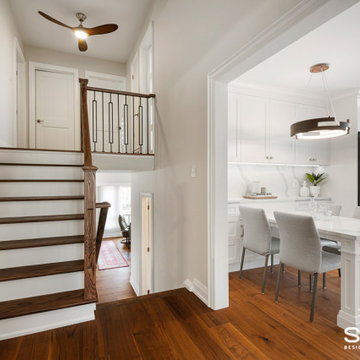
This well-loved 1960’s split-level home was in need of a makeover both in terms of design and function!
OPEN CONCEPT
Our clients wanted an open-concept layout for their Lower-Level and Main Floor spaces. This was no easy feat, given that the split-level construction of this home isolated the Kitchen and Family Room from the rest of the house. But we rose to the challenge!
How did we do it?!
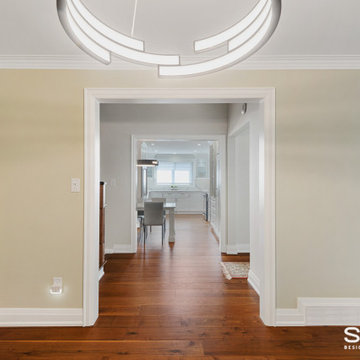
To bring more harmony to this 1960’s closed off split-level construction, we enlarged the entryways of the Kitchen and the Dining Room across the Hallway to brighten up the two rooms and allow for better traffic flow between them.
The worn out mixed flooring materials were replaced with new porcelain tiles in the Foyer and new beautiful engineered hardwood floors unified all three levels.
The 3 sets of staircases were updated for safety by raising the railing to Building Code Standards. Then they were redressed with new black metal pickets, Oak treads, posts and handrails.
KITCHEN
The tight kitchen with a dysfunctional layout was brought back to life with the creation of new dining and working zones and plenty of counter space and concealed storage.
How did we do it?!
A peninsula serving as the Breakfast table was installed along shallow-depth cabinetry as you enter the Kitchen. The fridge, stove and sink were relocated to the end of the Kitchen with big windows and more counter space. A row of tall pantries and an appliance garage were installed along one side of the room to offer plenty of storage and hide frequently used small appliances.
FAMILY ROOM
Our Clients spent a lot of time in their Family Room but felt isolated from the rest of the house when they were in it. The room was dim and the stone-clad wood burning fireplace, which they rarely used, took up a lot of space.
Here’s how we gave this Family Room a makeover
Removing dated wainscoting and wallpaper and replacing it with freshly painted walls in neutral tones with an accent colour catapulted this Family Room out of the stone ages!
The stone-clad fireplace in the middle of the room was removed and replaced with a slim electric fireplace at one end of the room. Add on the beautiful built-out clad with porcelain tiles and you’ve got a cozy and stylish reading nook.
When you and your home are ready for an upgrade, we're the Renovator You Can Count On™. It's our promise. Contact us to get started!
Find the right local pro for your project

 Vetter Architects
The client’s request was quite common - a typical 2800 sf builder home with 3 bedrooms, 2 baths, living space, and den. However, their desire was for this to be “anything but common.” The result is an innovative update on the production home for the modern era, and serves as a direct counterpoint to the neighborhood and its more conventional suburban housing stock, which focus views to the backyard and seeks to nullify the unique qualities and challenges of topography and the natural environment.
The Terraced House cautiously steps down the site’s steep topography, resulting in a more nuanced approach to site development than cutting and filling that is so common in the builder homes of the area. The compact house opens up in very focused views that capture the natural wooded setting, while masking the sounds and views of the directly adjacent roadway. The main living spaces face this major roadway, effectively flipping the typical orientation of a suburban home, and the main entrance pulls visitors up to the second floor and halfway through the site, providing a sense of procession and privacy absent in the typical suburban home.
Clad in a custom rain screen that reflects the wood of the surrounding landscape - while providing a glimpse into the interior tones that are used. The stepping “wood boxes” rest on a series of concrete walls that organize the site, retain the earth, and - in conjunction with the wood veneer panels - provide a subtle organic texture to the composition.
The interior spaces wrap around an interior knuckle that houses public zones and vertical circulation - allowing more private spaces to exist at the edges of the building. The windows get larger and more frequent as they ascend the building, culminating in the upstairs bedrooms that occupy the site like a tree house - giving views in all directions.
The Terraced House imports urban qualities to the suburban neighborhood and seeks to elevate the typical approach to production home construction, while being more in tune with modern family living patterns.
Overview:
Elm Grove
Size:
2,800 sf,
3 bedrooms, 2 bathrooms
Completion Date:
September 2014
Services:
Architecture, Landscape Architecture
Interior Consultants: Amy Carman Design
 Vetter Architects
The client’s request was quite common - a typical 2800 sf builder home with 3 bedrooms, 2 baths, living space, and den. However, their desire was for this to be “anything but common.” The result is an innovative update on the production home for the modern era, and serves as a direct counterpoint to the neighborhood and its more conventional suburban housing stock, which focus views to the backyard and seeks to nullify the unique qualities and challenges of topography and the natural environment.
The Terraced House cautiously steps down the site’s steep topography, resulting in a more nuanced approach to site development than cutting and filling that is so common in the builder homes of the area. The compact house opens up in very focused views that capture the natural wooded setting, while masking the sounds and views of the directly adjacent roadway. The main living spaces face this major roadway, effectively flipping the typical orientation of a suburban home, and the main entrance pulls visitors up to the second floor and halfway through the site, providing a sense of procession and privacy absent in the typical suburban home.
Clad in a custom rain screen that reflects the wood of the surrounding landscape - while providing a glimpse into the interior tones that are used. The stepping “wood boxes” rest on a series of concrete walls that organize the site, retain the earth, and - in conjunction with the wood veneer panels - provide a subtle organic texture to the composition.
The interior spaces wrap around an interior knuckle that houses public zones and vertical circulation - allowing more private spaces to exist at the edges of the building. The windows get larger and more frequent as they ascend the building, culminating in the upstairs bedrooms that occupy the site like a tree house - giving views in all directions.
The Terraced House imports urban qualities to the suburban neighborhood and seeks to elevate the typical approach to production home construction, while being more in tune with modern family living patterns.
Overview:
Elm Grove
Size:
2,800 sf,
3 bedrooms, 2 bathrooms
Completion Date:
September 2014
Services:
Architecture, Landscape Architecture
Interior Consultants: Amy Carman Design

 Remodel Works Bath & Kitchen
Full space with marble countertops (light white on inner island and dark on outer counters). StarMark cabinets with inset panels.
Large trendy u-shaped light wood floor open concept kitchen photo in San Diego with a drop-in sink, recessed-panel cabinets, white cabinets, marble countertops, gray backsplash, stainless steel appliances, beige walls and an island
Large trendy u-shaped light wood floor open concept kitchen photo in San Diego with a drop-in sink, recessed-panel cabinets, white cabinets, marble countertops, gray backsplash, stainless steel appliances, beige walls and an island
 Sosna Inc
This well-loved 1960’s split-level home was in need of a makeover both in terms of design and function!
OPEN CONCEPT
Our clients wanted an open-concept layout for their Lower-Level and Main Floor spaces. This was no easy feat, given that the split-level construction of this home isolated the Kitchen and Family Room from the rest of the house. But we rose to the challenge!
How did we do it?!
To bring more harmony to this 1960’s closed off split-level construction, we enlarged the entryways of the Kitchen and the Dining Room across the Hallway to brighten up the two rooms and allow for better traffic flow between them.
The worn out mixed flooring materials were replaced with new porcelain tiles in the Foyer and new beautiful engineered hardwood floors unified all three levels.
The 3 sets of staircases were updated for safety by raising the railing to Building Code Standards. Then they were redressed with new black metal pickets, Oak treads, posts and handrails.
KITCHEN
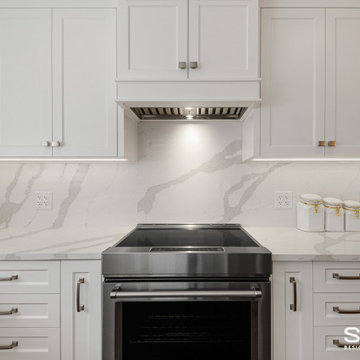
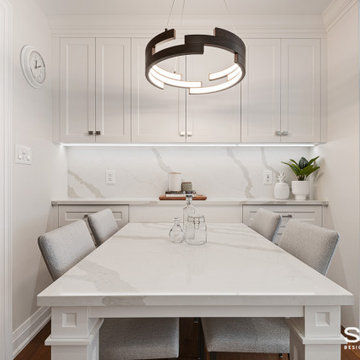
The tight kitchen with a dysfunctional layout was brought back to life with the creation of new dining and working zones and plenty of counter space and concealed storage.
How did we do it?!
A peninsula serving as the Breakfast table was installed along shallow-depth cabinetry as you enter the Kitchen. The fridge, stove and sink were relocated to the end of the Kitchen with big windows and more counter space. A row of tall pantries and an appliance garage were installed along one side of the room to offer plenty of storage and hide frequently used small appliances.
FAMILY ROOM
Our Clients spent a lot of time in their Family Room but felt isolated from the rest of the house when they were in it. The room was dim and the stone-clad wood burning fireplace, which they rarely used, took up a lot of space.
Here’s how we gave this Family Room a makeover
Removing dated wainscoting and wallpaper and replacing it with freshly painted walls in neutral tones with an accent colour catapulted this Family Room out of the stone ages!
The stone-clad fireplace in the middle of the room was removed and replaced with a slim electric fireplace at one end of the room. Add on the beautiful built-out clad with porcelain tiles and you’ve got a cozy and stylish reading nook.
When you and your home are ready for an upgrade, we're the Renovator You Can Count On™. It's our promise. Contact us to get started!
 Sosna Inc
This well-loved 1960’s split-level home was in need of a makeover both in terms of design and function!
OPEN CONCEPT
Our clients wanted an open-concept layout for their Lower-Level and Main Floor spaces. This was no easy feat, given that the split-level construction of this home isolated the Kitchen and Family Room from the rest of the house. But we rose to the challenge!
How did we do it?!
To bring more harmony to this 1960’s closed off split-level construction, we enlarged the entryways of the Kitchen and the Dining Room across the Hallway to brighten up the two rooms and allow for better traffic flow between them.
The worn out mixed flooring materials were replaced with new porcelain tiles in the Foyer and new beautiful engineered hardwood floors unified all three levels.
The 3 sets of staircases were updated for safety by raising the railing to Building Code Standards. Then they were redressed with new black metal pickets, Oak treads, posts and handrails.
KITCHEN
The tight kitchen with a dysfunctional layout was brought back to life with the creation of new dining and working zones and plenty of counter space and concealed storage.
How did we do it?!
A peninsula serving as the Breakfast table was installed along shallow-depth cabinetry as you enter the Kitchen. The fridge, stove and sink were relocated to the end of the Kitchen with big windows and more counter space. A row of tall pantries and an appliance garage were installed along one side of the room to offer plenty of storage and hide frequently used small appliances.
FAMILY ROOM
Our Clients spent a lot of time in their Family Room but felt isolated from the rest of the house when they were in it. The room was dim and the stone-clad wood burning fireplace, which they rarely used, took up a lot of space.
Here’s how we gave this Family Room a makeover
Removing dated wainscoting and wallpaper and replacing it with freshly painted walls in neutral tones with an accent colour catapulted this Family Room out of the stone ages!
The stone-clad fireplace in the middle of the room was removed and replaced with a slim electric fireplace at one end of the room. Add on the beautiful built-out clad with porcelain tiles and you’ve got a cozy and stylish reading nook.
When you and your home are ready for an upgrade, we're the Renovator You Can Count On™. It's our promise. Contact us to get started!

 Housetrends Magazine
Since moving into her Dublin home two and a half years ago, Nancy Sanford has been peeling off the decades—quite literally. Built in the 1980s, the home was “very well-maintained, but very little had been done to it” in terms of updating the finishes or style, Sanford says. Plush white carpet ran from wall-to-wall-to-wall, almond-colored laminate coated the kitchen cabinets and wallpaper ran rampant—even covering some ceilings.
Despite her efforts, Sanford knew it was going to take more than cosmetic editing to shake the ‘80s and make the home her own. Although she lives in the traditional-leaning Muirfield community, Sanford adores a minimalist, contemporary style—and admits to devouring design magazines “ad nauseam.”
To implement her thoroughly modern vision, Sanford turned to Brigid Norton, an interior designer and family friend, and Kristi Youles, a kitchen designer with The JAE Company. Working together, the trio created a carefully considered contemporary design that’s easy on the eyes, and the body.
In addition to improving the flow of the kitchen—by removing a V-shaped peninsula that angled out into the room—and adding appliances like a stainless steel refrigerator, Sanford’s short list of must-haves included clean, uncluttered lines and no wall cabinets over the countertops. “I’ve found as I’ve aged, I’ve gotten shorter and just don’t use the upper cabinets,” Sanford explains.
Easy-access, smooth-slide drawers with clean slab fronts were the answer—resulting in strong visual lines, an open, airy feel and enhanced ergonomics. Starting with a “needs assessment,” Youles and Norton designed the space quite literally around Nancy. By looking at factors such as her height and which items she uses most frequently, they were able to determine the optimum placement for everything from canned goods in the pantry to cutlery, pans and plates in the customized drawers, all of which helped to achieve the ultimate kitchen organization.
But there’s more to the kitchen cabinets smooth façade than clean-lined storage. Walnut drawer fronts—found on the oven and the base of the island—are book-matched, allowing the grain to continue from drawer to drawer. And even in spaces where drawers weren’t feasible, beneath the sink and in a desk area, the designers continued the look with cabinet doors crafted to resemble drawers.
The visual continuity of these lines might not be as impactful if it weren’t for the careful selection of contrasting finishes. The designers filled the space with pure, glossy white—using a specific type of quartz, White Cliff by Cambria, to accent the bold rectangular design of the island. Then, to break up the expanse of accompanying white painted drawers, walnut was selected to bring the contrasting warmth and grain of wood without red undertones. It is commonly found in modern furniture design, as well as current productions of mid-century designs like the iconic Eames Lounge Chair from Herman Miller, Youles says.
 Sosna Inc
This well-loved 1960’s split-level home was in need of a makeover both in terms of design and function!
OPEN CONCEPT
Our clients wanted an open-concept layout for their Lower-Level and Main Floor spaces. This was no easy feat, given that the split-level construction of this home isolated the Kitchen and Family Room from the rest of the house. But we rose to the challenge!
How did we do it?!
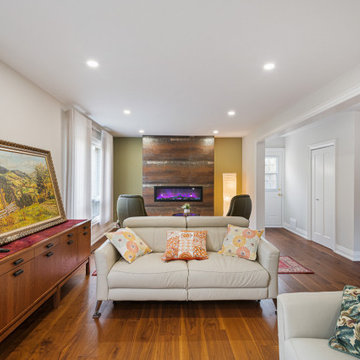
To bring more harmony to this 1960’s closed off split-level construction, we enlarged the entryways of the Kitchen and the Dining Room across the Hallway to brighten up the two rooms and allow for better traffic flow between them.
The worn out mixed flooring materials were replaced with new porcelain tiles in the Foyer and new beautiful engineered hardwood floors unified all three levels.
The 3 sets of staircases were updated for safety by raising the railing to Building Code Standards. Then they were redressed with new black metal pickets, Oak treads, posts and handrails.
KITCHEN
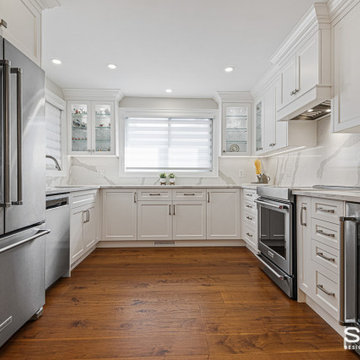
The tight kitchen with a dysfunctional layout was brought back to life with the creation of new dining and working zones and plenty of counter space and concealed storage.
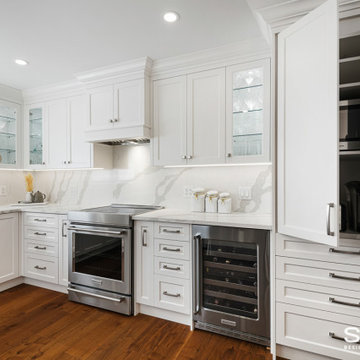
How did we do it?!
A peninsula serving as the Breakfast table was installed along shallow-depth cabinetry as you enter the Kitchen. The fridge, stove and sink were relocated to the end of the Kitchen with big windows and more counter space. A row of tall pantries and an appliance garage were installed along one side of the room to offer plenty of storage and hide frequently used small appliances.
FAMILY ROOM
Our Clients spent a lot of time in their Family Room but felt isolated from the rest of the house when they were in it. The room was dim and the stone-clad wood burning fireplace, which they rarely used, took up a lot of space.
Here’s how we gave this Family Room a makeover
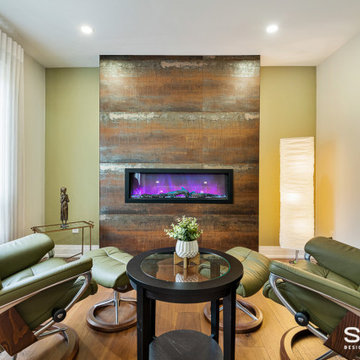
Removing dated wainscoting and wallpaper and replacing it with freshly painted walls in neutral tones with an accent colour catapulted this Family Room out of the stone ages!
The stone-clad fireplace in the middle of the room was removed and replaced with a slim electric fireplace at one end of the room. Add on the beautiful built-out clad with porcelain tiles and you’ve got a cozy and stylish reading nook.
When you and your home are ready for an upgrade, we're the Renovator You Can Count On™. It's our promise. Contact us to get started!
 Sosna Inc
This well-loved 1960’s split-level home was in need of a makeover both in terms of design and function!
OPEN CONCEPT
Our clients wanted an open-concept layout for their Lower-Level and Main Floor spaces. This was no easy feat, given that the split-level construction of this home isolated the Kitchen and Family Room from the rest of the house. But we rose to the challenge!
How did we do it?!
To bring more harmony to this 1960’s closed off split-level construction, we enlarged the entryways of the Kitchen and the Dining Room across the Hallway to brighten up the two rooms and allow for better traffic flow between them.
The worn out mixed flooring materials were replaced with new porcelain tiles in the Foyer and new beautiful engineered hardwood floors unified all three levels.
The 3 sets of staircases were updated for safety by raising the railing to Building Code Standards. Then they were redressed with new black metal pickets, Oak treads, posts and handrails.
KITCHEN
The tight kitchen with a dysfunctional layout was brought back to life with the creation of new dining and working zones and plenty of counter space and concealed storage.
How did we do it?!
A peninsula serving as the Breakfast table was installed along shallow-depth cabinetry as you enter the Kitchen. The fridge, stove and sink were relocated to the end of the Kitchen with big windows and more counter space. A row of tall pantries and an appliance garage were installed along one side of the room to offer plenty of storage and hide frequently used small appliances.
FAMILY ROOM
Our Clients spent a lot of time in their Family Room but felt isolated from the rest of the house when they were in it. The room was dim and the stone-clad wood burning fireplace, which they rarely used, took up a lot of space.
Here’s how we gave this Family Room a makeover
Removing dated wainscoting and wallpaper and replacing it with freshly painted walls in neutral tones with an accent colour catapulted this Family Room out of the stone ages!
The stone-clad fireplace in the middle of the room was removed and replaced with a slim electric fireplace at one end of the room. Add on the beautiful built-out clad with porcelain tiles and you’ve got a cozy and stylish reading nook.
When you and your home are ready for an upgrade, we're the Renovator You Can Count On™. It's our promise. Contact us to get started!
 Sosna Inc
This well-loved 1960’s split-level home was in need of a makeover both in terms of design and function!
OPEN CONCEPT
Our clients wanted an open-concept layout for their Lower-Level and Main Floor spaces. This was no easy feat, given that the split-level construction of this home isolated the Kitchen and Family Room from the rest of the house. But we rose to the challenge!
How did we do it?!
To bring more harmony to this 1960’s closed off split-level construction, we enlarged the entryways of the Kitchen and the Dining Room across the Hallway to brighten up the two rooms and allow for better traffic flow between them.
The worn out mixed flooring materials were replaced with new porcelain tiles in the Foyer and new beautiful engineered hardwood floors unified all three levels.
The 3 sets of staircases were updated for safety by raising the railing to Building Code Standards. Then they were redressed with new black metal pickets, Oak treads, posts and handrails.
KITCHEN
The tight kitchen with a dysfunctional layout was brought back to life with the creation of new dining and working zones and plenty of counter space and concealed storage.
How did we do it?!
A peninsula serving as the Breakfast table was installed along shallow-depth cabinetry as you enter the Kitchen. The fridge, stove and sink were relocated to the end of the Kitchen with big windows and more counter space. A row of tall pantries and an appliance garage were installed along one side of the room to offer plenty of storage and hide frequently used small appliances.
FAMILY ROOM
Our Clients spent a lot of time in their Family Room but felt isolated from the rest of the house when they were in it. The room was dim and the stone-clad wood burning fireplace, which they rarely used, took up a lot of space.
Here’s how we gave this Family Room a makeover
Removing dated wainscoting and wallpaper and replacing it with freshly painted walls in neutral tones with an accent colour catapulted this Family Room out of the stone ages!
The stone-clad fireplace in the middle of the room was removed and replaced with a slim electric fireplace at one end of the room. Add on the beautiful built-out clad with porcelain tiles and you’ve got a cozy and stylish reading nook.
When you and your home are ready for an upgrade, we're the Renovator You Can Count On™. It's our promise. Contact us to get started!
 Sosna Inc
This well-loved 1960’s split-level home was in need of a makeover both in terms of design and function!
OPEN CONCEPT
Our clients wanted an open-concept layout for their Lower-Level and Main Floor spaces. This was no easy feat, given that the split-level construction of this home isolated the Kitchen and Family Room from the rest of the house. But we rose to the challenge!
How did we do it?!
To bring more harmony to this 1960’s closed off split-level construction, we enlarged the entryways of the Kitchen and the Dining Room across the Hallway to brighten up the two rooms and allow for better traffic flow between them.
The worn out mixed flooring materials were replaced with new porcelain tiles in the Foyer and new beautiful engineered hardwood floors unified all three levels.
The 3 sets of staircases were updated for safety by raising the railing to Building Code Standards. Then they were redressed with new black metal pickets, Oak treads, posts and handrails.
KITCHEN
The tight kitchen with a dysfunctional layout was brought back to life with the creation of new dining and working zones and plenty of counter space and concealed storage.
How did we do it?!
A peninsula serving as the Breakfast table was installed along shallow-depth cabinetry as you enter the Kitchen. The fridge, stove and sink were relocated to the end of the Kitchen with big windows and more counter space. A row of tall pantries and an appliance garage were installed along one side of the room to offer plenty of storage and hide frequently used small appliances.
FAMILY ROOM
Our Clients spent a lot of time in their Family Room but felt isolated from the rest of the house when they were in it. The room was dim and the stone-clad wood burning fireplace, which they rarely used, took up a lot of space.
Here’s how we gave this Family Room a makeover
Removing dated wainscoting and wallpaper and replacing it with freshly painted walls in neutral tones with an accent colour catapulted this Family Room out of the stone ages!
The stone-clad fireplace in the middle of the room was removed and replaced with a slim electric fireplace at one end of the room. Add on the beautiful built-out clad with porcelain tiles and you’ve got a cozy and stylish reading nook.
When you and your home are ready for an upgrade, we're the Renovator You Can Count On™. It's our promise. Contact us to get started!
 Sosna Inc
This well-loved 1960’s split-level home was in need of a makeover both in terms of design and function!
OPEN CONCEPT
Our clients wanted an open-concept layout for their Lower-Level and Main Floor spaces. This was no easy feat, given that the split-level construction of this home isolated the Kitchen and Family Room from the rest of the house. But we rose to the challenge!
How did we do it?!
To bring more harmony to this 1960’s closed off split-level construction, we enlarged the entryways of the Kitchen and the Dining Room across the Hallway to brighten up the two rooms and allow for better traffic flow between them.
The worn out mixed flooring materials were replaced with new porcelain tiles in the Foyer and new beautiful engineered hardwood floors unified all three levels.
The 3 sets of staircases were updated for safety by raising the railing to Building Code Standards. Then they were redressed with new black metal pickets, Oak treads, posts and handrails.
KITCHEN
The tight kitchen with a dysfunctional layout was brought back to life with the creation of new dining and working zones and plenty of counter space and concealed storage.
How did we do it?!
A peninsula serving as the Breakfast table was installed along shallow-depth cabinetry as you enter the Kitchen. The fridge, stove and sink were relocated to the end of the Kitchen with big windows and more counter space. A row of tall pantries and an appliance garage were installed along one side of the room to offer plenty of storage and hide frequently used small appliances.
FAMILY ROOM
Our Clients spent a lot of time in their Family Room but felt isolated from the rest of the house when they were in it. The room was dim and the stone-clad wood burning fireplace, which they rarely used, took up a lot of space.
Here’s how we gave this Family Room a makeover
Removing dated wainscoting and wallpaper and replacing it with freshly painted walls in neutral tones with an accent colour catapulted this Family Room out of the stone ages!
The stone-clad fireplace in the middle of the room was removed and replaced with a slim electric fireplace at one end of the room. Add on the beautiful built-out clad with porcelain tiles and you’ve got a cozy and stylish reading nook.
When you and your home are ready for an upgrade, we're the Renovator You Can Count On™. It's our promise. Contact us to get started!

 Princeton Design Collaborative
New Kitchen with quartz counter at sink & stove with butcher block counter at Island. All Jen air appliances by Mrs G Appliances and cabinets by Tucker Distinctive Kitchens.
 DMJ
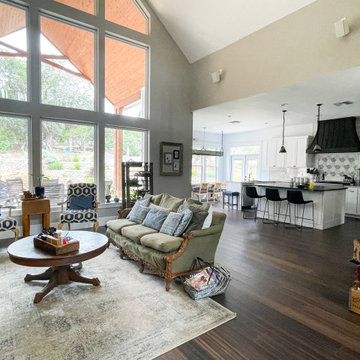
The open concept of this living room to kitchen transition provides a comfortable amount of space within the home. The beautiful window feature wall and tall windows in the breakfast nook area provide a massive amount natural light throughout this part of the home.
 Housetrends Magazine
Since moving into her Dublin home two and a half years ago, Nancy Sanford has been peeling off the decades—quite literally. Built in the 1980s, the home was “very well-maintained, but very little had been done to it” in terms of updating the finishes or style, Sanford says. Plush white carpet ran from wall-to-wall-to-wall, almond-colored laminate coated the kitchen cabinets and wallpaper ran rampant—even covering some ceilings.
Despite her efforts, Sanford knew it was going to take more than cosmetic editing to shake the ‘80s and make the home her own. Although she lives in the traditional-leaning Muirfield community, Sanford adores a minimalist, contemporary style—and admits to devouring design magazines “ad nauseam.”
To implement her thoroughly modern vision, Sanford turned to Brigid Norton, an interior designer and family friend, and Kristi Youles, a kitchen designer with The JAE Company. Working together, the trio created a carefully considered contemporary design that’s easy on the eyes, and the body.
In addition to improving the flow of the kitchen—by removing a V-shaped peninsula that angled out into the room—and adding appliances like a stainless steel refrigerator, Sanford’s short list of must-haves included clean, uncluttered lines and no wall cabinets over the countertops. “I’ve found as I’ve aged, I’ve gotten shorter and just don’t use the upper cabinets,” Sanford explains.
Easy-access, smooth-slide drawers with clean slab fronts were the answer—resulting in strong visual lines, an open, airy feel and enhanced ergonomics. Starting with a “needs assessment,” Youles and Norton designed the space quite literally around Nancy. By looking at factors such as her height and which items she uses most frequently, they were able to determine the optimum placement for everything from canned goods in the pantry to cutlery, pans and plates in the customized drawers, all of which helped to achieve the ultimate kitchen organization.
But there’s more to the kitchen cabinets smooth façade than clean-lined storage. Walnut drawer fronts—found on the oven and the base of the island—are book-matched, allowing the grain to continue from drawer to drawer. And even in spaces where drawers weren’t feasible, beneath the sink and in a desk area, the designers continued the look with cabinet doors crafted to resemble drawers.
The visual continuity of these lines might not be as impactful if it weren’t for the careful selection of contrasting finishes. The designers filled the space with pure, glossy white—using a specific type of quartz, White Cliff by Cambria, to accent the bold rectangular design of the island. Then, to break up the expanse of accompanying white painted drawers, walnut was selected to bring the contrasting warmth and grain of wood without red undertones. It is commonly found in modern furniture design, as well as current productions of mid-century designs like the iconic Eames Lounge Chair from Herman Miller, Youles says.

 Allreno
How Can I Reduce the Cost of Remodeling a Bathroom? Allreno Design AI
Renovating a bathroom is an exciting but often expensive project. Homeowners frequently worry about how to balance quality with affordability. Fortunately, there are smart strategies to cut costs without sacrificing style. Whether you're updating a bathroom vanity, retiling the floor, or overhauling the entire space, making informed decisions can help you save thousands.
At Allreno, we understand that affordability and quality go hand in hand. That’s why we developed the Allreno Design App, a cutting-edge tool that simplifies the bath renovation process and helps homeowners make cost-effective choices. Here’s how you can reduce expenses on your next bathroom remodel:
1. Plan Ahead with a Budget
One of the biggest mistakes homeowners make is starting a renovation without a clear budget. Before you begin, list all the necessary expenses, including labor, materials, and unexpected costs. Using tools like the Allreno Design App, you can visualize your remodel and get instant cost estimates based on your selections.
2. Choose a Cost-Effective Bathroom Vanity
A bathroom vanity is often the focal point of a bathroom remodel. Instead of opting for a custom-built unit, consider ready-to-assemble or pre-designed vanities. Allreno partners with top manufacturers to offer stylish, high-quality vanities at competitive prices, helping you save money without compromising on design.
3. Keep the Plumbing Where It Is
Relocating plumbing fixtures—such as sinks, toilets, and showers—can significantly increase labor costs. Keeping your layout intact can save you thousands in contractor fees. The Allreno Design App allows you to experiment with different configurations while ensuring you stay within your budget.
4. Refinish Instead of Replacing
Instead of replacing your bathtub, tiles, or countertops, consider refinishing them. Reglazing a tub, repainting cabinets, or updating hardware can make a huge difference at a fraction of the cost. Small changes can have a big impact without the need for a full replacement.
5. Shop Smart for Materials
Purchasing materials strategically can lead to big savings. Look for clearance items, buy in bulk, and compare prices across different suppliers. Allreno simplifies this by connecting you with trusted vendors and providing access to exclusive discounts on bath renovation materials.
6. Do Some of the Work Yourself
While some tasks require professionals, there are many things you can do on your own, such as painting, installing new hardware, or even assembling a pre-made bathroom vanity. If you're comfortable with DIY projects, this can significantly reduce labor costs.
7. Use Technology to Your Advantage
The Allreno Design App is a game-changer in the renovation industry. It helps homeowners design their ideal bathroom, estimate costs, and even connect with local professionals. By using AI-driven recommendations, the app ensures you get the best value without unnecessary expenses.
Conclusion
Bathroom remodeling doesn’t have to break the bank. By planning ahead, making smart material choices, and leveraging technology like the Allreno Design App, you can achieve a beautiful, budget-friendly bathroom. Whether you're upgrading a bathroom vanity or tackling a full bath renovation, these strategies will help you save money while creating a space you love.
www.allreno.co

 Benson Homes LLC
When you find a home that meets most of your needs in a neighborhood you love, remodeling to make it more suitable for your family’s lifestyle can make that house your dream home. That’s what happened in this remodeling story. Our clients purchased a home built in 1983 with the plan to remodel the kitchen to suit their needs and tastes.
The galley style kitchen was positioned at the center and rear of the main level and had an eat-in area at one end and a pantry at the opposite end. A small pass-through allowed view into the adjacent family room, but otherwise the two spaces were closed off from one another. The existing espresso stained cabinetry was attractive, but it darkened and narrowed the kitchen.
The homeowners wanted the kitchen to feel more connected to the other main level living spaces. Creating more light and improving organization and storage were must haves for the new design. They also requested relocating the pantry from under the stairs and longed for a ventilation system that would vent the cooking smells outdoors rather than throughout the inside of the house.
Our design involved removing a portion of wall between the kitchen and living room. This one change made it feel larger, more open and bright. It also connected the kitchen to the living room and allowed the two spaces to flow freely into one another. This new open area allowed us to extend the granite countertop to create a peninsula/bar that provides additional seating. To improve the existing lighting plan, we added new LED recessed lights, under-cabinet lighting, and pendant lighting over the peninsula.
The selections were integral in making the kitchen feel lighter and larger. Our clients chose maple cabinetry with an oak stained tumbleweed finish paired with creamy granite countertops, and a pearl tumbled travertine backsplash. A few standout features include a set of floating shelves, concrete farmhouse sink, and mercury glass pendant lights. Flooring throughout the first floor was updated to an easy to maintain wood-look vinyl plank floor.
Several new storage options were added including new cabinetry where the old pantry used to be, which accommodates the microwave in an upper cabinet as well as storage for small cooking appliances so they don’t take up space on the counters. There’s also a unique angled cabinet right next to the refrigerator.
When the work was complete on this project we were very pleased that the design delivered exactly what the homeowners had envisioned. In addition, we were able to complete the construction without causing too much disturbance or disruption for the homeowners; one works the night shift, and was actually able to sleep during the day, and the other travels frequently for work and felt confident that the project was in good hands.
 Lemon Remodeling & Services
Modern Two-Tone Kitchen Remodel Showcase! | Lemon Remodeling
**Looking for modern kitchen remodeling ideas? Check out this complete kitchen transformation by Lemon Remodeling!**
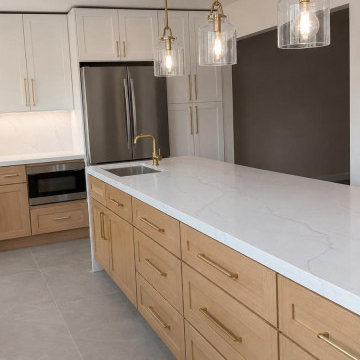
In this showcase featuring our latest project, we highlight a beautiful two-tone kitchen design combining warm natural light wood island cabinetry with classic white upper cabinets and sleek brass hardware. The centerpiece is a stunning white quartz island with subtle marble veining, a prep sink, and industrial-chic glass pendant lights.
At **Lemon Remodeling**, we handle everything from custom cabinetry and countertop installation to full layout redesigns.
---
### ✨ Key Design Features in This Remodel:
* **Two-Tone Cabinetry:** Warm wood shaker-style base cabinets paired with clean white wall cabinets.
* **Waterfall Quartz Countertops:** Durable, elegant white quartz featuring subtle grey veining.
* **Brass & Gold Hardware:** Modern brushed brass faucet, drawer pulls, and pendant lighting.
* **Integrated Appliances:** Built-in stainless steel microwave drawer and modern side-by-side refrigerator.
* **Large Format Tile Flooring:** Neutral grey flooring that ties the warm wood and cool white tones together.
---
### ? Why Work With Lemon Remodeling?
* **Diamond Certified Company:** Verified for top-tier craftsmanship, customer satisfaction, and reliable service.
* **Full-Service Remodeling:** From initial design to complete construction, we guide you every step of the way.
* **Tailored Solutions:** Designs built around your lifestyle, budget, and aesthetic preferences.
---
### ? READY TO REMODEL YOUR KITCHEN? TAKE THE NEXT STEP!
* ? **Book Your Consultation directly on our calendar:**
https://lemonremodeling.com/schedule-now ( https://www.google.com/search?q=https...)
* ⭐ **See what our happy clients say about working with us:**
https://lemonremodeling.com/clients-t...
* ? **Call us directly for a free phone consultation:**
**510-254-3211**
---
### ? Frequently Asked Questions (FAQ)
**Q: What kitchen remodeling services does Lemon Remodeling offer?**
**A:** We offer complete kitchen remodeling, custom cabinetry, countertop replacement, backsplash installation, layout redesigns, lighting, and plumbing updates.
**Q: Is Lemon Remodeling licensed and certified?**
**A:** Yes! We are a proud **Diamond Certified** company, meaning our work quality and customer satisfaction ratings have been independently tested and verified.
**Q: How can I schedule an estimate for my kitchen remodel?**
**A:** You can call us at ** 510-254-3211 ** or schedule a consultation directly online at **[lemonremodeling.com/schedule-now]( https://www.google.com/search?q=https....
---
### ? Connect With Us
Don't forget to **LIKE**, **COMMENT**, and **SUBSCRIBE** for more home remodeling walkthroughs, modern kitchen inspiration, and expert renovation tips!
19