Software
Houzz Logo Print
anney_gw

Stabilizing corners of raised bed frames?

18 years ago

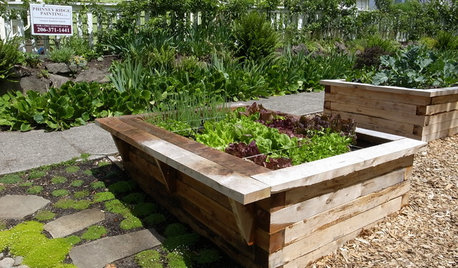
I'm adding five my raised beds to my garden this year and will use 2 x 6 lumber to build them. My other raised beds are framed with cinderblock, so this is a new venture. I have a question about finishing them off.

How do you stablize the corners of your wooden frames?

I looked into the cost of L-braces, and forget that! They're awfully expensive if they're wide enough.

Are nails without anything else sufficient at the corners? That would be easiest of course, but I've read that nails can work their way out of the wood because of weather stresses and can also cause the wood to split on the ends. I'd like to avoid that so they'll last for several seasons. Are screws any better?

I'm also exploring the possibility of using 2" x 2" square stakes that are about 2' deep for the inside corners and nailing or screwing the frame sides to them. Then pounding them into the earth until the frame is flush with the soil. (Or excavating a hole for them.) Is a 2" x 2" stake sufficient, or should they be larger?

Any advice for a first-time builder of the frames?

Comments (26)

  • 18 years ago

    using 2" x 2" square stakes that are about 2' deep for the inside corners and nailing or screwing the frame sides to them.

    Sounds like a plan but I would drive the stakes first and THEN, using long wood screws, attach the side board. I have one built like that and it has held up well. Nails will back out true.

    You can make your own angle brackets with an old piece of 2" angle iron you can pick up cheap at a recycling center. Cut it to length with a hacksaw and drill screw holes in both sides as needed.

    Good luck! ;)

    Dave

  • 18 years ago

    I also use 2x6 lumber for my (barely) raised beds. You don't want to put screws or nails lengthwise into the end of the lumber. That creates a weak joint that will fail over time.
    The 2x2 stake is a good idea but 4x4 would be better, that's what I do. But I don't use a stake, just a 6" long piece that matches the sides of the bed and aren't driven into the ground. Whatever 4x4 scraps I can find serve well for this purpose.
    I don't see the point of driving stakes into the ground. Believe me, these beds aren't going anywhere. The exception being that you may want to move them sometime, in which case the stakes will only make it harder.
    The 4x4 corner piece gives me enough room that I'm confident that the 3.5" lag bolts that I'm using aren't going to run into each other as they're screwed into each corner.
    I use 3/8" x 3.5" lag bolts with a washer, all galvonized.
    You could also some good quality, outdoor deck screws like those mentioned above. But I'd use at least two at each attachment point, meaning 4 total at each corner.
    But I do really think the 4x4 corner pieces are the way to go. You will never look back and regret having used such a large corner joint. And since they only have to be 6 inches long, you can probably find scrap pieces that work, or pieces at the reject/scrap pile at your local lumber supplier.
    Also remember to drill generously-sized pilot holes, whether you use screws or lag bolts. You will not regret it, especially if you're turning screws by hand or by drill.

  • 18 years ago

    digdirt

    The gutters were replaced on the house about a month ago, and we still haven't taken the old ones to the dump. Maybe I can cut strips from those for the outside corners. I'm trying to think of other ways to use them, too.

    gonefishin

    Thanks for the tip. I just checked, and a pound of those Deckmate screws (3") is about $5.50 at my HD. If I don't use them all for the corners, we can use the extras to fasten down some gradually-loosening boards on the deck.

    tcstoehr

    I like the idea of not having the frame staked and the 4" x 4" inside corner 6" tall stabilizing blocks.

    So thanks, all, for the good advice.

  • 18 years ago

    I don't really see any need for reinforcement at the corners of a 2x6 bed. The 2 by lumber is pretty strong by itself and 6" of height isn't enough volume to create a significant outward pressure. If the length of the bed goes much beyond 6' I would be more concerned about a 2x4 brace in the middle to prevent bowing out over time than I would corner reinforcement.

    Just my opinion.

    Also, if you dig down just an inch into the existing soil and "countersink" the beds this provides some reinforcement to the frame as well. Still, with 2 by lumber reinforcement isn't that critical unless you have long beds.

    Are you using rot resistant wood like cedar or redwood or regular wood?

  • 18 years ago

    JAG

    The bed size will be 4' x 8'. The untreated 2" x 6" lumber isn't rot-resistant, probably common pine. I'll keep an eye out for bowing and maybe put a stake on the outside center of the 8' lengths as a preventive measure.

  • 18 years ago

    We also just use 4 X 4 pieces as tcstoehr suggests. Nothing need to be driven into the ground at the corners.

    We have used 2 by 4 pieces as braces in the middle of a long bed so the wood doesn't bow out and these are put in the ground just a bit.

    We don't cut the corner braces off level. I like the way they look longer but that also prevents the hose from being dragged across the top.

    This pic was taken a while back when we were putting in some new beds.

    {{gwi:9721}}

  • 18 years ago

    farkee

    Neat! I like the posts extended upwards, too. (I copied your picture to show my son who said he'll build them for me rather than having to describe it to him.) It looks like you could add 2" x 4" lumber on top of what's already there for a 10" deep bed if you wanted, though you'd probably have to brace the sides together to keep everything aligned. Or even another 6 inches, though a 12" deep raised bed isn't all that common!

  • 18 years ago

    Contrary to what someone said earlier, it's fine to end-nail. Makes a strong joint - after all, it's how houses and decks are put together. It's true that screws tend to loosen up in end grain, but nails don't until the wood rots. You can also wrap flashing around the outside of the joint and tack it with small nails. If you bend it over the top with a hospital-corner then the joint won't rot for a long time, it'll probably outlast the rest of the timber rather than being the first place to rot as will otherwise be the case.

  • 18 years ago

    Good Advice P.N. I have about a bejillion of them deckmate screws in my house (from remodeling from the ground up) and sheds. I told the old man working on my house that if one of them UFOs flew over with a big magnet, everything would be stuck to the bottom of it and my land would be bare! The oldest ones are about 7 years old and no signs of loosening or weakness yet. I think that they would be more likely to shear off under extreme pressure or stress than a nail because a nail would bend and give a bit first, but I have not seen any of that happening either.
    Just my observations from here.
    The 4X4"s in the corner could be handy to screw 2 bys to later to build some trellises or frame for netting or shading cloth etc. etc.
    Bill P.

  • 18 years ago

    Yes, screws are brittle and break easily, common nails don't. When screws are sticking out of a piece of wood I often just snap them off with a hammer-blow - that's impossible with a common nail, it just bends and keeps bending. A nail wedges itself into end-grain and stays tightly wedged until the integrity of the wood changes dramatically, whereas a self-threading screw cuts it's way into the end-grain. If the joint gets repeated stress in the opposite direction, the threads can start to break the little pieces of end-grain between the threads and that's all that is holding the screw in. Screws are very resistant to withdrawal going across grain because wood doesn't break off easily in that direction.

    A little tip when hand-nailing stuff such as this: pre-drill the fist piece with a bit about the same size as the nail. Don't drill into the end-grain, only the piece that you start the nail in. It doesn't affect the strength of the joint and makes it much easier to nail together. Also, if you are using 2x material there is really no need for any corner-post, especially if you wrap the outside with the flashing. The corner post will much increase the speed of rot in the corner.

  • 18 years ago

    Hopefully not to start a flame war or anything but "end-nailing" is a disrecommended practice. Google for it and you will find statements that the connections are weak, and methods to avoid doing it, like joiners, hangers, brackets, and toe-nailing. There are situations where end-nailing is OK, for example fastening a horizontal 2x4 across the top of a row of vertical 2x4s. In this case there is no stress pulling the joint apart and the nail's sheer-strength prevents horizontal slippage. However, IANAC. (I Am Not A Carpenter) And I tend to build things stronger than necessary.

  • 18 years ago

    No flame, don't worry!(But IAAC, and one can easily toe-nail as well as end-nail).

    Much depends on the size of the timber and the nails in relation to the amount of fill in the bed that will be exerting outward pressure, also. In the case of a 2x6 or 8, very little pressure, and 2x nailed with 16p will be very strong. Particularly as PT timber is yellow-pine, which is a strong wood. It's quite splitty, though, so definitely pre-drill.

    I've got some beds framed with 1x white pine (not very strong) and end nailed with ring-shank siding nails (not much better than screws). The beds are two 1x8's stacked, so there is a lot of pressure from the fill. The corners have not busted apart nor rotted after after four years, but only because I wrapped the outsides with copper flashing.

  • 18 years ago

    anney you might want to be carfull with the wood you choose. here in georgia we have a bad termite problem. last year i used some stakes to help hold cages etc... pulled them up and the stake was about gone due to termites. here in north cobb any how.

    shane

  • 18 years ago

    raised beds don't need to have sides, if your garden in not formal, setup a frame, fill it, pack it down ( a good rain will do this well) , and remove the frame. You'll end up with a nice raised dirt mound.

    now move the frame setup to the next spot and repeat process.

  • 18 years ago

    rgilliam

    Thanks for the caution. So far, so good. No chomped up wooden stakes are in the garden.

    My more worrisome problem is fire ants. They absolutely love my raised beds, so I occasionally flood the beds to get them to go away. Usually they come back though.

  • 18 years ago

    Hi,

    On the subject of raised bed construction.... The wood for my raised beds was delivered yesterday, which happened to be the first full day of what looks like about a week long stretch of rains. I was wondering if there was any particular reason not to assemble the raised beds with (at least superficially) wet lumber. There will be lulls in the rain and I'm hoping I can get out to assemble the beds for an hour or so here and there.

    Thanks!
    Anne

  • 18 years ago

    Anne,

    If you're planning to use one, a circular saw might hang up a bit on wet wood.

  • 18 years ago

    Hi Anney,

    The woods all cut to length so I just need to drill pilot holes on the end pieces and then screw everything together.
    Offhand, it seems that when things dry out, the wood would shrink a bit and tighten up around the screws. I don't know if this is a good thing or a bad thing or if it doesn't make any difference! I'm using douglas fir, btw.

    Anne

  • 18 years ago

    Anne

    Well, I don't see any reason why not, then, but maybe you should wait for the garden carpenters to chime in.

    If you're interested in stacking raised bed frames to make them deeper, I found this neat "corner stabilizer", though I don't plan to use it this time around:

    {{gwi:9722}}

    They're called Stackable Corner Joints.

    This isn't the only design for stackable joints though. Here's another

  • 18 years ago

    Nails are fine I agree. I happen to have a left over supply of Monel and Bronze ring shank boat building nails and believe you me that do hold well in end grain IF you use the proper size nail. Please note, they bend easier than steel nails and if you are an inexperienced nailer do predrill the first piece.

    1eyedJaCK AND the Dawg

  • 18 years ago

    I'm sure nails would be fine, but as my father-in-law is a master carpenter, he rarely uses nails for anything but framing and roofing. We used 2.5 inch deck screws for my 2x6 raised beds this fall (I strongly recommend if they have both phillips and square capable heads, use square bits, it saves stripping dozens and breaking more). Screws don't back out and you certainly don't need corner supports, I didn't use them on my 3 story beds.

    I did however, use 2x4 supports every 4 feet to guard against bowing with all the weight of the soil. It also helps to keep the "stories" together. Note that I put them on the outside to not waste bed space.

    Of course just about everything is personal preference. I know most people wouldn't use pressure treated wood, but I don't want my beds to warp and rot. They cost too much to build and took too long to re-do them in a few years.

    Just my 2 cents.

    Here is a link that might be useful: Pics of my beds...

  • 18 years ago

    Anney,
    How well do you like your cinder block raised beds? Have they performed well or are they troublesome? Thanks!
    - Emily

  • 18 years ago

    My friend is a shop teacher and he has a cabinet building business during the summer. He built my garden boxes from 2x6 cedar. He used dado joints. Here is a picture.

    http://s298.photobucket.com/albums/mm261/kaneohe_/?action=view&current=gardenbox.jpg

  • 18 years ago

    Sorry about that. Don't know what I did wrong. Try again.

    {{gwi:9723}}

  • 17 years ago

    Thanks everyone for sharing...and I loved the pictures some of you supplied. I am going to TRY and build a raised bed. I think I need to come out with a book regarding gardening. It will be called raised bed gardening for dummies...that would be me of course!!!