Software
Houzz Logo Print
feddup

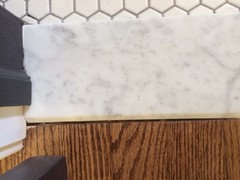
Does this threshold look right to you?

11 years ago

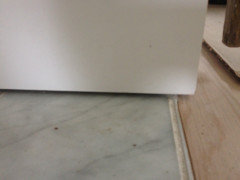
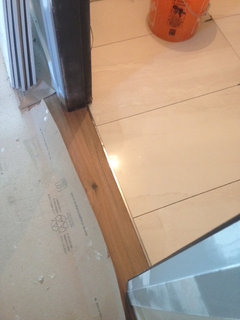
Three new thresholds between wood and tile were put in my house as part of a remodel. The house previously had flat transitions in the same places (universal design). I'm fine with having these marble thresholds, but there is a noticeable gap of about 1/8" that seems unfinished and unsightly. I can't compare it to other thresholds in my house because they're all universal design. Isn't the threshold supposed to

the gap? What can be done at this point? The tile is new; the wooden floors were there but refinished.

Comments (27)

  • 11 years ago

    Your photo looks like the tile is above the wood. Is that correct? You may be able to find a piece of rounded wood molding type thing that could make the transition nicer and would cover the gap? We have a place in our home where tile meets laminate and there is a laminate finishing piece that makes the transition look nice.

  • 11 years ago
    last modified: 11 years ago

    The tile and wood are at the same level, but the marble threshold between them, which I think you're referring to, is slightly higher.

    Suzi, I think your suggestion would lead to having 2 thresholds together. There are probably a few ways to make this look better, but it's so upsetting to have a supposedly finished master suite by a GC who supposedly pays attention to detail and either didn't notice this or hoped we wouldn't before he gets his last check. I didn't just move into an old house and wonder how to improve it. I paid a substantial sum for a way-long remodel that has one problem after another that should not exist.

  • 11 years ago

    I think the threshold should be on top of the wood, too. I don't understand how an experienced contractor got this so wrong.

  • 11 years ago

    That is how I've seen them installed (although mostly in older homes--it's a nice classic feature). The wood just butts into the marble which is a smidge higher. I wouldn't expect much of a gap, though; perhaps some caulking or wood filler would help? You can probably have it removed and replaced with something that covers the edges of the tile and wood, but it will have to be taller and wider.

    I can't tell if yours looks bad or not because it's a pretty close shot.

  • 11 years ago
    last modified: 11 years ago

    Maybe your answered your own question right in your last statement, and would go along with all the other issues you have had.

    "I don't understand how an experienced contractor got this so wrong."


    I would add to take a wider shot and possibly get more advice as it is tough to tell from the close up shot

  • 11 years ago
    last modified: 11 years ago

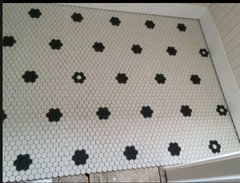
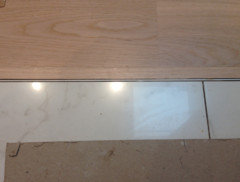
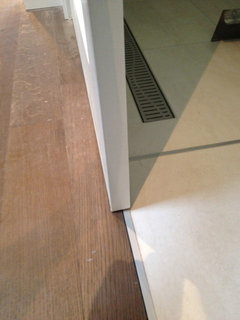
    Here's another photo, a little further away. As best I can tell, the gap between the tile and the wood, before the thresholds were installed, was a lot smaller than the thresholds, which are 4" or 5" wide. The top photo is from the GC's FB page and shows the interface before the threshold was installed. It looks like maybe the floorboards were cut after the threshold was placed?

    It would surprise me if the tile installers screwed up; they were so meticulous.

  • 11 years ago

    The tilers should have used a Schluter and the wood people should have used a flush crosspiece. Then everything would be the same height, and finished properly.

    feddup thanked User
  • 11 years ago

    yeah, THAT gap is too much. Overall the concept is fine (and actually perfect for your vintage style floor) but I agree with you, it's not supposed to look like that!


    feddup thanked Fori
  • 11 years ago
    last modified: 11 years ago

    So any suggestions for now what? Same situation in 3 different places.

  • 11 years ago

    Only one thing that will make it not look like a mistake...................

  • 11 years ago

    millworkman, maybe I'm just mentally exhausted from this whole project, but please don't make me play guessing games.


  • PRO
    11 years ago
    last modified: 11 years ago

    That could have worked..........insist its torn out and redone, and please share the facebook page link with us.....


  • 11 years ago

    Tundra and millworkman, would tearing out the marble threshold be what I should insist on? I'm so afraid that correcting one mistake will damage something else. That's how it's been going so far. I want to be as specific as possible to my GC, with as much support as possible. I might want to try having it done myself and asking for a credit. DH will try any way to never see his face again. I would consider asking the tile guys to work for me directly, but the trouble is, their boss is palsy with the GC, and not sure I can go over/under his head.

    Re the FB link: Though I'd love the world to know how bad he's been, I want to avoid potential legal issues and at least want to have all my ducks in a row before I hire a skywriter to blaze his name as Contractor from Hell.


  • PRO
    11 years ago
    last modified: 11 years ago

    Feddup

    The threshold would need to be removed and likely may get broken..The uglier option being a shoe molding as has been pointed out or a wood filler/ patch and that would fail over time as a flexible expansion joint is needed here.

    a new threshold set and customized to lap over the wood floor detail and also have a flexible silicone expansion joint between materials can work .......although its an interestingly large threshold likely covering some shortness of hex mosaic on the inside ...

  • PRO
    11 years ago

    Hi there. From what I can see it looks like there are too many materials crashing at the same point and none of which look finished. Personally I would have the stone removed and have the tile run closer to the door where it should be. Generally, if you are outside of the door, you don't want to see the floor coverings on the other side and the transition should be directly under the door. I would simply rip a piece of left over flooring on a table saw and make a custom transition strip. If you don't have any left over flooring, I would simply purchase an oak reducer and stain it to mach the floor. If the reducer doesn't fit perfectly, it too can be ripped down on a table saw and made to look right. Either way, the tile hasn't been brought to the right spot under the door and until it is, you are going to have a hard time having it look finished at a professional level. I hope I have been helpful. If not, I apologize for confusing you further.


  • PRO
    11 years ago
    last modified: 11 years ago

    OK - I think someone should ask why the sub floor was never prepped for tile before tiling? Laying marble slabs and installing tile over a chopped up layer of plywood is crazy talk.

    The gap should be there and a flexible wood wax should be used to fill it. I would be worried about the longevity of the tile job more than the gap in the transition myself.

    Here is a Featured Discussion on Houzz explaining things a little more.

    [TRANSITION TIME: HOW TO CONNECT TILE AND HARDWOOD FLOORS[(https://www.houzz.com/magazine/transition-time-how-to-connect-tile-and-hardwood-floors-stsetivw-vs~13643718)


    Floor transition · More Info


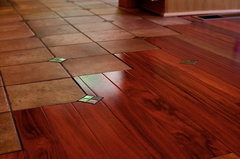
    This is a side note but what a fun idea. I like how the builder used the 4 little tiles inlayed into the wood. Clever Design.


    I'm sure the transition here is a colour matched silicone caulk. I like as well the proportions of the tile cut where the first tile meets the Island.


  • PRO
    11 years ago
    last modified: 11 years ago

    Here is a look at two different bathrooms with the same Schluter Transition.

    The first photo is the room I'm working on.

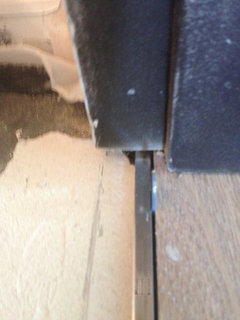
    The tile was installed first with the Schluter profile. I asked the flooring guys to keep a 1/16" - 1/8" away from the profile and left out some shims for them. Prior to them showing up I floated out the floors a little so the floor would not need to be shimmed to the tile edging.

    Same home different crew. The Marble tile was kept a ways off the schluter profile and grouted. No prep for the floor guys. They used wood shims to bend the hardwood when it was glued down. The millwork guys did a crap job and left a huge gap between the baseboards and the flooring. The tile was in first. Then the wood. Then the baseboard.

    Not very pretty.


    Down town at my other job I just installed eight large tiles to the bathroom floor and used a tile edging from Butech for the transition between the new Russian Oak flooring and the Italian Porcelain tile. Butech is a Spanish company owned by Porcelansona. The profile is wider and not made from aluminium but rather chrome plated brass.


    The tile to wood seam looks best when the change is under the door. Look below in this photo and you see how I undercut the door jamb so both wood and tile could fit under it. This makes it look like the door was set after the tile was done not the other way round.


    Tile to Hardwood Transition Ideas: Photos and Explanations · More Info


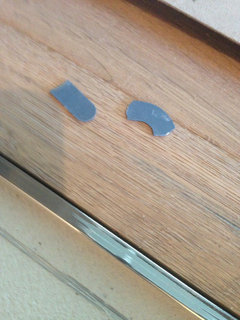
    The blue thing is a 1/16" spacer. The Butech profile was first set with some Ardex X32.


    Tile to Hardwood Transition Ideas: Photos and Explanations · More Info


    Just a couple pieces I snapped off from a horse shaped original shim. The profile is 1/2" tall so I will have only 1/8" of thin set under the tile right at this point.


    Tile to Hardwood Transition Ideas: Photos and Explanations · More Info


    I then cut and shaped the tile to keep a tight grout joint at the profile. The gap between the tile edging and wood will see a wood wax later. Need to make a shopping run to Mohawk Finishing here in Vancouver first.


    Tile to Hardwood Transition Ideas: Photos and Explanations · More Info


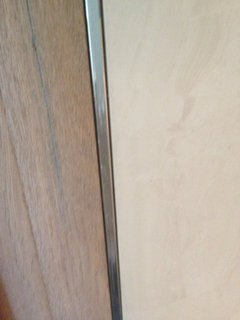
    The Butech profile's Chrome each and wider profile give it some sparkle. The chrome really picks up the light. Greater care is needed with these profiles since they are chrome plated brass. Schluter makes a nice stainless version but the edges are not fully square. The most durable edge would have to be some custom made flat bar stainless steel but for $85.00 I really like the added sparkle of the Butech edge.


  • PRO
    11 years ago


    Traditional Laundry Room · More Info


    This is a clever trick. The Schluter Profile you see here was installed flip side round so it could act as a baby dam in case the laundry closet blew a pipe. You might be able to set something like this into the space and clean up the look. I imagine you would have to nip the schluter profile's side edge the entire run but that might be an easy fix.

  • PRO
    11 years ago

    Why not caulk it with the grout-colored caulk; the dissimilar materials call for it. Wood will expand and contract. If you don't want the wood capped by a thicker stone rabetted out beneath, which would hide the expansion joint, but like I mentioned, be taller/thicker. In a similar vein, the wood could overtop the field tile, replacing the marble threshold with one of wood. That could be engineered to hide both seams, again, by making it taller than both.
    To keep it as flush as it already is, there will always have to be a seam there, and wood will expand and contract, exacerbating it seasonally.
    Casey


  • 11 years ago
    last modified: 11 years ago

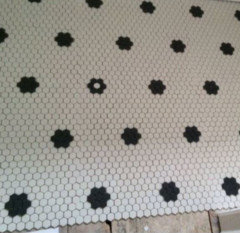
    John W, not sure why you think the subfloor wasn't prepped. Among the few things done right in my remodel, I think that was. The hex tile is on a floor that previously had different tile. That's one of three thresholds with the same issue. The floor in the master bath had to have been prepped properly because floor heat was installed. The wood floor was refinished but seems to have been cut--poorly. Other sources agree with Fori, that the method is not uncommon. It's the execution that's a problem (execution also being what I recommend for my GC). There's a fourth threshold that was also screwed up only in that they took a universal-design threshold that I think had a Schluter (I think all the thresholds in my house have these) and put in a conventional type. Though I currently do not need universal design, why change it if it's there, and since I'm used to not lifting my feet to cross into a room, this one keeps tripping me up.

  • PRO
    11 years ago


    I see huge gaps in the subfloor and tile installed directly over the plywood. Unless this photo shows a dry fit....


  • 11 years ago
    last modified: 11 years ago

    Oh, that's it. It is a dry fit. Luckily I saw it before it was glued down because the GC couldn't even follow the pattern in a photo. We had to redo it, and he posted the picture of our redo on FB.

  • 11 years ago
    last modified: 11 years ago

    Take up the trip hazard and have the tilers relay the last row of tile with a Schluter. Then have the wood guys do a custom transition piece, filling in between the two with caulk. A marble saddle over a virtually flush transition is the cheap and easy way out. However, if the transition method and material wasn't specified, any changes will be on you to pay for. Whatdid you specify in your contract?

  • 11 years ago

    I think it just said marble threshold on the drawings, and nothing for the wood-meets-wood. I'll have to check; he didn't give me the full-size drawings he promised until after the inspections.

    DH is pretty handy and has construction experience, so I'd much prefer he do the work when possible. Not going to get tile relaid at this point, but the tile guys adhered closely to direction from the GC. Sometimes they had to devise clever solutions to the GC's poor estimate of tile quantities, but they did a great job.


  • 11 years ago
    last modified: 11 years ago

    Specifying a "threshold" can be misleading. A threshold is a raised weather sill at an exterior door. A "saddle" (or saddle threshold) is a simple raised strip beveled on each edge that reduces the gap of an interior door undercut (an undercut allows carpets to lie within the arc of the door swing and/or the passage of make-up air). To get a flush "transition" at an interior door it is best to specify it with those terms as GreenDesigns suggests.

    I agree that Ditra is the best underlayment and that butt joints of dissimilar materials need room to move and that means a space large enough to install a flexible sealant. A tight joint would require letting the marble transition strip be able to move on the tile side with a gap and sealant. These unavoidable exposed joints and fillers are the price paid for modern/non-traditional detailing. In new construction the wood flooring might have been laid parallel and tight to the transition strip.

  • 11 years ago

    I think overall a marble threshold (saddle, whatever. That thing.) is a better option stylistically from what I can see of your floors. Schluter is very modern. There are probably some finishes that won't show up much, but it would be nice if this concept can be salvaged.


    feddup thanked Fori