Software
Houzz Logo Print
tishi111

Refinishing Maple Table Top

9 years ago

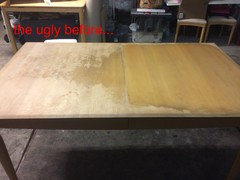
I have a dining table that is REALLY beat up, and more than half of the original coating is already rubbed off. My children are still small and I don't want to invest in a new table yet. Plus I have yet to find something I like. Most table tops seem to have grooves where crud (food, play doh etc) would get caught in and not friendly for writing and coloring! My table is solid maple so I figured I could refinish this and get more life out of it.


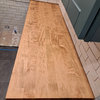
I probably will be painting the legs and the skirt(?) of the table eventually but I want to get the top taken care of. I do plan on removing the gummy residue on the surface with mineral spirits, then sanding with 80 grit, and finishing with 220 grit. I think I got it to here...


But here's where I'm stuck at.


If possible, I would like to go a little darker than the natural maple color, but I read maples don't take stain very well. Any suggestions without completely hiding the wood grain?

Since this will be a heavily used surface, which is the best "coating". I am leaning towards poly. Will oil based poly be my best choice? Is wipe-on poly a good choice for a heavily used table top?


TIA

Tish

Comments (15)

  • 9 years ago

    I would add that you should use a chemical stripper to remove the old finish. Just "sanding the finish off" is generally a very poor way to do it as it leaves some finish in the grain and can exacerbate the uneven stain problem. Yes, it's messy, but a lot less work and headache than just going to it with a sander.

    Better quality stains (either dye- or pigment-based), in my experience, work better than the cheap stains found in the grocery store and big box. You could also consider using a gel stain that can alleviate the uneven staining problems.


    I would rather put on a number of thin coats of varnish than a couple of thick ones. Runs, drips, brush marks, dust nibs, and that plastic look tend to be less of a problem. I also thin my varnishes before use, regardless of what the can says (to comply with VOC regs.) I would typically put on 4 or more coats on a table top. Twice as many if you are using a wipe-on finish (which, regardless of name, is either a highly thinned varnish or oil-varnish blend).

  • 9 years ago

    I will definitely add a chemical stripper to remove the old finish. Would Klean Strip Stirper work? Should stripping be done before or after sanding?

    And noted… I will only sand to 150 grit if staining!


    I was planning on (ha!) going to the big box store to buy my supplies, but I found a Rockler not too far away so I will head there instead.

    They carry General Finishes which seem to have good reviews.


    As much as a glass top would be easier to work with, I don’t trust my two wild kids and… it is an extendable table so I need polyurethane.

    Did I read correctly that if I used a water based stain, a water based poly should be used?

    The table is a heavily used surface so I do want a pretty strong coverage and I recall reading oil based polys might be stronger. Does it make a big difference?

    If maple doesn’t take oil based stains well, I could just stay with the natural color and just do the oil based poly coating.


    Thank you again,

    Tish

  • 9 years ago

    The current water based poly's are just about as good as the oil based types. Three advantages of WB poly: Ease of clean up(wash with soap and water), time to dry/recoat is 2-6 hours(12-24 for OB), and the lack of VOC's(no nasty odor.

  • 9 years ago

    I really like Citristrip. It is not as toxic as many chemical strippers. The trick is to spread it thickly (more like frosting than paint), and cover it with plastic (I cut trash bags), so it stays wet. Then let it sit for 24 hours. The stripper and finish will scrape off like sludge - use a plastic scraper to avoid gouging the wood. I rinse with water, then dry with a towel (you don't want the wood to soak up too much water). Wait another day for the wood to completely dry before sanding.

  • 9 years ago

    Thank you for your advice and suggestions!

    I went and bought supplies this weekend.

    •Wood scraper (as I was recommended to use to minimize the chemical stripper use)

    •Citristrip

    •Wood dye and wood stain (water based) from General Finishes… I liked the color of the two

    •Waterbased poly


    I am ready to get working! But not until later this week...

    Will post pictures! :)


  • 9 years ago

    I am making progress! The top was scraped, stripped, scrubbed using mineral spirits to remove residue and have started sanding. It is a lot of work... but I know it will come out great!

    So there's a lot of sawdust. What can I use to remove them? I am using water based stain and poly. Tack cloth probably isn't a good idea. I'm going to vacuum as much as possible. Can I use shop towel moistened with mineral spirits? Or just water?

  • 9 years ago

    I use blue shop towels just moistened with water. Not enough to wring out. You can use one until it is full(tan colored) and then another after vacuuming(great idea). Just don't sand more than 150 grit.

    After staining, use the 150 paper on a hand block to remove the fuzzies caused by the stain/dye.

  • 9 years ago

    >After staining, use the 150 paper on a hand block to remove the fuzzies caused by the stain/dye.


    II prefer to do what's called "burying the grain." There is some risk in sanding a stained finish and removing too much color. I apply the first coat of finish that will stiffen the raised grain, then lightly sand. I also sand between each coat of w/b finish with P400 sandpaper (I like 3M's Sandblaster (#216u) and/or light gray ScotchBrite pads (#7448)) The sandpaper levels the first few coats and the Scotch Brite provides an even dullness.

    I normally spray the w/b finishes. If you are brushing, be aware they dry very fast so get it on and don't go back over it once it starts to set. It's different than oil-based varnishes where you have a lot of open time. I've used the painter's pads (like you use for cutting trim lines) as a good applicator. Do not use a natural bristle brush as it will get floppy when wet.

    Also, the w/b stains dry very quickly. I often put on with right hand and a second rag in left hand to wipe off. Putting it on too thin to begin with also exacerbates the drying fast problem. If you get streaks, add some more before it dries completely and re-wipe. http://www.popularwoodworking.com/woodworking-blogs/why-there-are-streaks-in-your-wood-stain


  • 9 years ago

    After sanding somewhat, I've been a bit side tracked a bit, but hoping to get to staining and at least first coat of the poly this weekend.

    Thank you HandyMac! I will use the moistened blue-shop towel.

    bobismyuncle--- noted on the dry time for water based finishes. I will wipe it quickly. I plan on using foam brushes to apply the dye and then the stain. I wish I was experienced enough and had tools to spray, but I'm daring. This is my first project ever. My climate is pretty dry so I'll try to work on it at night time when the humidity level is higher when applying the dye/stain.

    I'm keeping my fingers crossed this method will work, but the gentlemen I spoke to said once the top is sanded down, spritz it with water and leave for about an hour--- and then do a final sand before dye/stain. He said this will avoid the wood fibers expanding from the moisture in the water based dye/stain. Does anyone have experience doing this?

  • 9 years ago

    Thank you for all your advice!

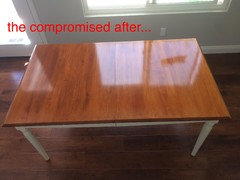
    It took a lot longer than expected having to deal with kids and their sickness, other house related chaos etc. but the table is DONE!
    I learned a lot along the way and I think I can do better next time, if there is such a thing!
    I now understand why the pros charge what they do. With the amount of time I spent plus material cost, it actually would have been very reasonable.


    After removing much of the prior varnish(or whatever that was on) with the scraper, I used citristrip. I cleaned it off using mineral spirits and then sanded the top. It really didn't need any coarse sanding. I used 80grit first, but it was way too coarse. Starting with the 120grit would have been plenty. I finished it with 150grit. As suggested by someone at Rockler, I sprayed the top with water and left it for a while. Wiped it and then let it dry well. Then resanded the top prior to applying stain. I do think it helped from the wood grain expanding. I used General Finishes Amber dye and applied General Finishes Shaker Maple stain and LOVE how the color turned out. It matches our new floor better than the prior natural maple color.
    For the apron and legs, rather than stripping and staining, I painted them with General Finishes Antique White milk paint. Big plus was not needing primer but just a quick cleaning with denatured alcohol and light sanding. It applied amazingly well, but I wished I had a sprayer! The learning curve would have been high but the finish would have been nicer without some drips.
    Then came the poly... I’m starting to sound like one, but no, I'm not sponsored by General Finishes... but used their High Performance water based polyurethane. I wish I had a sprayer here too! I tried both a foam brush and a poly brush. There is no way to avoid brush strokes for a novice like me... or foam strokes... or some bubbles…! I might have been able to sand/polish them out but it didn't work for me due to lack of skills. There are imperfections but it's too much work to undo all. Nor do I need a perfect table where I would constantly policing use so I think it is fine after all. So I tell myself... :) I mean, it looks a lot better than it did? And kids are still young. They’re going to wreak havoc in no time!

    It was a great learning experience and although exhausting, I really had fun with this project. I'm looking to working on something else but not sure if I want to do chairs. The chairs are looking pretty ugly, I either need to invest in a sprayer or just cut my losses and buy something that goes with the refinished table. Oh the dilemma...

  • 9 years ago

    Lovely! How many coats of poly did you use?

  • 9 years ago

    Thank you! I did two coats for the apron and legs, but the top... Ah... I stopped counting after five. Sandpaper grit and the sanding sponge grit don't seem to be the same and I ended up scratching the poly a bit. I tried wet sanding too, but that really didn't help much and gave it several coats after that trying to cover it up.

    I initially was recommended to use gloss for several coats and satin for the last coat to avoid a but am debating whether to do this or not. I most likely won't be able to apply the poly too evenly and have a feeling I might botch the whole thing. I'll live with the gloss a bit, and if kids sticky hand smudges bother me too much, I might apply satin poly later.

  • 9 years ago

    Looks pretty good---have seen experienced folks do worse. Glad you persevered and stuck with it!

    One thing, I seldom use foam brushes for finish. Rather, I use a good Purdy man made bristle, tapered brush(about $20). With minimal practice, a coat of poly can be applied with almost zero brush marks.

  • 9 years ago

    looks great - if thats solid maple you can keep it going many more yrs - its worth it !

Sponsored
AIS Renovations
Average rating: 4.5 out of 5 stars15 Reviews
Custom Craftsmanship & Construction Solutions in Franklin County, Ohio