Software
Houzz Logo Print
denice_shuty

How to make cabinet filler gaps disappear?

6 years ago
last modified: 6 years ago
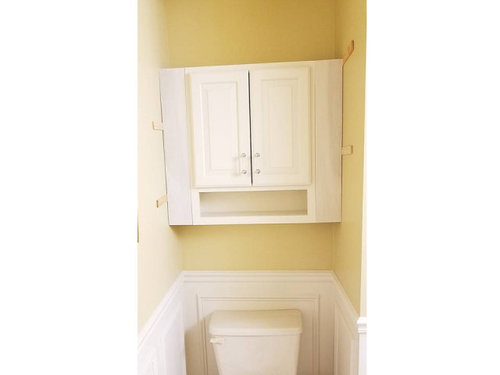
I made filler pieces for my bathroom wall cabinet. Just doing a test fitting now and I can see gaps between the filler pieces and the cabinet sides. What's the best way to address this for an invisible seam? Note: the filler pieces are primed but not painted yet.

Also, any installation/blocking tips would be great.


I would also like to install crown moulding in the bathroom. Any tips on installing the composite/polystyrene type?


Comments (25)

  • 6 years ago

    I'm interested in the answer too. Thanks for posting.


    I realize it's probably just the photo. But the first thing that caught my eye is that the cabinet doesn't look level.


  • 6 years ago

    I am only an amateur woodworking, so I could be wrong, but I think the face frame is usually scribed to the wall. Did you make the cabinet? If so (or if it looks easy to disassemble), you could make a new face frame for it that spans the wall.

    Denice Shuty thanked mononhemeter
  • 6 years ago
    last modified: 6 years ago

    @mononhemeter, no, I did not make the cabinet. That is beyond my skill level and tool library! Unfortunately, the cabinet is glued.

  • 6 years ago

    @tpliska I think its an optical illusion in the photo. :)

  • 6 years ago

    @HALLETT & Co., I'm a perfectionist! The caulk at the wall I could live with. But if I can see the telltale signs that the fillers were added to the cabinet that would drive me crazy.

  • 6 years ago

    The easiest way is to bring the fillers forward or backwards about 3/8" So it has a slight reveal and looks more intentional, like a decorative detail. Then run a very small bead of caulk in the seam, smoothing most of it away, just trying to blend the seam.
    Otherwise, take the doors off and spackle wood putty on then sand really well, repeat if needed. Sand down to a 220 level, prime the area and repaint. My husband and I build or refinish lots of various pieces and these are our preferred methods.

    Denice Shuty thanked Amy Lynn
  • 6 years ago

    @Amy Lynn, Thank you for that suggestion. I was thinking something similar - bringing the fillers forward just a bit and routing the edge to overlap the edge of the cabinet and thereby hiding the seam. But perhaps your idea would work just as well - no need to overlap.


    I will also be mounting a shelf on top of the whole thing and would like your opinions on that. The shelf will overhang the cabinet in front by 1-1/2" and go from wall to wall so that there is space above for sizable storage baskets. Knowing that, would you make the fillers recede or project? I also want to run a piece of simple crown moulding across the front of the shelf. What do you think of that?

  • 6 years ago

    I really like your idea of routering the edge to create a lip also. Either idea works, with my idea you can most likely still use the pieces you've already cut. But it's not a lot of work to redo with the routered edge. I think the fillers should project.

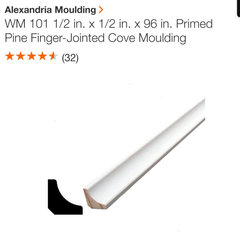
    The idea of the shelf is great. I would put some spacer blocks on top of the unit, place a deeper shelf on top of that and put a smaller, simple cove trim molding under the shelf to bridge the shelf and the cabinet. Especially since I think you said you wanted to put crown molding up on the ceiling, a smaller, simple piece would compliment it well.

    This is the type I was thinking about from Home Depot.

    Denice Shuty thanked Amy Lynn
  • 6 years ago

    @Amy Lynn Those ideas sound like they will work well. I was thinking of crown moulding all the way around the bathroom ceiling, and a piece of smaller crown across the front of the shelf. Too much?

  • 6 years ago

    Maybe, it depends on the size. Get a few samples of the different choices and play around with the proportions. Also, are you going to put a piece of wood on the bottom to finish it? I think you should, and have it project at least a bit beyond the projected filler pieces.

    Denice Shuty thanked Amy Lynn
  • 6 years ago

    @Amy Lynn I hadn't thought about a piece on the bottom. A simple rail moulding around the perimeter? If the fillers project, how would I wrap the bottom? Or do you mean a flat board under the entire bottom of the cabinet?

  • 6 years ago

    Yes, a flat board on the bottom. This will also hide the fact that it's just fillers on either side. It will look more like a built in cabinet.

    Denice Shuty thanked Amy Lynn
  • PRO
    6 years ago

    We try to never have a filler over 1" wide. Anything as wide as you need I would bring it out flush with the face of the door and probable have it flutted to make it more appealing.

    Denice Shuty thanked Creative Design Cabinetry
  • 6 years ago
    last modified: 6 years ago

    @CreativeDesignCabinetry The need for more storage is driving this - so I can put a shelf with storage baskets on top of the cabinet. If I would have known that sooner I would have purchased a different cabinet. I need to work with what I have now. Unfortunately, fluting is more of a Victorian detail and doesn't go with my cabinets or design style.

  • 6 years ago

    How much space is on the sides of the cabinet if you take the filler pieces out? Is there enough room to put shelves and doors on the front of the shelves for more storage? Like bottles or towels or little things? Personally I would not put filler pieces in... but by doing so and you could use more storage, then go ahead. Baskets on top wouldn't be too high to reach would they? Just tossing out things I think of...we redid our bath this year and you can never have enough storage in the bathroom.

    Denice Shuty thanked erinsean
  • 6 years ago
    last modified: 6 years ago

    @erinsean

    Thanks for brainstorming this. There's only 4.5 inches on each side, so the space is too small for anything of significant size or anything I need to store. I'm not one for displaying stuff either.

    I'm almost six feet tall, so touching the ceiling is no problem for me!


    Update: The more I think about it, you had a good idea. I will make little shelves on the sides. I found some small tilt-out bins online that I could use for cotton balls, hair ties, etc. I can line them with opaque paper so that the contents are hidden. It will be easier than trying to make the cabinet fillers look perfect. Thanks!!!

  • 6 years ago
    last modified: 6 years ago

    @Amy Lynn, I decided to make recessed shelves on the sides like little cubbies instead of aligning the fillers to the front. So I won't be able to add the cove moulding under the shelf since there won't be a face board going all the way from side to side under the shelf. Any other suggestion on how to bridge the shelf and the cabinet?

  • 6 years ago

    Are you really hoping to do a crown detail? The easiest solution would be to just go with a less detailed look and put a deeper shelf board right on top of the cabinet to span from wall to wall. This would be just like a cap on top of the whole unit. Then caulk the seam around the cabinet where they meet. You could then also put a board spanning wall to wall on the bottom of the cabinet that projects out a little deeper. This would give a nice finished look and create your bottom shelf on both sides. Then you just have to add the shelves in-between the top board and the bottom. Does this make sense?

  • 6 years ago

    @Amy Lynn, yes. makes total sense. You're an angel for taking the time to help me work this out!

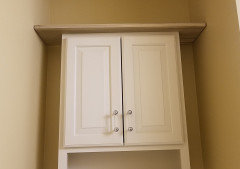
    I've think I'm giving up on the crown at the top with the floating shelf concept. It needs a simpler look with those unadorned shelves. The cap will span the entire thing from wall to wall. I'm just worried that the big overhang will look funny without something to "bridge" it. Photo is of an unpainted board on top. It overhangs the doors by 1.5 inches in order to fit my baskets. What do you think? I will do a board on the bottom that serves as the bottom shelf.

  • 6 years ago
    last modified: 6 years ago

    Oh, yes I can see the issue. The board does look out of scale like that. How about narrower board (about 3/8" reveal) sitting on top, then spacer blocks spaced around the perimeter, then your larger board nailed down on top of that. Then a strip of crown wall to wall in front to disguise the spacer blocks. I know you're adding a few inches to the height like that, but you said you were tall, so...

    Denice Shuty thanked Amy Lynn
  • 6 years ago

    @Amy Lynn that's a good idea. I will do that. In order to make it easier to work on and get all the pieces fit and installed, I'm going to take the cabinet down. I can reinstall it a little lower to make up for the added height of the top shelf. Thank you for all of your suggestions! I bet you do very nice work.

  • 6 years ago

    You are welcome Denice! Good luck with your project and post the finished result please 😀

  • 6 years ago

    @Amy Lynn, I will! It's so nice to come across generous and kind people like you here on Houzz.

  • 5 years ago

    Denice Shuty, I would love to see photos of your finished product. I have a similar dilemma with an over-the-toilet cabinet.

Sponsored
Custom Home Works
Average rating: 4.6 out of 5 stars10 Reviews
Franklin County's Award-Winning Design, Build and Remodeling Expert