Software
Houzz Logo Print
phil_boyd

Kitchen Remodel - Tremendous improvement for very little $$

12 years ago
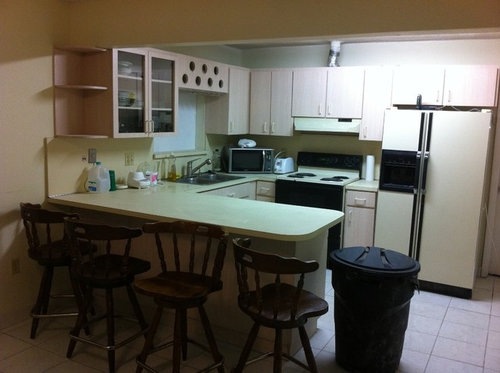
Here is my kitchen remodel results, same house i did the bathroom remodels on in a separate before/after post.

BEFORE
Kitchen is 100% 1970s, bland/boring, all yellow, yellow stove and refrigerator, yellow laminate counterops, yellow backsplash, and even yellow draw pulls. terrible florescent ceiling lighting, has a ceiling wall divider that blocked light and the view. most people would rip this kitchen out and start over from scratch.......

AFTER
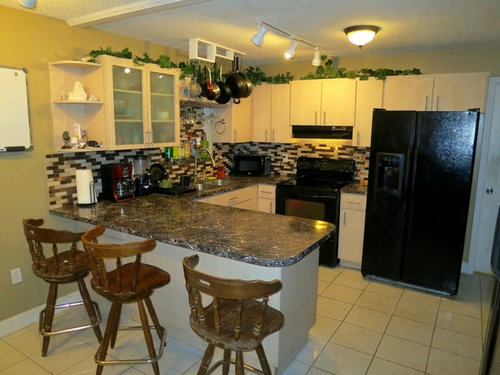
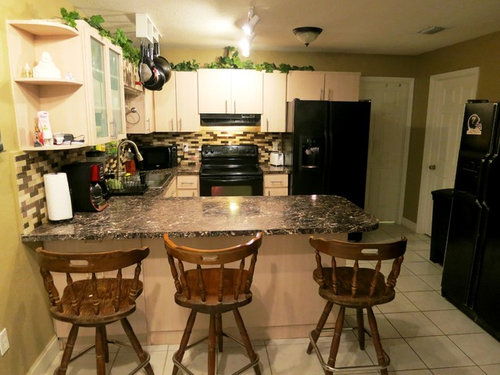
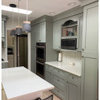
the cabinets were already laminated, light wood grain pattern, not really visible from the photos, but they were in great shape so i decided to keep them as it and just design around the existing cabinets.
new refrigerator, used - $200 from used appliance store
new flat top stove, used - $200 from used appliance store
Painted range hood black - $5 can of spray paint from home depot
Removed ceiling divider wall, installed new drywall strip, 1/4 painted boards and 1" crown molding over hole in ceiling where wall used to be - $40 from home depot
Sprayed knockdown texture on walls - $13 from homedepot
Primed and painted walls - $40 in paint from home depot
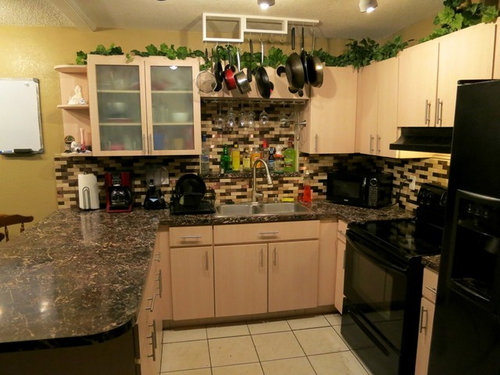
Laminated countertop - $130 for roll of granite look-a-like laminate from wilson art
laminate glue - $25 at home depot
Backsplash - copper canyon, special order from home depot - $375
Mortor for backsplash install - $13 from home depot
polished nickel drawer pulls - $50 off ebay
polished nickel towel holder - $12 off ebay
polished nickel faucet - $80 off ebay
Frosted glass spray to cloud up glass and make dishes less visible - $4 from home depot
Track lighting set - $40 from home depot
New light fixture - $10 from home depot
New light switches and electrical boxes/misc electrical parts - $20 home depot
custom made pot/pan holder out of 1 piece of 1x4 white pine board and metal hooks - $17 at home depot
silk/fake vines/leaves from Michaels hobby shop to add some decor to top of cabinet and hide the exhaust vent into the ceiling - $25
kept original sink - $0
installed garbage disposal - $90 at home depot

Total cost = $1764

Typical new kitchen cost with appliances/lighting/etc would be easily over $10k

The most important thing i did to save money was to keep the original cabinets and just design around them. I see so many people on here throw away perfectly good cabinets, when all they needed was some cabinet restoration, a properly color coordinated backsplash and countertop, and proper lighting.
Designer laminate, backsplash, and lighting go a long way.
For the money, i think the transformation is very good. If i wanted to take an extra step, i could re-laminate the doors/fronts of the cabinets to complete the transformation, but im petty happy with it as it is.

thanks, comments welcome.

-Phil

Comments (30)

  • 12 years ago
    You need updated bar stools. Try leather in a color. Like teal, or yellow. Pier one carries.
  • 12 years ago
    Seems a little busy. With all the stuff over and behind stove. But, good job.
  • 12 years ago
    I meant sink.
  • PRO
    12 years ago
    Good job! You got a kitchen that looks brand new for under $2000. Awesome!
  • 12 years ago
    I think you went overboard with the busy countertops and busy backsplash, Maybe rethink the backsplash to something simpler, may not be too hard to redo.
  • 12 years ago
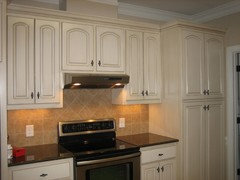
    I realize you want to hide the ducting above the stove, but the vines take away from your improvements. How about building an enclosure like a "U" shape the width of the cabinet above the stove? (see photo) It wouldn't have to be permanent. And until you find some better bar stools, paint your existing black. Really nice job. I like that this is a total DIY and you didn't toss useable stuff in a landfill.
  • 12 years ago
    last modified: 12 years ago
    thanks for the comments. @crashkitchen, nice idea on the vent enclosure.
    I see what you mean by the busy look in the photos, for some reason I dont notice it when standing in the kitchen, the backsplash has multiple stone and metal in it that blends in all the other colors in the countertop and cabinets. the backslash is much more reflective than the other surfaces, im wondering if the flash in the photo made it stand out too much. I brought in about 30 different backspash samples and a group of people selected the one i used, with everyone in agreement that it was the best. in real life it just looks really good, i get lots of complements on it.
  • 12 years ago
    I think you did a remarkable job. I do agree about removing the greenery. Just noticed your very clever use of the area behind the sink, and, the hanging rack looks good, too. You have enviable shopping and builidng skills.
  • 12 years ago
    Those 4' fluorescent fixtures were depressing, weren't they? Nothing like the look of Kmart in the kitchen. Nice transformation!
  • 12 years ago
    Great job! It looks so much more modern and I bet you really enjoy entertaining friends in it!
  • 12 years ago
    No importa k la silla queden bajita!
  • 12 years ago
    Thanks for the detailed information on your remodel. I own a condo with the same layout, and this gives me ideas for how I might upgrade my kitchen on a limited budget!
  • PRO
    12 years ago
    I like your transformation!
  • 11 years ago

    The brick backsplash, especially in the "window area" is too much. (What happened to the window?) Also those fake plants have to go, 70s look. Suggest you remove the backlash and introduce some color there, perhaps in a softer shade. Complete update would include stainless appliances.


  • 11 years ago

    Very nice. I see that you eliminated one barstool. Good idea. I would paint them to blend in with the kitchen for a more updated look.

  • 11 years ago
    Love the pots and pan hanger. Nice choice of countertop. Real improvement. Should be proud!
  • PRO
    11 years ago

    Great job of staying on budget!

  • 11 years ago

    Nice job. Wish I were handy like that. I like the black and white look. As others have said, remove the vine, change out the barstools. They caught my eye first thing because I had some very similar in the 70's. Penney's also has some very reasonably priced. I like the glasses hanging over the sink but the bar shelf does make it look busy. Can it be moved or find somewhere else to store the bottles? If not, I definitely believe function trumps form. I'd also declutter the bottom shelf at the end of the cabinets. I didn't know you could buy laminate like that. A good redecorating tip to know.


  • PRO
    10 years ago

    Well done!

  • PRO
    10 years ago

    Way to go.

  • 10 years ago
    Nice job. Big improvement for the money spent
  • PRO
    10 years ago

    Great job! Some new bar stools or refinishing those will finish the look :)

  • 10 years ago
    last modified: 10 years ago

    As a retired pro, I never cease to be amazed at what a DIYer will do... You have many good suggestions here. I'd take them! Also:

    DEFINITELY remove the faux vine and box in the range exhaust... Build a box out of plywood the full width of the stove and paint it wall color.

    Remove the pot rack if you can live without it...

    Replace your new dome light with a second track light (or at least replace the black dome with a white one.)

    Remove the "bar" above the sink. Hang a framed black and white photo or light themed print (protected under glass or clear lexan), and put a small plant or herb garden on top of the former window sill there...

    If you MUST have a "bar" consider either:

    1) enclosing the bottles in the existing location (assuming your cabinet doors are no longer available for purchase) with glass or lexan sliding doors to match your adjacent cabinets to the left (or, in another translucent white material or in black finish.) Kits are available at Home Depot for cabinet slider hardware, and Tap plastics will custom cut doors - with round finger hole pulls - for very little money, OR

    2) move your liquor storage to the unused wine rack area - and do the same there. With luck, you'll be able to dismantle the wine rack and use the front piece for the new sliding "cabinet" doors. Cover the holes from behind with lexan or glass (or even removable synthetic washable fabric or speaker mesh attached with velcro...) If you can't do that, look to see if you can remove the open shelf unit near your dry erase board and remove the back of it to use for sliding doors. You can replace the back with 1/4" ply and paint it wall color before reinstalling! ;- )

    Lastly, re PAINT! If you paint your stools, put a clear coat over your final paint coat. They will look nicer longer, and be easier to clean. Whenever you repaint the walls, go lighter and more neutral, choosing a beige tone from your backsplash. I love your wall color but the yellow in it feels a bit unsettling with the underlying rose tones in your cabinets and backsplash. Silly though it may sound, the wrong wall color can make or break the marriage of otherwise compatible design elements.

    I hope you're enjoying the fruits of your efforts! ;- )

  • PRO
    10 years ago

    Great job. And thanks for the list and prices.

  • 10 years ago

    Very impressive for do-it-yourself! I would suggest painting the bar stools black as they were the first thing my eye went to. Also, as with the other suggestions, remove the greenery as it looks too busy. Overall, great work! I would be proud too!

  • PRO
    10 years ago

    Nicely done!

  • PRO
    10 years ago

    Way to go. Very nice.

  • 10 years ago

    In re-reading my post of ten months ago I realize I was a bit harsh, and I apologize. I realize you may not have a window over the sink! Also, I think I overlooked your description of what you had done and how you tried to keep costs down. I too do not care for stainless steel. I still feel that the different designs in the materials used for the counter and backsplash as wall as the fake plants definitely make the kitchen too busy. Maybe you have changed this? Can you please tell me what product you used in restoring the kitchen cabinets? I have beautiful solid oak cabinets that need cleaning. Thank you.

  • 10 years ago
    hi. yeah, there used to be a window over the sink. there is an addition on the back of the house now so the window had to get blocked up. everything else has stayed the same. the cabinets are laminated, I didn't touch them, I just worked around it.