
Search results for "Conducting" in Home Design Ideas
 Alan Mascord Design Associates Inc
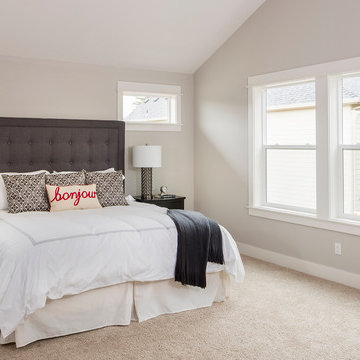
Park Place Homes chose design 22199 - The Hood River, and made some minor modifications to suit their specific site and client needs. The stock plan package was complimented by site planning and drafting services. The home construction and interior design was masterfully conducted by Park Place Homes.
 Costa Bella Builders
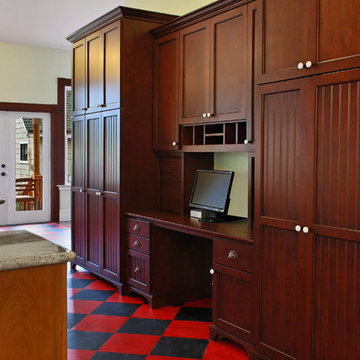
On this major remodel in Santa Cruz we were faced with a dilapidated Victorian built in 1904. We began by creating a complete set of building plans detailing the renovation and remodeling of the building. We added new square footage to the master bedroom, reengineered and rebuilt the back half of the structure and then completely replaced all of the plumbing and electrical services. All of our construction on the exterior was required to match the original in order to comply with the historical status of the building.
This project was conducted under the new green building guidelines established by the City of Santa Cruz. We were able to recycle nearly 80% of our demolition and construction refuse. We took care to preserve and renovate the existing redwood window casings and all of the original custom heart redwood doors in the home. These were planed, sanded and refinished to both save cost and maintain the vintage warmth of the original structure. The windows were recycled and new Marvin dual pane wood windows installed in their place. The original upstairs redwood flooring was preserved and the damaged sections replaced with material salvaged from the flooring at the first story. These surfaces were sanded and finished to recreate the look of the former flooring. We were also able to save and reuse the decorative fireplace mantle from the original construction.
 Sunrise Custom Fence
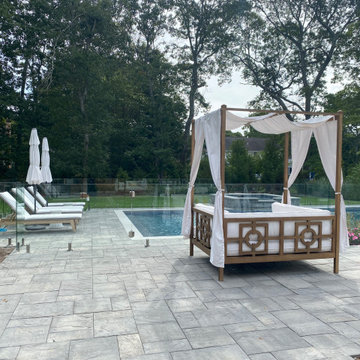
Stunning Frameless Glass Pool Fence Installation in Remsenburg-Speonk, NY 11960
We’re thrilled to share one of our latest projects—a meticulously crafted frameless glass pool fence installation in Remsenburg-Speonk, New York. This fence seamlessly blends safety with beauty, offering a clear view of the pool while enhancing the overall aesthetic of the outdoor space.
Our team took the time to ensure every detail was flawless. We used premium stainless steel Polaris gate hardware—the industry’s best—and non-conductive coated stainless steel spigots, which were custom imported for this project. These top-tier materials, combined with our expertise, resulted in a sleek, modern, and durable fence that complements the surrounding landscape.
This installation not only meets but exceeds safety standards, all while maintaining an unobstructed view of the pool area. It’s perfect for homeowners who value both style and security.
Interested in a glass pool fence? Contact us today to discuss your vision. Our team at Sunrise Custom Fence is committed to delivering top-quality installations tailored to your needs. Whether you’re looking for a pool fence or another fencing solution, we’re here to help!
Sunrise Custom Fence East Inc.
Call us at 631-474-8650
Visit us at: www.sunrisecustomfence.com
Email: sales@sunrisefence.com
Find the right local pro for your project
 Tile Doctor Ltd
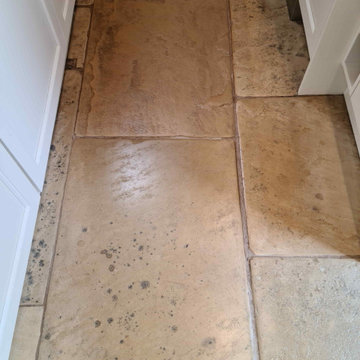
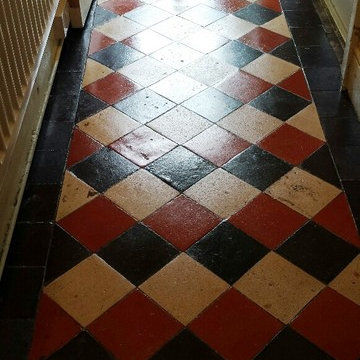
These pictures are of a beautiful Sandstone floor in Ilkley, the tiles were sourced from Lapicida of Harrogate and installed around twelve years prior. If you take a look at their website now you will see they are selling a similar London White Sandstone for nearly £100 per m2. This floor was 35 square metres so clearly this was a significant investment for the owner at the time.
After twelve years of use however the sealer had worn off the floor and dirt had become ingrained in the pores of the stone making it very difficult to keep clean. A good sealer takes a long time to wear off so the change to the appearance of the stone happens so slowly you don’t notice it. The floor was now looking permanently dirty, and the owner of the property had decided it was time to get it renovated.
Before quoting I paid a visit to the property to survey the floor and conduct an initial test clean which came out well. The test cleaning did not go as quickly as I had hoped it might however, due to traces of old satin sealer on some of the stone. It’s important to remove all the old sealer before applying new or you can end up with a patchy appearance. The remnants of old sealer proved challenging to remove as a result I had to try several products and methods before working out the right approach. In the end I resulted to using a product called Tile Doctor Wax Away. I had considered applying diamond burnishing pads which would have been a quicker option, but the flagstones had a riven finish, and the dirt was deeply pitted.
With a successful cleaning plan worked out I provided the client with a which was accepted, and a date agreed for my return.
The cleaning plan I had worked out was to apply a strong dilution of Tile Doctor Wax Away, leave it to soak into the stone for thirty minutes and then scrub it in with a rotary buffer fitted with a black scrubbing pad. The old sealer proved to be tough to remove and in total I used five litres of Tile Doctor Wax Away in the process, as I said it was a big floor!
On day three, I sealed the floor using three coats of Tile Doctor Seal and Go which gave the Sandstone a lovely satin finish that the client liked. This product is also water based so it doesn’t leave a smell as it dries.
Once done the floor was completely transformed, and my client very pleased with the floor which looked so much lighter and cleaner. For aftercare cleaning I recommended the use of Tile Doctor Neutral Tile Cleaner for maintenance, it is pH neutral so will ensure the newly applied seal is protected. It has a nice fresh smell and is gentle enough to use frequently keeping the newly renovated floor looking lovely.
Nigel Stoker
North West Yorkshire Tile Doctor
 Tile Doctor Ltd
The pictures below were taken at a house in the town of Merthyr Tydfil, which is located not too far north of Cardiff. My client was keen to keep her very old Quarry tiled floor – which dated back to 1905 – intact. The floor had understandably seen a large amount of traffic in its lifetime, and was now in dire need of a professional restoration, including a thorough clean and seal.
First, I completed a survey of the area and provided my client with a quote. After completing many similar jobs in the past, I generally have a good idea of what the final result will look like. I passed on some images of a final result to my client, who was happy for me to begin my work.
On the first day, my first task was to take run some damp tests which were fine; it’s always good to know up front if there are likely to be any damp issues. Next I covered the floor with water to take the surface suction out and waited fifteen minutes before applying a cocktail of Tile Doctor NanoTech Heavy Build-Up cleaner mixed with Pro-Clean and Grout clean-up covering the whole floor. I then immediately starting to work the solution into the floor with a rotary machine fitted with a coarse black pad. The solution was then rinsed off with water which was then extracted with a wet vacuum as I worked. For stubborn areas I applied more of the previously mixed solution scrubbed into the floor with coarse wire wool by hand followed by further rinsing with water.
Each of the products used serves a particular purpose. Pro-Clean is a strong high-alkaline cleaner for natural stone, while NanoTech HBU is a particularly powerful cleaner that uses nano-sized particles to penetrate deep into the stone to get underneath and lift out ingrained dirt and stains. Grout Clean-Up, as the name implies, is a product for resolving grout related problems such as removing grout smears from tile surfaces aka grout haze.
After completing the clean I left the house for 48 hours, to leave enough time for the floor to dry completely in preparation for sealing. Upon my arrival back at the house I conducted some more damp tests to check that the floor was dry enough to seal using the previous readings as a benchmark. The results indicated that I was fine to proceed with the seal, so I applied a total of eight coats of Tile Doctor Seal & Go for durable protection. This was the product I recommended to my client as she wanted a nice, soft shine for her surface seal.
As you can see from the photos, the desired result was achieved to a high standard and needless to say my client was delighted with the transformation.
Julian Iancono
South East Wales

 Premier Copper Products
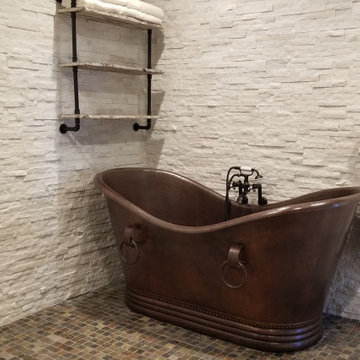
Envelop yourself in luxury! Our freestanding copper bathtubs transform ordinary bathrooms into spa-like sanctuaries. The richness of the copper coupled with its natural heat-conducting elements allow you to luxuriate in the tub longer, elevating bath time bliss and bathroom style to unprecedented levels.
 Premier Copper Products
Envelop yourself in luxury! Our freestanding copper bathtubs transform ordinary bathrooms into spa-like sanctuaries. The richness of the copper coupled with its natural heat-conducting elements allow you to luxuriate in the tub longer, elevating bath time bliss and bathroom style to unprecedented levels.
 Marty Anderson & Associates
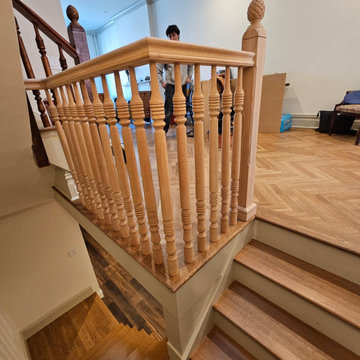
"Doctor's Row" is the name given for the eastern side of the 900 block of Washington Street in Hoboken, where historically many local doctors both conducted business and lived upstairs. For our part, on the heels of replacing every tread in the home with rift and quartered white oak, the next assignment was to match an existing circa 1870's Victorian railing system in an existing Victorian context. We were able to match the pineapple detail on the newel post (the pineapple being an indication of hospitality in traditional American architecture). Custom balusters were fabricated for this project to exactly match the existing balustrade throughout the home. #Hoboken #Hobokenstair

 safe ZOnea
Daylight is a very important factor that influences plant growth and reproduction. Gardeners need to make sure that they measure the length of daylight hours that a plant gets within a 24-hour period. This way, growth can be monitored and regulated.
For sun-loving plants, changes in the length of each day serve as the guide that helps plants transition from vegetative growth to reproductive stages. Changes in seasons and daylight hours have an impact on the adjustment of growth hormones that are responsible for flowering.
Therefore, it’s very important for gardeners to make sure that they conduct thorough research on long-season plants that are adapted to extended sunlight exposure. During this research, it’s not uncommon for gardeners to come across topics related to sativa seeds for sale because these plants are studied for their adaptation to bright, extended growing seasons.
For gardeners that want to experiment with these kinds of plants, sativa seeds for sale can be a good starting point. But in all cases of plant growth for sun-loving plants, the principle is always the same: it’s that daylight acts as a calendar that plants use so they can determine when it’s time for them to reproduce.
Long-Day, Short-Day, and Day-Neutral Responses
Different plants have different responses to light cycles. This is why plants are grouped into long-day, short-day, and day-neutral categories.
Long-day plants are those plants that thrive when daylight goes beyond the critical threshold. This is mostly common in late spring or early summer. A lot of sun-loving ornamental plants and vegetables fall within this category. They always take advantage of the longer days that support energy-intensive flower and seed production.
On the other hand, short-day plants are those that usually flower and thrive when nights grow longer. When temperatures cool or the seasonal rainfall patterns change, these plants tend to thrive. Sure, these plants still require strong sunlight. However, it’s their uninterrupted time in the dark that triggers their reproductive phase.
For day-neutral plants, it’s age and environmental stress that impacts their reproductive phase. However, they still do benefit from adequate sunlight.
It’s very important for gardeners to understand these categories so that they can plan what to grow in their garden with each turn of the season. By doing this, it’s easier to guarantee better results in one’s garden.
Why Sunlight Duration Matters More Than Intensity Alone
It’s not only the sun’s intensity that should be taken into account when growing a garden. It’s also very important to take note of sunlight duration, which is actually more important for plants.
Sure, light intensity does influence photosynthesis. However, it’s the duration of sunlight exposure that plays an important regulatory role. When plants are exposed to sunlight longer, they are able to produce more carbohydrates through photosynthesis. This helps them build the energy reserves they need to grow buds and flowers.
However, if a plant does not get enough sunlight time, there is a huge chance that the plant will not bloom at all. If you have observed plants that grow very quickly but do not flower, the reason is that it doesn’t get enough sunlight time. Therefore, it’s very important to monitor sunlight duration in order to make sure that plants will actually grow buds and flowers.
Practical Implications for Garden Planning
When gardeners understand the impact of daylight hours on plants, they are able to plan their gardens more effectively. After all, seasons do change and the conditions brought by each season will definitely have a huge impact on plant growth. Once gardeners have the right knowledge in terms of which categories plants belong to, they can easily decide which plants to grow at any given time.
It’s not enough to just rely on sunlight intensity and then expect plants to grow buds and flowers. It’s also very important to take into account the duration of sunlight time for each plant. By having this understanding, gardeners will become more effective when it comes to making sure that flowering occurs.

 Cornerstone Property Services, Inc.
Grant Rivera
Example of a mountain style living room design in Orange County
Example of a mountain style living room design in Orange County
 United Porte Inc
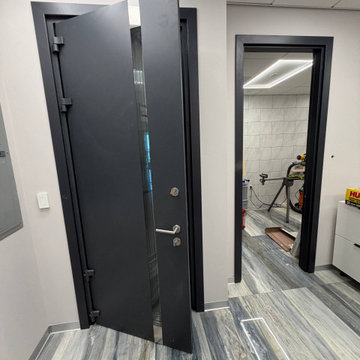
Your front door is your best defender. It protects you, your family, and your most valuable personal belongings from theft and damage.
Furthermore, VDom Doors insulate your home from extreme weather conditions, as well as unwanted animals, insects, and dust from entering.
This technology makes it possible to protect the front door from condensation and ice formation.
A thermal break is a layer of material with low thermal conductivity. For the correct operation of the door, it must be located between the outer and inner sides of the leaf and the frame, thereby excluding the contact of the metal parts with each other.
This technology prevents the door from freezing, preserving its properties and impeccable appearance for many years.
The two-tone painting ofthe door leaf and the frame makes it possible to select colours separately for interior and exterior decoration, which gives the door a complete look and makes it possible to create a harmonious image in the interior and exterior.
All models of this collection are made with a frame made of aluminum. The external framework and internal power framework of the frame do not touch in any way, because they are interconnected by a polyamide insert (thermal break) 18 mm thick, which guarantees maximum thermal insulation performance.
The door leaf ofthis series is made of two sheets of metal 1 mm thick. A reliable two-layer design with a thermal insulation layer and expanded polystyrene filling guarantees reliability. durability, and the best indicators of heat and noise insulation of the door.
Model - 6777 Cynex
Color - Grey
Door thickness - 3 1/4"
Frame thickness - 4"
Metal frame 4" thick - dimensions of the door with frame is 38" x 82".
Metal threshold.Plate-type, primary lock for armoured type of steel doors, locked by 3 key turns
To maintain the warranty, a canopy is required over the door.
 Phase II, Inc.
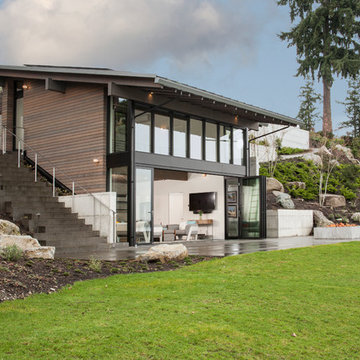
Inspiration for a mid-sized contemporary brown two-story wood exterior home remodel in Seattle with a shed roof
 Enterprise Kitchens
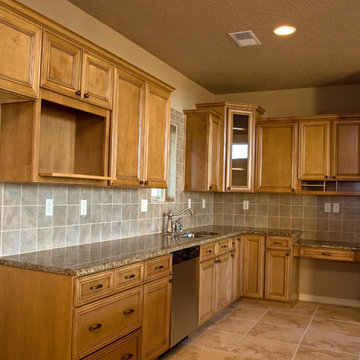
Wood-finished cabinets are still the style of choice; they represent about 80 percent of all kitchen cabinets purchased, according to a 2002 survey conducted by the National Kitchen and Bath Association. And even though homeowners are demanding furniture-quality styling, they are opting for a more casual appearance overall. Many of these have multi-step finishes and glazes to make them look like antiques that have weathered generations of use.
Cabinets are a very important part of any room in your Virginia home because they set the style and color scheme throughout the room. Adding new cabinetry is not only an exciting project, but is also a way for you to express yourself and add value to your home.
 Sunrise Custom Fence
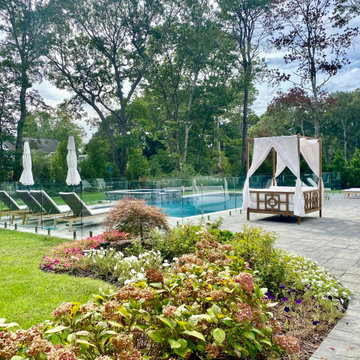
Stunning Frameless Glass Pool Fence Installation in Remsenburg-Speonk, NY 11960
We’re thrilled to share one of our latest projects—a meticulously crafted frameless glass pool fence installation in Remsenburg-Speonk, New York. This fence seamlessly blends safety with beauty, offering a clear view of the pool while enhancing the overall aesthetic of the outdoor space.
Our team took the time to ensure every detail was flawless. We used premium stainless steel Polaris gate hardware—the industry’s best—and non-conductive coated stainless steel spigots, which were custom imported for this project. These top-tier materials, combined with our expertise, resulted in a sleek, modern, and durable fence that complements the surrounding landscape.
This installation not only meets but exceeds safety standards, all while maintaining an unobstructed view of the pool area. It’s perfect for homeowners who value both style and security.
Interested in a glass pool fence? Contact us today to discuss your vision. Our team at Sunrise Custom Fence is committed to delivering top-quality installations tailored to your needs. Whether you’re looking for a pool fence or another fencing solution, we’re here to help!
Sunrise Custom Fence East Inc.
Call us at 631-474-8650
Visit us at: www.sunrisecustomfence.com
Email: sales@sunrisefence.com
 Modern Citi Group: Renovations & Remodeling
We helped Miki and David successfully execute a bathroom and kitchen remodel for their Co-op in New York City. The primary objective was to enhance the sense of space, functionality, and style while keeping the project on track and on budget.
To kickstart the project, Anna, the highly skilled project planner, conducted a thorough walkthrough with Miki and David. During the meeting, she captured their vision, outlined a realistic timeline, and carefully considered their budgetary restrictions.
Anna made sure to grasp their aspirations of modernizing the kitchen and bathroom, aiming to elevate both the aesthetics and practicality while incorporating a bespoke design tailored to their desires.
The design challenge was to modernize the outdated kitchen and bathroom while maintaining a budget-friendly approach. The clients opted for a Scandinavian style, featuring neutral olive green colors, stone, and natural wood materials. The designers explored various layouts to maximize functionality and accommodate the clients' preferences, providing Miki and David with multiple options. Eventually, the family made their design choices and felt assured as they entered the construction phase.
During the building phase, the construction team completed a gut renovation of the kitchen and bathroom, replacing ceilings, walls, floors, and all fixtures. The result was a stunning custom kitchen designed in the Scandinavian style featuring matte grey-green cabinetry, natural wood open shelving, a built-in pantry and appliances, and Vivid White Quartz countertops. The combination of sage base cabinets with grey undertones and modern, natural wood structures created a neutral and earthy impression, while the smooth white wall cabinets and countertops added a sleek and airy touch to the space.
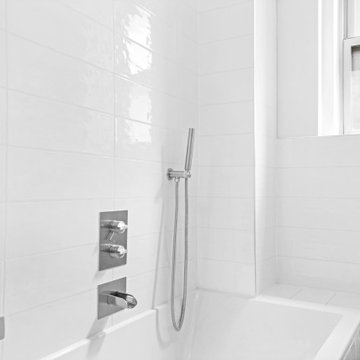
The bathroom renovation encompassed a full remodel, with all fixtures being replaced. A custom-ordered vanity in a matching grey-green shade was installed, along with the Maiolica White Polished Ceramic Wall Tile and Kohler and Delta fixtures. Within a few short weeks, Miki and David's new kitchen and bathroom were transformed to align perfectly with their style and vision, while significantly enhancing functionality.

 United Copper Industries
As a trusted copper pipe manufacturer in India, we deliver high-quality copper pipes engineered for HVAC, refrigeration, plumbing, medical gas pipeline, and industrial applications. Our products are known for superior durability, corrosion resistance, excellent thermal conductivity, and compliance with international quality standards, ensuring reliable performance across industries.
Contact : +91 9619994756
Email:sales@unitedcopper.in
Product Source: Copper Pipe Manufacturer In India
 Laria Construction LLC
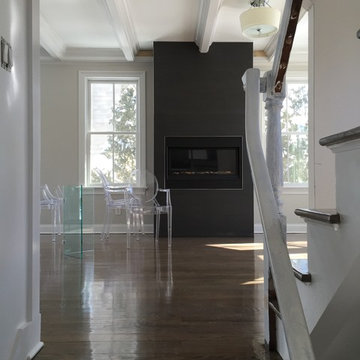
This renovation project was conducted in 2015 off of Greenwich Ave. (Greenwich, CT) at a spectacular centrally located townhouse. The gas fireplace and black/grey modern tiles bring out its character.
 Huber Interiors, LLC
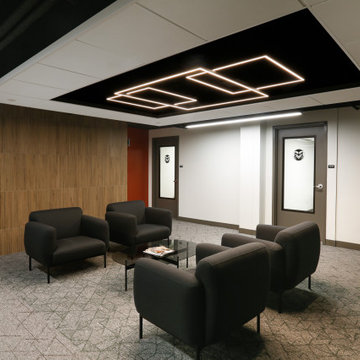
The CSU Foundation Office Remodel at Colorado State University in Fort Collins, CO, revitalizes a dated university space into a dynamic, modern workplace. This interior design project features a flexible, open floor plan to promote collaboration and functionality, incorporating a welcoming reception area, various open work zones, 15 private offices, a small conference room, and a break room, all tailored to the needs of employees and clients. Inspired by the Foundation’s existing office, designed in 2018, the remodel showcases a bold aesthetic with vibrant pops of color integrated through meticulously designed custom furniture. Our team crafted bespoke furniture pieces, carefully selecting fabrics and finishes to align with the Foundation’s signature color palette, ensuring a cohesive and striking visual identity. A creative exposed ceiling, painted dark to enhance the sense of height in the low-ceiling space, is complemented by modern light fixtures, creating an inviting and dynamic atmosphere. In addition to design, our team played a pivotal role in managing the construction process, conducting regular site visits and thorough submittal reviews to ensure seamless execution and adherence to the project vision. This design reflects the CSU Foundation’s vibrant personality and passion, delivering an engaging and inspiring environment that enhances productivity and leaves a lasting impression on visitors.
 Studio InSitu Architects
design:
W. Timothy Hess AIA, Design Principal
Justin Mello, Nathan Sawyer
all for DSA Architects
photographs: Charles Mayer photography and Tim Hess
photo-styling: Natalie Leighton
stone sculpture: Todd Fulshaw
paintings: Charles Mayer and Todd Fulshaw
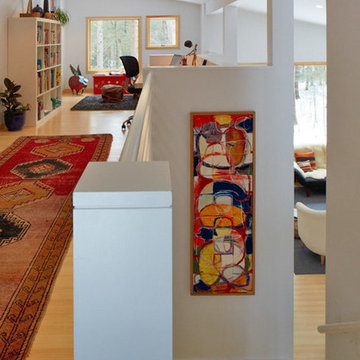
Guest quarters for a big house on the Concord River, this project enlarges former studio space over a four-bay garage into a new four-bedroom ‘outpost’.
design challenges:
Convert Studio Apartment to 4-Bedroom Home without enlarging footprint of building. Keep costs minimal.
On the ground floor, both pre-existing eight- and twelve-foot tall halves of the former scheme remain in-place, as do the structural bones of two faceted ‘beaks’. The complex former roof was removed for its limited use of available floor area.
A single long shed now unifies the high East side of the house and its small private individual spaces with the wide-open shared space of the lower West Side. Aligned with the stair-tower extruded from a former beak, a childrens’ loft-library and two-sided fireplace conduct the East-West interface.
 Kowalske Kitchen & Bath
Kowalske Kitchen & Bath was hired as the remodeling contractor for this first floor remodel in the countryside of Oconomowoc, WI. By opening the kitchen up to the living room, the layout is better for hosting family gatherings. The entire family can be together in the kitchen and living room – cooking or spending time together. Highlights of this country kitchen include a window seat, walk-in pantry and space for their treasured piano.
Project Goals
+ Restore the beauty of their family home, that was built by the homeowner’s grandfather
+ Cooking functionality for their family farm
+ Add a workstation sink for easy food prep
+ Pantry storage space for canned items & wine collection
+ Design that honors the mid-century ranch bones of the house her grandfather built and their own traditional style
Challenges & Issues
+ Needed space to highlight their piano, since the homeowner is an avid pianist
+ Old layout didn’t have good views of their outdoor space – the lake, gardens and chicken coop
+ Kitchen was too small and cut off from the rest of the home
+ The heat and air conditioning did not function well due to several past additions
Country Kitchen Features:
Cooking Kitchen – We created a larger kitchen by expanding into the old dining room. The homeowners needed more space for canning vegetables, cooking and entertaining.
Mid-Century Country Design – The ranch home was built in the 1950s so we kept the mid-century and country kitchen design aesthetic by using hickory wood, tall verticals and long horizontals.
Kitchen Window Seat – A custom window seat with a curved backrest creates a gathering spot in the kitchen. This connects the home to the outdoor view of the lake where the family fishes and ice skates in winter. The bench is large enough to be used as a guest bed when they have visitors. The cozy nook has shelving, art lights, and a hidden radiator underneath to keep it warm and toasty.
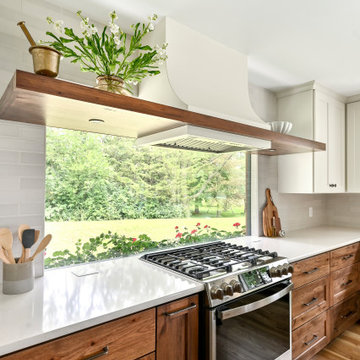
Window Backsplash – Along the range wall, a new window backsplash features the beautiful view of the farm driveway, trees and gardens.
Minimalistic Hood – The hood with the wood shelf mimics the new fireplace mantel and ties the country kitchen and living room together.
New Pantry – The old kitchen area was converted into the new pantry and a laundry room. The pantry is their working kitchen where they can store food, their wine collection, and have countertop space for small appliances. Butcher block countertops, colorful wallpaper and a new window make the pantry inviting. Adjustable shelves allow for flexible storage options. The pocket door can be closed when they have guests.
Recycled Ash Flooring in Kitchen – The homeowners chose an eco-friendly flooring for their country kitchen. The beautiful varied width wood planks are from recycled ash trees from Milwaukee parks.
Workstation Sink – This sink has sliding platforms that hold bowls, colanders and cutting boards to multiply the countertop by going deep instead of wide. The sink can be used to chop, rinse, prep, dry dishes, hold hot dishes and clean up after a meal more efficiently.
Country House Living Room:
New Tile Floor – To better conduct the heat, we replaced the old wood floors with porcelain tile. New radiators, insulation, ductwork, and enclosing the basement staircase improved the function of their HVAC.
Fireplace Makeover – To create a new focal point for the living room, we installed a new fire box, new mantle, and floor to ceiling stone. The goal was to draw the eye up to the vaulted beamed ceiling.
Open Concept Layout – The wall between the kitchen and living room was removed to connect the two spaces. We added new cabinetry along the wall with a tall bookcase. Since they didn’t use their formal dining room, a small dining table was added to the living room.
New Railing & Stairs – The staircase to the kitchen area was tricky because we needed to find a style that would make it feel airy. We did a glass enclosure with a simple metal railing and moved the staircase to the center of the room to allow room for the piano.
41