
Search results for "Defaulter" in Home Design Ideas
 Indigo Remodeling
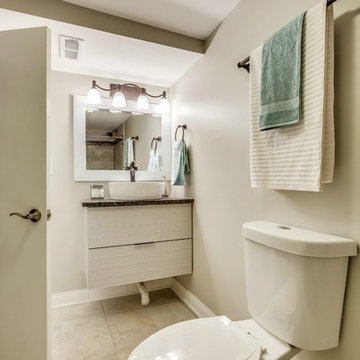
We took helm of this project in Morton Grove, an area of Southside Chicago, when the property's contractor defaulted on the project midway. We provided full fixes and updates of all carpentry and electrical work, as well as a major rehab of the kitchen, bathrooms, and basement - addng new mechanical elements and completely reconfiguring the layout.
 Leicht Westchester-Greenwich
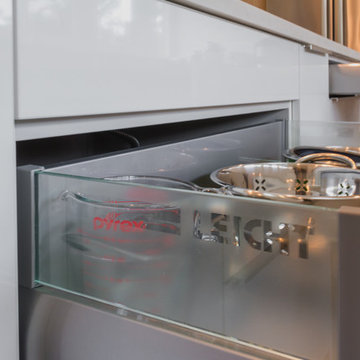
Clear glass side is a default in every LEICHT drawer!
Mid-sized minimalist u-shaped marble floor eat-in kitchen photo in New York with an integrated sink, quartzite countertops, stainless steel appliances, an island, flat-panel cabinets, light wood cabinets and multicolored backsplash
Mid-sized minimalist u-shaped marble floor eat-in kitchen photo in New York with an integrated sink, quartzite countertops, stainless steel appliances, an island, flat-panel cabinets, light wood cabinets and multicolored backsplash
 RED
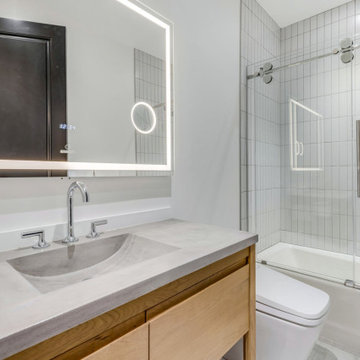
REDIn this guest bathroom, simplicity didn’t mean defaulting to basic. The vertically stacked tile layout adds a quiet rhythm, while the integrated sink in cast concrete brings just enough texture to hold its own. A backlit mirror and soft white oak vanity keep the space clean but not cold, exactly what we wanted for a secondary bath that still feels considered.
Find the right local pro for your project
 Living with Lolo
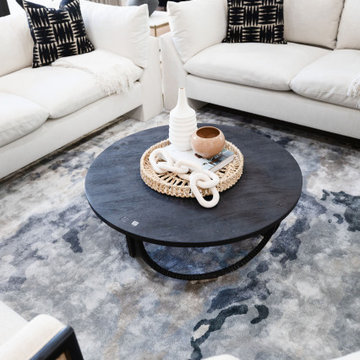
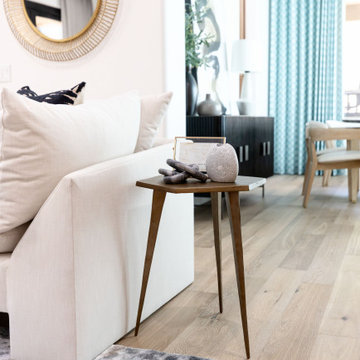
Living Room in Trailside View | Refined Transitional Home in Scottsdale, AZ |
Room Type: Whole Home Remodel and Furnishings |
Project Name: Trailside View Residence |
Key Feature: A full home remodel and furnishings project anchored by white oak cabinetry and countertops, where the clients gave Living with Lolo real creative freedom to play with bold fabrics, wallpapers, and drapery that most homeowners would talk themselves out of.
Challenge: Transitional design can play it safe by default, neutral palette, inoffensive finishes, nothing that makes you catch your breath. The remodel needed a strong foundation that felt refined and timeless, but the clients wanted more than that. They wanted a home with personality, and the challenge was channeling that creative openness into something cohesive rather than chaotic.
Solution: Living with Lolo used white oak cabinetry and countertops to ground the remodel in warmth and quiet sophistication, then let the soft goods carry the personality. Bold fabric choices, expressive wallpapers, and thoughtful drapery gave each room its own moment without losing the thread that connected the whole home. Because the remodel and furnishings were managed together under one roof, the bolder design choices landed the way they were intended to rather than feeling like afterthoughts layered onto a finished renovation.
Materials: White oak cabinetry, white oak countertops, curated wallpapers, bold upholstery fabrics, custom drapery, and layered accessories sourced through Living with Lolo's trade relationships.
Budget: $250,000 to $550,000 |
Timeline: Approximately 5 to 9 months from design through completion.
 Living with Lolo
Living Room in Trailside View | Refined Transitional Home in Scottsdale, AZ |
Room Type: Whole Home Remodel and Furnishings |
Project Name: Trailside View Residence |
Key Feature: A full home remodel and furnishings project anchored by white oak cabinetry and countertops, where the clients gave Living with Lolo real creative freedom to play with bold fabrics, wallpapers, and drapery that most homeowners would talk themselves out of.
Challenge: Transitional design can play it safe by default, neutral palette, inoffensive finishes, nothing that makes you catch your breath. The remodel needed a strong foundation that felt refined and timeless, but the clients wanted more than that. They wanted a home with personality, and the challenge was channeling that creative openness into something cohesive rather than chaotic.
Solution: Living with Lolo used white oak cabinetry and countertops to ground the remodel in warmth and quiet sophistication, then let the soft goods carry the personality. Bold fabric choices, expressive wallpapers, and thoughtful drapery gave each room its own moment without losing the thread that connected the whole home. Because the remodel and furnishings were managed together under one roof, the bolder design choices landed the way they were intended to rather than feeling like afterthoughts layered onto a finished renovation.
Materials: White oak cabinetry, white oak countertops, curated wallpapers, bold upholstery fabrics, custom drapery, and layered accessories sourced through Living with Lolo's trade relationships.
Budget: $250,000 to $550,000 |
Timeline: Approximately 5 to 9 months from design through completion.
 Susan Yeley Homes
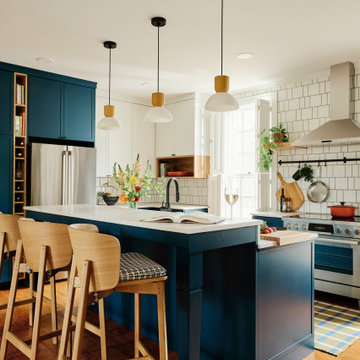
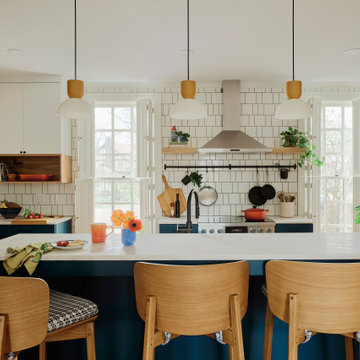
The tall shuttered windows stayed — too lovely to touch, and the plants needed them — so we tucked drawers beneath each one and let the home's traditional bones lead: crown molding, original hardwood floors, grasscloth wainscoting. The palette emerged, navy below, crisp white above, a two-tone strategy that grounds the color while drawing the eye upward, making a modest kitchen feel larger than it is. Against variably-sized white tile with dark grout, it delivers exactly the punch the clients wanted — vibrant and traditional at once, right at home in an older Bloomington house and unlike anyone else's kitchen. Warm wood and color pull the contrast back from the edge: oak stools with plaid cushions, a built-in wine rack, a butcher block that looks integrated but isn't, ochre-capped pendants, and a plaid runner tying mustard, olive, and blue together at floor level. Every finish chosen, nothing defaulted.


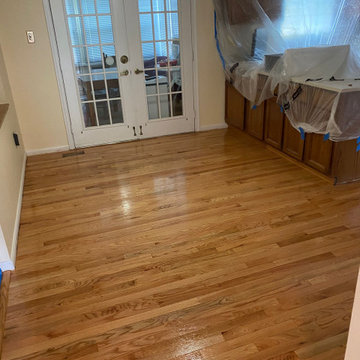
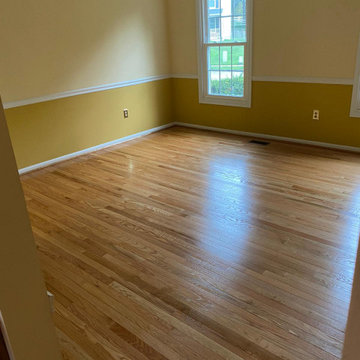
 MD Flooring Solutions, LLC
Natural
1x coat of ZINSSER®SealCoat™ Universal Sanding Sealer.
1x coat of Water-Based Oil-Modified polyurethane by default.
1x final coat of SamSeal or Masterline Oil-based polyurethane by default.
---} Finish: Semi-Gloss.
- To cover with plastic and use vacuum to do the job
- To remove current toilet from powder room and KEEP.
- Sand and refinish 2-1/4" red oak Prefinished Hardwood floors on First floor: front foyer, closet, dining room, kitchen, hallway & powder room (no family room, no living room) - 404.12 sqft
- To remove Bevels from floors on First floor: front foyer, closet, dining room, kitchen, hallway & powder room (no family room, no living room) - 404.12 sqft
- To Sand & Refinish T-moldings 3LFT + 3LFT + 3LFT between foyer to family room, dining room to living room
- To Install Unfinished Red Oak Shoe Molding to be polyurethaned on First floor: front foyer, closet, dining room, kitchen, hallway & powder room (no family room, no living room) + around powder room vanity
- To reinstall same toilet, including new ring after refinish.
 bageti proyectos
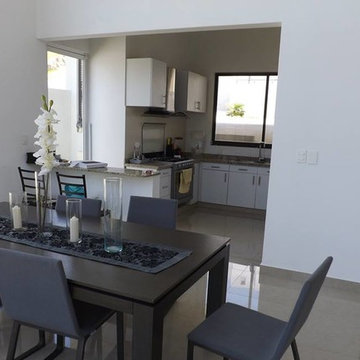
Example of a mid-sized minimalist porcelain tile kitchen/dining room combo design in Other with white walls and no fireplace
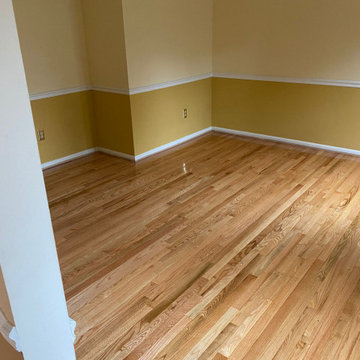 MD Flooring Solutions, LLC
Natural
1x coat of ZINSSER®SealCoat™ Universal Sanding Sealer.
1x coat of Water-Based Oil-Modified polyurethane by default.
1x final coat of SamSeal or Masterline Oil-based polyurethane by default.
---} Finish: Semi-Gloss.
- To cover with plastic and use vacuum to do the job
- To remove current toilet from powder room and KEEP.
- Sand and refinish 2-1/4" red oak Prefinished Hardwood floors on First floor: front foyer, closet, dining room, kitchen, hallway & powder room (no family room, no living room) - 404.12 sqft
- To remove Bevels from floors on First floor: front foyer, closet, dining room, kitchen, hallway & powder room (no family room, no living room) - 404.12 sqft
- To Sand & Refinish T-moldings 3LFT + 3LFT + 3LFT between foyer to family room, dining room to living room
- To Install Unfinished Red Oak Shoe Molding to be polyurethaned on First floor: front foyer, closet, dining room, kitchen, hallway & powder room (no family room, no living room) + around powder room vanity
- To reinstall same toilet, including new ring after refinish.
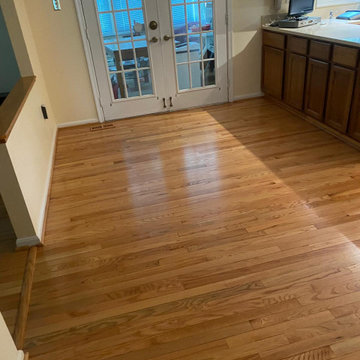
 MD Flooring Solutions, LLC
Natural
1x coat of ZINSSER®SealCoat™ Universal Sanding Sealer.
1x coat of Water-Based Oil-Modified polyurethane by default.
1x final coat of SamSeal or Masterline Oil-based polyurethane by default.
---} Finish: Semi-Gloss.
- To cover with plastic and use vacuum to do the job
- To remove current toilet from powder room and KEEP.
- Sand and refinish 2-1/4" red oak Prefinished Hardwood floors on First floor: front foyer, closet, dining room, kitchen, hallway & powder room (no family room, no living room) - 404.12 sqft
- To remove Bevels from floors on First floor: front foyer, closet, dining room, kitchen, hallway & powder room (no family room, no living room) - 404.12 sqft
- To Sand & Refinish T-moldings 3LFT + 3LFT + 3LFT between foyer to family room, dining room to living room
- To Install Unfinished Red Oak Shoe Molding to be polyurethaned on First floor: front foyer, closet, dining room, kitchen, hallway & powder room (no family room, no living room) + around powder room vanity
- To reinstall same toilet, including new ring after refinish.
 MD Flooring Solutions, LLC
Natural
1x coat of ZINSSER®SealCoat™ Universal Sanding Sealer.
1x coat of Water-Based Oil-Modified polyurethane by default.
1x final coat of SamSeal or Masterline Oil-based polyurethane by default.
---} Finish: Semi-Gloss.
- To cover with plastic and use vacuum to do the job
- To remove current toilet from powder room and KEEP.
- Sand and refinish 2-1/4" red oak Prefinished Hardwood floors on First floor: front foyer, closet, dining room, kitchen, hallway & powder room (no family room, no living room) - 404.12 sqft
- To remove Bevels from floors on First floor: front foyer, closet, dining room, kitchen, hallway & powder room (no family room, no living room) - 404.12 sqft
- To Sand & Refinish T-moldings 3LFT + 3LFT + 3LFT between foyer to family room, dining room to living room
- To Install Unfinished Red Oak Shoe Molding to be polyurethaned on First floor: front foyer, closet, dining room, kitchen, hallway & powder room (no family room, no living room) + around powder room vanity
- To reinstall same toilet, including new ring after refinish.

 Naaya Studio
Introducing one of the most requested shapes, inspired by milk canisters this design is picking up quite a bit of trend off lately. and hence our design for those who are looking for classic good old looks and a barn feeling. An edgy form available in three sizes that allows you to suit all the requirement whether you are looking to buy for bedside, above dining or kitchen island.
3 variation of sizes available as per below dimensions:
1. 8.5" dia x 7" height
2. 10.5" dia x 8.75" height
3. 12.5" dia x 10.5" height
Buy assorted of more than 1 and save big!
PRODUCT INFO
- A small Naaya logo (approx 3/4") is embossed in 1 place on the inside surface of lamp.
- All the shades are available in Plug in as well as hard wired version.
- 10 feet (3 meter) of wire comes as standard with plug in versions. country specific converter is supplied with Indian pin
- 6 feet (2 meter) wire is supplied with all the hard wired version
- All Light electrical Fixtures are in compliance with US, European, UK, Australian, Canadian and International Standard.
- Each lamp comes with individual canopy. Individual canopy are available black or white color (please specify). By default Black canopy will be sent.
- Lamp comes with E27 holder (bulbs not supplied)
- 3 port black / white canopy is available on request.
- Wire/cord length and color (black/white) can be changed on request, please write to us. Black cord will be sent by default
 MD Flooring Solutions, LLC
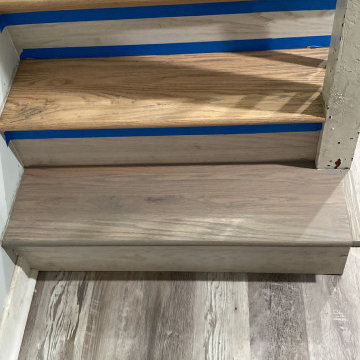
Basement steps project:
1x coat of Minwax or DuraSeal Stain: Stain to best match LVP in basement —1 color included
1x coat of ZINSSER®SealCoat™ Universal Sanding Sealer.
1x coat of Water-Based Oil-Modified polyurethane by default.
1x final coat of SamSeal or Masterline Oil-based polyurethane.
Finish: to best match LVP in basement
- To sand and refinish Unfinished hardwood 11x Treads only
 Susan Yeley Homes
The tall shuttered windows stayed — too lovely to touch, and the plants needed them — so we tucked drawers beneath each one and let the home's traditional bones lead: crown molding, original hardwood floors, grasscloth wainscoting. The palette emerged, navy below, crisp white above, a two-tone strategy that grounds the color while drawing the eye upward, making a modest kitchen feel larger than it is. Against variably-sized white tile with dark grout, it delivers exactly the punch the clients wanted — vibrant and traditional at once, right at home in an older Bloomington house and unlike anyone else's kitchen. Warm wood and color pull the contrast back from the edge: oak stools with plaid cushions, a built-in wine rack, a butcher block that looks integrated but isn't, ochre-capped pendants, and a plaid runner tying mustard, olive, and blue together at floor level. Every finish chosen, nothing defaulted.
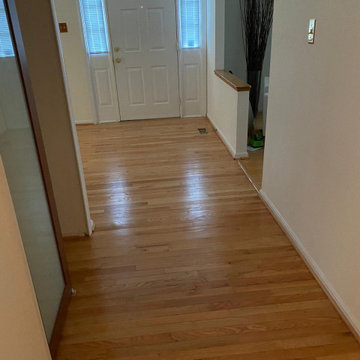 MD Flooring Solutions, LLC
Natural
1x coat of ZINSSER®SealCoat™ Universal Sanding Sealer.
1x coat of Water-Based Oil-Modified polyurethane by default.
1x final coat of SamSeal or Masterline Oil-based polyurethane by default.
---} Finish: Semi-Gloss.
- To cover with plastic and use vacuum to do the job
- To remove current toilet from powder room and KEEP.
- Sand and refinish 2-1/4" red oak Prefinished Hardwood floors on First floor: front foyer, closet, dining room, kitchen, hallway & powder room (no family room, no living room) - 404.12 sqft
- To remove Bevels from floors on First floor: front foyer, closet, dining room, kitchen, hallway & powder room (no family room, no living room) - 404.12 sqft
- To Sand & Refinish T-moldings 3LFT + 3LFT + 3LFT between foyer to family room, dining room to living room
- To Install Unfinished Red Oak Shoe Molding to be polyurethaned on First floor: front foyer, closet, dining room, kitchen, hallway & powder room (no family room, no living room) + around powder room vanity
- To reinstall same toilet, including new ring after refinish.

 safe ZOnea
Every year, the same thing happens. The first real snowfall arrives, demand for de-icing materials spikes overnight, and the businesses that waited too long find themselves scrambling for supply at the worst possible moment. Facility managers, property owners, contractors, and municipalities all depend on a steady supply of salt and ice melt to keep their properties safe and operational through winter. The ones who plan ahead sail through. The ones who don't pay more, wait longer, and take on real risk.
Sourcing de-icing materials well is not complicated, but it does require thinking ahead and understanding the options. The choices you make about what to buy, how to buy it, and who to buy it from have a direct effect on your costs, your reliability, and your ability to keep people safe when conditions turn dangerous. This article lays out what matters.
Why Your Choice of Supplier Matters More Than You Think
It is easy to treat de-icing material as a commodity, something you grab whenever you need it without much thought about where it comes from. That works fine until the moment it doesn't, usually in the middle of a storm when everyone needs supply at once and the casual sources have run dry. At that point, the relationships you built before the season become the difference between staying stocked and being stuck.
Reliable supply is the whole game in winter operations. A property that runs out of ice melt during a storm faces safety hazards, liability exposure, and disruption, none of which can wait for a back-ordered shipment. This is why establishing relationships with dependable rock salt suppliers before the season starts is one of the smartest moves a facility manager or contractor can make. It locks in supply, often locks in better pricing, and removes a major source of mid-winter stress.
The lesson here is to treat sourcing as a planning decision rather than a last-minute errand. The businesses that come through winter smoothly are almost always the ones that secured their supply chain early, chose suppliers who could actually deliver when it counted, and never had to gamble on finding material during a shortage. Reliability bought in advance is far cheaper than scarcity paid for in a crisis.
Bagged or Bulk: Matching the Material to the Job
One of the first practical decisions is whether to buy de-icing material in bags or in bulk, and the right answer depends entirely on the operation. Each format has clear advantages, and many operations end up using both for different purposes.
Bagged material offers convenience, control, and easy storage. It is simple to handle, easy to distribute to different locations or crews, straightforward to store without special equipment, and convenient for spot application by hand. It suits smaller properties, businesses without bulk storage, and situations where portion control and tidiness matter. Bulk material, on the other hand, tends to make sense for large operations that go through high volumes, where buying in quantity lowers the per-unit cost and the operation has the equipment and space to store and handle it. The tradeoff is between the convenience and flexibility of bags and the volume economics of bulk.
For many operations, the right approach is a mix: bulk for the high-volume core of the work and bags for flexibility, spot treatment, and locations where bulk handling is impractical. The key is to match the format to how the material will actually be stored, moved, and applied, rather than defaulting to one or the other out of habit. Thinking this through in advance avoids both the waste of over-buying bulk you can't handle and the expense of relying entirely on bags for a large operation.
Rock Salt Is Not Your Only Option
Rock salt, or sodium chloride, is the workhorse of winter de-icing for good reason. It is effective, widely available, and cost-efficient, which makes it the default choice for most operations most of the time. But it has limits, and understanding the alternatives helps you choose the right material for the conditions you actually face.
The most important limitation is temperature. Rock salt becomes less effective as temperatures drop, and in genuinely cold conditions it can struggle to do the job at all. This is where alternatives come in. Calcium chloride, for instance, works at much lower temperatures than rock salt and acts quickly, which makes it valuable when conditions are severe or when fast melting matters. Operations that face hard freezes or need dependable performance in extreme cold often keep calcium chloride for sale on hand for exactly those situations, using it alongside rock salt rather than instead of it.
The practical approach is to understand the conditions your property faces and stock accordingly. For many operations, rock salt handles the bulk of the work while a faster, colder-rated material like calcium chloride covers the extreme days when ordinary salt falls short. Matching the material to the temperature and the urgency of the situation is what separates an operation that stays ahead of winter from one that is constantly reacting to it.
Securing Your Supply Before the Season
Knowing what to buy is only half the equation. The other half is making sure you can actually get it when you need it, which means securing your supply before winter arrives rather than after it has already started. Timing is one of the most underrated factors in winter operations.
The logic is simple. Demand for de-icing materials is highly seasonal and spikes sharply during storms, when everyone needs supply simultaneously. Prices and availability both move against the buyer at exactly those moments. By contrast, planning ahead, estimating your needs and arranging supply before the season, puts you in a far stronger position. Working with established rock salt suppliers ahead of time means your material is accounted for before the rush, often at better pricing and with the confidence that it will be there when the first storm hits.
This kind of planning also lets you think clearly rather than react under pressure. You can estimate your seasonal needs based on your property and past winters, decide on the right mix of materials and formats, and arrange storage in advance. Operations that do this consistently spend less, worry less, and never find themselves making frantic calls during a storm. The effort of planning ahead is modest, and the payoff in reliability and cost savings is substantial.
Storing and Handling What You Buy
Securing supply is not much use if the material degrades before you can use it, which makes proper storage and handling an important and often overlooked part of the equation. De-icing materials are sensitive to moisture, and poor storage can turn a good supply into a clumped, hardened mess that is difficult to apply.
The fundamentals are straightforward. Keep material dry and protected from moisture, since salt and ice melt readily absorb water and can harden if exposed. Store it in a way that suits the format, whether that means a proper bulk storage area or a dry space for stacked bags. Keep it accessible, so crews can get to it quickly when a storm hits and time is short. And handle it with the right equipment for the format and volume, which protects both the material and the people working with it. None of this is complicated, but neglecting it can undermine even a well-planned supply.
Good storage practices protect the investment you made in securing supply early. There is little point in arranging your materials ahead of the season only to have them degrade before use. Treating storage and handling as part of the overall plan, rather than an afterthought, ensures that the material you secured is actually usable when the moment comes. It is the final link in a supply chain built to perform under winter conditions.
Estimating How Much You Actually Need
One question trips up operations of every size: how much de-icing material to buy. Order too little and you risk running short during a storm. Order too much and you tie up money and storage space in material you may not use. Getting the estimate reasonably right is a meaningful part of sourcing well.
Several factors shape the answer. The size and type of the areas you treat, sidewalks, lots, entrances, and drive lanes, set the baseline for how much material each application consumes. The local climate matters too, since colder regions and those with frequent snowfall go through far more material than milder ones. Application frequency depends on how often storms hit and how quickly surfaces need to be cleared, which varies with the kind of property and the expectations of the people who use it. And the type of material plays a role, since different products are applied at different rates.
Past experience is often the best guide. Operations that track what they used in previous winters, adjusted for the size of the property and the severity of the season, can estimate their needs with reasonable confidence. For newer operations without that history, it helps to plan conservatively and to work with a supplier who can replenish stock reliably, so that a low estimate does not turn into a mid-storm shortage.
The goal is not perfect precision but a sound, slightly cautious estimate paired with a dependable supply relationship. That combination lets an operation keep enough material on hand to handle the season without over-committing to volume it cannot store or use. Thinking this through before winter, rather than guessing during it, is one more way that planning ahead pays off when the snow starts to fall.
The Bottom Line
Sourcing de-icing materials well comes down to a few straightforward principles: plan ahead, choose reliable suppliers before the season, match your materials and formats to your actual needs and conditions, and store what you buy properly. The operations that follow these principles move through winter with confidence, while those that improvise pay more and take on needless risk.
Winter is predictable in one respect: it arrives every year, and demand for de-icing material spikes the moment it does. The businesses that prepare for that reality, rather than being surprised by it, are the ones that keep their properties safe, their costs controlled, and their operations running no matter what the season throws at them. A little foresight before the first snowfall pays off through every storm that follows.
 Susan Yeley Homes
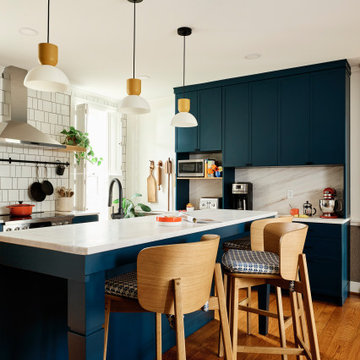
The tall shuttered windows stayed — too lovely to touch, and the plants needed them — so we tucked drawers beneath each one and let the home's traditional bones lead: crown molding, original hardwood floors, grasscloth wainscoting. The palette emerged, navy below, crisp white above, a two-tone strategy that grounds the color while drawing the eye upward, making a modest kitchen feel larger than it is. Against variably-sized white tile with dark grout, it delivers exactly the punch the clients wanted — vibrant and traditional at once, right at home in an older Bloomington house and unlike anyone else's kitchen. Warm wood and color pull the contrast back from the edge: oak stools with plaid cushions, a built-in wine rack, a butcher block that looks integrated but isn't, ochre-capped pendants, and a plaid runner tying mustard, olive, and blue together at floor level. Every finish chosen, nothing defaulted.
8